
User Guide
Page 59
... Yellow Worldwide 24B6515 24B6512 24B6513 24B6514 24B4803 24B2455 24B3581 24B3587 Ordering a photoconductor unit Item Photoconductor unit (1 pack) Photoconductor unit (3 pack) Part number 72K0P00 72K0Q00 Ordering developer units Item Return Program developer units Black developer unit Part number 72K0DK0
... Yellow Worldwide 24B6515 24B6512 24B6513 24B6514 24B4803 24B2455 24B3581 24B3587 Ordering a photoconductor unit Item Photoconductor unit (1 pack) Photoconductor unit (3 pack) Part number 72K0P00 72K0Q00 Ordering developer units Item Return Program developer units Black developer unit Part number 72K0DK0
User Guide
Page 60
...fications > Supplies > Custom Supply Notifications. Maintaining the printer 60 Item Color (CMY) developer kit Cyan developer unit Magenta developer unit Yellow developer unit Regular developer units Black developer unit Color (CMY) developer kit Cyan developer unit Magenta developer unit Yellow developer unit Part number 72K0DV0 72K0DC0 72K0DM0 72K0DY0 72K0D10 72K0D50 72K0D20 72K0D30 72K0D40 Ordering imaging units Item...
...fications > Supplies > Custom Supply Notifications. Maintaining the printer 60 Item Color (CMY) developer kit Cyan developer unit Magenta developer unit Yellow developer unit Regular developer units Black developer unit Color (CMY) developer kit Cyan developer unit Magenta developer unit Yellow developer unit Part number 72K0DV0 72K0DC0 72K0DM0 72K0DY0 72K0D10 72K0D50 72K0D20 72K0D30 72K0D40 Ordering imaging units Item...

User Guide
Page 61
Maintaining the printer 61 3 Select the type of injury from a hot component, allow the surface to cool before touching it. 2 Open door A. Replacing parts and supplies Replacing a developer unit 1 Open door B. To reduce the risk of notification. 4 Apply the changes. CAUTION-HOT SURFACE: The inside of the printer might be hot.
Maintaining the printer 61 3 Select the type of injury from a hot component, allow the surface to cool before touching it. 2 Open door A. Replacing parts and supplies Replacing a developer unit 1 Open door B. To reduce the risk of notification. 4 Apply the changes. CAUTION-HOT SURFACE: The inside of the printer might be hot.
User Guide
Page 62
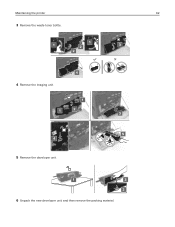
Maintaining the printer 62 3 Remove the waste toner bottle. 4 Remove the imaging unit. 5 Remove the developer unit. 6 Unpack the new developer unit, and then remove the packing material.
Maintaining the printer 62 3 Remove the waste toner bottle. 4 Remove the imaging unit. 5 Remove the developer unit. 6 Unpack the new developer unit, and then remove the packing material.

User Guide
Page 63
Replacing the fuser 1 Turn off the printer. 2 Open door B. CAUTION-HOT SURFACE: The inside of injury from a hot component, allow the surface to cool before touching it. To reduce the risk of the printer might be hot. Maintaining the printer 63 7 Insert the new developer unit. 8 Insert the imaging unit. 9 Insert the waste toner bottle. 10 Close doors A and B.
Replacing the fuser 1 Turn off the printer. 2 Open door B. CAUTION-HOT SURFACE: The inside of injury from a hot component, allow the surface to cool before touching it. To reduce the risk of the printer might be hot. Maintaining the printer 63 7 Insert the new developer unit. 8 Insert the imaging unit. 9 Insert the waste toner bottle. 10 Close doors A and B.

User Guide
Page 134
....), then replace the photoconductor unit. • If the distance between the defects equals 96.6 mm (3.80 in.) or 127.6 mm (5.02 in .), then replace the developer unit. distance, and then contact customer support or your service representative. • If the distance between the defects equals 47.1 mm (1.86 in.) or 90...
....), then replace the photoconductor unit. • If the distance between the defects equals 96.6 mm (3.80 in.) or 127.6 mm (5.02 in .), then replace the developer unit. distance, and then contact customer support or your service representative. • If the distance between the defects equals 47.1 mm (1.86 in.) or 90...

User Guide
Page 172
... 33 fax destination 48 Customer Support using 19 customer support contacting 149 D date and time fax settings 47 daylight saving time, configuring 47 developer unit ordering 59 replacing 61 Device Quotas setting up 19 different paper sizes, copying 30 digital subscriber line (DSL) fax setup 39 digital telephone service...
... 33 fax destination 48 Customer Support using 19 customer support contacting 149 D date and time fax settings 47 daylight saving time, configuring 47 developer unit ordering 59 replacing 61 Device Quotas setting up 19 different paper sizes, copying 30 digital subscriber line (DSL) fax setup 39 digital telephone service...
User Guide
Page 174
... 170 non‑volatile memory 53 erasing 52 notices 170, 171 O optional card installing 155 options firmware cards 150 174 memory card 150 ordering developer unit 59 imaging units 60 photoconductor unit 59 ordering supplies staple cartridges 60 waste toner bottle 60 organizing cables 12 P paper saving 31 Universal size...
... 170 non‑volatile memory 53 erasing 52 notices 170, 171 O optional card installing 155 options firmware cards 150 174 memory card 150 ordering developer unit 59 imaging units 60 photoconductor unit 59 ordering supplies staple cartridges 60 waste toner bottle 60 organizing cables 12 P paper saving 31 Universal size...
User Guide
Page 175
... 20 printing held jobs from a Macintosh computer 28 from Windows 28 Push Button method 55 Q QR codes adding 20 R recycling Lexmark packaging 96 Lexmark products 96 toner cartridges 96 reducing a copy 31 repeat print jobs 28 printing from a Macintosh computer 28 printing from Windows 28 ...repeating print defects 133 replacing a developer unit 61 replacing a photoconductor unit 65 replacing a toner cartridge 71 replacing an imaging unit 68 replacing ...
... 20 printing held jobs from a Macintosh computer 28 from Windows 28 Push Button method 55 Q QR codes adding 20 R recycling Lexmark packaging 96 Lexmark products 96 toner cartridges 96 reducing a copy 31 repeat print jobs 28 printing from a Macintosh computer 28 printing from Windows 28 ...repeating print defects 133 replacing a developer unit 61 replacing a photoconductor unit 65 replacing a toner cartridge 71 replacing an imaging unit 68 replacing ...
User Guide
Page 176
... in door G 110 staple jam, clearing door G 110 statement of volatility 53 storing print jobs 28 supplies conserving 95 supplies status checking 58 supplies, ordering developer unit 59 imaging units 60 photoconductor unit 59 staple cartridges 60 waste toner bottle 60 supply notifications configuring 60 supported fi...
... in door G 110 staple jam, clearing door G 110 statement of volatility 53 storing print jobs 28 supplies conserving 95 supplies status checking 58 supplies, ordering developer unit 59 imaging units 60 photoconductor unit 59 staple cartridges 60 waste toner bottle 60 supply notifications configuring 60 supported fi...
