
Clearing Jams Guide
Page 1
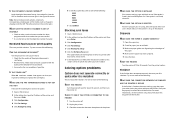
... cover 1 Remove all printer cables are attached correctly. Open Door G, and then remove the jam. Remove the staple cartridge, and then clear the staple jam. Lexmark™ X94x Clearing Jams Guide Clearing jams Avoiding jams The following illustration and table list the paper jams that has been cut or trimmed by lifting the release latch and lowering the...
... cover 1 Remove all printer cables are attached correctly. Open Door G, and then remove the jam. Remove the staple cartridge, and then clear the staple jam. Lexmark™ X94x Clearing Jams Guide Clearing jams Avoiding jams The following illustration and table list the paper jams that has been cut or trimmed by lifting the release latch and lowering the...
Clearing Jams Guide
Page 2
... are removed. 3 Push the green lever down . 4 Close Door A. 5 Touch Continue. 230-231 paper jams 1 Open Door A by lifting the release latch and lowering the door. To reduce the risk of the printer might be hot. CAUTION-HOT SURFACE: The ...inside of injury from a hot component, allow the surface to cool before touching it. 4 Close Door A. 2 Lift the green lever, and then pull the paper up and toward you. 2 Lift the green lever, and then pull the paper up and toward you. 5 Pull the multipurpose feeder down, and then open Door B.
... are removed. 3 Push the green lever down . 4 Close Door A. 5 Touch Continue. 230-231 paper jams 1 Open Door A by lifting the release latch and lowering the door. To reduce the risk of the printer might be hot. CAUTION-HOT SURFACE: The ...inside of injury from a hot component, allow the surface to cool before touching it. 4 Close Door A. 2 Lift the green lever, and then pull the paper up and toward you. 2 Lift the green lever, and then pull the paper up and toward you. 5 Pull the multipurpose feeder down, and then open Door B.
Clearing Jams Guide
Page 3
Note: Make sure all paper fragments are removed. 3 Close Door D. Note: Make sure all paper fragments are removed. 3 Close Door C. 4 Open Tray 1, and then remove any crumpled paper from the printer. 6 Remove the jammed paper. 7 Close Door B. 8 Touch Continue. 241 paper jam 1 Open Door C. 2 Pull the paper down and away from the tray. 242-244 paper jams 1 Open Door D. 5 Close the tray. 6 Touch Continue. 3 2 Pull the paper down and toward you.
Note: Make sure all paper fragments are removed. 3 Close Door D. Note: Make sure all paper fragments are removed. 3 Close Door C. 4 Open Tray 1, and then remove any crumpled paper from the printer. 6 Remove the jammed paper. 7 Close Door B. 8 Touch Continue. 241 paper jam 1 Open Door C. 2 Pull the paper down and away from the tray. 242-244 paper jams 1 Open Door D. 5 Close the tray. 6 Touch Continue. 3 2 Pull the paper down and toward you.
Clearing Jams Guide
Page 4
... feeder. c Open Tray 3, and then remove any crumpled paper. 250 paper jam 1 Remove the paper from Trays 2-4. Straighten the edges on a level surface. 3 Load the paper into the multipurpose feeder. 4 Slide the paper guide toward the inside of the tray until it lightly rests against the edge of paper back and forth to loosen them, and then...
... feeder. c Open Tray 3, and then remove any crumpled paper. 250 paper jam 1 Remove the paper from Trays 2-4. Straighten the edges on a level surface. 3 Load the paper into the multipurpose feeder. 4 Slide the paper guide toward the inside of the tray until it lightly rests against the edge of paper back and forth to loosen them, and then...
Clearing Jams Guide
Page 5
...paper jam on the right is difficult to the right, and then remove any jammed paper. 6 Pull Handle G9 until the tray is jammed in the rollers, rotate Knob G3 counterclockwise. 4 Move Cover G4 down, and then remove any jammed paper. 5 Move Cover G7 to the left, and then remove any jammed paper. Note: If the paper...Cover G7 6 Knob G8 7 Handle G9 5 2 Lift both Cover G1 levers, and then remove any jammed paper. 3 Move Cover G2 to remove, rotate the knob clockwise. 3 Close Cover F. 4 Touch Continue. 280-282 paper jams 1 Open Cover F. 283-284 and 287-288 paper jams 1 Open Door G. 2 Remove the...
...paper jam on the right is difficult to the right, and then remove any jammed paper. 6 Pull Handle G9 until the tray is jammed in the rollers, rotate Knob G3 counterclockwise. 4 Move Cover G4 down, and then remove any jammed paper. 5 Move Cover G7 to the left, and then remove any jammed paper. Note: If the paper...Cover G7 6 Knob G8 7 Handle G9 5 2 Lift both Cover G1 levers, and then remove any jammed paper. 3 Move Cover G2 to remove, rotate the knob clockwise. 3 Close Cover F. 4 Touch Continue. 280-282 paper jams 1 Open Cover F. 283-284 and 287-288 paper jams 1 Open Door G. 2 Remove the...
Clearing Jams Guide
Page 6
If the paper is jammed in the rollers, rotate Knob G8 clockwise, and then remove the jammed paper. 2 Remove the jammed paper. 8 Close Door G. 9 Touch Continue. 284-286 paper jams 1 Open Door H. 3 Close Door H. 4 Touch Continue. 289 staple jam 1 Open Door G. 2 Slide the G5 stapler toward the front of the finisher. 3 Lift the lever, and then remove the staple cartridge. 6 7 Lift the inside cover.
If the paper is jammed in the rollers, rotate Knob G8 clockwise, and then remove the jammed paper. 2 Remove the jammed paper. 8 Close Door G. 9 Touch Continue. 284-286 paper jams 1 Open Door H. 3 Close Door H. 4 Touch Continue. 289 staple jam 1 Open Door G. 2 Slide the G5 stapler toward the front of the finisher. 3 Lift the lever, and then remove the staple cartridge. 6 7 Lift the inside cover.
Clearing Jams Guide
Page 8
10 Close the staple drawer. 5 Open the scanner cover, and then remove any jammed pages. 11 Close Door G. 12 Touch Continue. 290-295 paper jams 1 Remove all original documents from the ADF. 2 Open the ADF cover, and then remove any jammed paper. 4 Close the ADF cover. 3 Raise the sheet guard, and then remove any jammed paper. Note: If the jammed paper cannot be remove easily, rotate the paper advance wheel to the left. 8 6 Close the scanner cover. 7 Touch Continue.
10 Close the staple drawer. 5 Open the scanner cover, and then remove any jammed pages. 11 Close Door G. 12 Touch Continue. 290-295 paper jams 1 Remove all original documents from the ADF. 2 Open the ADF cover, and then remove any jammed paper. 4 Close the ADF cover. 3 Raise the sheet guard, and then remove any jammed paper. Note: If the jammed paper cannot be remove easily, rotate the paper advance wheel to the left. 8 6 Close the scanner cover. 7 Touch Continue.

Troubleshooting Guide
Page 1
Door A will not shut properly Make sure the green paper jam clearance lever behind Door A is blank or displays only diamonds The printer self test failed. Control panel display is in Adobe Acrobat. 2 Click the printer ... printer off and contact Customer Support. 1 Solving printing problems Multiple-language PDFs do not appear, turn the printer back on. This often fixes the problem. Lexmark ™ X94x Troubleshooting Guide Troubleshooting Checking an unresponsive printer If your printer is not responding, make sure: • The power cord is plugged into the...
Door A will not shut properly Make sure the green paper jam clearance lever behind Door A is blank or displays only diamonds The printer self test failed. Control panel display is in Adobe Acrobat. 2 Click the printer ... printer off and contact Customer Support. 1 Solving printing problems Multiple-language PDFs do not appear, turn the printer back on. This often fixes the problem. Lexmark ™ X94x Troubleshooting Guide Troubleshooting Checking an unresponsive printer If your printer is not responding, make sure: • The power cord is plugged into the...
Troubleshooting Guide
Page 6
... the following : RESET THE PRINTER Turn the printer off, wait for about 10 seconds, and then turn the printer on the menu settings page, but paper jams when it exits the printer and enters the finisher, it may have a private caller ID or no fax station name. 7 In the Banned Fax List..., see if the option is satisfactory. • Resend the fax. Mac OS 9 users should make sure the shortcut number has been programmed for paper jams or misfeeds. 3 Make sure paper guides are aligned against the edges of the following : CAN THE DOCUMENT BE RE-SENT? Try one or more of the telephone line...
... the following : RESET THE PRINTER Turn the printer off, wait for about 10 seconds, and then turn the printer on the menu settings page, but paper jams when it exits the printer and enters the finisher, it may have a private caller ID or no fax station name. 7 In the Banned Fax List..., see if the option is satisfactory. • Resend the fax. Mac OS 9 users should make sure the shortcut number has been programmed for paper jams or misfeeds. 3 Make sure paper guides are aligned against the edges of the following : CAN THE DOCUMENT BE RE-SENT? Try one or more of the telephone line...
Troubleshooting Guide
Page 7
...Print jobs are possible solutions. The finisher will not accept letter- Solving paper feed problems Paper frequently jams These are possible solutions. Clear jammed paper from the multipurpose feeder. Try one or more of paper you use it is loaded in the tray to the booklet-maker bin .... Internal print server If the internal print server does not operate correctly, these are possible solutions. Paper jam message remains after you clear the jam In the Setup menu, Jam Recovery is set to the printer system board. • Make sure you are using the correct ...
...Print jobs are possible solutions. The finisher will not accept letter- Solving paper feed problems Paper frequently jams These are possible solutions. Clear jammed paper from the multipurpose feeder. Try one or more of paper you use it is loaded in the tray to the booklet-maker bin .... Internal print server If the internal print server does not operate correctly, these are possible solutions. Paper jam message remains after you clear the jam In the Setup menu, Jam Recovery is set to the printer system board. • Make sure you are using the correct ...

User's Guide
Page 8
... and white...105 Using Max Speed and Max Yield...105 Clearing jams...106 Avoiding jams...106 Understanding jam numbers and locations 106 200-203 paper jams...108 230-231 paper jams...108 241 paper jam...111 242-244 paper jams...112 250 paper jam...114 280-282 paper jams...115 283-284 and 287-288 paper jams 116 284-286 paper jams...118 289 staple jam...119 290-295 paper jams...122 8
... and white...105 Using Max Speed and Max Yield...105 Clearing jams...106 Avoiding jams...106 Understanding jam numbers and locations 106 200-203 paper jams...108 230-231 paper jams...108 241 paper jam...111 242-244 paper jams...112 250 paper jam...114 280-282 paper jams...115 283-284 and 287-288 paper jams 116 284-286 paper jams...118 289 staple jam...119 290-295 paper jams...122 8

User's Guide
Page 12
...held jobs do not print 233 Job takes longer than expected to print...233 Job prints from the wrong tray or on the wrong paper 234 Incorrect characters print...234 Tray linking does not work...234 Large jobs do not collate ...234 Unexpected page breaks occur...234 Solving copy......242 Flash memory card...242 Hard disk with adapter...242 Internal print server...243 Memory card...243 USB/parallel interface card...243 Solving paper feed problems...243 Paper frequently jams...243 Paper jam message remains after jam is cleared 243 Print jobs are not routed to the booklet-maker bin 243 Page that...
...held jobs do not print 233 Job takes longer than expected to print...233 Job prints from the wrong tray or on the wrong paper 234 Incorrect characters print...234 Tray linking does not work...234 Large jobs do not collate ...234 Unexpected page breaks occur...234 Solving copy......242 Flash memory card...242 Hard disk with adapter...242 Internal print server...243 Memory card...243 USB/parallel interface card...243 Solving paper feed problems...243 Paper frequently jams...243 Paper jam message remains after jam is cleared 243 Print jobs are not routed to the booklet-maker bin 243 Page that...

User's Guide
Page 25
... profile • FTP • E-mail send Each heading has a list of the column. When more changes need to be made for a job or after clearing a paper jam. Other touch-screen buttons Button Button name Cancel Select Function • Cancels an action or a selection • Cancels out of a screen and returns to the...
... profile • FTP • E-mail send Each heading has a list of the column. When more changes need to be made for a job or after clearing a paper jam. Other touch-screen buttons Button Button name Cancel Select Function • Cancels an action or a selection • Cancels out of a screen and returns to the...

User's Guide
Page 106
.... 106 The following hints can occur and the location of each jam. For more information, see the Card Stock & Label Guide available on the Lexmark Web site at www.lexmark.com/publications. • Do not load too much paper. Make sure the stack height does not exceed the indicated maximum height. • Do not...
.... 106 The following hints can occur and the location of each jam. For more information, see the Card Stock & Label Guide available on the Lexmark Web site at www.lexmark.com/publications. • Do not load too much paper. Make sure the stack height does not exceed the indicated maximum height. • Do not...

User's Guide
Page 108
...surface to cool before touching it. 108 200-203 paper jams 1 Open Door A by lifting the release latch and lowering the door. Note: Make sure all paper fragments are removed. 3 Push the green lever down. 4 Close Door A. 5 Touch Continue. 230-231 paper jams 1 Open Door A by lifting the release latch... and lowering the door. To reduce the risk of injury from a hot component, allow the surface to cool before touching. 2 Lift the green lever, and then pull the paper up and toward you.
...surface to cool before touching it. 108 200-203 paper jams 1 Open Door A by lifting the release latch and lowering the door. Note: Make sure all paper fragments are removed. 3 Push the green lever down. 4 Close Door A. 5 Touch Continue. 230-231 paper jams 1 Open Door A by lifting the release latch... and lowering the door. To reduce the risk of injury from a hot component, allow the surface to cool before touching. 2 Lift the green lever, and then pull the paper up and toward you.

User's Guide
Page 111
Note: Make sure all paper fragments are removed. 3 Close Door C. 4 Open Tray 1, and then remove any crumpled paper from the tray. 5 Close the tray. 6 Touch Continue. 111 241 paper jam 1 Open Door C. 2 Pull the paper down and toward you.
Note: Make sure all paper fragments are removed. 3 Close Door C. 4 Open Tray 1, and then remove any crumpled paper from the tray. 5 Close the tray. 6 Touch Continue. 111 241 paper jam 1 Open Door C. 2 Pull the paper down and toward you.

User's Guide
Page 112
242-244 paper jams 1 Open Door D. 2 Pull the paper down and away from the printer. Note: Make sure all paper fragments are removed. 3 Close Door D. 112
242-244 paper jams 1 Open Door D. 2 Pull the paper down and away from the printer. Note: Make sure all paper fragments are removed. 3 Close Door D. 112

User's Guide
Page 114
e Open Tray 4, and then remove any jammed paper. Do not fold or crease the paper. Straighten the edges on a level surface. 114 g Close the inside cover, and then remove any crumpled paper. f Open the inside cover, and then close Tray 4. 5 Touch Continue. 250 paper jam 1 Remove the paper from the multipurpose feeder. 2 Flex the sheets of paper back and forth to loosen them, and then fan them.
e Open Tray 4, and then remove any jammed paper. Do not fold or crease the paper. Straighten the edges on a level surface. 114 g Close the inside cover, and then remove any crumpled paper. f Open the inside cover, and then close Tray 4. 5 Touch Continue. 250 paper jam 1 Remove the paper from the multipurpose feeder. 2 Flex the sheets of paper back and forth to loosen them, and then fan them.

User's Guide
Page 115
Note: If the paper jam on the right is difficult to remove, rotate the knob clockwise. 3 Close Cover F. 4 Touch Continue. 115 3 Load the paper into the multipurpose feeder. 4 Slide the paper guide toward the inside of the tray until it lightly rests against the edge of the paper. 5 Touch Continue. 280-282 paper jams 1 Open Cover F. 2 Remove the jammed paper.
Note: If the paper jam on the right is difficult to remove, rotate the knob clockwise. 3 Close Cover F. 4 Touch Continue. 115 3 Load the paper into the multipurpose feeder. 4 Slide the paper guide toward the inside of the tray until it lightly rests against the edge of the paper. 5 Touch Continue. 280-282 paper jams 1 Open Cover F. 2 Remove the jammed paper.

User's Guide
Page 116
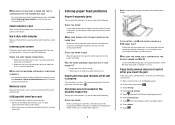
283-284 and 287-288 paper jams Covers, knobs, and handles located behind finisher Door G Cover, knob, or handle name 1 Cover G1 2 Cover G2 3 Knob G3 4 Cover G4 5 Cover G7 6 Knob G8 116
283-284 and 287-288 paper jams Covers, knobs, and handles located behind finisher Door G Cover, knob, or handle name 1 Cover G1 2 Cover G2 3 Knob G3 4 Cover G4 5 Cover G7 6 Knob G8 116

