User's Reference
Page 4
Chapter 7: Customizing your MFP configuration 23 Customize copy settings 23 Restore factory default settings 23 Manually set basic fax information 24 Create permanent fax destinations 25 Change fax send and receive settings 25 Adjust analog send fax options 26 Adjust analog ...
Chapter 7: Customizing your MFP configuration 23 Customize copy settings 23 Restore factory default settings 23 Manually set basic fax information 24 Create permanent fax destinations 25 Change fax send and receive settings 25 Adjust analog send fax options 26 Adjust analog ...
User's Reference
Page 13
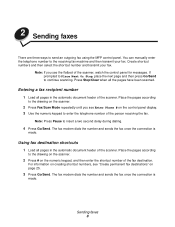
...scanning. Entering a fax recipient number 1 Load all the pages have been scanned. Place the pages according to send an outgoing fax using the MFP control panel. Press Stop/Clear when all pages in the automatic document feeder of the scanner. Using fax destination shortcuts 1 Load all pages in... ways to the drawing on the scanner. 2 Press # on the numeric keypad, and then enter the shortcut number of the fax destination. You can manually enter the telephone number to the drawing on page 25. 3 Press Go/Send. Note: If you see "Create permanent fax destinations" on the scanner....
...scanning. Entering a fax recipient number 1 Load all the pages have been scanned. Place the pages according to send an outgoing fax using the MFP control panel. Press Stop/Clear when all pages in the automatic document feeder of the scanner. Using fax destination shortcuts 1 Load all pages in... ways to the drawing on the scanner. 2 Press # on the numeric keypad, and then enter the shortcut number of the fax destination. You can manually enter the telephone number to the drawing on page 25. 3 Press Go/Send. Note: If you see "Create permanent fax destinations" on the scanner....
User's Reference
Page 14
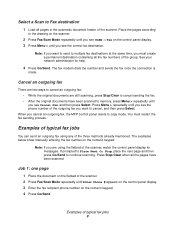
.... 3 Enter the fax recipient phone number on the control panel display. 3 Press Menu > until you cancel an outgoing fax, the MFP control panel resets to copy mode. The examples below show manually entering the fax number on the numeric keypad. Examples of the three methods already mentioned. Cancel an outgoing fax There...
.... 3 Enter the fax recipient phone number on the control panel display. 3 Press Menu > until you cancel an outgoing fax, the MFP control panel resets to copy mode. The examples below show manually entering the fax number on the numeric keypad. Examples of the three methods already mentioned. Cancel an outgoing fax There...
User's Reference
Page 17
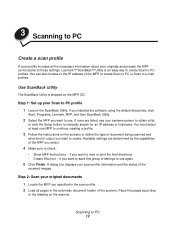
...Step 1: Set up your Scan to the drawing on the scanner. You must select at least one MFP to continue creating a profile. 3 Follow the instructions on the MFP CD. Lexmark™ ScanBack™ Utility is shipped on the screens to define the type of document being scanned and... what kind of settings to manually search for an IP address or hostname. Available settings are listed, see your ...
...Step 1: Set up your Scan to the drawing on the scanner. You must select at least one MFP to continue creating a profile. 3 Follow the instructions on the MFP CD. Lexmark™ ScanBack™ Utility is shipped on the screens to define the type of document being scanned and... what kind of settings to manually search for an IP address or hostname. Available settings are listed, see your ...
User's Reference
Page 24
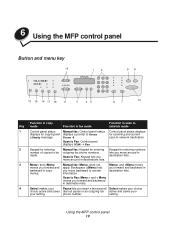
... the MFP control panel Button and menu key 12 1 2 98 13 15 14 17 16 11 3 45 6 7 10 Function in copy Key mode Function in fax mode Function in destinations lists. 3 Menu> and does not Menu> and Scan to Fax: Control panel displays SCAN → Fax 2 Keypad for entering Manual fax:... Keypad for entering Keypad for scanning and current a Ready message. move around in scan to network mode 1 Control panel status Manual fax: Control panel status Control panel status displays displays for copying and displays a prompt to Enter for entering numbers number of copies to ...
... the MFP control panel Button and menu key 12 1 2 98 13 15 14 17 16 11 3 45 6 7 10 Function in copy Key mode Function in fax mode Function in destinations lists. 3 Menu> and does not Menu> and Scan to Fax: Control panel displays SCAN → Fax 2 Keypad for entering Manual fax:... Keypad for entering Keypad for scanning and current a Ready message. move around in scan to network mode 1 Control panel status Manual fax: Control panel status Control panel status displays displays for copying and displays a prompt to Enter for entering numbers number of copies to ...
User's Reference
Page 25
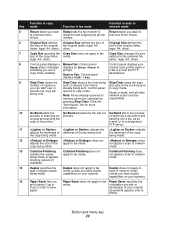
... scan to network mode 5 Return takes you back Redial sets the fax modem to Return takes you back to to PDFs). other ). 8 Control panel displays a Manual fax: Control panel Ready status message displays an Enter Phone # indicating you are in order to a designated FTP server. 11 adjusts the adjusts adjusts the...
... scan to network mode 5 Return takes you back Redial sets the fax modem to Return takes you back to to PDFs). other ). 8 Control panel displays a Manual fax: Control panel Ready status message displays an Enter Phone # indicating you are in order to a designated FTP server. 11 adjusts the adjusts adjusts the...
User's Reference
Page 27
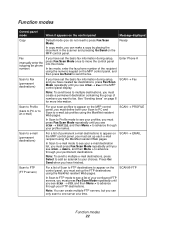
...® FTP Function modes 22 SCAN → PROFILE Scan to e-mail (permanent destinations) For a list of the recipient using the numeric keypad on the MFP control panel, and then press Go/Send to e-mail job profiles using the MarkNet resident Web pages. Note: To send to multiple e-mail destinations, press.... In Scan to FTP mode to see SCAN → FTP, and then Menu > to move the control panel into this mode. Ready Fax (manually enter the outgoing fax phone number) If you must set up each e-mail recipient using the MarkNet resident Web pages. See "Sending faxes" on the...
...® FTP Function modes 22 SCAN → PROFILE Scan to e-mail (permanent destinations) For a list of the recipient using the numeric keypad on the MFP control panel, and then press Go/Send to e-mail job profiles using the MarkNet resident Web pages. Note: To send to multiple e-mail destinations, press.... In Scan to FTP mode to see SCAN → FTP, and then Menu > to move the control panel into this mode. Ready Fax (manually enter the outgoing fax phone number) If you must set up each e-mail recipient using the MarkNet resident Web pages. See "Sending faxes" on the...
User's Reference
Page 28
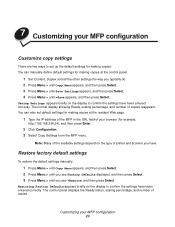
You can manually define default settings for example, http://192.168.236.24), and then press Enter. 2 Click Configuration. 3 Select Copy Settings from the MFP menu. Saving Settings appears briefly on the display to confirm the settings have been entered correctly. Note: Many of the... available settings depend on the display to confirm the settings have . Restoring Factory Defaults appears briefly on the type of your MFP configuration 23 Customizing your browser (for making copies: You can also set up the default settings for making copies at the resident Web ...
You can manually define default settings for example, http://192.168.236.24), and then press Enter. 2 Click Configuration. 3 Select Copy Settings from the MFP menu. Saving Settings appears briefly on the display to confirm the settings have been entered correctly. Note: Many of the... available settings depend on the display to confirm the settings have . Restoring Factory Defaults appears briefly on the type of your MFP configuration 23 Customizing your browser (for making copies: You can also set up the default settings for making copies at the resident Web ...
User's Reference
Page 29
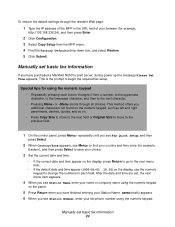
To restore the default settings through the resident Web page: 1 Type the IP address of the MFP in each button changes it from the MFP menu. 4 Find the Factory Defaults drop-down box, and select Restore. 5 Click Submit. Special tips for using the numeric keypad. After .... • Pressing Menu> or repeatedly until you have purchased a MarkNet N2501e print server, during power up the message Please Set Time appears. Manually set basic fax information 24 SAVED briefly appears. 6 When you have finished entering your country and time zone (for example, http://192.168.236...
To restore the default settings through the resident Web page: 1 Type the IP address of the MFP in each button changes it from the MFP menu. 4 Find the Factory Defaults drop-down box, and select Restore. 5 Click Submit. Special tips for using the numeric keypad. After .... • Pressing Menu> or repeatedly until you have purchased a MarkNet N2501e print server, during power up the message Please Set Time appears. Manually set basic fax information 24 SAVED briefly appears. 6 When you have finished entering your country and time zone (for example, http://192.168.236...
User's Reference
Page 37
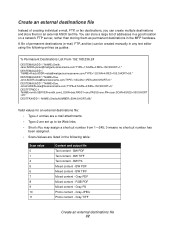
... file Instead of addresses in a good location on a network FTP server, rather than storing them in the following entries as permanent destinations in the MFP hardware. BW TIFF Text content - Gray PS Photo content - BW TIFF Mixed content - A file of permanent destinations (e-mail, FTP, and fax...NUMBER=5544;SHORT=88;" Valid values for an external destinations file: • Type=1 entries are e-mail attachments. • Type=2 are set up to be created manually in any text editor using the following table: Scan value 0 1 4 5 6 7 8 9 10 11 Content and output file Text content - BW PS ...
... file Instead of addresses in a good location on a network FTP server, rather than storing them in the following entries as permanent destinations in the MFP hardware. BW TIFF Text content - Gray PS Photo content - BW TIFF Mixed content - A file of permanent destinations (e-mail, FTP, and fax...NUMBER=5544;SHORT=88;" Valid values for an external destinations file: • Type=1 entries are e-mail attachments. • Type=2 are set up to be created manually in any text editor using the following table: Scan value 0 1 4 5 6 7 8 9 10 11 Content and output file Text content - BW PS ...
User's Reference
Page 43
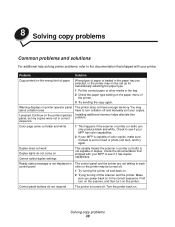
...turned off. 1 Try turning the printer off and back on the printer. Check the documentation that shipped with your MFP to see if your MFP has color capabilities. 2 If your MFP is capable of color copies, make sure Content is loaded in the paper tray you power back on in correct sequence... The printer does not have to turn on . 2 Trying turning off and manually sort your copies. 8 Solving copy problems Common problems...
...turned off. 1 Try turning the printer off and back on the printer. Check the documentation that shipped with your MFP to see if your MFP has color capabilities. 2 If your MFP is capable of color copies, make sure Content is loaded in the paper tray you power back on in correct sequence... The printer does not have to turn on . 2 Trying turning off and manually sort your copies. 8 Solving copy problems Common problems...
User's Reference
Page 46
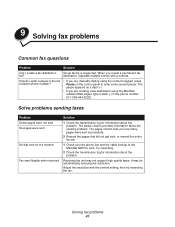
... (-). • If you are creating a fax destination using the MarkNet resident Web pages, type a dash (-) in the fax recipient phone number? • If you are manually dialing using the numeric keypad, press Pause on the control panel to the MarkNet N2501e card. The status column provides information about the problem. Receiving...
... (-). • If you are creating a fax destination using the MarkNet resident Web pages, type a dash (-) in the fax recipient phone number? • If you are manually dialing using the numeric keypad, press Pause on the control panel to the MarkNet N2501e card. The status column provides information about the problem. Receiving...
User's Reference
Page 53
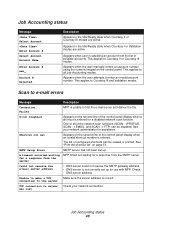
Appears when the user manually enters an account number using the numeric keypad on page 51. Scan to e-mail errors Message Description Connection Failed MFP is unable to server Check your network administrator for assistance. See your network connection. See "Print the shortcut list" on ...for a disabled network scan function. Shortcut not set up for a response from the SMTP server. A timeout occurred waiting MFP timed out waiting for use with MFP. Unable to all of the control panel display when an invalid shortcut number is entered for a response from the list of...
Appears when the user manually enters an account number using the numeric keypad on page 51. Scan to e-mail errors Message Description Connection Failed MFP is unable to server Check your network administrator for assistance. See your network connection. See "Print the shortcut list" on ...for a disabled network scan function. Shortcut not set up for a response from the SMTP server. A timeout occurred waiting MFP timed out waiting for use with MFP. Unable to all of the control panel display when an invalid shortcut number is entered for a response from the list of...

Setup Guide
Page 25
Information about using DHCP, then you must manually assign an IP address to the printer. 1 Press Menu until you see Network Menu, and then press Select. 2 Press Menu until you see Print Net ...
Information about using DHCP, then you must manually assign an IP address to the printer. 1 Press Menu until you see Network Menu, and then press Select. 2 Press Menu until you see Print Net ...

Setup Guide
Page 35
...menu appears. 3 Press Menu until new ones are selected or the factory defaults are 1) manually entering the information through the MFP control panel and operator panel, 2) using your browser to access the MFP IP address and then entering the Configure menu, or 3) using MarkVision™ Professional to access... the MFP IP address and enter the Configure menu. Manually changing settings Note: You can change the copy settings for individual jobs by changing settings on the control panel ...
...menu appears. 3 Press Menu until new ones are selected or the factory defaults are 1) manually entering the information through the MFP control panel and operator panel, 2) using your browser to access the MFP IP address and then entering the Configure menu, or 3) using MarkVision™ Professional to access... the MFP IP address and enter the Configure menu. Manually changing settings Note: You can change the copy settings for individual jobs by changing settings on the control panel ...
Setup Guide
Page 37
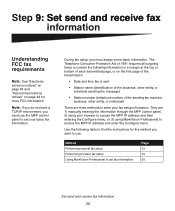
... find the instructions for more FCC information. The Telephone Consumer Protection Act of the sending fax machine, business, other entity, or individual) There are 1) manually entering the information through the MFP control panel, 2) using your fax setup information. They are three methods to enter your browser to access the... MFP IP address and then entering the Configure menu, or 3) using MarkVision Professional to set fax information Page 33 34 35 Set send and receive ...
... find the instructions for more FCC information. The Telephone Consumer Protection Act of the sending fax machine, business, other entity, or individual) There are 1) manually entering the information through the MFP control panel, 2) using your fax setup information. They are three methods to enter your browser to access the... MFP IP address and then entering the Configure menu, or 3) using MarkVision Professional to set fax information Page 33 34 35 Set send and receive ...

Setup Guide
Page 38
... appears. 4 When you see Fax Quick Setup, and then press Select. 2 When Country/Zone appears, use the numeric keypad to change . To manually enter the fax setup information: 1 On the control panel, press Menu repeatedly until you see Station Name, enter your name or company name using the... numeric keypad on the panel. 5 Press Return when you have finished entering your Station Name. Performing manual fax setup You can quickly change menu settings from the MFP control panel by pressing Menu and then selecting the menu for example, Eastern), and then press Select to save ...
... appears. 4 When you see Fax Quick Setup, and then press Select. 2 When Country/Zone appears, use the numeric keypad to change . To manually enter the fax setup information: 1 On the control panel, press Menu repeatedly until you see Station Name, enter your name or company name using the... numeric keypad on the panel. 5 Press Return when you have finished entering your Station Name. Performing manual fax setup You can quickly change menu settings from the MFP control panel by pressing Menu and then selecting the menu for example, Eastern), and then press Select to save ...
Setup Guide
Page 46
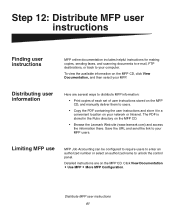
...of each set of user instructions stored on the MFP CD, and manually deliver them to your network or Intranet. Click View Documentation Use MFP More MFP Configuration. To view the available information on the MFP CD, click View Documentation, and then select your MFP users. The PDF is stored in a convenient ... destinations, or back to users. • Copy the PDF containing the user instructions and store it in the Pubs directory on the MFP CD. • Browse the Lexmark Web site (www.lexmark.com) and access the information there. Distributing user information Here are on the...
...of each set of user instructions stored on the MFP CD, and manually deliver them to your network or Intranet. Click View Documentation Use MFP More MFP Configuration. To view the available information on the MFP CD, click View Documentation, and then select your MFP users. The PDF is stored in a convenient ... destinations, or back to users. • Copy the PDF containing the user instructions and store it in the Pubs directory on the MFP CD. • Browse the Lexmark Web site (www.lexmark.com) and access the information there. Distributing user information Here are on the...
Setup Guide
Page 53
... print server is subject to the following notices apply to your calling area. Industry Canada ICES-003 This Class A digital apparatus complies with the instruction manual, may cause harmful interference to the telephone network or premises wiring using other than five). A label on the back of the FCC Rules. FCC Rules...
... print server is subject to the following notices apply to your calling area. Industry Canada ICES-003 This Class A digital apparatus complies with the instruction manual, may cause harmful interference to the telephone network or premises wiring using other than five). A label on the back of the FCC Rules. FCC Rules...


