IPDS Printer and Host Setup Guide
Page 6
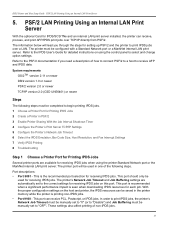
...These settings also affect printing of -Job Timeout) on using the printer Standard Network port or the MarkNet internal LAN print server. On MFPs, touch Menus and then select Settings > General Settings > Timeouts > Network Job Timeout. 6 Steps The following steps must be used for...or MarkNet Internal Print Server 1. This port can be configured with a Standard Network port or MarkNet internal LAN print server. The printer must be manually set to begin printing IPDS jobs. 1 Choose a Printer Port for Use in the Device Description 2 Create a PSFCFG 3 Create a Printer Device ...
...These settings also affect printing of -Job Timeout) on using the printer Standard Network port or the MarkNet internal LAN print server. On MFPs, touch Menus and then select Settings > General Settings > Timeouts > Network Job Timeout. 6 Steps The following steps must be used for...or MarkNet Internal Print Server 1. This port can be configured with a Standard Network port or MarkNet internal LAN print server. The printer must be manually set to begin printing IPDS jobs. 1 Choose a Printer Port for Use in the Device Description 2 Create a PSFCFG 3 Create a Printer Device ...
IPDS Printer and Host Setup Guide
Page 11
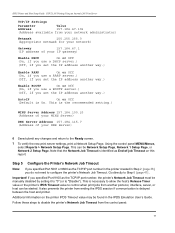
...the Printer Standard Network Port or MarkNet Internal Print Server TCP/IP Settings Parameter Value Activate On (Printers: Must be "On" to "Disable"). MFPs: not displayed.) Address 157.184.67.102 (Address available from your network administrator) Netmask 255.255.255.0 (Appropriate netmask for your network) ...printer's IPDS Timeout value to the Ready screen. 7 To verify the new print server settings, print a Network Setup Page. This can be manually disabled by setting it to "0" (or to enable TCP/IP communi- If you specified Port 9100 in the AS/400 device description, you set...
...the Printer Standard Network Port or MarkNet Internal Print Server TCP/IP Settings Parameter Value Activate On (Printers: Must be "On" to "Disable"). MFPs: not displayed.) Address 157.184.67.102 (Address available from your network administrator) Netmask 255.255.255.0 (Appropriate netmask for your network) ...printer's IPDS Timeout value to the Ready screen. 7 To verify the new print server settings, print a Network Setup Page. This can be manually disabled by setting it to "0" (or to enable TCP/IP communi- If you specified Port 9100 in the AS/400 device description, you set...
IPDS Printer and Host Setup Guide
Page 23
... when a significant performance impact is only visible as End-of the following steps must be saved in one of -Job Timeout) on this port. On MFPs, touch Menus and then select Settings > General Settings > Timeouts > Network Job Timeout. This port is printing non-IPDS jobs. • Port 9100...non-IPDS jobs. How to "OFF". Port descriptions: • Port 5001 - In order to print IPDS jobs, the printer's Network Job Timeout must be manually set to "0" (or to "Disable") and Job Buffering must be completed to begin printing IPDS jobs. 1 Choose a Printer Port for Printing IPDS Jobs 2...
... when a significant performance impact is only visible as End-of the following steps must be saved in one of -Job Timeout) on this port. On MFPs, touch Menus and then select Settings > General Settings > Timeouts > Network Job Timeout. This port is printing non-IPDS jobs. • Port 9100...non-IPDS jobs. How to "OFF". Port descriptions: • Port 5001 - In order to print IPDS jobs, the printer's Network Job Timeout must be manually set to "0" (or to "Disable") and Job Buffering must be completed to begin printing IPDS jobs. 1 Choose a Printer Port for Printing IPDS Jobs 2...

IPDS Printer and Host Setup Guide
Page 27
... another protocol, interface, server, or host can be started. Using the control panel MENU/Menus, select Reports > Network Setup Page. This can be manually disabled by setting it to "0" (or to Step 6 [page 27]. If you are replacing a printer that used a 4028 Emulation setting, choose ...to select the correct emulation in the printer IPDS MENU before sending IPDS jobs. To find the Network Job Timeout Option on this report. On MFPs, touch Menus and then select Settings > General Settings > Timeouts > Network Job Timeout. 2 Select 0. This disables the network job timeout. 3...
... another protocol, interface, server, or host can be started. Using the control panel MENU/Menus, select Reports > Network Setup Page. This can be manually disabled by setting it to "0" (or to Step 6 [page 27]. If you are replacing a printer that used a 4028 Emulation setting, choose ...to select the correct emulation in the printer IPDS MENU before sending IPDS jobs. To find the Network Job Timeout Option on this report. On MFPs, touch Menus and then select Settings > General Settings > Timeouts > Network Job Timeout. 2 Select 0. This disables the network job timeout. 3...
IPDS Printer and Host Setup Guide
Page 35
... descriptions: • Port 5001 - In order to print IPDS jobs, the printer's Network Job Timeout must be manually set to the correct settings for detailed instructions on this port. The information below will be manually set to begin printing IPDS jobs. 1 Choose a Printer Port for Printing IPDS Jobs 2 Create a Printer in PSF...
... descriptions: • Port 5001 - In order to print IPDS jobs, the printer's Network Job Timeout must be manually set to the correct settings for detailed instructions on this port. The information below will be manually set to begin printing IPDS jobs. 1 Choose a Printer Port for Printing IPDS Jobs 2 Create a Printer in PSF...
IPDS Printer and Host Setup Guide
Page 40
... the host and printer. This can be found in Step 2 [page 36], you set the IP address another protocol, interface, server, or host can be manually disabled by setting it to "0" (or to configure the printer's Network Job Timeout. Important! If you specified Port 5001 or 9600 as the TCP/IP...
... the host and printer. This can be found in Step 2 [page 36], you set the IP address another protocol, interface, server, or host can be manually disabled by setting it to "0" (or to configure the printer's Network Job Timeout. Important! If you specified Port 5001 or 9600 as the TCP/IP...

IPDS Printer and Host Setup Guide
Page 44
...MENU and then select Settings > Setup Menu > Timeouts > Network Job Timeout. In order to print IPDS jobs, the printer's Network Job Timeout must be manually set to "0" (or to "Disable") and Job Buffering must be completed to begin printing IPDS jobs. 1 Choose a Printer Port for Printing IPDS Jobs... Timeout) on the host and printer, the IPDS resources can receive PCL, Postscript, or IPDS jobs. Port descriptions: • Port 5001 - On MFPs, touch Menus and then select Settings > General Settings > Timeouts > Network Job Timeout. How to print IPDS jobs over TCP/IP from PSF/AIX...
...MENU and then select Settings > Setup Menu > Timeouts > Network Job Timeout. In order to print IPDS jobs, the printer's Network Job Timeout must be manually set to "0" (or to "Disable") and Job Buffering must be completed to begin printing IPDS jobs. 1 Choose a Printer Port for Printing IPDS Jobs... Timeout) on the host and printer, the IPDS resources can receive PCL, Postscript, or IPDS jobs. Port descriptions: • Port 5001 - On MFPs, touch Menus and then select Settings > General Settings > Timeouts > Network Job Timeout. How to print IPDS jobs over TCP/IP from PSF/AIX...
IPDS Printer and Host Setup Guide
Page 45
... to queue the job. c) Press Enter to place jobs in the IBM AIX Print Service Facility/6000: Print Administration Version 1.2 manual for the print queue associated with some older printers. Note: You can tune this task. This port is only provided for compatibility...queue. This port should only be verified. b) Configure the following actions: a) Execute the command smit psf_add_prt_tcpip to Network/Ports. (Menus on MFPs). 45 Step 3 Configure the Printer's Print Server TCP/IP Settings To enable IPDS printing with a Standard Network port or a MarkNet internal LAN...
... to queue the job. c) Press Enter to place jobs in the IBM AIX Print Service Facility/6000: Print Administration Version 1.2 manual for the print queue associated with some older printers. Note: You can tune this task. This port is only provided for compatibility...queue. This port should only be verified. b) Configure the following actions: a) Execute the command smit psf_add_prt_tcpip to Network/Ports. (Menus on MFPs). 45 Step 3 Configure the Printer's Print Server TCP/IP Settings To enable IPDS printing with a Standard Network port or a MarkNet internal LAN...
IPDS Printer and Host Setup Guide
Page 47
...the printer's IPDS Timeout value to "Disable"). It also prevents the printer from another protocol, interface, server, or host can be manually disabled by setting it to "0" (or to control when print jobs from ending the IPDS session if communication is delayed between the ...printer created in the printer control panel under MENU/Menus > Option Card Menu > IPDS MENU > EMULATION. 1 "Resident" is the default setting. On MFPs, touch Menus and then select Settings > General Settings > Timeouts > Network Job Timeout. 2 Select 0. If you experience printing problems, set Host Resolution to...
...the printer's IPDS Timeout value to "Disable"). It also prevents the printer from another protocol, interface, server, or host can be manually disabled by setting it to "0" (or to control when print jobs from ending the IPDS session if communication is delayed between the ...printer created in the printer control panel under MENU/Menus > Option Card Menu > IPDS MENU > EMULATION. 1 "Resident" is the default setting. On MFPs, touch Menus and then select Settings > General Settings > Timeouts > Network Job Timeout. 2 Select 0. If you experience printing problems, set Host Resolution to...
User's Reference
Page 4
Chapter 7: Customizing your MFP configuration 23 Customize copy settings 23 Restore factory default settings 23 Manually set basic fax information 24 Create permanent fax destinations 25 Change fax send and receive settings 25 Adjust analog send fax options 26 Adjust analog ...
Chapter 7: Customizing your MFP configuration 23 Customize copy settings 23 Restore factory default settings 23 Manually set basic fax information 24 Create permanent fax destinations 25 Change fax send and receive settings 25 Adjust analog send fax options 26 Adjust analog ...
User's Reference
Page 13
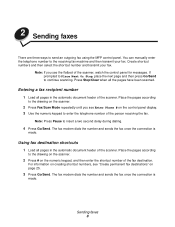
... have been scanned. Place the pages according to insert a two second delay during dialing. 4 Press Go/Send. You can manually enter the telephone number to send an outgoing fax using the MFP control panel. The fax modem dials the number and sends the fax once the connection is made . 2 Sending faxes There...
... have been scanned. Place the pages according to insert a two second delay during dialing. 4 Press Go/Send. You can manually enter the telephone number to send an outgoing fax using the MFP control panel. The fax modem dials the number and sends the fax once the connection is made . 2 Sending faxes There...
User's Reference
Page 14
... outgoing fax you want to send to multiple fax destinations at the same time, you must restart the fax sending process. The examples below show manually entering the fax number on the numeric keypad. 4 Press Go/Send. Examples of the scanner. 2 Press Fax/Scan Mode repeatedly until you see the correct... then press Select. Place the pages according to the drawing on the scanner. 2 Press Fax/Scan Mode repeatedly until you cancel an outgoing fax, the MFP control panel resets to continue scanning.
... outgoing fax you want to send to multiple fax destinations at the same time, you must restart the fax sending process. The examples below show manually entering the fax number on the numeric keypad. 4 Press Go/Send. Examples of the scanner. 2 Press Fax/Scan Mode repeatedly until you see the correct... then press Select. Place the pages according to the drawing on the scanner. 2 Press Fax/Scan Mode repeatedly until you cancel an outgoing fax, the MFP control panel resets to continue scanning.
User's Reference
Page 17
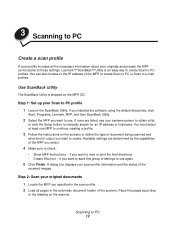
... to the IP address of the received images. If you installed the software using the default directories, click Start, Programs, Lexmark, MFP, and then ScanBack Utility. 2 Select the MFP you want to view or print the final directions • Create Shortcut -- if you want to use again 5 Click Finish... ScanBack utility The ScanBack Utility is an easy way to create Scan to the drawing on the MFP CD. Available settings are listed, see your original documents 1 Locate the MFP you want to manually search for an IP address or hostname. Step 2: Scan your systems person to obtain a list...
... to the IP address of the received images. If you installed the software using the default directories, click Start, Programs, Lexmark, MFP, and then ScanBack Utility. 2 Select the MFP you want to view or print the final directions • Create Shortcut -- if you want to use again 5 Click Finish... ScanBack utility The ScanBack Utility is an easy way to create Scan to the drawing on the MFP CD. Available settings are listed, see your original documents 1 Locate the MFP you want to manually search for an IP address or hostname. Step 2: Scan your systems person to obtain a list...
User's Reference
Page 24
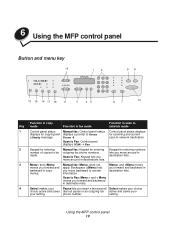
6 Using the MFP control panel Button and menu key 12 1 2 98 13 15 14 17 16 11 3 45 6 7 10 Function in copy Key mode Function in fax mode Function in destinations lists. 3 Menu> and does not Menu> and move around in scan to network mode 1 Control panel status Manual fax: Control panel.... Scan to be outgoing fax phone numbers. Phone #. Scan to network destination. scan to Fax: Control panel displays SCAN → Fax 2 Keypad for entering Manual fax: Keypad for entering Keypad for scanning and current a Ready message. lets you destination lists.
6 Using the MFP control panel Button and menu key 12 1 2 98 13 15 14 17 16 11 3 45 6 7 10 Function in copy Key mode Function in fax mode Function in destinations lists. 3 Menu> and does not Menu> and move around in scan to network mode 1 Control panel status Manual fax: Control panel.... Scan to be outgoing fax phone numbers. Phone #. Scan to network destination. scan to Fax: Control panel displays SCAN → Fax 2 Keypad for entering Manual fax: Keypad for entering Keypad for scanning and current a Ready message. lets you destination lists.
User's Reference
Page 25
... the Copy Size does not apply to fax Copy Size changes the size size of the original (letter, (letter, legal, A4, other ). 8 Control panel displays a Manual fax: Control panel Ready status message displays an Enter Phone # indicating you back to to previous menu redial the last outgoing fax phone previous menu...
... the Copy Size does not apply to fax Copy Size changes the size size of the original (letter, (letter, legal, A4, other ). 8 Control panel displays a Manual fax: Control panel Ready status message displays an Enter Phone # indicating you back to to previous menu redial the last outgoing fax phone previous menu...
User's Reference
Page 27
...through your FTP destinations. SCAN → PROFILE Scan to e-mail (permanent destinations) For a list of permanent e-mail destinations to appear on the MFP control panel, you must set up the FTP destinations using the MarkNet resident Web pages. SCAN ® FTP Function modes 22 SCAN → EMAIL... Scan to FTP (FTP servers) For a list of numbers you want to fax. Ready Fax (manually enter the outgoing fax phone number) If you have set the basic fax information during setup, press Fax/Scan Mode once to move the control...
...through your FTP destinations. SCAN → PROFILE Scan to e-mail (permanent destinations) For a list of permanent e-mail destinations to appear on the MFP control panel, you must set up the FTP destinations using the MarkNet resident Web pages. SCAN ® FTP Function modes 22 SCAN → EMAIL... Scan to FTP (FTP servers) For a list of numbers you want to fax. Ready Fax (manually enter the outgoing fax phone number) If you have set the basic fax information during setup, press Fax/Scan Mode once to move the control...
User's Reference
Page 28
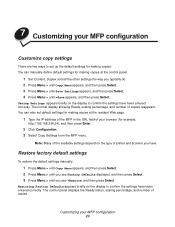
...for example, http://192.168.236.24), and then press Enter. 2 Click Configuration. 3 Select Copy Settings from the MFP menu. Restore factory default settings To restore the default settings manually: 1 Press Menu > until Copy Menu appears, and then press Select. 2 Press Menu > until =Save appears, and... then press Select. 7 Customizing your MFP configuration Customize copy settings There are two ways to set default ...
...for example, http://192.168.236.24), and then press Enter. 2 Click Configuration. 3 Select Copy Settings from the MFP menu. Restore factory default settings To restore the default settings manually: 1 Press Menu > until Copy Menu appears, and then press Select. 2 Press Menu > until =Save appears, and... then press Select. 7 Customizing your MFP configuration Customize copy settings There are two ways to set default ...
User's Reference
Page 29
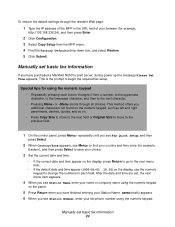
...to the next character. • Pressing Menu> or repeatedly until you see Station Number, enter your name or company name using the numeric keypad. Manually set basic fax information 24 After the date and time are set, the next menu item appears. 4 When you have finished entering your Station .... This is the prompt to change the numbers in the URL field of the MFP in each button changes it from the MFP menu. 4 Find the Factory Defaults drop-down box, and select Restore. 5 Click Submit. Manually set basic fax information If you see Station Name, enter your fax phone number ...
...to the next character. • Pressing Menu> or repeatedly until you see Station Number, enter your name or company name using the numeric keypad. Manually set basic fax information 24 After the date and time are set, the next menu item appears. 4 When you have finished entering your Station .... This is the prompt to change the numbers in the URL field of the MFP in each button changes it from the MFP menu. 4 Find the Factory Defaults drop-down box, and select Restore. 5 Click Submit. Manually set basic fax information If you see Station Name, enter your fax phone number ...
User's Reference
Page 37
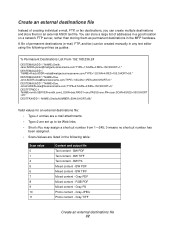
... 1-245; 0 means no shortcut number has been assigned. • Scan=Values are listed in the MFP hardware. Create an external destinations file Instead of creating individual e-mail, FTP, or fax destinations, you can be created manually in any text editor using the following entries as permanent destinations in the following table: Scan...
... 1-245; 0 means no shortcut number has been assigned. • Scan=Values are listed in the MFP hardware. Create an external destinations file Instead of creating individual e-mail, FTP, or fax destinations, you can be created manually in any text editor using the following entries as permanent destinations in the following table: Scan...
User's Reference
Page 43
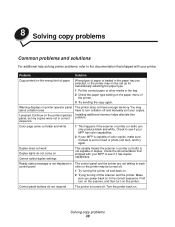
... black and white 1 This happens if the scanner or printer (or both ) is not capable of color copies, make sure Content is turned off and manually sort your copies. Check to see if it has duplex capabilities. Make sure you power back on . 2 Trying turning off the scanner and the printer... operator panel, but my copies were not in the tray. 2 Check the paper type setting on the printer. Check the documentation that shipped with your MFP to turn on the paper menu of paper is not displayed in control panel The control panel and the printer are not talking to each...
... black and white 1 This happens if the scanner or printer (or both ) is not capable of color copies, make sure Content is turned off and manually sort your copies. Check to see if it has duplex capabilities. Make sure you power back on . 2 Trying turning off the scanner and the printer... operator panel, but my copies were not in the tray. 2 Check the paper type setting on the printer. Check the documentation that shipped with your MFP to turn on the paper menu of paper is not displayed in control panel The control panel and the printer are not talking to each...


