User's Guide for Windows
Page 9
... 120 Nothing happens when a memory card is inserted 120 Error messages on display...121 Error messages...121 Low Ink...121 Paper Jam...121 Cartridge Error...121 Carrier Jam...122 Error: 2200...122 Paper Out...123 Cartridge Missing...123 Alignment Error...123 Photo Mode: problem reading memory card 124 Photo Mode: second memory card...
... 120 Nothing happens when a memory card is inserted 120 Error messages on display...121 Error messages...121 Low Ink...121 Paper Jam...121 Cartridge Error...121 Carrier Jam...122 Error: 2200...122 Paper Out...123 Cartridge Missing...123 Alignment Error...123 Photo Mode: problem reading memory card 124 Photo Mode: second memory card...
User's Guide for Windows
Page 27
..., press Scan Mode. 2 Press or repeatedly until the option you select. Modify the default settings. Customizing scan settings using the ADF. • View ink levels. • Clean cartridges. • Align cartridges. • Print a test page. Using the Scan menu To access and navigate the Scan menu: 1 From the control panel, press Scan Mode...
..., press Scan Mode. 2 Press or repeatedly until the option you select. Modify the default settings. Customizing scan settings using the ADF. • View ink levels. • Clean cartridges. • Align cartridges. • Print a test page. Using the Scan menu To access and navigate the Scan menu: 1 From the control panel, press Scan Mode...

User's Guide for Windows
Page 28
Use this menu, or enter the available submenus. Send a fax to be scanned. Preview the scanned image on the display. • View ink levels. • Clean cartridges. • Align cartridges. • Print a test page. Customizing fax settings using the control panel Using the Fax Mode menu To access and navigate the Fax Mode menu...
Use this menu, or enter the available submenus. Send a fax to be scanned. Preview the scanned image on the display. • View ink levels. • Clean cartridges. • Align cartridges. • Print a test page. Customizing fax settings using the control panel Using the Fax Mode menu To access and navigate the Fax Mode menu...
User's Guide for Windows
Page 29
... call (On Hook Dial)" on page 55. 2 Press or repeatedly until the menu option you want is useful when you specify. • View ink levels. • Clean cartridges. • Align cartridges. • Print a test page. Dial a telephone number while listening to fax settings. Modify ringing and answering options. Specify the fax dialing and...
... call (On Hook Dial)" on page 55. 2 Press or repeatedly until the menu option you want is useful when you specify. • View ink levels. • Clean cartridges. • Align cartridges. • Print a test page. Dial a telephone number while listening to fax settings. Modify ringing and answering options. Specify the fax dialing and...
User's Guide for Windows
Page 30
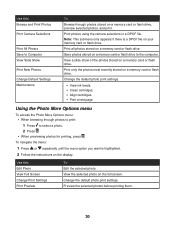
... photos stored on your memory card or flash drive. Change the default photo print settings. Change the default photo print settings. • View ink levels. • Clean cartridges. • Align cartridges. • Print a test page. Note: This submenu only appears if there is highlighted. 2 Follow the instructions on a memory card or flash drive...
... photos stored on your memory card or flash drive. Change the default photo print settings. Change the default photo print settings. • View ink levels. • Clean cartridges. • Align cartridges. • Print a test page. Note: This submenu only appears if there is highlighted. 2 Follow the instructions on a memory card or flash drive...
User's Guide for Windows
Page 37
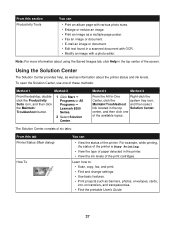
...then click the Maintain/ Troubleshoot button. 1 Click Start Œ Programs or All Programs Œ Lexmark 8300 Series. 2 Select Solution Center. The Solution Center consists of six tabs: From this section Productivity...View the status of the printer. Note: For more information about the printer status and ink levels. center, and then click one of the available topics. Method 3 Method 4 ... system tray icon, Maintain/Troubleshoot and then select link located in the top center of the print cartridges. Learn how to: • Scan, copy, fax, and print. • Find and change...
...then click the Maintain/ Troubleshoot button. 1 Click Start Œ Programs or All Programs Œ Lexmark 8300 Series. 2 Select Solution Center. The Solution Center consists of six tabs: From this section Productivity...View the status of the printer. Note: For more information about the printer status and ink levels. center, and then click one of the available topics. Method 3 Method 4 ... system tray icon, Maintain/Troubleshoot and then select link located in the top center of the print cartridges. Learn how to: • Scan, copy, fax, and print. • Find and change...
User's Guide for Windows
Page 38
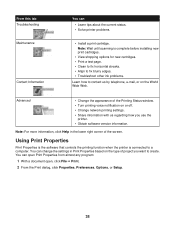
...voice notification on the World Wide Web. You can • Learn tips about the current status. • Solve printer problems. • Install a print cartridge. You can open Print Properties from almost any program: 1 With a document open, click File Œ Print. 2 From the Print dialog, click ...; View shopping options for new cartridges. • Print a test page. • Clean to fix horizontal streaks. • Align to fix blurry edges. • Troubleshoot other ink problems. Learn how to contact us by telephone, e-mail, or on or off. • Change network printing settings. &#...
...voice notification on the World Wide Web. You can • Learn tips about the current status. • Solve printer problems. • Install a print cartridge. You can open Print Properties from almost any program: 1 With a document open, click File Œ Print. 2 From the Print dialog, click ...; View shopping options for new cartridges. • Print a test page. • Clean to fix horizontal streaks. • Align to fix blurry edges. • Troubleshoot other ink problems. Learn how to contact us by telephone, e-mail, or on or off. • Change network printing settings. &#...

User's Guide for Windows
Page 97
... quality, print your document again. 3 Click the Maintenance tab. 4 Click Align to two more times. If you aligned the cartridges to two more times. 97 A page prints, forcing ink through the print cartridge nozzles to clean them . 8 Print the document again to verify that the print quality has improved. 7 If print quality has...
... quality, print your document again. 3 Click the Maintenance tab. 4 Click Align to two more times. If you aligned the cartridges to two more times. 97 A page prints, forcing ink through the print cartridge nozzles to clean them . 8 Print the document again to verify that the print quality has improved. 7 If print quality has...
User's Guide for Windows
Page 99
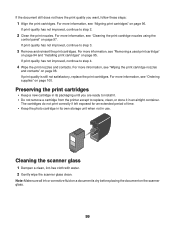
...not improved, continue to replace, clean, or store it . • Do not remove a cartridge from the printer except to step 4. 4 Wipe the print nozzles and contacts. Note: Make sure all ink or corrective fluid on page 100. For more information, see "Ordering supplies" on a document... is still not satisfactory, replace the print cartridges. For more information, see "Cleaning the print cartridge nozzles using the control panel" on page 95....
...not improved, continue to replace, clean, or store it . • Do not remove a cartridge from the printer except to step 4. 4 Wipe the print nozzles and contacts. Note: Make sure all ink or corrective fluid on page 100. For more information, see "Ordering supplies" on a document... is still not satisfactory, replace the print cartridges. For more information, see "Cleaning the print cartridge nozzles using the control panel" on page 95....
User's Guide for Windows
Page 103
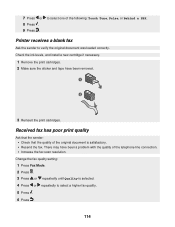
... in the right carrier. Check the ink levels, and install a new print cartridge if necessary. 1 Remove the print cartridges. 2 Make sure the sticker and tape have been removed. 1 2 3 Reinsert the print cartridges. Page does not print If an error message is in the left carrier, and the color cartridge is displayed, see "Power button is not...
... in the right carrier. Check the ink levels, and install a new print cartridge if necessary. 1 Remove the print cartridges. 2 Make sure the sticker and tape have been removed. 1 2 3 Reinsert the print cartridges. Page does not print If an error message is in the left carrier, and the color cartridge is displayed, see "Power button is not...
User's Guide for Windows
Page 105
...8226; Dark print • Faded print • Incorrect colors • Light and dark bands in print • Skewed lines • Smudges • Streaks • White lines in print Check the ink levels, and install a new print cartridge if necessary. For more information, see "Ordering supplies" .... If print quality is still not satisfactory, replace the print cartridges. To avoid ink smudging when you want, follow these steps: 1 Align the print cartridges. For more information, see "Cleaning the print cartridge nozzles using the control panel" on page 104. If print ...
...8226; Dark print • Faded print • Incorrect colors • Light and dark bands in print • Skewed lines • Smudges • Streaks • White lines in print Check the ink levels, and install a new print cartridge if necessary. For more information, see "Ordering supplies" .... If print quality is still not satisfactory, replace the print cartridges. To avoid ink smudging when you want, follow these steps: 1 Align the print cartridges. For more information, see "Cleaning the print cartridge nozzles using the control panel" on page 104. If print ...
User's Guide for Windows
Page 108
... paper size being used matches the size you are copying or scanning from magazines or newspapers" on page 75. If you selected. 108 Check the ink levels and install a new print cartridge if necessary. If the scanner glass is not satisfactory, try using a clearer version of the document or image.
... paper size being used matches the size you are copying or scanning from magazines or newspapers" on page 75. If you selected. 108 Check the ink levels and install a new print cartridge if necessary. If the scanner glass is not satisfactory, try using a clearer version of the document or image.
User's Guide for Windows
Page 112
... . 3 Press or repeatedly until the country where you are operating the printer appears. 7 Press . 8 Press . Check the status of telephone rings. Check the ink levels, and install a new cartridge if necessary. Setting selections include single ring, double ring, triple ring, and any faxes that have been stored in the printer. Make sure...
... . 3 Press or repeatedly until the country where you are operating the printer appears. 7 Press . 8 Press . Check the status of telephone rings. Check the ink levels, and install a new cartridge if necessary. Setting selections include single ring, double ring, triple ring, and any faxes that have been stored in the printer. Make sure...
User's Guide for Windows
Page 114
...of the telephone line connection. • Increase the fax scan resolution. There may have been removed. 1 2 3 Reinsert the print cartridges. Change the fax quality setting: 1 Press Fax Mode. 2 Press . 3 Press or repeatedly until Quality is satisfactory. • Resend the fax. Check... the ink levels, and install a new cartridge if necessary. 1 Remove the print cartridges. 2 Make sure the sticker and tape have been a problem with the quality of the following: Touch Tone, Pulse, or...
...of the telephone line connection. • Increase the fax scan resolution. There may have been removed. 1 2 3 Reinsert the print cartridges. Change the fax quality setting: 1 Press Fax Mode. 2 Press . 3 Press or repeatedly until Quality is satisfactory. • Resend the fax. Check... the ink levels, and install a new cartridge if necessary. 1 Remove the print cartridges. 2 Make sure the sticker and tape have been a problem with the quality of the following: Touch Tone, Pulse, or...
User's Guide for Windows
Page 115
... take your fax to print. • This solution will reduce the speed for future faxes until Standard or Fine appears. 115 Check the ink levels and install a new cartridge if necessary. Decrease the transmission speed. 1 Press Fax Mode. 2 Press . 3 Press or repeatedly until Dialing and Sending is highlighted. 4 Press . 5 Press or repeatedly...
... take your fax to print. • This solution will reduce the speed for future faxes until Standard or Fine appears. 115 Check the ink levels and install a new cartridge if necessary. Decrease the transmission speed. 1 Press Fax Mode. 2 Press . 3 Press or repeatedly until Dialing and Sending is highlighted. 4 Press . 5 Press or repeatedly...
User's Guide for Windows
Page 121
Error messages Low Ink 1 Check the ink levels and install a new cartridge if necessary. Cartridge Error This includes the following cartridge errors: • 1105 • 1203 • 1204 • 1205 • 1206 Procedure 1 1 Remove the print cartridges. 2 Disconnect the power supply cord from the electrical outlet. 3 Reconnect the power ... obvious damage. 2 Firmly plug the rectangular end of the USB cable into the back of the computer. The Low Ink warning occurs when the cartridge is marked with the USB symbol . 3 Firmly plug the square end of the USB cable into the USB port of...
Error messages Low Ink 1 Check the ink levels and install a new cartridge if necessary. Cartridge Error This includes the following cartridge errors: • 1105 • 1203 • 1204 • 1205 • 1206 Procedure 1 1 Remove the print cartridges. 2 Disconnect the power supply cord from the electrical outlet. 3 Reconnect the power ... obvious damage. 2 Firmly plug the rectangular end of the USB cable into the back of the computer. The Low Ink warning occurs when the cartridge is marked with the USB symbol . 3 Firmly plug the square end of the USB cable into the USB port of...
User's Guide for Windows
Page 133
... 121 cartridge missing 123 DPOF error: no images found 124 DPOF error: photo larger than paper size 125 error 2200 122 low ink 121 no computer 125 paper jam 121 paper out 123 photo mode: no images found 124 photo mode: problem reading memory card 124 photo mode: ... index cards loading 46 printing 50 information, finding 11 inserting flash drives 55 memory cards 54 PictBridge-enabled camera 58 installing network printer 92 print cartridges 95 printer software 125 software and sharing printer on network 90 IP address, assigning 92 J jams and misfeeds troubleshooting 117 banner jams 119 paper jam...
... 121 cartridge missing 123 DPOF error: no images found 124 DPOF error: photo larger than paper size 125 error 2200 122 low ink 121 no computer 125 paper jam 121 paper out 123 photo mode: no images found 124 photo mode: problem reading memory card 124 photo mode: ... index cards loading 46 printing 50 information, finding 11 inserting flash drives 55 memory cards 54 PictBridge-enabled camera 58 installing network printer 92 print cartridges 95 printer software 125 software and sharing printer on network 90 IP address, assigning 92 J jams and misfeeds troubleshooting 117 banner jams 119 paper jam...
User's Guide for Windows
Page 136
... photo copies 108 poor copy quality 108 scanner unit does not close 107 troubleshooting, error messages alignment error 123 card format 124 carrier jam 122 cartridge error 121 cartridge missing 123 DPOF error: no images found 124 DPOF error: photo larger than paper size 125 error 2200 122 low... ink 121 no computer 125 paper jam 121 paper out 123 photo mode: no images found 124 photo mode: problem reading memory card 124 photo mode: ...
... photo copies 108 poor copy quality 108 scanner unit does not close 107 troubleshooting, error messages alignment error 123 card format 124 carrier jam 122 cartridge error 121 cartridge missing 123 DPOF error: no images found 124 DPOF error: photo larger than paper size 125 error 2200 122 low... ink 121 no computer 125 paper jam 121 paper out 123 photo mode: no images found 124 photo mode: problem reading memory card 124 photo mode: ...


