Getting Started
Page 6
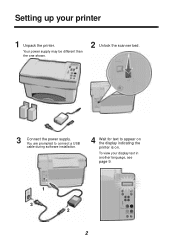
Your power supply may be different than the one shown. 2 Unlock the scanner bed. 3 Connect the power supply. Setting up your display text in another language, see page 9. 1 3 2 2 To view your printer 1 Unpack the printer. You are prompted to connect a USB cable during software installation. 4 Wait for text to appear on the display indicating the printer is on.
Your power supply may be different than the one shown. 2 Unlock the scanner bed. 3 Connect the power supply. Setting up your display text in another language, see page 9. 1 3 2 2 To view your printer 1 Unpack the printer. You are prompted to connect a USB cable during software installation. 4 Wait for text to appear on the display indicating the printer is on.
Getting Started
Page 10
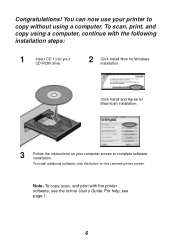
... with the following installation steps: 1 Insert CD 1 into your printer to complete software installation. Congratulations! For help, see the online User's Guide. Click Install and Agree for Windows installation. To scan, print, and copy using a computer. You can now use your CD-ROM drive. 2 Click Install Now for Macintosh installation. 3 Follow the instructions on the Lexmark printer screen.
... with the following installation steps: 1 Insert CD 1 into your printer to complete software installation. Congratulations! For help, see the online User's Guide. Click Install and Agree for Windows installation. To scan, print, and copy using a computer. You can now use your CD-ROM drive. 2 Click Install Now for Macintosh installation. 3 Follow the instructions on the Lexmark printer screen.
Getting Started
Page 16
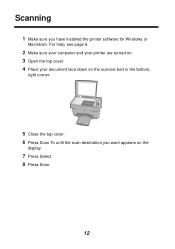
For help, see page 6. 2 Make sure your computer and your printer are turned on. 3 Open the top cover. 4 Place your document face down on the display. 7 Press Select. 8 Press Scan. 12 Scanning 1 Make sure you want appears on the scanner bed in the bottom, right corner. 5 Close the top cover. 6 Press Scan To until the scan destination you have installed the printer software for Windows or Macintosh.
For help, see page 6. 2 Make sure your computer and your printer are turned on. 3 Open the top cover. 4 Place your document face down on the display. 7 Press Select. 8 Press Scan. 12 Scanning 1 Make sure you want appears on the scanner bed in the bottom, right corner. 5 Close the top cover. 6 Press Scan To until the scan destination you have installed the printer software for Windows or Macintosh.

Getting Started
Page 17
For help , see page 6. 2 From your software application, open the File menu. 3 Choose Print.... 4 Change settings as needed, and then choose Save Settings. 5 Select Print. 13 For help , see page 6. 2 From your software application File menu, select Print. 3 To customize print settings, click Properties or Printer Preferences. 4 From the Print dialog box, click OK or Print (depending on the software application). Macintosh 1 Make sure you have installed the printer software for Windows. Printing Windows 1 Make sure you have installed the printer software for Macintosh.
For help , see page 6. 2 From your software application, open the File menu. 3 Choose Print.... 4 Change settings as needed, and then choose Save Settings. 5 Select Print. 13 For help , see page 6. 2 From your software application File menu, select Print. 3 To customize print settings, click Properties or Printer Preferences. 4 From the Print dialog box, click OK or Print (depending on the software application). Macintosh 1 Make sure you have installed the printer software for Windows. Printing Windows 1 Make sure you have installed the printer software for Macintosh.
User's Guide for Windows 98, Me, and 2000
Page 8
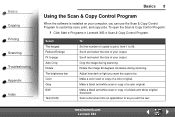
.... Select: The keypad Reduce/Enlarge Fit to page Auto Crop Rotate The brightness bar Color Gray B/W Text/(OCR) To: Set the number of a color original. www.lexmark.com Lexmark X83 Adjust how dark or light you want the copy to customize scan, print, and copy...Lexmark X83 Scan & Copy Control Program. Crop the image during scanning. Make a color scan or copy of a black and white original document. Scroll and select the size of your output. Basics Copying Printing Scanning Troubleshooting Appendix Index Basics 8 Using the Scan & Copy Control Program When the software is installed...
.... Select: The keypad Reduce/Enlarge Fit to page Auto Crop Rotate The brightness bar Color Gray B/W Text/(OCR) To: Set the number of a color original. www.lexmark.com Lexmark X83 Adjust how dark or light you want the copy to customize scan, print, and copy...Lexmark X83 Scan & Copy Control Program. Crop the image during scanning. Make a color scan or copy of a black and white original document. Scroll and select the size of your output. Basics Copying Printing Scanning Troubleshooting Appendix Index Basics 8 Using the Scan & Copy Control Program When the software is installed...
User's Guide for Windows 98, Me, and 2000
Page 10
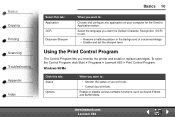
...; Monitor the status of a scanned image. • Enable and set the sharpen level. To open the Control Program, click Start Programs Lexmark X83 Print Control Program. Using the Print Control Program The Control Program lets you want the Optical Character Recognition (OCR) to use. • ...the background of your print job. • Cancel your computer for the Send to Application button. Enable or disable various software functions, such as Sound Effects and Buffer Mode. www.lexmark.com Lexmark X83 Select the language you monitor the printer and install or replace cartridges.
...; Monitor the status of a scanned image. • Enable and set the sharpen level. To open the Control Program, click Start Programs Lexmark X83 Print Control Program. Using the Print Control Program The Control Program lets you want the Optical Character Recognition (OCR) to use. • ...the background of your print job. • Cancel your computer for the Send to Application button. Enable or disable various software functions, such as Sound Effects and Buffer Mode. www.lexmark.com Lexmark X83 Select the language you monitor the printer and install or replace cartridges.
User's Guide for Windows 98, Me, and 2000
Page 47
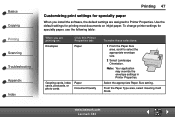
Use the default settings for specialty paper, use the following table: When you install the software, the default settings are printing on inkjet paper. From the Paper Type area, select Greeting Card Stock. Select the appropriate Paper Size setting. www.lexmark.com Lexmark X83 To change printer settings for printing most documents on : Envelopes Click this Printer...
Use the default settings for specialty paper, use the following table: When you install the software, the default settings are printing on inkjet paper. From the Paper Type area, select Greeting Card Stock. Select the appropriate Paper Size setting. www.lexmark.com Lexmark X83 To change printer settings for printing most documents on : Envelopes Click this Printer...
User's Guide for Windows 98, Me, and 2000
Page 69
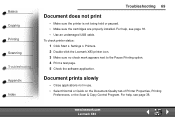
... paused. • Make sure the cartridges are properly installed. To check printer status: 1 Click Start Settings Printers. 2 Double-click the Lexmark X83 printer icon. 3 Make sure no check mark appears next to the Pause Printing option. 4 Print a test page. 5 Check the software application. www.lexmark.com Lexmark X83 Document prints slowly • Close applications not in use...
... paused. • Make sure the cartridges are properly installed. To check printer status: 1 Click Start Settings Printers. 2 Double-click the Lexmark X83 printer icon. 3 Make sure no check mark appears next to the Pause Printing option. 4 Print a test page. 5 Check the software application. www.lexmark.com Lexmark X83 Document prints slowly • Close applications not in use...


