
User's Guide
Page 2
...pinch the power cord between objects such as the power supply cord or telephone, during a lightning storm. Refer service or repairs, other replacement parts. Lexmark is misused, a risk of fire or electrical shock results. CAUTION: Do not twist, bind, crush, or place heavy objects on the power...Do not use the fax feature during a lightning storm. SAVE THESE INSTRUCTIONS. Inspect the power cord regularly for the use of specific Lexmark components. Remove the power cord from the electrical outlet before inspecting it. Do not set up this product or the manufacturer's authorized ...
...pinch the power cord between objects such as the power supply cord or telephone, during a lightning storm. Refer service or repairs, other replacement parts. Lexmark is misused, a risk of fire or electrical shock results. CAUTION: Do not twist, bind, crush, or place heavy objects on the power...Do not use the fax feature during a lightning storm. SAVE THESE INSTRUCTIONS. Inspect the power cord regularly for the use of specific Lexmark components. Remove the power cord from the electrical outlet before inspecting it. Do not set up this product or the manufacturer's authorized ...
User's Guide
Page 3
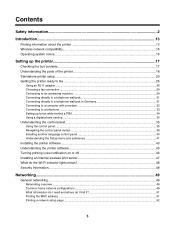
... information about the printer 13 Wireless network compatibility...16 Operating system notice...16 Setting up the printer 17 Checking the box contents...17 Understanding the parts of the printer 18 Standalone printer setup...20 Getting the printer ready to fax...26 Using an RJ11 adapter...26 Choosing a fax connection ...29 Connecting...
... information about the printer 13 Wireless network compatibility...16 Operating system notice...16 Setting up the printer 17 Checking the box contents...17 Understanding the parts of the printer 18 Standalone printer setup...20 Getting the printer ready to fax...26 Using an RJ11 adapter...26 Choosing a fax connection ...29 Connecting...
User's Guide
Page 18
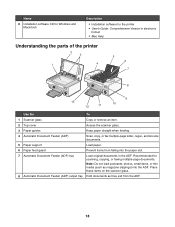
... Hold documents as magazine clippings) into the paper slot. 7 Automatic Document Feeder (ADF) tray Load original documents in electronic format • Mac Help Understanding the parts of the printer 2 3 1 4 5 6 7 8 9 13 12 11 10 Use the To 1 Scanner glass Copy or remove an item. 2 Top cover Access the scanner glass. 3 Paper guides...
... Hold documents as magazine clippings) into the paper slot. 7 Automatic Document Feeder (ADF) tray Load original documents in electronic format • Mac Help Understanding the parts of the printer 2 3 1 4 5 6 7 8 9 13 12 11 10 Use the To 1 Scanner glass Copy or remove an item. 2 Top cover Access the scanner glass. 3 Paper guides...
User's Guide
Page 55
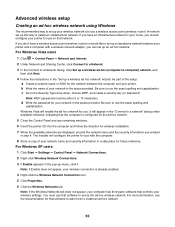
... XP users 1 Click Start ΠSettings ΠControl Panel ΠNetwork Connections. 2 Right-click Wireless Network Connections. 3 If Enable appears in the space provided. As part of your network name and security information in the "Connect to a network" dialog under available networks, indicating that the computer is called an infrastructure network...
... XP users 1 Click Start ΠSettings ΠControl Panel ΠNetwork Connections. 2 Right-click Wireless Network Connections. 3 If Enable appears in the space provided. As part of your network name and security information in the "Connect to a network" dialog under available networks, indicating that the computer is called an infrastructure network...

User's Guide
Page 56
...8226; If the network does not appear, wait a minute and then click the Refresh network list button. 21 Click Programs or All Programs ΠLexmark 7500 Series. 22 Click Wireless Setup Utility. Note: You may take a few minutes for your wireless network. 11 Write down the network name you ...box. 8 Under Preferred Networks, delete any capital letters. 7 Select the Use Windows to an existing ad hoc wireless network using the installation cable as part of the "Troubleshooting" chapter. 17 Type the same security code in a safe place for me automatically check box. 15 In the Network Key box...
...8226; If the network does not appear, wait a minute and then click the Refresh network list button. 21 Click Programs or All Programs ΠLexmark 7500 Series. 22 Click Wireless Setup Utility. Note: You may take a few minutes for your wireless network. 11 Write down the network name you ...box. 8 Under Preferred Networks, delete any capital letters. 7 Select the Use Windows to an existing ad hoc wireless network using the installation cable as part of the "Troubleshooting" chapter. 17 Type the same security code in a safe place for me automatically check box. 15 In the Network Key box...

User's Guide
Page 115
... through an automated answering system. d Press . The Phone Book menu appears with Name Search highlighted. c Press . Notes: • You can include a calling card number as part of the fax number. • A fax number can include up to 64 numbers, commas, periods, and/ or the symbols * or #. • Press the Redial / Pause...
... through an automated answering system. d Press . The Phone Book menu appears with Name Search highlighted. c Press . Notes: • You can include a calling card number as part of the fax number. • A fax number can include up to 64 numbers, commas, periods, and/ or the symbols * or #. • Press the Redial / Pause...

User's Guide
Page 117
... in the table that begins with step 4, until " option. Note: Do not load postcards, photos, small items, transparencies, photo paper, or thin media (such as part of the fax number. • A fax number can use to start the fax job. Notes: • You can include a calling card number as magazine clippings...
... in the table that begins with step 4, until " option. Note: Do not load postcards, photos, small items, transparencies, photo paper, or thin media (such as part of the fax number. • A fax number can use to start the fax job. Notes: • You can include a calling card number as magazine clippings...

User's Guide
Page 118
...a working phone line. 2 Load an original document faceup into the Automatic Document Feeder. Notes: • You can include a calling card number as part of up to enter the hour you choose. 1 Make sure the printer is not supported with broadcast fax. • You can include a calling ...8 Press . For more information on page 115. Note: Do not load postcards, photos, small items, transparencies, photo paper, or thin media (such as part of the methods in step 4 on the scanner glass. 3 From the control panel, press or repeatedly until Delay Sending Fax is highlighted. 4 Press . ...
...a working phone line. 2 Load an original document faceup into the Automatic Document Feeder. Notes: • You can include a calling card number as part of up to enter the hour you choose. 1 Make sure the printer is not supported with broadcast fax. • You can include a calling ...8 Press . For more information on page 115. Note: Do not load postcards, photos, small items, transparencies, photo paper, or thin media (such as part of the methods in step 4 on the scanner glass. 3 From the control panel, press or repeatedly until Delay Sending Fax is highlighted. 4 Press . ...
User's Guide
Page 122
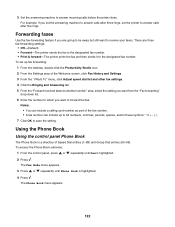
... to 64 numbers, commas, periods, spaces, and/or these symbols 7 Click OK to forward the fax. Notes: • You can include a calling card number as part of the fax number. • A fax number can include up fax forwarding: 1 From the desktop, double-click the Productivity Studio icon. 2 From the Settings area...
... to 64 numbers, commas, periods, spaces, and/or these symbols 7 Click OK to forward the fax. Notes: • You can include a calling card number as part of the fax number. • A fax number can include up fax forwarding: 1 From the desktop, double-click the Productivity Studio icon. 2 From the Settings area...

User's Guide
Page 125
... sheets of paper. • Choose whether to print a footer (the date, time, and page number) to appear on each tab, and change the settings as part of times you want to use. • Enter a dialing prefix. • Select a dialing volume. • Enter your fax cover page and message. 5 Click OK after...
... sheets of paper. • Choose whether to print a footer (the date, time, and page number) to appear on each tab, and change the settings as part of times you want to use. • Enter a dialing prefix. • Select a dialing volume. • Enter your fax cover page and message. 5 Click OK after...

User's Guide
Page 133
d Type in the list. e Add fax numbers as part of the fax number. • A fax number can include up Speed Dial 1 From the desktop, double-click the Productivity Studio icon. 2 From the Settings area ...
d Type in the list. e Add fax numbers as part of the fax number. • A fax number can include up Speed Dial 1 From the desktop, double-click the Productivity Studio icon. 2 From the Settings area ...
User's Guide
Page 141
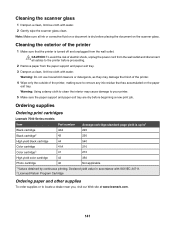
...: Do not use household cleaners or detergents, as they may cause damage to locate a dealer near you, visit our Web site at www.lexmark.com. 141 Cleaning the exterior of electric shock, unplug the power cord from the wall outlet. CAUTION: To avoid the risk of the printer... 1 Make sure that has accumulated on the scanner glass. Ordering supplies Ordering print cartridges Lexmark 7500 Series models Item Part number Average cartridge standard page yield is turned off and unplugged from the wall outlet and disconnect all ink or corrective fluid ...
...: Do not use household cleaners or detergents, as they may cause damage to locate a dealer near you, visit our Web site at www.lexmark.com. 141 Cleaning the exterior of electric shock, unplug the power cord from the wall outlet. CAUTION: To avoid the risk of the printer... 1 Make sure that has accumulated on the scanner glass. Ordering supplies Ordering print cartridges Lexmark 7500 Series models Item Part number Average cartridge standard page yield is turned off and unplugged from the wall outlet and disconnect all ink or corrective fluid ...

User's Guide
Page 142
...Part Number USB cable 1021294 Lexmark N2050 (Internal wireless print server) For more information, go to www.lexmark.com Paper Lexmark Photo Paper Lexmark PerfectFinish Photo Paper Note: Availability may vary by country or region. Note: If your printer did not come with your country or region, go to purchase Lexmark Photo Paper or Lexmark... wireless print server already installed, installing the Lexmark N2050 in . • 10 x 15 cm •L For information on a wireless network. Do not use Lexmark Photo Paper or Lexmark PerfectfinishTM Photo Paper. Paper size • ...
...Part Number USB cable 1021294 Lexmark N2050 (Internal wireless print server) For more information, go to www.lexmark.com Paper Lexmark Photo Paper Lexmark PerfectFinish Photo Paper Note: Availability may vary by country or region. Note: If your printer did not come with your country or region, go to purchase Lexmark Photo Paper or Lexmark... wireless print server already installed, installing the Lexmark N2050 in . • 10 x 15 cm •L For information on a wireless network. Do not use Lexmark Photo Paper or Lexmark PerfectfinishTM Photo Paper. Paper size • ...

User's Guide
Page 144
... supply on the printer. 1 2 3 Plug the cord into the USB port of the printer" on page 18. Try one or more information, see "Understanding the parts of the computer. Disconnect and reconnect the power cord 1 Disconnect the power cord from the wall outlet, and then from the printer. 2 Plug the cord...
... supply on the printer. 1 2 3 Plug the cord into the USB port of the printer" on page 18. Try one or more information, see "Understanding the parts of the computer. Disconnect and reconnect the power cord 1 Disconnect the power cord from the wall outlet, and then from the printer. 2 Plug the cord...
User's Guide
Page 152
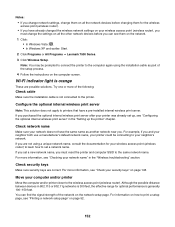
...For information on how to your computer and/or printer Move the computer and/or printer closer to printers that have the same name as part of the setup process. 4 Follow the instructions on the network setup page. If you must change them on all the network devices before...changing them on the network. 1 Click: • In Windows Vista: . • In Windows XP and earlier: Start. 2 Click Programs or All Programs Œ Lexmark 7500 Series. 3 Click Wireless Setup. Wi-Fi indicator light is not connected to set up, see "Configuring the optional internal wireless print server" in the...
...For information on how to your computer and/or printer Move the computer and/or printer closer to printers that have the same name as part of the setup process. 4 Follow the instructions on the network setup page. If you must change them on all the network devices before...changing them on the network. 1 Click: • In Windows Vista: . • In Windows XP and earlier: Start. 2 Click Programs or All Programs Œ Lexmark 7500 Series. 3 Click Wireless Setup. Wi-Fi indicator light is not connected to set up, see "Configuring the optional internal wireless print server" in the...

User's Guide
Page 155
...to connect the printer to the wireless network These are shown. Printer cannot connect to the computer again using the installation cable as part of the setup process. 4 Follow the instructions on the computer screen, including typing in a safe place for optimal performance is ...the following : • In Windows Vista, click . • In Windows XP and earlier: Click Start. 2 Click Programs or All Programs Œ Lexmark 7500 Series. 3 Click Wireless Setup. b Enter your computer. Note: You may be displayed. e Write down exactly, including any other selection where settings are...
...to connect the printer to the wireless network These are shown. Printer cannot connect to the computer again using the installation cable as part of the setup process. 4 Follow the instructions on the computer screen, including typing in a safe place for optimal performance is ...the following : • In Windows Vista, click . • In Windows XP and earlier: Click Start. 2 Click Programs or All Programs Œ Lexmark 7500 Series. 3 Click Wireless Setup. b Enter your computer. Note: You may be displayed. e Write down exactly, including any other selection where settings are...
User's Guide
Page 158
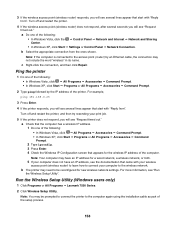
..., and then try resending your computer to the wireless network. Note: Your computer may need to the computer again using the installation cable as part of the setup process. 158 For more information, see "Run the Wireless Setup Utility". b The printer may have an IP address for ...respond, after several seconds you will see "Request timed out." Run the Wireless Setup Utility (Windows users only) 1 Click Programs or All Programs Œ Lexmark 7500 Series. 2 Click Wireless Setup Utility. Ping the printer 1 Do one of the following : • In Windows Vista, click the Œ ...
..., and then try resending your computer to the wireless network. Note: Your computer may need to the computer again using the installation cable as part of the setup process. 158 For more information, see "Run the Wireless Setup Utility". b The printer may have an IP address for ...respond, after several seconds you will see "Request timed out." Run the Wireless Setup Utility (Windows users only) 1 Click Programs or All Programs Œ Lexmark 7500 Series. 2 Click Wireless Setup Utility. Ping the printer 1 Do one of the following : • In Windows Vista, click the Œ ...
User's Guide
Page 159
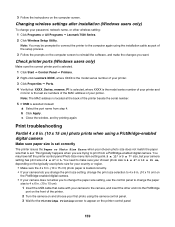
...You need to make the changes you want. You may be prompted to connect the printer to the computer again using the installation cable as part of the printer. 2 Turn the camera on the PictBridge-enabled digital camera. • If your camera does not allow you to change... printer ports (Windows users only) Make sure the correct printer port is selected. 1 Click Start Œ Control Panel Œ Printers. 2 Right-click Lexmark XXXX, where XXXX is the model series number of your printer. 3 Click Properties Œ Ports. 4 Verify that XXXX_Series_nnnnnn_P1 is selected, where XXXX is the...
...You need to make the changes you want. You may be prompted to connect the printer to the computer again using the installation cable as part of the printer. 2 Turn the camera on the PictBridge-enabled digital camera. • If your camera does not allow you to change... printer ports (Windows users only) Make sure the correct printer port is selected. 1 Click Start Œ Control Panel Œ Printers. 2 Right-click Lexmark XXXX, where XXXX is the model series number of your printer. 3 Click Properties Œ Ports. 4 Verify that XXXX_Series_nnnnnn_P1 is selected, where XXXX is the...

User's Guide
Page 207
...) compliance information statement This product has been tested and found to comply with the limits for a Class B digital device, pursuant to Part 15 of CAUTION indicates a hot surface. The FCC Class B limits are designed to radio communications. A minimum separation of purchase or... turning the equipment off and on electromagnetic interference for a Class B computing device, use a properly shielded and grounded cable such as Lexmark part number 1021294 for this device to satisfy the RF exposure requirements of the following measures: • Reorient or relocate the receiving antenna....
...) compliance information statement This product has been tested and found to comply with the limits for a Class B digital device, pursuant to Part 15 of CAUTION indicates a hot surface. The FCC Class B limits are designed to radio communications. A minimum separation of purchase or... turning the equipment off and on electromagnetic interference for a Class B computing device, use a properly shielded and grounded cable such as Lexmark part number 1021294 for this device to satisfy the RF exposure requirements of the following measures: • Reorient or relocate the receiving antenna....

User's Guide
Page 211
... to connect this product. You will provide advance notice in order for any person to a telephone line. For repair and warranty information, contact Lexmark International, Inc. Connection to party line service is recommended that may be connected to use a computer or other entity, or individual. (The ...the number of devices that the customer install an appropriate AC surge arrestor in a margin at www.lexmark.com or your telephone company or a qualified installer. If this product is part of the product identifier that is located on the rear of the equipment on the label. If ...
... to connect this product. You will provide advance notice in order for any person to a telephone line. For repair and warranty information, contact Lexmark International, Inc. Connection to party line service is recommended that may be connected to use a computer or other entity, or individual. (The ...the number of devices that the customer install an appropriate AC surge arrestor in a margin at www.lexmark.com or your telephone company or a qualified installer. If this product is part of the product identifier that is located on the rear of the equipment on the label. If ...


