
User's Guide
Page 5
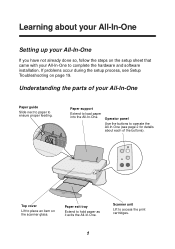
... next to paper to ensure proper feeding. Scanner unit Lift to load paper into the All-In-One. Paper support Extend to access the print cartridges. 1 If problems occur during the setup process, see page 2 for details about your All-In-One Setting up your All-In-One If you have...
... next to paper to ensure proper feeding. Scanner unit Lift to load paper into the All-In-One. Paper support Extend to access the print cartridges. 1 If problems occur during the setup process, see page 2 for details about your All-In-One Setting up your All-In-One If you have...

User's Guide
Page 7
... Your All-In-One software consists of three main components: • Print Properties (printing) • The Lexmark X74-X75 All-In-One Center (scanning, copying, and faxing) • The Lexmark X74-X75 Solution Center (troubleshooting, maintenance, and cartridge ordering information) While each component has a distinct function, they all work together to optimize the performance of...
... Your All-In-One software consists of three main components: • Print Properties (printing) • The Lexmark X74-X75 All-In-One Center (scanning, copying, and faxing) • The Lexmark X74-X75 Solution Center (troubleshooting, maintenance, and cartridge ordering information) While each component has a distinct function, they all work together to optimize the performance of...
User's Guide
Page 13
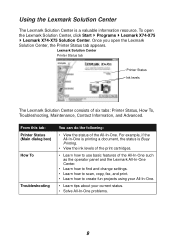
... levels of the print cartridges. • Learn how to use basic features of six tabs: Printer Status, How To, Troubleshooting, Maintenance, Contact Information, and Advanced. To open the Lexmark Solution Center, the Printer Status tab appears. Once you open the Lexmark Solution Center, click Start Programs Lexmark X74-X75 Lexmark X74-X75 Solution Center. Lexmark Solution Center Printer...
... levels of the print cartridges. • Learn how to use basic features of six tabs: Printer Status, How To, Troubleshooting, Maintenance, Contact Information, and Advanced. To open the Lexmark Solution Center, the Printer Status tab appears. Once you open the Lexmark Solution Center, click Start Programs Lexmark X74-X75 Lexmark X74-X75 Solution Center. Lexmark Solution Center Printer...
User's Guide
Page 14
... You can do the following: • Install a new print cartridge. • View shopping options for new cartridges. • Print a test page. • Clean print nozzles to fix horizontal streaks. • Align the print cartridges to fix blurry edges. • Troubleshoot ink problems. •... Remove residue from Japanese postcards (Hagaki). • Learn how to contact Lexmark by phone. • Change the appearance of the Printing Status window ...
... You can do the following: • Install a new print cartridge. • View shopping options for new cartridges. • Print a test page. • Clean print nozzles to fix horizontal streaks. • Align the print cartridges to fix blurry edges. • Troubleshoot ink problems. •... Remove residue from Japanese postcards (Hagaki). • Learn how to contact Lexmark by phone. • Change the appearance of the Printing Status window ...
User's Guide
Page 22
... your USB cable securely attached to your computer and your All-In-One. Is the black print cartridge secure in the right carrier and the color cartridge secure in the Lexmark Solution Center. Did you try to solve the problem, check the following: Is the power supply firmly... correctly? Refer to the back of both your computer and your setup documentation for more information. 18 Are both print cartridges (refer to access the Lexmark Solution Center. Troubleshooting checklist Before you install the printer software correctly? Did you remove the sticker and transparent tape from ...
... your USB cable securely attached to your computer and your All-In-One. Is the black print cartridge secure in the right carrier and the color cartridge secure in the Lexmark Solution Center. Did you try to solve the problem, check the following: Is the power supply firmly... correctly? Refer to the back of both your computer and your setup documentation for more information. 18 Are both print cartridges (refer to access the Lexmark Solution Center. Troubleshooting checklist Before you install the printer software correctly? Did you remove the sticker and transparent tape from ...

User's Guide
Page 23
... problems you completely removed the sticker and transparent tape from the back and bottom of both print cartridges. Make sure the black print cartridge is secure in the right carrier and the color cartridge is secure in the left carrier. When I inserted the All-In-One software CD, nothing...happened From the Desktop, double-click the My Computer icon, and then double-click your setup documentation for information about installing print cartridges. Alignment page did not print Make sure you may experience during setup. Press the Power button on Check the power supply connections.
... problems you completely removed the sticker and transparent tape from the back and bottom of both print cartridges. Make sure the black print cartridge is secure in the right carrier and the color cartridge is secure in the left carrier. When I inserted the All-In-One software CD, nothing...happened From the Desktop, double-click the My Computer icon, and then double-click your setup documentation for information about installing print cartridges. Alignment page did not print Make sure you may experience during setup. Press the Power button on Check the power supply connections.
User's Guide
Page 26
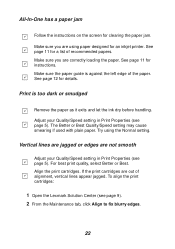
...11 for a list of the paper. For best print quality, select Better or Best. See page 12 for clearing the paper jam. Align the print cartridges. Adjust your Quality/Speed setting in Print Properties (see page 9). 2 From the Maintenance tab, click Align to fix blurry edges. 22 Print is ...used with plain paper. Make sure you are not smooth Adjust your Quality/Speed setting in Print Properties (see page 5). To align the print cartridges: 1 Open the Lexmark Solution Center (see page 5). All-In-One has a paper jam Follow the instructions on the screen for details.
...11 for a list of the paper. For best print quality, select Better or Best. See page 12 for clearing the paper jam. Align the print cartridges. Adjust your Quality/Speed setting in Print Properties (see page 9). 2 From the Maintenance tab, click Align to fix blurry edges. 22 Print is ...used with plain paper. Make sure you are not smooth Adjust your Quality/Speed setting in Print Properties (see page 5). To align the print cartridges: 1 Open the Lexmark Solution Center (see page 5). All-In-One has a paper jam Follow the instructions on the screen for details.
User's Guide
Page 27
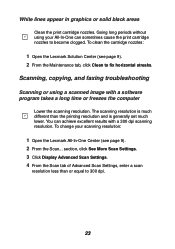
...much different than or equal to 300 dpi. 23 Scanning, copying, and faxing troubleshooting Scanning or using your scanning resolution: 1 Open the Lexmark All-In-One Center (see page 9). 2 From the Maintenance tab, click Clean to become clogged. To change your All-In-One can... computer Lower the scanning resolution. The scanning resolution is much lower. You can sometimes cause the print cartridge nozzles to fix horizontal streaks. To clean the cartridge nozzles: 1 Open the Lexmark Solution Center (see page 9). 2 From the Scan... White lines appear in graphics or solid black ...
...much different than or equal to 300 dpi. 23 Scanning, copying, and faxing troubleshooting Scanning or using your scanning resolution: 1 Open the Lexmark All-In-One Center (see page 9). 2 From the Maintenance tab, click Clean to become clogged. To change your All-In-One can... computer Lower the scanning resolution. The scanning resolution is much lower. You can sometimes cause the print cartridge nozzles to fix horizontal streaks. To clean the cartridge nozzles: 1 Open the Lexmark Solution Center (see page 9). 2 From the Scan... White lines appear in graphics or solid black ...

User's Guide
Page 32
...cartridges viewing ink levels of 9 ink levels viewing 9 iron-on , see Lexmark All-In-One Center All-In-One status 9 appendix 26 B banner paper 11 black and white, printing in 5 Black Copy button 2, 16 bond paper 11 both sides, printing on transfers 11 L labels 11 Lexmark All-In-One Center 6 opening 6 using 6 Lexmark... setup 1 How To tab 9 I I want to... Index A Advanced tab 10 All-In-One Center, see duplexing C card stock paper 11 cartridges viewing ink levels of your All-In-One 1 photo paper 11 photographs modifying 7, 8 scanning 14 poor quality printing 22 poster 7, 8 Power button ...
...cartridges viewing ink levels of 9 ink levels viewing 9 iron-on , see Lexmark All-In-One Center All-In-One status 9 appendix 26 B banner paper 11 black and white, printing in 5 Black Copy button 2, 16 bond paper 11 both sides, printing on transfers 11 L labels 11 Lexmark All-In-One Center 6 opening 6 using 6 Lexmark... setup 1 How To tab 9 I I want to... Index A Advanced tab 10 All-In-One Center, see duplexing C card stock paper 11 cartridges viewing ink levels of your All-In-One 1 photo paper 11 photographs modifying 7, 8 scanning 14 poor quality printing 22 poster 7, 8 Power button ...
User's Guide
Page 33
Preview Area Preview Now button 14 Print/Copy preview 7 Scan preview 7 Preview Now button 14 print cartridges viewing ink levels of 10 Q Quality/Copies tab 5 R reduce an image 7, 8 reinstalling software 25 S safety information ii Save Settings menu 5 saved images viewing 8 Scan & Copy ...
Preview Area Preview Now button 14 Print/Copy preview 7 Scan preview 7 Preview Now button 14 print cartridges viewing ink levels of 10 Q Quality/Copies tab 5 R reduce an image 7, 8 reinstalling software 25 S safety information ii Save Settings menu 5 saved images viewing 8 Scan & Copy ...

Setup Sheet
Page 2
Important! Insert the print cartridges. 1 2 3 4 Close the scanner unit. Follow the instructions on all Add New Hardware screens. All rights reserved. Click Cancel on your computer screen. Connect the USB cable. 1 2 P/N 14J0070 EC 4J0006 © Copyright 2002 Lexmark International, Inc. Insert the CD. Remove the tape.
Important! Insert the print cartridges. 1 2 3 4 Close the scanner unit. Follow the instructions on all Add New Hardware screens. All rights reserved. Click Cancel on your computer screen. Connect the USB cable. 1 2 P/N 14J0070 EC 4J0006 © Copyright 2002 Lexmark International, Inc. Insert the CD. Remove the tape.


