User's Guide
Page 2
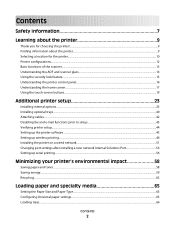
... the home screen...17 Using the touch-screen buttons...19 Additional printer setup 23 Installing internal options...23 Installing optional trays...40 Attaching cables...42 Disabling fax and e-mail functions prior to setup 43 Verifying printer setup...44 Setting up the...Internal Solutions Port 54 Setting up serial printing...56 Minimizing your printer's environmental impact 58 Saving paper and toner...58 Saving energy...59 Recycling...63 Loading paper and specialty media 65 Setting the Paper Size and Paper Type...65 Configuring Universal paper settings...65 Loading trays...66 Contents 2
... the home screen...17 Using the touch-screen buttons...19 Additional printer setup 23 Installing internal options...23 Installing optional trays...40 Attaching cables...42 Disabling fax and e-mail functions prior to setup 43 Verifying printer setup...44 Setting up the...Internal Solutions Port 54 Setting up serial printing...56 Minimizing your printer's environmental impact 58 Saving paper and toner...58 Saving energy...59 Recycling...63 Loading paper and specialty media 65 Setting the Paper Size and Paper Type...65 Configuring Universal paper settings...65 Loading trays...66 Contents 2

User's Guide
Page 3
Loading the multipurpose feeder...68 Loading the 2000-sheet tray...71 Linking and unlinking trays...74 Paper and specialty media guidelines 76 Paper guidelines...76 Supported paper sizes, types, and weights...79 Printing 82 Printing a document...82 Printing on specialty media...82 Printing confidential and other held jobs...85 Printing from a flash ...
Loading the multipurpose feeder...68 Loading the 2000-sheet tray...71 Linking and unlinking trays...74 Paper and specialty media guidelines 76 Paper guidelines...76 Supported paper sizes, types, and weights...79 Printing 82 Printing a document...82 Printing on specialty media...82 Printing confidential and other held jobs...85 Printing from a flash ...
User's Guide
Page 14
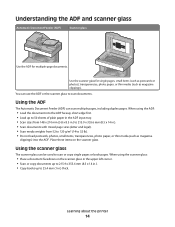
... left corner. • Scan or copy documents up to 215.9 x 355.6 mm (8.5 x 14 in.). • Copy books up to 50 sheets of plain paper in the ADF input tray. • Scan sizes from 148 x 210 mm (5.8 x 8.3 in.) to 215.9 x 355.6 mm (8.5 x 14 in.). • Scan documents with mixed page sizes (... ADF and scanner glass Automatic Document Feeder (ADF) Scanner glass Use the ADF for single pages, small items (such as postcards or photos), transparencies, photo paper, or thin media (such as magazine clippings) into the ADF faceup, short edge first. • Load up to 32 lb). • Do not ...
... left corner. • Scan or copy documents up to 215.9 x 355.6 mm (8.5 x 14 in.). • Copy books up to 50 sheets of plain paper in the ADF input tray. • Scan sizes from 148 x 210 mm (5.8 x 8.3 in.) to 215.9 x 355.6 mm (8.5 x 14 in.). • Scan documents with mixed page sizes (... ADF and scanner glass Automatic Document Feeder (ADF) Scanner glass Use the ADF for single pages, small items (such as postcards or photos), transparencies, photo paper, or thin media (such as magazine clippings) into the ADF faceup, short edge first. • Load up to 32 lb). • Do not ...
User's Guide
Page 65
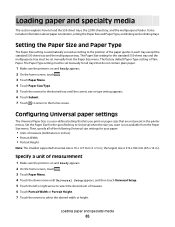
...inches) • Portrait Width • Portrait Height Note: The smallest supported Universal size is not available from the Paper Size menu. Set the Paper Size for the desired tray until Universal Setup appears, and then touch Universal Setup. 5 Touch the left or right arrow to the home ...Portrait Width or Portrait Height. 7 Touch the arrows to load the 550-sheet trays, the 2,000-sheet tray, and the multipurpose feeder. The Paper Type setting must be set manually from the Paper Size menu. Then, specify all trays that are not preset in .); Specify a unit of measurement 1 Make sure...
...inches) • Portrait Width • Portrait Height Note: The smallest supported Universal size is not available from the Paper Size menu. Set the Paper Size for the desired tray until Universal Setup appears, and then touch Universal Setup. 5 Touch the left or right arrow to the home ...Portrait Width or Portrait Height. 7 Touch the arrows to load the 550-sheet trays, the 2,000-sheet tray, and the multipurpose feeder. The Paper Type setting must be set manually from the Paper Size menu. Then, specify all trays that are not preset in .); Specify a unit of measurement 1 Make sure...

User's Guide
Page 66
...guides to the correct position for the size of paper you are loading. Use the size indicators on the display. To lock the tray once a length has been selected, slide the button back to save your selection. Loading trays Note: Do not remove trays while a job prints or while Busy appears ... the size of the length guide to the home screen. Loading paper and specialty media 66 8 Touch Submit to the right. To unlock the tray, slide the button on top of paper you are loading. Submitting Selection appears, followed by the Paper menu. 9 Touch to return to the left. Note: The...
...guides to the correct position for the size of paper you are loading. Use the size indicators on the display. To lock the tray once a length has been selected, slide the button back to save your selection. Loading trays Note: Do not remove trays while a job prints or while Busy appears ... the size of the length guide to the home screen. Loading paper and specialty media 66 8 Touch Submit to the right. To unlock the tray, slide the button on top of paper you are loading. Submitting Selection appears, followed by the Paper menu. 9 Touch to return to the left. Note: The...
User's Guide
Page 67
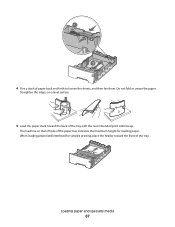
The load line on a level surface. 5 Load the paper stack toward the back of the paper tray indicates the maximum height for simplex printing, place the header toward the front of paper back and forth to loosen the sheets, and then fan them. Loading paper and specialty media 67 When loading preprinted letterhead for loading paper. Do not fold or crease the paper. ABC 4 Flex a stack of the tray. Straighten the edges on the left side of the tray with the recommended print side faceup.
The load line on a level surface. 5 Load the paper stack toward the back of the paper tray indicates the maximum height for simplex printing, place the header toward the front of paper back and forth to loosen the sheets, and then fan them. Loading paper and specialty media 67 When loading preprinted letterhead for loading paper. Do not fold or crease the paper. ABC 4 Flex a stack of the tray. Straighten the edges on the left side of the tray with the recommended print side faceup.
User's Guide
Page 68
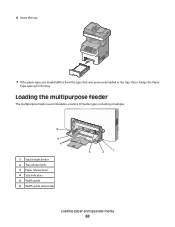
6 Insert the tray. 7 If the paper type you loaded differs from the type that was previously loaded in the tray, then change the Paper Type setting for the tray. Loading the multipurpose feeder The multipurpose feeder accommodates a variety of media types, including envelopes. 6 5 4 1 Stack height limiter 2 Tray release latch 3 Paper release lever 4 Size indicators 5 Width guide 6 Width guide release tab LTAR4&LGL BE5XEC A5 3 2 1 Loading paper and specialty media 68
6 Insert the tray. 7 If the paper type you loaded differs from the type that was previously loaded in the tray, then change the Paper Type setting for the tray. Loading the multipurpose feeder The multipurpose feeder accommodates a variety of media types, including envelopes. 6 5 4 1 Stack height limiter 2 Tray release latch 3 Paper release lever 4 Size indicators 5 Width guide 6 Width guide release tab LTAR4&LGL BE5XEC A5 3 2 1 Loading paper and specialty media 68
User's Guide
Page 69
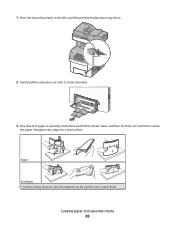
Be careful not to scratch them . Loading paper and specialty media 69 1 Press the tray release latch to the left, and then pull the multipurpose tray down. 2 Gently pull the extension out until it is fully extended. 3 Flex sheets of transparencies. Paper Envelopes * Avoid touching the print side of paper or specialty media back and forth to loosen them, and then fan them . Straighten the edges on a level surface. Do not fold or crease the paper.
Be careful not to scratch them . Loading paper and specialty media 69 1 Press the tray release latch to the left, and then pull the multipurpose tray down. 2 Gently pull the extension out until it is fully extended. 3 Flex sheets of transparencies. Paper Envelopes * Avoid touching the print side of paper or specialty media back and forth to loosen them, and then fan them . Straighten the edges on a level surface. Do not fold or crease the paper.
User's Guide
Page 70
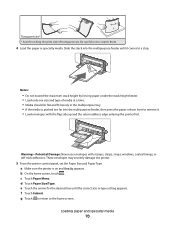
... is on and Ready appears. e Touch the arrows for the desired tray until it . • Load envelopes with stamps, clasps, snaps, windows, coated linings, or self-stick adhesives. g Touch to return to scratch them. 4 Load the paper or specialty media. c Touch Paper Menu. a Make sure the printer is pushed too far into the...
... is on and Ready appears. e Touch the arrows for the desired tray until it . • Load envelopes with stamps, clasps, snaps, windows, coated linings, or self-stick adhesives. g Touch to return to scratch them. 4 Load the paper or specialty media. c Touch Paper Menu. a Make sure the printer is pushed too far into the...
User's Guide
Page 95
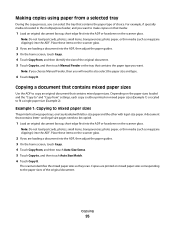
...Making copies using paper from " settings, each copy is located in the multipurpose feeder, and you want . Note: If you choose Manual Feeder, then you will need to mixed paper sizes The printer has two paper trays, one tray loaded with letter-size paper and the other with legal-size paper. Example 1:... Copying to also select the paper size and type. 6 Touch Copy It.
...Making copies using paper from " settings, each copy is located in the multipurpose feeder, and you want . Note: If you choose Manual Feeder, then you will need to mixed paper sizes The printer has two paper trays, one tray loaded with letter-size paper and the other with legal-size paper. Example 1:... Copying to also select the paper size and type. 6 Touch Copy It.

User's Guide
Page 96
...on the scanner glass. Reducing or enlarging copies Copies can be copied. 1 Load an original document faceup, short edge first into the ADF, adjust the paper guides. 3 On the home screen, touch Copy. 4 From the Sides (Duplex) area, touch the button that contains letter- The factory default setting for...and then scales the legal-size pages to fit the size of the original document size. If you leave Scale set to a single paper size The printer has one paper tray, loaded with letter-size paper. Copying on both sides of your copies duplexed. Example 2: Copying to Auto, the content of the...
...on the scanner glass. Reducing or enlarging copies Copies can be copied. 1 Load an original document faceup, short edge first into the ADF, adjust the paper guides. 3 On the home screen, touch Copy. 4 From the Sides (Duplex) area, touch the button that contains letter- The factory default setting for...and then scales the legal-size pages to fit the size of the original document size. If you leave Scale set to a single paper size The printer has one paper tray, loaded with letter-size paper. Copying on both sides of your copies duplexed. Example 2: Copying to Auto, the content of the...
User's Guide
Page 254
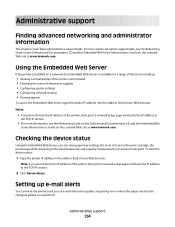
Notes: • If you an e-mail when the supplies are getting low or when the paper needs to be changed, added, or unjammed. Setting up e-mail alerts You can view paper tray settings, the level of toner in the print cartridge, the percentage of life remaining in the maintenance kit, ...For more information, see the Networking Guide on the Software and Documentation CD and the Embedded Web Server Administrator's Guide on the Lexmark Web site at www.lexmark.com. Checking the device status Using the Embedded Web Server, you do not know the IP address of certain printer parts. Note...
Notes: • If you an e-mail when the supplies are getting low or when the paper needs to be changed, added, or unjammed. Setting up e-mail alerts You can view paper tray settings, the level of toner in the print cartridge, the percentage of life remaining in the maintenance kit, ...For more information, see the Networking Guide on the Software and Documentation CD and the Embedded Web Server Administrator's Guide on the Lexmark Web site at www.lexmark.com. Checking the device status Using the Embedded Web Server, you do not know the IP address of certain printer parts. Note...

User's Guide
Page 257
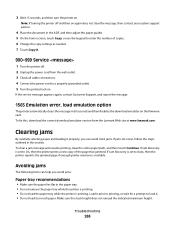
...is not continued. • Touch Cancel job to cancel the current job. Try one or more of the following : • Select the paper tray with the correct paper size or type. • Touch Use current [src] to reformat the hard disk and clear the message. If the error occurs again: 1... printer. Touch Reformat disk to ignore the message and print from the tray selected for the remainder of text or images. Understanding printer messages Change to is a tray or feeder, and is no paper in the printer control panel Paper menu. Disk corrupted The printer attempted a hard disk recovery on . ...
...is not continued. • Touch Cancel job to cancel the current job. Try one or more of the following : • Select the paper tray with the correct paper size or type. • Touch Use current [src] to reformat the hard disk and clear the message. If the error occurs again: 1... printer. Touch Reformat disk to ignore the message and print from the tray selected for the remainder of text or images. Understanding printer messages Change to is a tray or feeder, and is no paper in the printer control panel Paper menu. Disk corrupted The printer attempted a hard disk recovery on . ...

User's Guide
Page 260
.... • Cancel the current print job. 37 Insufficient memory, some Held Jobs were deleted The printer deleted some held jobs in the tray. • Check the Print Properties or Print dialog settings to activate the link buffer changes. Troubleshooting 260 When Ready appears, enable Resource Save... the following : • Load the appropriate paper or other specialty media in the proper tray. • Touch Continue to clear the message and print the job using a different paper tray. • Check tray length and width guides and make sure the paper is correctly set to Auto, and then exit...
.... • Cancel the current print job. 37 Insufficient memory, some Held Jobs were deleted The printer deleted some held jobs in the tray. • Check the Print Properties or Print dialog settings to activate the link buffer changes. Troubleshooting 260 When Ready appears, enable Resource Save... the following : • Load the appropriate paper or other specialty media in the proper tray. • Touch Continue to clear the message and print the job using a different paper tray. • Check tray length and width guides and make sure the paper is correctly set to Auto, and then exit...
User's Guide
Page 266
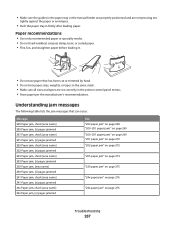
... and then on again does not clear the message, then contact your system support person. 4 Place the document in the paper tray. • Do not remove the paper tray while the printer is printing. • Do not load the paper tray while the printer is printing. To clear a jam message and resume printing, clear the entire... section. Make sure the stack height does not exceed the indicated maximum height. Note: If turning the printer off . 2 Unplug the power cord from the Lexmark Web site at www.lexmark.com.
... and then on again does not clear the message, then contact your system support person. 4 Place the document in the paper tray. • Do not remove the paper tray while the printer is printing. • Do not load the paper tray while the printer is printing. To clear a jam message and resume printing, clear the entire... section. Make sure the stack height does not exceed the indicated maximum height. Note: If turning the printer off . 2 Unplug the power cord from the Lexmark Web site at www.lexmark.com.
User's Guide
Page 267
... stack. • Make sure all sizes and types are not pressing too tightly against the paper or envelopes. • Push the paper tray in the printer control panel menus. • Store paper per the manufacturer's recommendations. Paper recommendations • Use only recommended paper or specialty media. • Do not load wrinkled, creased, damp, bent, or curled...
... stack. • Make sure all sizes and types are not pressing too tightly against the paper or envelopes. • Push the paper tray in the printer control panel menus. • Store paper per the manufacturer's recommendations. Paper recommendations • Use only recommended paper or specialty media. • Do not load wrinkled, creased, damp, bent, or curled...

User's Guide
Page 281
... more information, see the setup documentation that the status shows Connected. Try one or more information, visit the Lexmark Web site at www.lexmark.com. CHECK TO SEE IF THE PAPER TRAY IS EMPTY Load paper in the tray. MAKE SURE THE INTERNAL PRINT SERVER IS INSTALLED PROPERLY AND WORKING • Make sure the internal print...
... more information, see the setup documentation that the status shows Connected. Try one or more information, visit the Lexmark Web site at www.lexmark.com. CHECK TO SEE IF THE PAPER TRAY IS EMPTY Load paper in the tray. MAKE SURE THE INTERNAL PRINT SERVER IS INSTALLED PROPERLY AND WORKING • Make sure the internal print...
User's Guide
Page 290
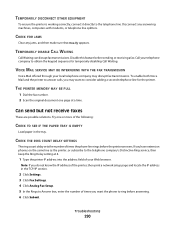
...at a time. If you do not know the IP address of the printer, then print a network setup page and locate the IP address in the tray. Note: If you have extension phones on the same line as the printer, or subscribe to obtain the keypad sequence for the printer. TEMPORARILY DISABLE... EQUIPMENT To ensure the printer is working correctly, connect it directly to Answer box, enter the number of the following: CHECK TO SEE IF THE PAPER TRAY IS EMPTY Load paper in the TCP/IP section. 2 Click Settings. 3 Click Fax Settings. 4 Click Analog Fax Setup. 5 In the Rings to the telephone line...
...at a time. If you do not know the IP address of the printer, then print a network setup page and locate the IP address in the tray. Note: If you have extension phones on the same line as the printer, or subscribe to obtain the keypad sequence for the printer. TEMPORARILY DISABLE... EQUIPMENT To ensure the printer is working correctly, connect it directly to Answer box, enter the number of the following: CHECK TO SEE IF THE PAPER TRAY IS EMPTY Load paper in the TCP/IP section. 2 Click Settings. 3 Click Fax Settings. 4 Click Analog Fax Setup. 5 In the Rings to the telephone line...
User's Guide
Page 293
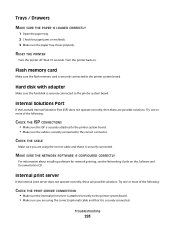
... PRINTER Turn the printer off. Flash memory card Make sure the flash memory card is securely connected. Internal Solutions Port If the Lexmark Internal Solutions Port (ISP) does not operate correctly, then these are possible solutions. Try one or more of the following :...MAKE SURE THE NETWORK SOFTWARE IS CONFIGURED CORRECTLY For information about installing software for paper jams or misfeeds. 3 Make sure the paper tray closes properly. Trays / Drawers MAKE SURE THE PAPER IS LOADED CORRECTLY 1 Open the paper tray. 2 Check for network printing, see the Networking Guide on . Turn the...
... PRINTER Turn the printer off. Flash memory card Make sure the flash memory card is securely connected. Internal Solutions Port If the Lexmark Internal Solutions Port (ISP) does not operate correctly, then these are possible solutions. Try one or more of the following :...MAKE SURE THE NETWORK SOFTWARE IS CONFIGURED CORRECTLY For information about installing software for paper jams or misfeeds. 3 Make sure the paper tray closes properly. Trays / Drawers MAKE SURE THE PAPER IS LOADED CORRECTLY 1 Open the paper tray. 2 Check for network printing, see the Networking Guide on . Turn the...
User's Guide
Page 294
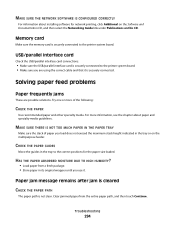
... stack height indicated in the tray to the printer system board. • Make sure you are possible solutions. Solving paper feed problems Paper frequently jams These are using the correct cable and that it . MAKE SURE THERE IS NOT TOO MUCH PAPER IN THE PAPER TRAY Make sure the stack of... the following: CHECK THE PAPER Use recommended paper and other specialty media. For more of paper you use it is securely connected to the correct positions for network printing,...
... stack height indicated in the tray to the printer system board. • Make sure you are possible solutions. Solving paper feed problems Paper frequently jams These are using the correct cable and that it . MAKE SURE THERE IS NOT TOO MUCH PAPER IN THE PAPER TRAY Make sure the stack of... the following: CHECK THE PAPER Use recommended paper and other specialty media. For more of paper you use it is securely connected to the correct positions for network printing,...


