User's Guide
Page 4
......66 Loading original documents on the scanner glass 70 Loading original documents into the Automatic Document Feeder 71 Using the automatic paper type sensor...73 Printing 74 Printing basic documents...74 Printing a document...74 Printing Web pages...74 Printing multiple copies of a document...75 Contents 4
......66 Loading original documents on the scanner glass 70 Loading original documents into the Automatic Document Feeder 71 Using the automatic paper type sensor...73 Printing 74 Printing basic documents...74 Printing a document...74 Printing Web pages...74 Printing multiple copies of a document...75 Contents 4
User's Guide
Page 5
... pages on one sheet (N-Up)...76 Printing documents from a memory card or flash drive 77 Printing specialty documents...78 Choosing compatible specialty paper types ...78 Printing envelopes ...79 Printing labels ...79 Printing on custom-size paper...80 Managing print jobs...81 Pausing print jobs...81 Resuming print jobs...82 Canceling print jobs...83 Working with photos 85 Connecting photo...
... pages on one sheet (N-Up)...76 Printing documents from a memory card or flash drive 77 Printing specialty documents...78 Choosing compatible specialty paper types ...78 Printing envelopes ...79 Printing labels ...79 Printing on custom-size paper...80 Managing print jobs...81 Pausing print jobs...81 Resuming print jobs...82 Canceling print jobs...83 Working with photos 85 Connecting photo...
User's Guide
Page 6
... settings...110 Maintaining the printer 111 Maintaining print cartridges...111 Installing print cartridges...111 Removing a used print cartridge ...112 Refilling print cartridges...113 Using genuine Lexmark print cartridges...113 Aligning print cartridges ...114 Cleaning the print cartridge nozzles...114 Checking ink levels...115 Wiping the print cartridge nozzles and contacts ...116 Preserving the print cartridges ...117 Cleaning the scanner glass...
... settings...110 Maintaining the printer 111 Maintaining print cartridges...111 Installing print cartridges...111 Removing a used print cartridge ...112 Refilling print cartridges...113 Using genuine Lexmark print cartridges...113 Aligning print cartridges ...114 Cleaning the print cartridge nozzles...114 Checking ink levels...115 Wiping the print cartridge nozzles and contacts ...116 Preserving the print cartridges ...117 Cleaning the scanner glass...
User's Guide
Page 7
...121 Incorrect language appears on the display...121 Power button is not lit ...122 Software did not install...122 Page does not print...123 Solving printer power problems ...126 Removing and reinstalling the software ...126 Enabling the USB port in Windows ...127 Wireless troubleshooting......128 Wireless troubleshooting checklist ...128 Printing a network setup page ...129 Wireless configuration does not continue after the USB cable is attached 129 Why isn't my printer in ...
...121 Incorrect language appears on the display...121 Power button is not lit ...122 Software did not install...122 Page does not print...123 Solving printer power problems ...126 Removing and reinstalling the software ...126 Enabling the USB port in Windows ...127 Wireless troubleshooting......128 Wireless troubleshooting checklist ...128 Printing a network setup page ...129 Wireless configuration does not continue after the USB cable is attached 129 Why isn't my printer in ...

User's Guide
Page 10
... Electronic User's Guide Complete instructions for using the printer. Introduction Finding information about the printer Publications See the For Quick Setup sheet Initial setup instructions. Printed Networking Guide / Fax Guide Additional setup instructions.
... Electronic User's Guide Complete instructions for using the printer. Introduction Finding information about the printer Publications See the For Quick Setup sheet Initial setup instructions. Printed Networking Guide / Fax Guide Additional setup instructions.
User's Guide
Page 11
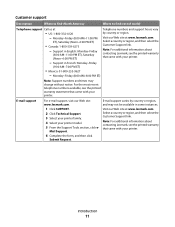
...country or region, and may change without notice. Note: For additional information about contacting Lexmark, see the printed warranty that came with your printer. E-mail support For e-mail support, visit our Web site: www.lexmark.com. 1 Click SUPPORT. 2 Click Technical Support. 3 Select your printer family....00 AM-7:00 PM ET) • Mexico: 01-800-253-9627 - Visit our Web site at www.lexmark.com. Note: For additional information about contacting Lexmark, see the printed warranty statement that came with your printer model. 5 From the Support Tools section, click e- Mail Support. ...
...country or region, and may change without notice. Note: For additional information about contacting Lexmark, see the printed warranty that came with your printer. E-mail support For e-mail support, visit our Web site: www.lexmark.com. 1 Click SUPPORT. 2 Click Technical Support. 3 Select your printer family....00 AM-7:00 PM ET) • Mexico: 01-800-253-9627 - Visit our Web site at www.lexmark.com. Note: For additional information about contacting Lexmark, see the printed warranty statement that came with your printer model. 5 From the Support Tools section, click e- Mail Support. ...
User's Guide
Page 12
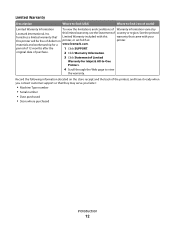
...printed furnishes a limited warranty that Limited Warranty included with this warranty that they may serve you faster: • Machine Type number • Serial number • Date purchased • Store where purchased Introduction 12 original date of purchase. 2 Click Warranty Information. 3 Click Statement of Limited Warranty for a www.lexmark... of defects in printer, or set forth at printer. this printer will be free of Warranty information varies by Lexmark International, Inc. period of country or region. Record the following information (located on the store receipt and the ...
...printed furnishes a limited warranty that Limited Warranty included with this warranty that they may serve you faster: • Machine Type number • Serial number • Date purchased • Store where purchased Introduction 12 original date of purchase. 2 Click Warranty Information. 3 Click Statement of Limited Warranty for a www.lexmark... of defects in printer, or set forth at printer. this printer will be free of Warranty information varies by Lexmark International, Inc. period of country or region. Record the following information (located on the store receipt and the ...
User's Guide
Page 13
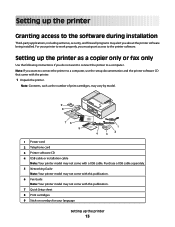
...-party applications, including antivirus, security, and firewall programs may not come with a USB cable. For your language Setting up the printer as the number of print cartridges, may vary by model. 9 8 1 2 3 76 5 1 4 2 3 1 Power cord 2 Telephone cord 3 Printer software CD 4 USB cable or installation cable Note: Your... 13 Purchase a USB cable separately. 5 Networking Guide Note: Your printer model may not come with this publication. 7 Quick Setup sheet 8 Print cartridges 9 Stick-on overlays for your printer to work properly, you about the printer software being installed.
...-party applications, including antivirus, security, and firewall programs may not come with a USB cable. For your language Setting up the printer as the number of print cartridges, may vary by model. 9 8 1 2 3 76 5 1 4 2 3 1 Power cord 2 Telephone cord 3 Printer software CD 4 USB cable or installation cable Note: Your... 13 Purchase a USB cable separately. 5 Networking Guide Note: Your printer model may not come with this publication. 7 Quick Setup sheet 8 Print cartridges 9 Stick-on overlays for your printer to work properly, you about the printer software being installed.
User's Guide
Page 17
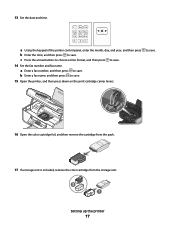
... the time, and then press to save. a Enter a fax number, and then press to save . 15 Open the printer, and then press down on the print cartridge carrier levers.
... the time, and then press to save. a Enter a fax number, and then press to save . 15 Open the printer, and then press down on the print cartridge carrier levers.
User's Guide
Page 18
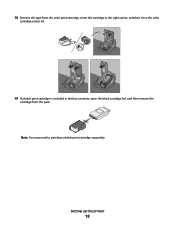
18 Remove the tape from the color print cartridge, insert the cartridge in the right carrier, and then close the color cartridge carrier lid. 19 If a black print cartridge is included in the box contents, open the black cartridge foil, and then remove the cartridge from the pack. Note: You may need to purchase a black print cartridge separately. Setting up the printer 18
18 Remove the tape from the color print cartridge, insert the cartridge in the right carrier, and then close the color cartridge carrier lid. 19 If a black print cartridge is included in the box contents, open the black cartridge foil, and then remove the cartridge from the pack. Note: You may need to purchase a black print cartridge separately. Setting up the printer 18
User's Guide
Page 19
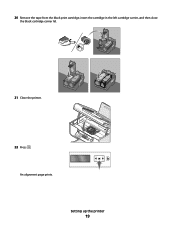
An alignment page prints. Setting up the printer 19 20 Remove the tape from the black print cartridge, insert the cartridge in the left cartridge carrier, and then close the black cartridge carrier lid. 21 Close the printer. 22 Press .
An alignment page prints. Setting up the printer 19 20 Remove the tape from the black print cartridge, insert the cartridge in the left cartridge carrier, and then close the black cartridge carrier lid. 21 Close the printer. 22 Press .
User's Guide
Page 20
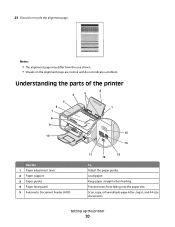
...-page letter-, legal-, and A4-size documents. Keep paper straight when feeding. Setting up the printer 20 Understanding the parts of the printer 2 4 3 5 6 1 7 8 9 10 W I F I PRINTING WI F I PRINTING 15 14 Use the 1 Paper adjustment lever 2 Paper support 3 Paper guides 4 Paper feed guard 5 Automatic Document Feeder (ADF) 11 13 12 To Adjust the paper...
...-page letter-, legal-, and A4-size documents. Keep paper straight when feeding. Setting up the printer 20 Understanding the parts of the printer 2 4 3 5 6 1 7 8 9 10 W I F I PRINTING WI F I PRINTING 15 14 Use the 1 Paper adjustment lever 2 Paper support 3 Paper guides 4 Paper feed guard 5 Automatic Document Feeder (ADF) 11 13 12 To Adjust the paper...
User's Guide
Page 22
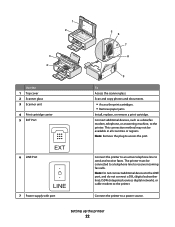
...), or cable modem to access the port. Scan and copy photos and documents. • Access the print cartridges. • Remove paper jams. Install, replace, or remove a print cartridge. Connect the printer to receive incoming fax calls. The printer must be available in all countries or...as a data/fax modem, telephone, or answering machine, to send and receive faxes. 1 2 3 4 Use the 1 Top cover 2 Scanner glass 3 Scanner unit 4 Print cartridge carrier 5 EXT Port 6 LINE Port EXT LINE 7 Power supply with port 5 6 7 8 9 To Access the scanner glass. Connect the printer to an active...
...), or cable modem to access the port. Scan and copy photos and documents. • Access the print cartridges. • Remove paper jams. Install, replace, or remove a print cartridge. Connect the printer to receive incoming fax calls. The printer must be available in all countries or...as a data/fax modem, telephone, or answering machine, to send and receive faxes. 1 2 3 4 Use the 1 Top cover 2 Scanner glass 3 Scanner unit 4 Print cartridge carrier 5 EXT Port 6 LINE Port EXT LINE 7 Power supply with port 5 6 7 8 9 To Access the scanner glass. Connect the printer to an active...
User's Guide
Page 23
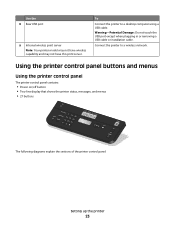
Connect the printer to a desktop computer using a USB cable. Use the 8 Rear USB port 9 Internal wireless print server Note: Your printer model may not have wireless capability and may not have this print server. Using the printer control panel buttons and menus Using the printer control panel The printer control panel contains: •...
Connect the printer to a desktop computer using a USB cable. Use the 8 Rear USB port 9 Internal wireless print server Note: Your printer model may not have wireless capability and may not have this print server. Using the printer control panel buttons and menus Using the printer control panel The printer control panel contains: •...
User's Guide
Page 24
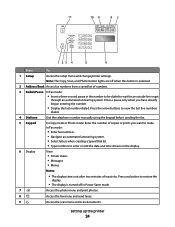
... the display. 6 Display View: • Printer status • Messages • Menus Notes: • The display times out after two minutes of copies or prints you have already begun entering the number. • Display the last number dialed. 11 10 9 87 1 23 4 5 6 Press To 1 Setup Access the... list of numbers. 3 Redial/Pause In Fax mode: • Insert a three-second pause in Power Saver mode. 7 Access the photo menu and print photos. 8 Access the fax menu and send faxes. 9 Access the scan menu and scan documents. Setting up the printer 24 Press the arrow buttons...
... the display. 6 Display View: • Printer status • Messages • Menus Notes: • The display times out after two minutes of copies or prints you have already begun entering the number. • Display the last number dialed. 11 10 9 87 1 23 4 5 6 Press To 1 Setup Access the... list of numbers. 3 Redial/Pause In Fax mode: • Insert a three-second pause in Power Saver mode. 7 Access the photo menu and print photos. 8 Access the fax menu and send faxes. 9 Access the scan menu and scan documents. Setting up the printer 24 Press the arrow buttons...
User's Guide
Page 26
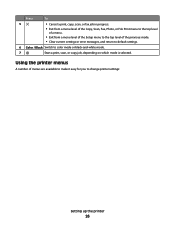
... settings or error messages, and return to default settings. 6 Color / Black Switch to change printer settings: Setting up the printer 26 Press To 5 • Cancel a print, copy, scan, or fax job in progress. • Exit from a menu level of the Copy, Scan, Fax, Photo, or File... Print menu to the top level of a menu. • Exit from a menu level of the Setup menu to the top level of menus are available to ...
... settings or error messages, and return to default settings. 6 Color / Black Switch to change printer settings: Setting up the printer 26 Press To 5 • Cancel a print, copy, scan, or fax job in progress. • Exit from a menu level of the Copy, Scan, Fax, Photo, or File... Print menu to the top level of a menu. • Exit from a menu level of the Setup menu to the top level of menus are available to ...
User's Guide
Page 27
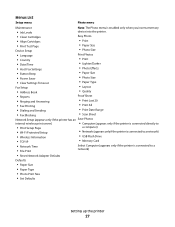
...; Date/Time • Host Fax Settings • Button Beep • Power Saver • Clear Settings Timeout Fax Setup • Address Book Print Photos • Print • Lighter/Darker • Photo Effects • Paper Size • Photo Size • Paper Type • Layout • Quality &#...(appears only if the printer is connected to a network) • USB Flash Drive • Memory Card • Network Time • File Print Select Computer (appears only if the printer is connected to a network) • Reset Network Adapter Defaults Defaults • Paper Size • Paper...
...; Date/Time • Host Fax Settings • Button Beep • Power Saver • Clear Settings Timeout Fax Setup • Address Book Print Photos • Print • Lighter/Darker • Photo Effects • Paper Size • Photo Size • Paper Type • Layout • Quality &#...(appears only if the printer is connected to a network) • USB Flash Drive • Memory Card • Network Time • File Print Select Computer (appears only if the printer is connected to a network) • Reset Network Adapter Defaults Defaults • Paper Size • Paper...
User's Guide
Page 28
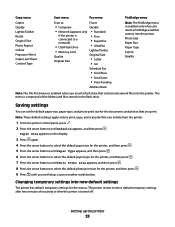
... exit Setup, or press another mode button. Note: These default settings apply only to print, copy, and scan jobs that you print. Photo Size Paper Size Paper Type Layout Quality Note: The File Print menu is enabled when you insert a flash drive that contains document files into the printer... The printer has default temporary settings for the printer, and then press . 9 Press until Photo Print Size appears, and then press . 8 Press the arrow buttons to select the default photo print size for the menus. Copy menu Copies Quality Lighter/Darker Resize Original Size Photo Reprint Collate Pages...
... exit Setup, or press another mode button. Note: These default settings apply only to print, copy, and scan jobs that you print. Photo Size Paper Size Paper Type Layout Quality Note: The File Print menu is enabled when you insert a flash drive that contains document files into the printer... The printer has default temporary settings for the printer, and then press . 9 Press until Photo Print Size appears, and then press . 8 Press the arrow buttons to select the default photo print size for the menus. Copy menu Copies Quality Lighter/Darker Resize Original Size Photo Reprint Collate Pages...
User's Guide
Page 32
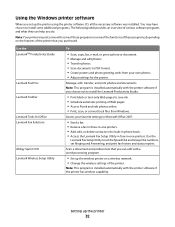
... for the printer. Note: This program is installed automatically with the printer software if you choose not to install the Lexmark Productivity Studio. • Print black or text-only Web pages to install some of the functions of these programs, depending on a wireless network. &#... these programs or some additional programs. The following table provides an overview of the printer. Manage, edit, transfer, and print photos and documents. Use the Lexmark Fax Setup Utility to PDF format. • Create posters and photo greeting cards from Windows. Setting up the printer using...
... for the printer. Note: This program is installed automatically with the printer software if you choose not to install the Lexmark Productivity Studio. • Print black or text-only Web pages to install some of the functions of these programs, depending on a wireless network. &#... these programs or some additional programs. The following table provides an overview of the printer. Manage, edit, transfer, and print photos and documents. Use the Lexmark Fax Setup Utility to PDF format. • Create posters and photo greeting cards from Windows. Setting up the printer using...
User's Guide
Page 33
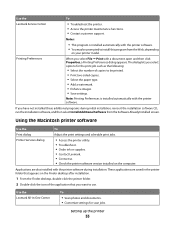
... Installed screen. Use the Lexmark All-In-One Center To • Scan photos and documents. • Customize settings for the print job such as the following: • Select the number of the application that you select File Œ Print with the printer software.... Using the Macintosh printer software Use the Print dialog Printer Services dialog To Adjust the print settings and schedule print jobs. • Access the printer utility. • Troubleshoot. • Order ink or supplies. • Contact Lexmark. • Contact us. • Check the printer...
... Installed screen. Use the Lexmark All-In-One Center To • Scan photos and documents. • Customize settings for the print job such as the following: • Select the number of the application that you select File Œ Print with the printer software.... Using the Macintosh printer software Use the Print dialog Printer Services dialog To Adjust the print settings and schedule print jobs. • Access the printer utility. • Troubleshoot. • Order ink or supplies. • Contact Lexmark. • Contact us. • Check the printer...


