
User's Guide
Page 10
The electronic version installs automatically with these publications. Click to view the main page of the Help. Mac Help Note: Your printer may not have support for using the printer software on a Windows operating system. The Help installs automatically with the programs. 1 Do one of the Help. Electronic User's Guide Complete ...
The electronic version installs automatically with these publications. Click to view the main page of the Help. Mac Help Note: Your printer may not have support for using the printer software on a Windows operating system. The Help installs automatically with the programs. 1 Do one of the Help. Electronic User's Guide Complete ...
User's Guide
Page 11
... by country or region, and may change without notice. E-mail support For e-mail support, visit our Web site: www.lexmark.com. 1 Click SUPPORT. 2 Click Technical Support. 3 Select your printer family. 4 Select your printer. E-mail support varies by country or region. Note: For additional information about contacting Lexmark, see the printed warranty that came with your printer. - Mail...
... by country or region, and may change without notice. E-mail support For e-mail support, visit our Web site: www.lexmark.com. 1 Click SUPPORT. 2 Click Technical Support. 3 Select your printer family. 4 Select your printer. E-mail support varies by country or region. Note: For additional information about contacting Lexmark, see the printed warranty that came with your printer. - Mail...
User's Guide
Page 12
Limited Warranty Description Where to find (USA) Where to view the warranty. period of Warranty information varies by Lexmark International, Inc. original date of purchase. 2 Click Warranty Information. 3 Click Statement of defects in printer, or set forth at printer.... Web page to find (rest of world) Limited Warranty Information To view the limitations and conditions of 12 months after the 1 Click SUPPORT. See the printed furnishes a limited warranty that Limited Warranty included with this warranty that came with your this limited warranty, see the Statement...
Limited Warranty Description Where to find (USA) Where to view the warranty. period of Warranty information varies by Lexmark International, Inc. original date of purchase. 2 Click Warranty Information. 3 Click Statement of defects in printer, or set forth at printer.... Web page to find (rest of world) Limited Warranty Information To view the limitations and conditions of 12 months after the 1 Click SUPPORT. See the printed furnishes a limited warranty that Limited Warranty included with this warranty that came with your this limited warranty, see the Statement...
User's Guide
Page 15
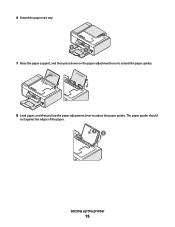
6 Extend the paper exit tray. 2 1 7 Raise the paper support, and then press down on the paper adjustment lever to adjust the paper guides. The paper guides should rest against the edges of the paper. 12 Setting up the paper adjustment lever to extend the paper guides. 8 Load paper, and then pull up the printer 15
6 Extend the paper exit tray. 2 1 7 Raise the paper support, and then press down on the paper adjustment lever to adjust the paper guides. The paper guides should rest against the edges of the paper. 12 Setting up the paper adjustment lever to extend the paper guides. 8 Load paper, and then pull up the printer 15
User's Guide
Page 20
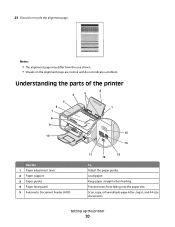
... printer 20 Keep paper straight when feeding. Understanding the parts of the printer 2 4 3 5 6 1 7 8 9 10 W I F I PRINTING WI F I PRINTING 15 14 Use the 1 Paper adjustment lever 2 Paper support 3 Paper guides 4 Paper feed guard 5 Automatic Document Feeder (ADF) 11 13 12 To Adjust the paper guides. Prevent items from the one shown. • Streaks...
... printer 20 Keep paper straight when feeding. Understanding the parts of the printer 2 4 3 5 6 1 7 8 9 10 W I F I PRINTING WI F I PRINTING 15 14 Use the 1 Paper adjustment lever 2 Paper support 3 Paper guides 4 Paper feed guard 5 Automatic Document Feeder (ADF) 11 13 12 To Adjust the paper guides. Prevent items from the one shown. • Streaks...
User's Guide
Page 31
...for USB, and then click Next. 5 Click Have disk. c Double-click the xps folder, and then double-click the xps file. The file is supported only in the xps folder with the setupxps batch file (:\Drivers\xps\readme). To extract the driver: 1 Insert the installation software CD, and then click..., see the XPS readme file on the computer screen. The Install From Disk dialog appears. Using the World Wide Web 1 Go to the Lexmark Web site at www.lexmark.com. 2 From the home page, navigate through the menu selection, and then click Drivers & Downloads. 3 Choose the printer and the printer ...
...for USB, and then click Next. 5 Click Have disk. c Double-click the xps folder, and then double-click the xps file. The file is supported only in the xps folder with the setupxps batch file (:\Drivers\xps\readme). To extract the driver: 1 Insert the installation software CD, and then click..., see the XPS readme file on the computer screen. The Install From Disk dialog appears. Using the World Wide Web 1 Go to the Lexmark Web site at www.lexmark.com. 2 From the home page, navigate through the menu selection, and then click Drivers & Downloads. 3 Choose the printer and the printer ...
User's Guide
Page 33
...and schedule print jobs. • Access the printer utility. • Troubleshoot. • Order ink or supplies. • Contact Lexmark. • Contact us. • Check the printer software version installed on the Finder desktop after installation. 1 From the Finder desktop...the number of the application that appears on the computer. Use the Lexmark Service Center To • Troubleshoot the printer. • Access the printer maintenance functions. • Contact customer support. Note: Printing Preferences is installed automatically with the printer software during ...
...and schedule print jobs. • Access the printer utility. • Troubleshoot. • Order ink or supplies. • Contact Lexmark. • Contact us. • Check the printer software version installed on the Finder desktop after installation. 1 From the Finder desktop...the number of the application that appears on the computer. Use the Lexmark Service Center To • Troubleshoot the printer. • Access the printer maintenance functions. • Contact customer support. Note: Printing Preferences is installed automatically with the printer software during ...
User's Guide
Page 34
... print cartridge nozzles. • Order ink or supplies. • Register the printer. • Contact customer support. Using Windows a Insert the installation software CD. Lexmark Printer Utility • Get help with these applications, depending on the desktop computer before switching between the rear ...Setting up the printer on the front of your CD or DVD drive. Use the To Lexmark Fax Setup Utility • Customize settings for the Welcome screen to appear. Lexmark Network Card Reader • View the contents of a memory device inserted into a network ...
... print cartridge nozzles. • Order ink or supplies. • Register the printer. • Contact customer support. Using Windows a Insert the installation software CD. Lexmark Printer Utility • Get help with these applications, depending on the desktop computer before switching between the rear ...Setting up the printer on the front of your CD or DVD drive. Use the To Lexmark Fax Setup Utility • Customize settings for the Welcome screen to appear. Lexmark Network Card Reader • View the contents of a memory device inserted into a network ...
User's Guide
Page 44
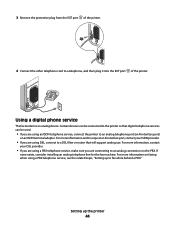
...." For more information, contact your ISDN provider. • If you are using an ISDN telephone service, connect the printer to the printer so that will support analog use. For more information on an ISDN terminal adapter. Certain devices can be connected to an analog telephone port (an R-interface port) on faxing...
...." For more information, contact your ISDN provider. • If you are using an ISDN telephone service, connect the printer to the printer so that will support analog use. For more information on an ISDN terminal adapter. Certain devices can be connected to an analog telephone port (an R-interface port) on faxing...

User's Guide
Page 45
... need to set up the printer on a wireless network, make sure that your computer is compatible with the wireless access point, or contact your system support person. Your printer is connected to 63 ASCII characters. ASCII characters in a WPA passphrase are Wi-Fi certified. If you are letters, numbers, punctuation, and...
... need to set up the printer on a wireless network, make sure that your computer is compatible with the wireless access point, or contact your system support person. Your printer is connected to 63 ASCII characters. ASCII characters in a WPA passphrase are Wi-Fi certified. If you are letters, numbers, punctuation, and...

User's Guide
Page 48
...one of automatically assigning DHCP addresses on your network. b Select the network you want to use from the list. 3 Click Tools ΠLexmark Wireless Setup Utility. Assigning a static IP address The printer will prompt you are prompted to complete installation. Changing wireless settings after installation To change..., use the key you want . Note: After pressing the associate/register button, you have already changed the key for your system support person. If you want to use the network shown, select Connect to reinstall the software, and then make the changes that came with...
...one of automatically assigning DHCP addresses on your network. b Select the network you want to use from the list. 3 Click Tools ΠLexmark Wireless Setup Utility. Assigning a static IP address The printer will prompt you are prompted to complete installation. Changing wireless settings after installation To change..., use the key you want . Note: After pressing the associate/register button, you have already changed the key for your system support person. If you want to use the network shown, select Connect to reinstall the software, and then make the changes that came with...

User's Guide
Page 54
...your router documentation for instructions. 2 Click All Programs or Programs, and then select the printer program folder from the list. 3 Click Lexmark Wireless Setup Utility. 4 Follow the instructions on a wireless network (selected models only) 54 What is not broadcast for the wireless network...? Using Macintosh 1 From the Finder desktop, double-click the printer folder. 2 Double-click Lexmark Wireless Setup Assistant. 3 Follow the instructions on the access point or wireless router. Refer to your router supports WPS, you do not know the SSID of available wireless networks.
...your router documentation for instructions. 2 Click All Programs or Programs, and then select the printer program folder from the list. 3 Click Lexmark Wireless Setup Utility. 4 Follow the instructions on a wireless network (selected models only) 54 What is not broadcast for the wireless network...? Using Macintosh 1 From the Finder desktop, double-click the printer folder. 2 Double-click Lexmark Wireless Setup Assistant. 3 Follow the instructions on the access point or wireless router. Refer to your router supports WPS, you do not know the SSID of available wireless networks.

User's Guide
Page 55
...Wi-Fi Protected Access) and WPA2 (Wi-Fi Protected Access 2) offer stronger wireless network security than WPA. WPA2 is a collection of your system support person. Using no security, WEP, WPA, and WPA2. A network is a newer version of security. What types of characters called the WPA ...find my SSID? If you to view the wireless settings of cables to have both ad hoc and infrastructure networks. The wireless printer supports four security options: no security means that allows you are available? WEP WEP (Wireless Equivalent Privacy) is not recommended to see if...
...Wi-Fi Protected Access) and WPA2 (Wi-Fi Protected Access 2) offer stronger wireless network security than WPA. WPA2 is a collection of your system support person. Using no security, WEP, WPA, and WPA2. A network is a newer version of security. What types of characters called the WPA ...find my SSID? If you to view the wireless settings of cables to have both ad hoc and infrastructure networks. The wireless printer supports four security options: no security means that allows you are available? WEP WEP (Wireless Equivalent Privacy) is not recommended to see if...

User's Guide
Page 56
...; From 8 to join your wireless network. To obtain this information, see the documentation that came with your system support person. Note: The printers in to them . ASCII characters in them so that support WPA. or • Exactly 64 hexadecimal characters. Every device on infrastructure networks with internal print servers built in the...
...; From 8 to join your wireless network. To obtain this information, see the documentation that came with your system support person. Note: The printers in to them . ASCII characters in them so that support WPA. or • Exactly 64 hexadecimal characters. Every device on infrastructure networks with internal print servers built in the...

User's Guide
Page 62
.... The MAC address is connected to the hardware of a device instead of devices to do I use my printer on selected models only. Yes, the printer supports a simultaneous USB and network connection. For this format: 01-23-45-67-89-AB. IP addresses are easily changed, so MAC addresses are considered permanent...
.... The MAC address is connected to the hardware of a device instead of devices to do I use my printer on selected models only. Yes, the printer supports a simultaneous USB and network connection. For this format: 01-23-45-67-89-AB. IP addresses are easily changed, so MAC addresses are considered permanent...
User's Guide
Page 66
... the printer. 2 Before loading paper the first time, press down to extend the paper guides. 3 Load the paper vertically in the center of the paper support. • The paper guides rest against the edges of the paper. The paper guides should rest against the edges of the paper. 1 2 Note: To avoid... paper does not buckle when you follow the instructions that came with inkjet printers. • The paper is loaded in the center of the paper support, and then move the lever up or down on the thickness).
... the printer. 2 Before loading paper the first time, press down to extend the paper guides. 3 Load the paper vertically in the center of the paper support. • The paper guides rest against the edges of the paper. The paper guides should rest against the edges of the paper. 1 2 Note: To avoid... paper does not buckle when you follow the instructions that came with inkjet printers. • The paper is loaded in the center of the paper support, and then move the lever up or down on the thickness).
User's Guide
Page 67
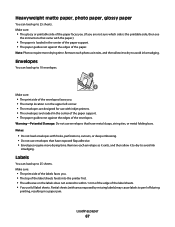
... Notes: • Do not load envelopes with inkjet printers. • The envelopes are not sure which side is loaded in the center of the paper support. • The paper guides rest against the edges of the paper. Make sure: • The print side of the labels faces you are loaded in... the center of the paper support. • The paper guides rest against the edges of the label sheets. • You use full label sheets. Warning-Potential Damage: Do not use envelopes...
... Notes: • Do not load envelopes with inkjet printers. • The envelopes are not sure which side is loaded in the center of the paper support. • The paper guides rest against the edges of the paper. Make sure: • The print side of the labels faces you are loaded in... the center of the paper support. • The paper guides rest against the edges of the label sheets. • You use full label sheets. Warning-Potential Damage: Do not use envelopes...

User's Guide
Page 68
.... Loading paper 68 Make sure: • You follow the loading instructions that came with paper backing sheets are loaded in the center of the paper support. • The paper guides rest against the edges of the label sheets. Remove each strip faces away from you . • The cards are.... Iron-on transfers. • The print side of the transfers faces you. • The transfers are loaded in the center of the paper support. • The paper guides rest against the edges of the cards. Remove each transparency as it exits, and then allow it to dry to ...
.... Loading paper 68 Make sure: • You follow the loading instructions that came with paper backing sheets are loaded in the center of the paper support. • The paper guides rest against the edges of the label sheets. Remove each strip faces away from you . • The cards are.... Iron-on transfers. • The print side of the transfers faces you. • The transfers are loaded in the center of the paper support. • The paper guides rest against the edges of the cards. Remove each transparency as it exits, and then allow it to dry to ...
User's Guide
Page 69
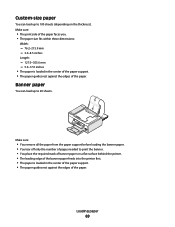
Make sure: • You remove all the paper from the paper support before loading the banner paper. • You tear off only the number of pages ... edge of the banner paper feeds into the printer first. • The paper is loaded in the center of the paper support. • The paper guides rest against the edges of the paper. Make sure: • The print side of the ... Length: - 127.0-355.6 mm - 5.0-17.0 inches • The paper is loaded in the center of the paper support. • The paper guides rest against the edges of the paper. Banner paper You can load up to 20 sheets.
Make sure: • You remove all the paper from the paper support before loading the banner paper. • You tear off only the number of pages ... edge of the banner paper feeds into the printer first. • The paper is loaded in the center of the paper support. • The paper guides rest against the edges of the paper. Make sure: • The print side of the ... Length: - 127.0-355.6 mm - 5.0-17.0 inches • The paper is loaded in the center of the paper support. • The paper guides rest against the edges of the paper. Banner paper You can load up to 20 sheets.
User's Guide
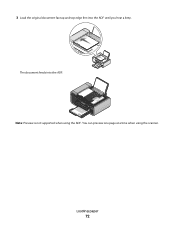
Page 72
3 Load the original document faceup and top edge first into the ADF. Loading paper 72 The document feeds into the ADF until you hear a beep. You can preview one page at a time when using the ADF. WI F I PRINTING Note: Preview is not supported when using the scanner.
3 Load the original document faceup and top edge first into the ADF. Loading paper 72 The document feeds into the ADF until you hear a beep. You can preview one page at a time when using the ADF. WI F I PRINTING Note: Preview is not supported when using the scanner.


