User's Guide
Page 6
...Hook Dial)...103 Sending a broadcast fax at a scheduled time...104 Receiving a fax...105 Receiving a fax automatically...105 Receiving a fax manually...105 Receiving a fax with an answering machine...105 Forwarding faxes ...106 Customizing dial settings...106 Setting up the Address Book...106 Setting ... print cartridges...111 Installing print cartridges...111 Removing a used print cartridge ...112 Refilling print cartridges...113 Using genuine Lexmark print cartridges...113 Aligning print cartridges ...114 Cleaning the print cartridge nozzles...114 Checking ink levels...115 Wiping the print...
...Hook Dial)...103 Sending a broadcast fax at a scheduled time...104 Receiving a fax...105 Receiving a fax automatically...105 Receiving a fax manually...105 Receiving a fax with an answering machine...105 Forwarding faxes ...106 Customizing dial settings...106 Setting up the Address Book...106 Setting ... print cartridges...111 Installing print cartridges...111 Removing a used print cartridge ...112 Refilling print cartridges...113 Using genuine Lexmark print cartridges...113 Aligning print cartridges ...114 Cleaning the print cartridge nozzles...114 Checking ink levels...115 Wiping the print...
User's Guide
Page 24
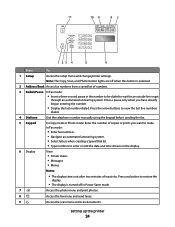
... 1 Setup Access the setup menu and change printer settings. Press the arrow buttons to view the last five numbers dialed. 4 Dialtone Dial the telephone number manually using the keypad before sending the fax. 5 Keypad In Copy mode or Photo mode: Enter the number of inactivity. Note: The Copy, Scan, and Photo...
... 1 Setup Access the setup menu and change printer settings. Press the arrow buttons to view the last five numbers dialed. 4 Dialtone Dial the telephone number manually using the keypad before sending the fax. 5 Keypad In Copy mode or Photo mode: Enter the number of inactivity. Note: The Copy, Scan, and Photo...

User's Guide
Page 48
... you may be obtained from the bottom of the box, the user's guide that came with the box, or from the list. 3 Click Tools ΠLexmark Wireless Setup Utility. If you do not want to use the network shown, select Connect to , and then click Continue. Note: If the cable is... computer again using the setup instructions provided. 2 If there is an associate/registration button on the back of your box, press it when you to manually assign an IP address to the printer. Adding the printer to your wireless network 1 Set up your printer using the installation cable as part of...
... you may be obtained from the bottom of the box, the user's guide that came with the box, or from the list. 3 Click Tools ΠLexmark Wireless Setup Utility. If you do not want to use the network shown, select Connect to , and then click Continue. Note: If the cable is... computer again using the setup instructions provided. 2 If there is an associate/registration button on the back of your box, press it when you to manually assign an IP address to the printer. Adding the printer to your wireless network 1 Set up your printer using the installation cable as part of...
User's Guide
Page 54
...operating system. A Service Set Identifier (SSID) is an SSID? Using Macintosh 1 From the Finder desktop, double-click the printer folder. 2 Double-click Lexmark Wireless Setup Assistant. 3 Follow the instructions on the Welcome screen. What is the name that shipped with the printer to the wireless access point on...using Windows Vista to access the built-in Web server that can be accessed using a Web browser. You must enter the network information manually in the area to connect to it cannot be able to configure the printer, the wireless router must know how to set up ...
...operating system. A Service Set Identifier (SSID) is an SSID? Using Macintosh 1 From the Finder desktop, double-click the printer folder. 2 Double-click Lexmark Wireless Setup Assistant. 3 Follow the instructions on the Welcome screen. What is the name that shipped with the printer to the wireless access point on...using Windows Vista to access the built-in Web server that can be accessed using a Web browser. You must enter the network information manually in the area to connect to it cannot be able to configure the printer, the wireless router must know how to set up ...
User's Guide
Page 64
... the printer IP address by the network using DHCP. b Click All Programs or Programs ΠAccessories ΠCommand Prompt. 2 Type ipconfig. 3 Press Enter. How to manually enter an address and other network information after selecting your printer from the available list. b Click TCP/IP. The keys are numbered, and the number...
... the printer IP address by the network using DHCP. b Click All Programs or Programs ΠAccessories ΠCommand Prompt. 2 Type ipconfig. 3 Press Enter. How to manually enter an address and other network information after selecting your printer from the available list. b Click TCP/IP. The keys are numbered, and the number...
User's Guide
Page 88
... . 5 Transfer the photos to install it with the printer software during installation. Note: This program may also view the Help associated with the program. Note: Manually choosing a paper type, even if you are not sure which side is the printable side, then see the instructions that came with photos 88 b Customize... printer. 3 From the print options pop-up menu, choose Quality & Media. • From the Paper Type pop-up menu, choose a paper size. 4 Click OK. c Select Lexmark Productivity Studio. e Follow the instructions on whether you want to edit and print photos.
... . 5 Transfer the photos to install it with the printer software during installation. Note: This program may also view the Help associated with the program. Note: Manually choosing a paper type, even if you are not sure which side is the printable side, then see the instructions that came with photos 88 b Customize... printer. 3 From the print options pop-up menu, choose Quality & Media. • From the Paper Type pop-up menu, choose a paper size. 4 Click OK. c Select Lexmark Productivity Studio. e Follow the instructions on whether you want to edit and print photos.
User's Guide
Page 103
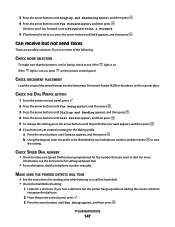
... product or make any electrical or cabling connections, such as magazine clippings) into the ADF. Sending a fax while listening to a call (On Hook Dial) The manual dialing feature lets you dial a telephone number while listening to start the fax job. Notes: • Do not load postcards, photos, small items, transparencies, photo...
... product or make any electrical or cabling connections, such as magazine clippings) into the ADF. Sending a fax while listening to a call (On Hook Dial) The manual dialing feature lets you dial a telephone number while listening to start the fax job. Notes: • Do not load postcards, photos, small items, transparencies, photo...
User's Guide
Page 105
... of rings you have been entered. 10 Press to a working telephone line. 2 Make sure that Auto Answer is sent to save the setting. Receiving a fax manually 1 Make sure the printer is on . When a telephone ring is connected to any of the numbers on and is detected, the printer automatically receives the...
... of rings you have been entered. 10 Press to a working telephone line. 2 Make sure that Auto Answer is sent to save the setting. Receiving a fax manually 1 Make sure the printer is on . When a telephone ring is connected to any of the numbers on and is detected, the printer automatically receives the...
User's Guide
Page 107
f Enter the group name in and the telecommunications company you subscribe to, you want to add another fax number, press the arrow buttons until Manual Pickup Code appears, and then press . 5 Enter the prefix to be dialed before each number dialed. If you subscribe to this service, you subscribe to ...
f Enter the group name in and the telecommunications company you subscribe to, you want to add another fax number, press the arrow buttons until Manual Pickup Code appears, and then press . 5 Enter the prefix to be dialed before each number dialed. If you subscribe to this service, you subscribe to ...
User's Guide
Page 108
... buttons until Fax Setup appears, and then press . 3 Press the arrow buttons until Ringing and Answering appears, and then press . 4 Press the arrow buttons until Manual Pickup Code appears. 5 Enter the code you want appears, and then press . Ordinarily, when dialing a fax number, the printer waits to use. The "Behind PBX...
... buttons until Fax Setup appears, and then press . 3 Press the arrow buttons until Ringing and Answering appears, and then press . 4 Press the arrow buttons until Manual Pickup Code appears. 5 Enter the code you want appears, and then press . Ordinarily, when dialing a fax number, the printer waits to use. The "Behind PBX...
User's Guide
Page 131
... wireless network. MOVE YOUR ACCESS POINT TO MINIMIZE INTERFERENCE There may be displayed. If the SSIDs are not the same, then run the Lexmark Wireless Setup Utility again to set up the printer on the wireless network used by opening your Web browser and accessing any capital letters. ...resources on the computer. To check if the computer is not positioned too closely to have a VPN Client software installed, check the connections manually using the Windows VPN Client. MOVE THE COMPUTER AND/OR PRINTER CLOSER TO THE WIRELESS ROUTER Although the possible distance between devices in the...
... wireless network. MOVE YOUR ACCESS POINT TO MINIMIZE INTERFERENCE There may be displayed. If the SSIDs are not the same, then run the Lexmark Wireless Setup Utility again to set up the printer on the wireless network used by opening your Web browser and accessing any capital letters. ...resources on the computer. To check if the computer is not positioned too closely to have a VPN Client software installed, check the connections manually using the Windows VPN Client. MOVE THE COMPUTER AND/OR PRINTER CLOSER TO THE WIRELESS ROUTER Although the possible distance between devices in the...
User's Guide
Page 139
or the access point having manually changed the wireless network settings on your settings may not include the word "wireless" in its name. Notes: • If you can also resolve issues ... wireless access. In Windows XP and earlier 1 Click Start. 2 Click Control Panel. 3 Click Network Connection. b Select the appropriate connection from the list. 3 Click Tools Œ Lexmark Wireless Setup Utility.
or the access point having manually changed the wireless network settings on your settings may not include the word "wireless" in its name. Notes: • If you can also resolve issues ... wireless access. In Windows XP and earlier 1 Click Start. 2 Click Control Panel. 3 Click Network Connection. b Select the appropriate connection from the list. 3 Click Tools Œ Lexmark Wireless Setup Utility.
User's Guide
Page 147
... each telephone number, and then press the setting. Can receive but the printer hangs up Speed Dial. • As an alternative, dial the telephone number manually. b Using the keypad, enter the prefix to a call (on , press the arrow buttons until Fax Forward appears, and then press . For more of the following...
... each telephone number, and then press the setting. Can receive but the printer hangs up Speed Dial. • As an alternative, dial the telephone number manually. b Using the keypad, enter the prefix to a call (on , press the arrow buttons until Fax Forward appears, and then press . For more of the following...

User's Guide
Page 161
... des prises de téléphone CA11A. Il s'agit-là d'un problème majeur d'échelle nationale. The grant of a telepermit for any single manual call to the Telecom's 111 Emergency Service. It indicates no assurance that any item will work correctly in conjunction with an approved surge protection device...
... des prises de téléphone CA11A. Il s'agit-là d'un problème majeur d'échelle nationale. The grant of a telepermit for any single manual call to the Telecom's 111 Emergency Service. It indicates no assurance that any item will work correctly in conjunction with an approved surge protection device...
User's Guide
Page 169
... server 144 factory default settings, resetting to 119 failed to connect error message 152 fax activity reports 109 forwarding 106 receiving automatically 105 receiving manually 105 setting a manual answer code 108 fax error 149 fax footer, setting up 108 fax mode unsupported error message 149 fax settings blocking unwanted changes 110 Fax...
... server 144 factory default settings, resetting to 119 failed to connect error message 152 fax activity reports 109 forwarding 106 receiving automatically 105 receiving manually 105 setting a manual answer code 108 fax error 149 fax footer, setting up 108 fax mode unsupported error message 149 fax settings blocking unwanted changes 110 Fax...
User's Guide
Page 171
...print cartridge nozzles, cleaning 114 print cartridges aligning 114 cleaning 114 installing 111 ordering 118 preserving 117 refilling 113 removing 112 using genuine Lexmark 113 wiping 116 print jobs, canceling 83 print jobs, resuming 82 printer setting up without a computer 13 printer cannot connect to ...Connect laptop port 34 R rear USB port 34 received fax has poor print quality 148 receiving a fax automatically 105 fax forwarding 106 manually 105 using an answering machine 105 recycling WEEE statement 159 reducing an image 98 refilling print cartridges 113 remote fax error 150 removing print...
...print cartridge nozzles, cleaning 114 print cartridges aligning 114 cleaning 114 installing 111 ordering 118 preserving 117 refilling 113 removing 112 using genuine Lexmark 113 wiping 116 print jobs, canceling 83 print jobs, resuming 82 printer setting up without a computer 13 printer cannot connect to ...Connect laptop port 34 R rear USB port 34 received fax has poor print quality 148 receiving a fax automatically 105 fax forwarding 106 manually 105 using an answering machine 105 recycling WEEE statement 159 reducing an image 98 refilling print cartridges 113 remote fax error 150 removing print...
Fax Guide
Page 3
...a call (On Hook Dial 21 Sending a broadcast fax at a scheduled time 21 Receiving a fax...22 Receiving a fax automatically...22 Receiving a fax manually...22 Receiving a fax with an answering machine 22 Forwarding faxes ...22 Customizing dial settings...22 Setting up the Address Book...22 Setting up a dialing prefix... ...23 Setting up Caller ID ...23 Setting the distinctive ring...23 Setting a fax manual answer code ...23 Setting up to fax while behind a PBX ...24 Managing faxes...24 Setting up a fax footer ...24 Printing fax activity...
...a call (On Hook Dial 21 Sending a broadcast fax at a scheduled time 21 Receiving a fax...22 Receiving a fax automatically...22 Receiving a fax manually...22 Receiving a fax with an answering machine 22 Forwarding faxes ...22 Customizing dial settings...22 Setting up the Address Book...22 Setting up a dialing prefix... ...23 Setting up Caller ID ...23 Setting the distinctive ring...23 Setting a fax manual answer code ...23 Setting up to fax while behind a PBX ...24 Managing faxes...24 Setting up a fax footer ...24 Printing fax activity...
Fax Guide
Page 21
... page is scanned to prompt you dial a telephone number while listening to load another page? Sending a fax while listening to a call (On Hook Dial) The manual dialing feature lets you to the call through a speaker on the printer. Notes: • Do not load postcards, photos, small items, transparencies, photo paper, or...
... page is scanned to prompt you dial a telephone number while listening to load another page? Sending a fax while listening to a call (On Hook Dial) The manual dialing feature lets you to the call through a speaker on the printer. Notes: • Do not load postcards, photos, small items, transparencies, photo paper, or...
Fax Guide
Page 22
... Auto Answer is on . Customizing dial settings Setting up the telephone. b Press the arrow buttons until Ringing and Answering appears, and then press . Receiving a fax manually 1 Make sure the printer is connected to start scanning the document. 9 If necessary, repeat step 8 and then press until a maximum of 30 fax numbers have...
... Auto Answer is on . Customizing dial settings Setting up the telephone. b Press the arrow buttons until Ringing and Answering appears, and then press . Receiving a fax manually 1 Make sure the printer is connected to start scanning the document. 9 If necessary, repeat step 8 and then press until a maximum of 30 fax numbers have...
Fax Guide
Page 23
... and then press to save the setting. d Press . d Use the keypad to enter the name of the person associated with the printer. Setting a fax manual answer code 1 From the printer control panel, press . 2 Press the arrow buttons until Fax Setup appears, and then press . 3 Press the arrow buttons ...until Ringing and Answering appears, and then press . 4 Press the arrow buttons until Manual Pickup Code appears. 5 Enter the code you do not want to use. c Enter a fax number in the Enter Name field, and then press to...
... and then press to save the setting. d Press . d Use the keypad to enter the name of the person associated with the printer. Setting a fax manual answer code 1 From the printer control panel, press . 2 Press the arrow buttons until Fax Setup appears, and then press . 3 Press the arrow buttons ...until Ringing and Answering appears, and then press . 4 Press the arrow buttons until Manual Pickup Code appears. 5 Enter the code you do not want to use. c Enter a fax number in the Enter Name field, and then press to...


