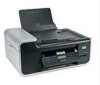
User's Guide
Page 4
... after installation...48 Switching between USB and wireless connections (Windows only 49 Switching between USB and wireless connections (Macintosh only 50 Advanced wireless setup...51 Creating an ad hoc wireless network ...51 Adding a printer to an existing ad hoc wireless network 53 Using WPS (Wi-Fi Protected Setup)...54 Frequently asked questions...54 Where do I find my WEP...
... after installation...48 Switching between USB and wireless connections (Windows only 49 Switching between USB and wireless connections (Macintosh only 50 Advanced wireless setup...51 Creating an ad hoc wireless network ...51 Adding a printer to an existing ad hoc wireless network 53 Using WPS (Wi-Fi Protected Setup)...54 Frequently asked questions...54 Where do I find my WEP...
User's Guide
Page 7
... ...122 Software did not install...122 Page does not print...123 Solving printer power problems ...126 Removing and reinstalling the software ...126 Enabling the USB port in Windows ...127 Wireless troubleshooting...128 Wireless troubleshooting checklist ...128 Printing a network setup page ...129 Wireless configuration does not continue after the USB cable is attached 129 Why isn...
... ...122 Software did not install...122 Page does not print...123 Solving printer power problems ...126 Removing and reinstalling the software ...126 Enabling the USB port in Windows ...127 Wireless troubleshooting...128 Wireless troubleshooting checklist ...128 Printing a network setup page ...129 Wireless configuration does not continue after the USB cable is attached 129 Why isn...

User's Guide
Page 10
...The electronic version installs automatically with these publications. Introduction Finding information about the printer Publications See the For Quick Setup sheet Initial setup instructions. Note: Your printer may not come with the printer software. Electronic User's Guide Complete instructions for Macintosh and may not have... the application that you want to make it the active application. Mac Help Note: Your printer may not have this Help. The Help installs automatically with the programs. 1 Do one of the following: • In Windows Vista, click . • In Windows XP ...
...The electronic version installs automatically with these publications. Introduction Finding information about the printer Publications See the For Quick Setup sheet Initial setup instructions. Note: Your printer may not come with the printer software. Electronic User's Guide Complete instructions for Macintosh and may not have... the application that you want to make it the active application. Mac Help Note: Your printer may not have this Help. The Help installs automatically with the programs. 1 Do one of the following: • In Windows Vista, click . • In Windows XP ...
User's Guide
Page 13
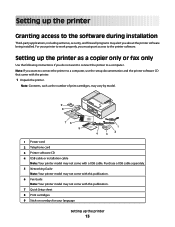
..., and firewall programs may alert you do not want to connect the printer to a computer, use the setup documentation and the printer software CD that came with the printer. 1 Unpack the printer. Setting up the printer 13 Purchase a USB cable separately. 5 Networking Guide Note: Your printer model may not come with this publication. 6 Fax Guide Note: Your...
..., and firewall programs may alert you do not want to connect the printer to a computer, use the setup documentation and the printer software CD that came with the printer. 1 Unpack the printer. Setting up the printer 13 Purchase a USB cable separately. 5 Networking Guide Note: Your printer model may not come with this publication. 6 Fax Guide Note: Your...
User's Guide
Page 24
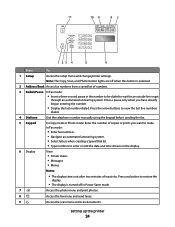
... numbers to wait for an outside line or get through an automated answering system. Setting up the printer 24 11 10 9 87 1 23 4 5 6 Press To 1 Setup Access the setup menu and change printer settings. Note: The Copy, Scan, and Photo button lights are off when this button is turned... off in the number to be dialed to enter or edit the date and time shown on the display. 6 Display View: • Printer status • Messages...
... numbers to wait for an outside line or get through an automated answering system. Setting up the printer 24 11 10 9 87 1 23 4 5 6 Press To 1 Setup Access the setup menu and change printer settings. Note: The Copy, Scan, and Photo button lights are off when this button is turned... off in the number to be dialed to enter or edit the date and time shown on the display. 6 Display View: • Printer status • Messages...
User's Guide
Page 26
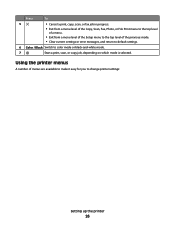
... a menu level of the Copy, Scan, Fax, Photo, or File Print menu to the top level of a menu. • Exit from a menu level of the Setup menu to the top level of menus are available to make it easy for you to color mode or black-and-white mode. 7 Start a print..., scan, or copy job, depending on which mode is selected. Using the printer menus A number of the previous mode. • Clear current settings or error messages, and return to default settings. 6 Color / Black Switch to change...
... a menu level of the Copy, Scan, Fax, Photo, or File Print menu to the top level of a menu. • Exit from a menu level of the Setup menu to the top level of menus are available to make it easy for you to color mode or black-and-white mode. 7 Start a print..., scan, or copy job, depending on which mode is selected. Using the printer menus A number of the previous mode. • Clear current settings or error messages, and return to default settings. 6 Color / Black Switch to change...
User's Guide
Page 27
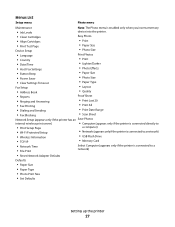
...Date Range • Scan Sheet Network Setup (appears only if the printer has an Save Photos internal wireless print server) • Computer (appears only if the printer is connected directly to • Print Setup Page • Wi-Fi Protected Setup • Wireless Information • TCP/IP a computer...) • Network (appears only if the printer is connected to a network) • USB Flash Drive ...
...Date Range • Scan Sheet Network Setup (appears only if the printer has an Save Photos internal wireless print server) • Computer (appears only if the printer is connected directly to • Print Setup Page • Wi-Fi Protected Setup • Wireless Information • TCP/IP a computer...) • Network (appears only if the printer is connected to a network) • USB Flash Drive ...
User's Guide
Page 28
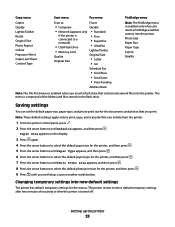
... Quality Note: The File Print menu is turned off: Setting up the printer 28 Note: These default settings apply only to print, copy, and scan jobs that you exit Setup, or press another mode button. The printer reverts to these default temporary settings after two minutes of the folders and... files stored on the display. 3 Press again. 4 Press the arrow buttons to select the default paper size for the printer, and then press . 5 ...
... Quality Note: The File Print menu is turned off: Setting up the printer 28 Note: These default settings apply only to print, copy, and scan jobs that you exit Setup, or press another mode button. The printer reverts to these default temporary settings after two minutes of the folders and... files stored on the display. 3 Press again. 4 Press the arrow buttons to select the default paper size for the printer, and then press . 5 ...
User's Guide
Page 29
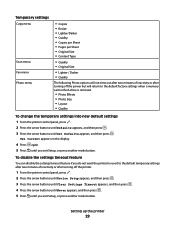
... . 2 Press the arrow buttons until Defaults appears, and then press . 3 Press the arrow buttons until you exit Setup, or press another mode button. Setting up the printer 29 Temporary settings Copy menu Scan menu Fax menu Photo menu • Copies • Resize • Lighter/Darker &#... but will return to the default temporary settings after two minutes of inactivity or after turning off the printer. 1 From the printer control panel, press . 2 Press the arrow buttons until Device Setup appears, and then press . 3 Press the arrow buttons until Clear Settings Timeout appears, and then...
... . 2 Press the arrow buttons until Defaults appears, and then press . 3 Press the arrow buttons until you exit Setup, or press another mode button. Setting up the printer 29 Temporary settings Copy menu Scan menu Fax menu Photo menu • Copies • Resize • Lighter/Darker &#... but will return to the default temporary settings after two minutes of inactivity or after turning off the printer. 1 From the printer control panel, press . 2 Press the arrow buttons until Device Setup appears, and then press . 3 Press the arrow buttons until Clear Settings Timeout appears, and then...
User's Guide
Page 30
... Follow the instructions on your CD or DVD drive. Note: If you exit Setup, or press another mode button. If you do one of your printer. 1 From the printer control panel, press . 2 Press the arrow buttons until Device Setup appears, and then press . 3 Press the arrow buttons until you want to... set up the printer 30 If the Welcome screen does not appear after a ...
... Follow the instructions on your CD or DVD drive. Note: If you exit Setup, or press another mode button. If you do one of your printer. 1 From the printer control panel, press . 2 Press the arrow buttons until Device Setup appears, and then press . 3 Press the arrow buttons until you want to... set up the printer 30 If the Welcome screen does not appear after a ...
User's Guide
Page 31
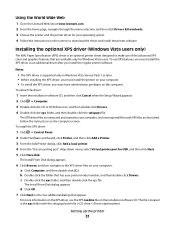
... the xps folder, and then double-click the xps file. To extract the driver: 1 Insert the installation software CD, and then click Cancel when the Setup Wizard appears. 2 Click ΠComputer. 3 Double-click the CD or DVD drive icon, and then double-click Drivers. 4 Double-click the xps ...only for Windows Vista users. Using the World Wide Web 1 Go to the Lexmark Web site at www.lexmark.com. 2 From the home page, navigate through the menu selection, and then click Drivers & Downloads. 3 Choose the printer and the printer driver for USB, and then click Next. 5 Click Have disk. Installing the...
... the xps folder, and then double-click the xps file. To extract the driver: 1 Insert the installation software CD, and then click Cancel when the Setup Wizard appears. 2 Click ΠComputer. 3 Double-click the CD or DVD drive icon, and then double-click Drivers. 4 Double-click the xps ...only for Windows Vista users. Using the World Wide Web 1 Go to the Lexmark Web site at www.lexmark.com. 2 From the home page, navigate through the menu selection, and then click Drivers & Downloads. 3 Choose the printer and the printer driver for USB, and then click Next. 5 Click Have disk. Installing the...
User's Guide
Page 32
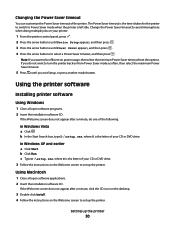
...• Send a fax. • Receive a fax in three-in-one printers. • Add, edit, or delete contacts in the built-in phone book. • Access the Lexmark Fax Setup Utility in four-in-one printers. Note: This program is installed automatically with a word-processing program. &#..., transfer, and print photos and documents. You may not come with the printer software if the printer has wireless capability. Access your own photos. • Adjust settings for Office Lexmark Fax Solutions Abbyy Sprint OCR Lexmark Wireless Setup Utility To • Scan, copy, fax, e-mail, or print a ...
...• Send a fax. • Receive a fax in three-in-one printers. • Add, edit, or delete contacts in the built-in phone book. • Access the Lexmark Fax Setup Utility in four-in-one printers. Note: This program is installed automatically with a word-processing program. &#..., transfer, and print photos and documents. You may not come with the printer software if the printer has wireless capability. Access your own photos. • Adjust settings for Office Lexmark Fax Solutions Abbyy Sprint OCR Lexmark Wireless Setup Utility To • Scan, copy, fax, e-mail, or print a ...
User's Guide
Page 34
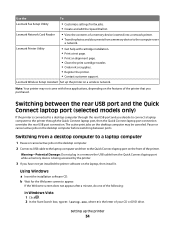
If the Welcome screen does not appear after a minute, do one of the following: In Windows Vista 1 Click . 2 In the Start Search box, type D:\setup.exe, where D is the letter of the printer. Lexmark Wireless Setup Assistant Set up the printer 34 Switching between ports. Lexmark Printer Utility • Get help with these applications, depending on the laptop, then install...
If the Welcome screen does not appear after a minute, do one of the following: In Windows Vista 1 Click . 2 In the Start Search box, type D:\setup.exe, where D is the letter of the printer. Lexmark Wireless Setup Assistant Set up the printer 34 Switching between ports. Lexmark Printer Utility • Get help with these applications, depending on the laptop, then install...
User's Guide
Page 35
In Windows XP and earlier 1 Click Start. 2 Click Run. 3 Type D:\setup.exe, where D is the letter of the printer. Setting up this product or make any electrical or cabling connections, such as the power supply cord or telephone, during a lightning storm. Note: If the ... computer screen. b Wait for the Welcome screen to fax CAUTION-SHOCK HAZARD: Do not use the telephone line adapter included in the box with the printer. 1 Connect one end of the telephone cord into the Line port of your CD or DVD drive. d Follow the instructions on the desktop. Using Macintosh a Insert...
In Windows XP and earlier 1 Click Start. 2 Click Run. 3 Type D:\setup.exe, where D is the letter of the printer. Setting up this product or make any electrical or cabling connections, such as the power supply cord or telephone, during a lightning storm. Note: If the ... computer screen. b Wait for the Welcome screen to fax CAUTION-SHOCK HAZARD: Do not use the telephone line adapter included in the box with the printer. 1 Connect one end of the telephone cord into the Line port of your CD or DVD drive. d Follow the instructions on the desktop. Using Macintosh a Insert...
User's Guide
Page 38
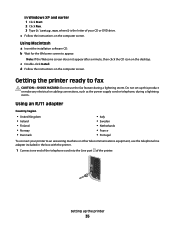
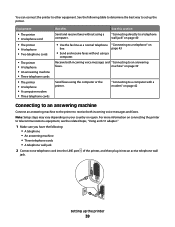
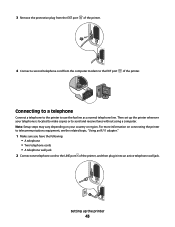
...Do not remove the plug. Note: The printer is a plug installed in the setup steps. Other devices (such as a telephone or answering machine) can connect the printer with equipment such as described in the EXT port of the printer. Setting up the printer 38 Choosing a fax connection You can ...be successfully attached to pass through the printer, as a telephone, an answering machine, or a computer modem. If problems occur, see "Setup troubleshooting" on the back of the printer. You do not need to attach the printer to a computer, but you do need to send and ...
...Do not remove the plug. Note: The printer is a plug installed in the setup steps. Other devices (such as a telephone or answering machine) can connect the printer with equipment such as described in the EXT port of the printer. Setting up the printer 38 Choosing a fax connection You can ...be successfully attached to pass through the printer, as a telephone, an answering machine, or a computer modem. If problems occur, see "Setup troubleshooting" on the back of the printer. You do not need to attach the printer to a computer, but you do need to send and ...
User's Guide
Page 39
...Setup steps may vary depending on page 39 Send faxes using a computer. Equipment • The printer • A telephone cord • The printer • A telephone • Two telephone cords • The printer... • A telephone • An answering machine • Three telephone cords • The printer...to the printer to a telephone wall jack" on connecting the printer to an ...You can connect the printer to set up the printer 39 See the following : •...
...Setup steps may vary depending on page 39 Send faxes using a computer. Equipment • The printer • A telephone cord • The printer • A telephone • Two telephone cords • The printer... • A telephone • An answering machine • Three telephone cords • The printer...to the printer to a telephone wall jack" on connecting the printer to an ...You can connect the printer to set up the printer 39 See the following : •...

User's Guide
Page 42
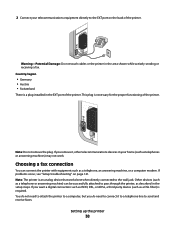
Setting up the printer 42 Note: Setup steps may vary depending on your country or region. For more information on connecting the printer to telecommunications equipment, see the related topic, "Using an ... (not provided) between the answering machine and the other N slot of the printer, and then plug it into the LINE port of the telephone wall jack. Connecting to a computer with a... modem Connect the printer to a computer with a modem • Two telephone cords • A telephone wall jack 2 Connect...
Setting up the printer 42 Note: Setup steps may vary depending on your country or region. For more information on connecting the printer to telecommunications equipment, see the related topic, "Using an ... (not provided) between the answering machine and the other N slot of the printer, and then plug it into the LINE port of the telephone wall jack. Connecting to a computer with a... modem Connect the printer to a computer with a modem • Two telephone cords • A telephone wall jack 2 Connect...
User's Guide
Page 43
Note: Setup steps may vary depending on connecting the printer to telecommunications equipment, see the related topic, "Using an RJ11 adapter." 1 Make sure you have the following: • A telephone • Two telephone cords • A telephone wall jack 2 Connect one telephone cord to the EXT port of the printer, and then plug it into an active...
Note: Setup steps may vary depending on connecting the printer to telecommunications equipment, see the related topic, "Using an RJ11 adapter." 1 Make sure you have the following: • A telephone • Two telephone cords • A telephone wall jack 2 Connect one telephone cord to the EXT port of the printer, and then plug it into an active...
User's Guide
Page 46
... one of your CD or DVD drive. Using Windows 1 Insert the installation software CD. 2 Wait for the Welcome screen to set up the printer. c Type D:\setup.exe, where D is the letter of the following : In Windows Vista a Click . Using Macintosh 1 Insert the installation software CD. However, you will access it can be accessed wirelessly...
... one of your CD or DVD drive. Using Windows 1 Insert the installation software CD. 2 Wait for the Welcome screen to set up the printer. c Type D:\setup.exe, where D is the letter of the following : In Windows Vista a Click . Using Macintosh 1 Insert the installation software CD. However, you will access it can be accessed wirelessly...

User's Guide
Page 48
...settings: Using Windows 1 Do one of the following: • In Windows Vista, click . • In Windows XP and earlier, click Start. 2 Click All Programs or Programs, and then select the printer program folder from the list. 3 Click Tools Œ Lexmark Wireless Setup Utility. Note: After pressing ...the associate/register button, you have already changed the key for your wireless network, use the key you created. 5 Follow the ...
...settings: Using Windows 1 Do one of the following: • In Windows Vista, click . • In Windows XP and earlier, click Start. 2 Click All Programs or Programs, and then select the printer program folder from the list. 3 Click Tools Œ Lexmark Wireless Setup Utility. Note: After pressing ...the associate/register button, you have already changed the key for your wireless network, use the key you created. 5 Follow the ...


