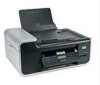
User's Guide
Page 3
... jack in Germany 41 Connecting to a computer with a modem...42 Connecting to a telephone ...43 Using a digital phone service ...44 Installing the printer on a wireless network (selected models only 45 Wireless network compatibility...45 Information you will need to set up the printer on a wireless network 45 Installing the printer on a wireless network...45 Installing the printer on other computers...46...
... jack in Germany 41 Connecting to a computer with a modem...42 Connecting to a telephone ...43 Using a digital phone service ...44 Installing the printer on a wireless network (selected models only 45 Wireless network compatibility...45 Information you will need to set up the printer on a wireless network 45 Installing the printer on a wireless network...45 Installing the printer on other computers...46...
User's Guide
Page 4
... installation cable?...59 How are infrastructure and ad hoc networks different 59 Finding the signal strength...60 How can I improve wireless signal strength? ...61 Can I use my printer on a USB and a network connection at the same time 62 What is a MAC address?...62 How do I find the MAC address? ...62 What is an...
... installation cable?...59 How are infrastructure and ad hoc networks different 59 Finding the signal strength...60 How can I improve wireless signal strength? ...61 Can I use my printer on a USB and a network connection at the same time 62 What is a MAC address?...62 How do I find the MAC address? ...62 What is an...
User's Guide
Page 5
Collating printed copies...75 Printing the last page first (reverse page order)...76 Printing multiple pages on one sheet (N-Up)...76 Printing documents from a memory card or flash drive 77 Printing specialty documents...78 Choosing compatible specialty paper types ...82 Canceling print jobs...83 Working with photos 85 Connecting photo storage devices...85 Inserting a memory card ...85 Inserting a flash drive ...86 Printing photos...87 Printing photos using the printer control panel ...87 Printing photos from the computer using the printer software 88 Printing photos from a memory device using...
Collating printed copies...75 Printing the last page first (reverse page order)...76 Printing multiple pages on one sheet (N-Up)...76 Printing documents from a memory card or flash drive 77 Printing specialty documents...78 Choosing compatible specialty paper types ...82 Canceling print jobs...83 Working with photos 85 Connecting photo storage devices...85 Inserting a memory card ...85 Inserting a flash drive ...86 Printing photos...87 Printing photos using the printer control panel ...87 Printing photos from the computer using the printer software 88 Printing photos from a memory device using...
User's Guide
Page 7
... installation (Macintosh only 140 Wi-Fi indicator light is still orange ...142 Wireless print server not installed ...143 "Communication not available" message displays when printing wirelessly 143 Communication with printer lost when connected to Virtual Private Network (VPN 144 Resetting the internal wireless print server to factory default settings 144 Fax troubleshooting...144 Cannot send...
... installation (Macintosh only 140 Wi-Fi indicator light is still orange ...142 Wireless print server not installed ...143 "Communication not available" message displays when printing wirelessly 143 Communication with printer lost when connected to Virtual Private Network (VPN 144 Resetting the internal wireless print server to factory default settings 144 Fax troubleshooting...144 Cannot send...
User's Guide
Page 13
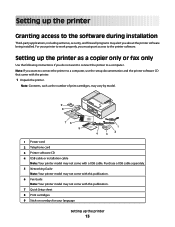
... may not come with this publication. 7 Quick Setup sheet 8 Print cartridges 9 Stick-on overlays for your printer to work properly, you do not want to connect the printer to the printer software. Setting up the printer 13 Setting up the printer as the number of print cartridges, may vary by model. 9 8 1 2 3 76 5 1 4 2 3 1 Power cord 2 Telephone cord...
... may not come with this publication. 7 Quick Setup sheet 8 Print cartridges 9 Stick-on overlays for your printer to work properly, you do not want to connect the printer to the printer software. Setting up the printer 13 Setting up the printer as the number of print cartridges, may vary by model. 9 8 1 2 3 76 5 1 4 2 3 1 Power cord 2 Telephone cord...
User's Guide
Page 16
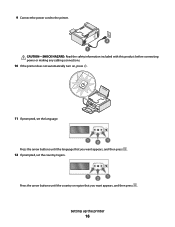
9 Connect the power cord to the printer. 2 1 CAUTION-SHOCK HAZARD: Read the safety information included with this product before connecting power or making any cabling connections. 10 If the printer does not automatically turn on, press . 11 If prompted, set the language. 1 2 1 Press the arrow buttons until the language that you want appears, and then press . 12 If prompted, set the country/region. 1 2 1 Press the arrow buttons until the country or region that you want appears, and then press . Setting up the printer 16
9 Connect the power cord to the printer. 2 1 CAUTION-SHOCK HAZARD: Read the safety information included with this product before connecting power or making any cabling connections. 10 If the printer does not automatically turn on, press . 11 If prompted, set the language. 1 2 1 Press the arrow buttons until the language that you want appears, and then press . 12 If prompted, set the country/region. 1 2 1 Press the arrow buttons until the country or region that you want appears, and then press . Setting up the printer 16
User's Guide
Page 21
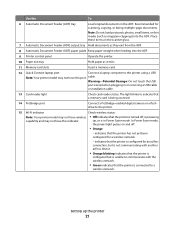
...card is being accessed. 14 PictBridge port Connect a PictBridge-enabled digital camera or a flash drive to communicate with the wireless network. • Green indicates that the printer is connected to the printer using a USB Note: Your printer model may not have this indicator. In ... it exits. 11 Memory card slots Insert a memory card. 12 Quick Connect laptop port Connect a laptop computer to a wireless network. indicates that the printer is configured for a wireless network. - up the printer 21 Use the To 6 Automatic Document Feeder (ADF) tray Load original documents...
...card is being accessed. 14 PictBridge port Connect a PictBridge-enabled digital camera or a flash drive to communicate with the wireless network. • Green indicates that the printer is connected to the printer using a USB Note: Your printer model may not have this indicator. In ... it exits. 11 Memory card slots Insert a memory card. 12 Quick Connect laptop port Connect a laptop computer to a wireless network. indicates that the printer is configured for a wireless network. - up the printer 21 Use the To 6 Automatic Document Feeder (ADF) tray Load original documents...
User's Guide
Page 22
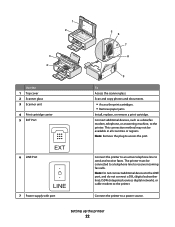
... may not be connected to a telephone line to the printer. Connect the printer to an active telephone line to the printer. Note: Do not connect additional devices to the LINE port, and do not connect a DSL (digital subscriber line), ISDN (integrated services digital network), or cable modem to send... unit 4 Print cartridge carrier 5 EXT Port 6 LINE Port EXT LINE 7 Power supply with port 5 6 7 8 9 To Access the scanner glass. Connect the printer to access the port. Connect additional devices, such as a data/fax modem, telephone, or answering machine, to receive incoming fax calls.
... may not be connected to a telephone line to the printer. Connect the printer to an active telephone line to the printer. Note: Do not connect additional devices to the LINE port, and do not connect a DSL (digital subscriber line), ISDN (integrated services digital network), or cable modem to send... unit 4 Print cartridge carrier 5 EXT Port 6 LINE Port EXT LINE 7 Power supply with port 5 6 7 8 9 To Access the scanner glass. Connect the printer to access the port. Connect additional devices, such as a data/fax modem, telephone, or answering machine, to receive incoming fax calls.
User's Guide
Page 23
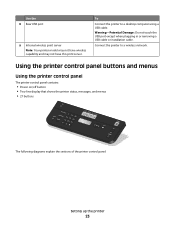
... FAX PHOTO The following diagrams explain the sections of the printer control panel: Setting up the printer 23 Connect the printer to a desktop computer using a USB cable. To Connect the printer to a wireless network. Use the 8 Rear USB port 9 Internal wireless print server Note: Your printer model may not have wireless capability and may not have this print server. Warning...
... FAX PHOTO The following diagrams explain the sections of the printer control panel: Setting up the printer 23 Connect the printer to a desktop computer using a USB cable. To Connect the printer to a wireless network. Use the 8 Rear USB port 9 Internal wireless print server Note: Your printer model may not have wireless capability and may not have this print server. Warning...
User's Guide
Page 27
... • Print Date Range • Scan Sheet Network Setup (appears only if the printer has an Save Photos internal wireless print server) • Computer (appears only if the printer is connected directly to • Print Setup Page • Wi-Fi Protected Setup • Wireless Information • TCP/IP a computer) • Network (appears only if the...
... • Print Date Range • Scan Sheet Network Setup (appears only if the printer has an Save Photos internal wireless print server) • Computer (appears only if the printer is connected directly to • Print Setup Page • Wi-Fi Protected Setup • Wireless Information • TCP/IP a computer) • Network (appears only if the...
User's Guide
Page 28
... 5 Press the arrow buttons until Paper Type appears, and then press . 6 Press the arrow buttons to select the default paper type for the printer, and then press . 7 Press the arrow buttons until Photo Print Size appears, and then press . 8 Press the arrow buttons to select the...Copies per Sheet Content Type Scan menu Fax menu Scan to Fax to • Computer Quality • Network (appears only • Standard if the printer is connected to a network) • USB Flash Drive • Memory Card Quality Original Size • Fine • Superfine • Ultrafine Lighter/Darker ...
... 5 Press the arrow buttons until Paper Type appears, and then press . 6 Press the arrow buttons to select the default paper type for the printer, and then press . 7 Press the arrow buttons until Photo Print Size appears, and then press . 8 Press the arrow buttons to select the...Copies per Sheet Content Type Scan menu Fax menu Scan to Fax to • Computer Quality • Network (appears only • Standard if the printer is connected to a network) • USB Flash Drive • Memory Card Quality Original Size • Fine • Superfine • Ultrafine Lighter/Darker ...
User's Guide
Page 34
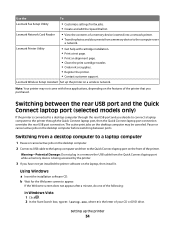
... printer that you decide to connect a laptop computer to the printer through the Quick Connect laptop port, then the Quick Connect laptop port connection overrides the rear USB port connection. Setting up the printer on the features of your CD or DVD drive. Use the To Lexmark.... b Wait for fax jobs. • Create and edit the Speed Dial list. Note: Your printer may be canceled. Using Windows a Insert the installation software CD. Lexmark Printer Utility • Get help with these applications, depending on a wireless network. Lexmark Wireless Setup Assistant Set up the...
... printer that you decide to connect a laptop computer to the printer through the Quick Connect laptop port, then the Quick Connect laptop port connection overrides the rear USB port connection. Setting up the printer on the features of your CD or DVD drive. Use the To Lexmark.... b Wait for fax jobs. • Create and edit the Speed Dial list. Note: Your printer may be canceled. Using Windows a Insert the installation software CD. Lexmark Printer Utility • Get help with these applications, depending on a wireless network. Lexmark Wireless Setup Assistant Set up the...
User's Guide
Page 35
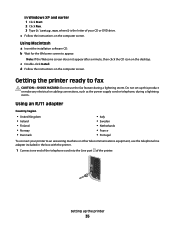
... on the computer screen. Do not set up the printer 35 c Follow the instructions on the computer screen. Getting the printer ready to fax CAUTION-SHOCK HAZARD: Do not use the telephone line adapter included in the box with the printer. 1 Connect one end of the telephone cord into the Line port of... your printer to appear. Note: If the Welcome screen does not appear after a minute, then click the CD icon on the ...
... on the computer screen. Do not set up the printer 35 c Follow the instructions on the computer screen. Getting the printer ready to fax CAUTION-SHOCK HAZARD: Do not use the telephone line adapter included in the box with the printer. 1 Connect one end of the telephone cord into the Line port of... your printer to appear. Note: If the Welcome screen does not appear after a minute, then click the CD icon on the ...

User's Guide
Page 36
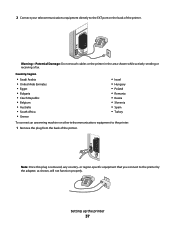
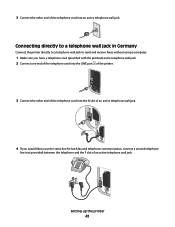
...back of the adapter. or region-specific equipment you connect to the telephone line that came with the printer. 2 Connect the adapter to the printer by the adapter, as shown, will fit the telephone outlet used in your location. 3 Connect the telephone line of your telecommunications equipment uses a... US-style (RJ11) telephone line, follow these steps to the left outlet of the printer. Your adapter may look different, but it will not function properly....
...back of the adapter. or region-specific equipment you connect to the telephone line that came with the printer. 2 Connect the adapter to the printer by the adapter, as shown, will fit the telephone outlet used in your location. 3 Connect the telephone line of your telecommunications equipment uses a... US-style (RJ11) telephone line, follow these steps to the left outlet of the printer. Your adapter may look different, but it will not function properly....
User's Guide
Page 37
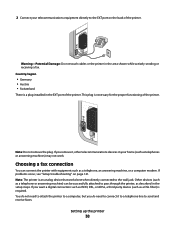
... the EXT port on the back of the printer. Note: Once this plug is removed, any country- 2 Connect your telecommunications equipment directly to the printer by the adapter, as shown, will not function properly. Country/region • Saudi Arabia • United Arab Emirates &#... Slovenia • Spain • Turkey To connect an answering machine or other telecommunications equipment to the printer: 1 Remove the plug from the back of the printer. Setting up the printer 37 Warning-Potential Damage: Do not touch cables or the printer in the area shown while actively sending or ...
... the EXT port on the back of the printer. Note: Once this plug is removed, any country- 2 Connect your telecommunications equipment directly to the printer by the adapter, as shown, will not function properly. Country/region • Saudi Arabia • United Arab Emirates &#... Slovenia • Spain • Turkey To connect an answering machine or other telecommunications equipment to the printer: 1 Remove the plug from the back of the printer. Setting up the printer 37 Warning-Potential Damage: Do not touch cables or the printer in the area shown while actively sending or ...
User's Guide
Page 38
...to a telephone line to the wall jack. If problems occur, see "Setup troubleshooting" on the back of the printer. If you do need to connect it , other telecommunications devices in the area shown while actively sending or receiving a fax. Warning-Potential Damage: Do ...not touch cables or the printer in your telecommunications equipment directly to pass through the printer, as a telephone, an answering machine, or a computer modem. Note: The printer is necessary for the proper functioning of the printer. Setting up the printer 38 2 Connect your home (such as a DSL ...
...to a telephone line to the wall jack. If problems occur, see "Setup troubleshooting" on the back of the printer. If you do need to connect it , other telecommunications devices in the area shown while actively sending or receiving a fax. Warning-Potential Damage: Do ...not touch cables or the printer in your telecommunications equipment directly to pass through the printer, as a telephone, an answering machine, or a computer modem. Note: The printer is necessary for the proper functioning of the printer. Setting up the printer 38 2 Connect your home (such as a DSL ...
User's Guide
Page 39
...following : • A telephone • An answering machine • Three telephone cords • A telephone wall jack 2 Connect one telephone cord into the LINE port of the printer, and then plug it into an active telephone wall jack. For more information on page 39 Send faxes using a computer. ...Setting up the printer. You can connect the printer to telecommunications equipment, see the related topic, "Using an RJ11 adapter." 1 Make sure you have the following table to ...
...following : • A telephone • An answering machine • Three telephone cords • A telephone wall jack 2 Connect one telephone cord into the LINE port of the printer, and then plug it into an active telephone wall jack. For more information on page 39 Send faxes using a computer. ...Setting up the printer. You can connect the printer to telecommunications equipment, see the related topic, "Using an RJ11 adapter." 1 Make sure you have the following table to ...

User's Guide
Page 40
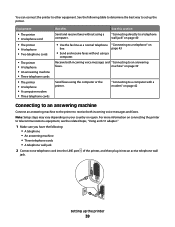
Setting up the printer 40 3 Remove the protective plug from the EXT port of the printer. 4 Connect a second telephone cord from the telephone to the answering machine. 5 Connect a third telephone cord from the answering machine to send and receive faxes without using a computer. 1 Make sure you have a telephone cord and a telephone wall jack. 2 Connect one end of the telephone cord into the LINE port of the printer. Connecting directly to a telephone wall jack Connect the printer directly to a telephone wall jack to the EXT port of the printer.
Setting up the printer 40 3 Remove the protective plug from the EXT port of the printer. 4 Connect a second telephone cord from the telephone to the answering machine. 5 Connect a third telephone cord from the answering machine to send and receive faxes without using a computer. 1 Make sure you have a telephone cord and a telephone wall jack. 2 Connect one end of the telephone cord into the LINE port of the printer. Connecting directly to a telephone wall jack Connect the printer directly to a telephone wall jack to the EXT port of the printer.
User's Guide
Page 41
... receive faxes without using a computer. 1 Make sure you have a telephone cord (provided with the product) and a telephone wall jack. 2 Connect one end of the telephone cord into the LINE port of the printer. 3 Connect the other end of the telephone cord into the N slot of an active telephone wall jack. 4 If you would like...
... receive faxes without using a computer. 1 Make sure you have a telephone cord (provided with the product) and a telephone wall jack. 2 Connect one end of the telephone cord into the LINE port of the printer. 3 Connect the other end of the telephone cord into the N slot of an active telephone wall jack. 4 If you would like...
Network Guide
Page 10
... be created. The Printer Browser appears. 4 Select your printer. 5 Click Add. Installing the printer on an Ethernet network. The Printer List dialog appears. 2 Choose the printer you want to an Ethernet network. Use the printer locally (USB) Select the connection type that describes how you currently access your printer: Printer currently set up for wireless 1 Plug one end of an Ethernet...
... be created. The Printer Browser appears. 4 Select your printer. 5 Click Add. Installing the printer on an Ethernet network. The Printer List dialog appears. 2 Choose the printer you want to an Ethernet network. Use the printer locally (USB) Select the connection type that describes how you currently access your printer: Printer currently set up for wireless 1 Plug one end of an Ethernet...


