
Troubleshooting Guide
Page 2
... SAME SIZE AND TYPE OF PAPER • Load the same size and type of paper in each tray to be linked. • Move the paper guides to On. Incorrect characters print MAKE SURE THE PRINTER IS NOT IN HEX TRACE MODE If Ready Hex appears on and Ready appears. 2 On the... Collate to the correct positions for each tray. Note: Setting Collate to print, specify the correct type setting: • For Windows users, specify the type from Print Properties. • For Macintosh users, specify the type from the wrong tray or on and Ready appears. 2 On the home screen, touch . 3 Touch Settings. 4 ...
... SAME SIZE AND TYPE OF PAPER • Load the same size and type of paper in each tray to be linked. • Move the paper guides to On. Incorrect characters print MAKE SURE THE PRINTER IS NOT IN HEX TRACE MODE If Ready Hex appears on and Ready appears. 2 On the... Collate to the correct positions for each tray. Note: Setting Collate to print, specify the correct type setting: • For Windows users, specify the type from Print Properties. • For Macintosh users, specify the type from the wrong tray or on and Ready appears. 2 On the home screen, touch . 3 Touch Settings. 4 ...
Troubleshooting Guide
Page 6
... or exits the tray, then it may not be properly installed. For more information, see the User's Guide. For more information, see the hardware setup documentation that came with the paper tray, or go to www.lexmark.com/publications to view the paper tray instruction sheet. 2000-sheet tray These are possible solutions...
... or exits the tray, then it may not be properly installed. For more information, see the User's Guide. For more information, see the hardware setup documentation that came with the paper tray, or go to www.lexmark.com/publications to view the paper tray instruction sheet. 2000-sheet tray These are possible solutions...
Troubleshooting Guide
Page 8
...Properties. • For Macintosh users, change the setting from the Page Setup dialog. Clipped images These are supported by the printer, the host computer, and the software program. Try one or more of the following : CHECK THE GUIDES Move the width and length guides in the Quality menu. ... the guides in the tray: 1 From the printer control panel, check the Paper Size setting from the Paper menu. 2 Before sending the job to print, specify the correct size setting: • For Windows users, specify the size from Print Properties. • For Macintosh users, specify the size from ...
...Properties. • For Macintosh users, change the setting from the Page Setup dialog. Clipped images These are supported by the printer, the host computer, and the software program. Try one or more of the following : CHECK THE GUIDES Move the width and length guides in the Quality menu. ... the guides in the tray: 1 From the printer control panel, check the Paper Size setting from the Paper menu. 2 Before sending the job to print, specify the correct size setting: • For Windows users, specify the size from Print Properties. • For Macintosh users, specify the size from ...
Troubleshooting Guide
Page 9
... mm (1.11 in .). CHECK THE PAPER Make sure you are possible solutions. Try one or more of the following : CHECK THE PAPER GUIDES Move the guides in the tray to the correct positions for the paper size loaded. Try one or more of the following : CHECK THE PAPER TYPE SETTING... setting from the Paper menu. 2 Before sending the job to print, specify the correct type setting: • For Windows users, specify the type from Print Properties. • For Macintosh users, specify the type from a fresh package. • Store paper in its original wrapper until you use it . Replace the...
... mm (1.11 in .). CHECK THE PAPER Make sure you are possible solutions. Try one or more of the following : CHECK THE PAPER GUIDES Move the guides in the tray to the correct positions for the paper size loaded. Try one or more of the following : CHECK THE PAPER TYPE SETTING... setting from the Paper menu. 2 Before sending the job to print, specify the correct type setting: • For Windows users, specify the type from Print Properties. • For Macintosh users, specify the type from a fresh package. • Store paper in its original wrapper until you use it . Replace the...
Help Menu Pages
Page 1
...packaged with the printer includes a User's Guide. Menu item Print all guides Copy guide E-mail guide Fax guide FTP guide Information guide (this page) Print defects guide Supplies guide Description Prints all the guides Provides information about making copies and...guide Help menu The Help menu consists of a series of Help pages that are stored in the printer. They contain information about loading paper, printing, ordering supplies, troubleshooting, clearing jams, and maintaining the printer. English, French, German, and Spanish translations are stored in the multifunction printer (MFP...
...packaged with the printer includes a User's Guide. Menu item Print all guides Copy guide E-mail guide Fax guide FTP guide Information guide (this page) Print defects guide Supplies guide Description Prints all the guides Provides information about making copies and...guide Help menu The Help menu consists of a series of Help pages that are stored in the printer. They contain information about loading paper, printing, ordering supplies, troubleshooting, clearing jams, and maintaining the printer. English, French, German, and Spanish translations are stored in the multifunction printer (MFP...
Quick Reference
Page 2
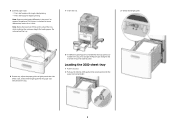
..., see the User's Guide. Do not overload the tray. 7 Insert the tray. 3 Unlock the length guide. 6 If necessary, adjust the paper guides to the correct position for the paper size being loaded. 2 Loading the 2000-sheet tray 1 Pull the tray out. 2 Pull up and slide the width guide to lightly touch...height for loading paper. 5 Load the paper stack: • Print side facedown for single-sided printing • Print side faceup for duplex printing Note: Paper must be loaded differently in the tray, then change the Paper Type setting for the tray from the printer control panel.
..., see the User's Guide. Do not overload the tray. 7 Insert the tray. 3 Unlock the length guide. 6 If necessary, adjust the paper guides to the correct position for the paper size being loaded. 2 Loading the 2000-sheet tray 1 Pull the tray out. 2 Pull up and slide the width guide to lightly touch...height for loading paper. 5 Load the paper stack: • Print side facedown for single-sided printing • Print side faceup for duplex printing Note: Paper must be loaded differently in the tray, then change the Paper Type setting for the tray from the printer control panel.
Quick Reference
Page 3
...the multipurpose feeder door. 5 Flex the sheets back and forth to the correct position for the paper size being loaded, and then lock the guide. Do not fold or crease the paper. Do not overload the tray. Straighten the edges on the side of the tray which indicates the... maximum height for duplex printing Note: Paper must be loaded differently in the trays if an optional StapleSmart II Finisher is fully extended. 4 Push the length guide release latch to raise the length guide, slide the guide to loosen them, and then fan them. For more information, see the User's Guide. 3 2 Pull out...
...the multipurpose feeder door. 5 Flex the sheets back and forth to the correct position for the paper size being loaded, and then lock the guide. Do not fold or crease the paper. Do not overload the tray. Straighten the edges on the side of the tray which indicates the... maximum height for duplex printing Note: Paper must be loaded differently in the trays if an optional StapleSmart II Finisher is fully extended. 4 Push the length guide release latch to raise the length guide, slide the guide to loosen them, and then fan them. For more information, see the User's Guide. 3 2 Pull out...
Quick Reference
Page 6
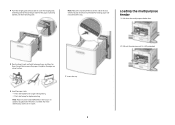
...then enter the recipient's telephone number or shortcut number, or search the address book. Printing Printing a document 1 Load paper into the ADF, then adjust the paper guides. 3 On the home screen, touch Fax. 4 Enter the fax number or a shortcut using the touch screen or keypad. b ... process additional held jobs. Verify lets you are called held jobs. Place these items on the scanner glass. Other types of the following: For Windows users a With a document open , click File ª Print. 2 Click Properties, Preferences, Options, or Setup. 3 Click Other Options, and then ...
...then enter the recipient's telephone number or shortcut number, or search the address book. Printing Printing a document 1 Load paper into the ADF, then adjust the paper guides. 3 On the home screen, touch Fax. 4 Enter the fax number or a shortcut using the touch screen or keypad. b ... process additional held jobs. Verify lets you are called held jobs. Place these items on the scanner glass. Other types of the following: For Windows users a With a document open , click File ª Print. 2 Click Properties, Preferences, Options, or Setup. 3 Click Other Options, and then ...

User Manual
Page 1
All rights reserved. 740 West New Circle Road Lexington, Kentucky 40550 X651de, X652de, X654de, X656de, X656dte, X658d, X658de, X658dme, X658dfe, X658dte, X658dtme, X658dtfe User's Guide July 2008 www.lexmark.com Lexmark and Lexmark with diamond design are the property of Lexmark International, Inc., registered in the United States and/or other countries. All other trademarks are trademarks of their respective owners. © 2008 Lexmark International, Inc.
All rights reserved. 740 West New Circle Road Lexington, Kentucky 40550 X651de, X652de, X654de, X656de, X656dte, X658d, X658de, X658dme, X658dfe, X658dte, X658dtme, X658dtfe User's Guide July 2008 www.lexmark.com Lexmark and Lexmark with diamond design are the property of Lexmark International, Inc., registered in the United States and/or other countries. All other trademarks are trademarks of their respective owners. © 2008 Lexmark International, Inc.

User Manual
Page 71
...1 Make sure the printer is 76 x 76 mm (3 x 3 in the tray for all trays that do not contain plain paper. 1 Make sure the printer is a user-defined setting that lets you print on and Ready appears. 2 On the home screen, touch . 3 Touch Paper Menu. 4 Touch Paper Size/Type. 5 Touch the arrows... down arrow until Universal Setup appears, and then touch Universal Setup. 5 Touch the left or right arrow to select the desired unit of the paper guides in .); Loading paper and specialty media 71 The Paper Size setting for all trays except the multipurpose feeder. The Paper Type setting must be set...
...1 Make sure the printer is 76 x 76 mm (3 x 3 in the tray for all trays that do not contain plain paper. 1 Make sure the printer is a user-defined setting that lets you print on and Ready appears. 2 On the home screen, touch . 3 Touch Paper Menu. 4 Touch Paper Size/Type. 5 Touch the arrows... down arrow until Universal Setup appears, and then touch Universal Setup. 5 Touch the left or right arrow to select the desired unit of the paper guides in .); Loading paper and specialty media 71 The Paper Size setting for all trays except the multipurpose feeder. The Paper Type setting must be set...

User Manual
Page 283
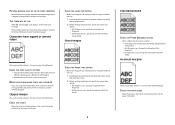
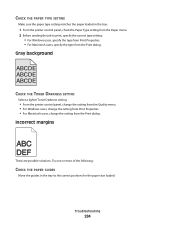
Try one or more of the following : CHECK THE GUIDES Move the width and length guides in the Quality menu. Ghost images ABCDE ABCDE ABCDE Troubleshooting 283 Try one or more of the following : CHECK THE PRINT QUALITY SETTINGS • Change ... 2400 Image Q. • Enable Enhance Fine Lines in the tray to print, specify the correct size setting: • For Windows users, specify the size from Print Properties. • For Macintosh users, specify the size from the Page Setup dialog. Clipped images These are supported by the printer, the host computer, and the...
Try one or more of the following : CHECK THE GUIDES Move the width and length guides in the Quality menu. Ghost images ABCDE ABCDE ABCDE Troubleshooting 283 Try one or more of the following : CHECK THE PRINT QUALITY SETTINGS • Change ... 2400 Image Q. • Enable Enhance Fine Lines in the tray to print, specify the correct size setting: • For Windows users, specify the size from Print Properties. • For Macintosh users, specify the size from the Page Setup dialog. Clipped images These are supported by the printer, the host computer, and the...
User Manual
Page 284
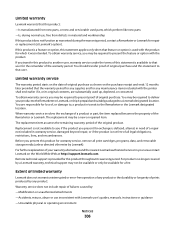
... tray to print, specify the correct type setting: • For Windows users, specify the type from Print Properties. • For Macintosh users, specify the type from the Print dialog. Try one or more of the following: CHECK THE PAPER GUIDES Move the guides in the tray: 1 From the printer control panel, check the Paper...
... tray to print, specify the correct type setting: • For Windows users, specify the type from Print Properties. • For Macintosh users, specify the type from the Print dialog. Try one or more of the following: CHECK THE PAPER GUIDES Move the guides in the tray: 1 From the printer control panel, check the Paper...
User Manual
Page 306
... be required to present the feature or option with Lexmark user's guides, manuals, instructions or guidance -Unsuitable physical or operating environment Notices 306 You may be required to deliver your area contact Lexmark on the World Wide Web at Lexmark's option). The replacement may be required to present... as shown on the date of a repair not included in your product to the Remarketer or Lexmark, or ship it prepaid and suitably packaged to another user, warranty service under the terms of this statement is provided for this product throughout its original contents...
... be required to present the feature or option with Lexmark user's guides, manuals, instructions or guidance -Unsuitable physical or operating environment Notices 306 You may be required to deliver your area contact Lexmark on the World Wide Web at Lexmark's option). The replacement may be required to present... as shown on the date of a repair not included in your product to the Remarketer or Lexmark, or ship it prepaid and suitably packaged to another user, warranty service under the terms of this statement is provided for this product throughout its original contents...

IPDS Emulation User's Guide
Page 1
Card for IPDS and SCS/TNe IPDS Emulation User's Guide Printers • Lexmark C734, C736 • Lexmark E460dn, E460dw • Lexmark E462dtn • Lexmark T650, T652 • Lexmark T654 • Lexmark T656dne • Lexmark W850 Multifunction Products • Lexmark X463de, X464de • Lexmark X466dte, X466dtwe • Lexmark X651de, X652de • Lexmark X654de, X656de • Lexmark X658de • Lexmark X734de, X736de, X738de • Lexmark X860de, X862de, X864de
Card for IPDS and SCS/TNe IPDS Emulation User's Guide Printers • Lexmark C734, C736 • Lexmark E460dn, E460dw • Lexmark E462dtn • Lexmark T650, T652 • Lexmark T654 • Lexmark T656dne • Lexmark W850 Multifunction Products • Lexmark X463de, X464de • Lexmark X466dte, X466dtwe • Lexmark X651de, X652de • Lexmark X654de, X656de • Lexmark X658de • Lexmark X734de, X736de, X738de • Lexmark X860de, X862de, X864de

IPDS Emulation User's Guide
Page 7
..., please refer to the following Multifunction Products (MFPs): • Lexmark X463de, X464de • Lexmark X466dte, X466dtwe • Lexmark X651de, X652de • Lexmark X654de, X656de • Lexmark X658de • Lexmark X734de, X736de, X738de • Lexmark X860de, X862de, X864de 7 This provides high ...: • Lexmark C734, C736 • Lexmark E460dn, E460dw • Lexmark E462dtn • Lexmark T650, T652 • Lexmark T654 • Lexmark T656dne • Lexmark W850 This manual applies to the SCS/TNe Emulation User's Guide. 1 Introduction 1.1 About This Guide Thank you for...
..., please refer to the following Multifunction Products (MFPs): • Lexmark X463de, X464de • Lexmark X466dte, X466dtwe • Lexmark X651de, X652de • Lexmark X654de, X656de • Lexmark X658de • Lexmark X734de, X736de, X738de • Lexmark X860de, X862de, X864de 7 This provides high ...: • Lexmark C734, C736 • Lexmark E460dn, E460dw • Lexmark E462dtn • Lexmark T650, T652 • Lexmark T654 • Lexmark T656dne • Lexmark W850 This manual applies to the SCS/TNe Emulation User's Guide. 1 Introduction 1.1 About This Guide Thank you for...

IPDS Emulation User's Guide
Page 8
...SCS/TNe installed, a minimum of 128 MB of user memory (DRAM) for printers, a minimum of 256 MB of user memory (DRAM) for IPDS and SCS/TNe IPDS Printer and Host Setup Guide. If you can not find answers in this guide about using the IPDS emulation, or require firmware updates...card providing Ethernet connection) • Lexmark wireless internal print server 1.3 Customer Support Information on how to configure the host and printer during the initial installation is found in the Card for MFPs, and one of purchase, your local Lexmark office, or check the Lexmark support web site at http://support...
...SCS/TNe installed, a minimum of 128 MB of user memory (DRAM) for printers, a minimum of 256 MB of user memory (DRAM) for IPDS and SCS/TNe IPDS Printer and Host Setup Guide. If you can not find answers in this guide about using the IPDS emulation, or require firmware updates...card providing Ethernet connection) • Lexmark wireless internal print server 1.3 Customer Support Information on how to configure the host and printer during the initial installation is found in the Card for MFPs, and one of purchase, your local Lexmark office, or check the Lexmark support web site at http://support...
IPDS Emulation User's Guide
Page 10
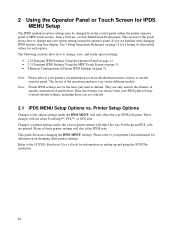
... operator panel or MFP touch screen), from a browser, or from MarkVision Professional. Thus, the settings you choose from the host. Many of specific instructions from your printer's documentation for more detailed instructions on how to the SCS/TNe Emulation User's Guide for information on setting...Setup Options Changes to change , save option settings using the SCS/TNe emulation. 10 These changes will also affect IPDS jobs. This guide discusses changing the IPDS MENU settings. The following sections show how to change and save , and verify option settings: • 2.2 ...
... operator panel or MFP touch screen), from a browser, or from MarkVision Professional. Thus, the settings you choose from the host. Many of specific instructions from your printer's documentation for more detailed instructions on how to the SCS/TNe Emulation User's Guide for information on setting...Setup Options Changes to change , save option settings using the SCS/TNe emulation. 10 These changes will also affect IPDS jobs. This guide discusses changing the IPDS MENU settings. The following sections show how to change and save , and verify option settings: • 2.2 ...
IPDS Emulation User's Guide
Page 58
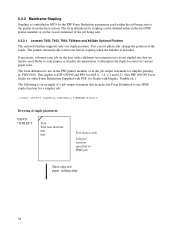
... (v. 3.4, 4.1 and 4.2). (See PSF OS/390 Users Guide for other Form Definitions Supplied with PSF, for various ...PSF Form Definition parameters used within the job being sent. 5.2.2.1 Lexmark T650, T652, T654, T656dne and X658de Optional Finisher The optional finisher supports only one staple position. The ...form definition to use IPDS staple function for a simplex job: //OUT1 OUTPUT CLASS=C,COPIES=1,FORMDEF=FC0010 Drawing of the job being sent to determine the staple location for Staple with Duplex...
... (v. 3.4, 4.1 and 4.2). (See PSF OS/390 Users Guide for other Form Definitions Supplied with PSF, for various ...PSF Form Definition parameters used within the job being sent. 5.2.2.1 Lexmark T650, T652, T654, T656dne and X658de Optional Finisher The optional finisher supports only one staple position. The ...form definition to use IPDS staple function for a simplex job: //OUT1 OUTPUT CLASS=C,COPIES=1,FORMDEF=FC0010 Drawing of the job being sent to determine the staple location for Staple with Duplex...

IPDS Emulation User's Guide
Page 82
...when optional hardware features are installed on some printers • SCS TN3270e and TN5250e printing feature (See the SCS/TNe Emulation User's Guide for all download font formats • OCA image resource support (downloadable as a resource) • Auto resolution scaling of fonts... segments • OCA Traditional color support (8/16 color values) • Full image color support (FS45) with grayscaling option. • Duplex support • Multiple input tray support • Multiple output bin support • Finishing supported (Offset stacking,Stapling and Hole punching depending on...
...when optional hardware features are installed on some printers • SCS TN3270e and TN5250e printing feature (See the SCS/TNe Emulation User's Guide for all download font formats • OCA image resource support (downloadable as a resource) • Auto resolution scaling of fonts... segments • OCA Traditional color support (8/16 color values) • Full image color support (FS45) with grayscaling option. • Duplex support • Multiple input tray support • Multiple output bin support • Finishing supported (Offset stacking,Stapling and Hole punching depending on...
Technical Reference
Page 7
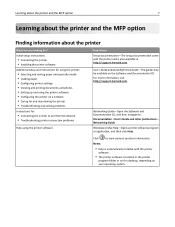
... : Documentation > User's Guide and other publications > Networking Guide Windows or Mac Help-Open a printer software program or application, and then click Help. ? Networking Guide-Open the Software and Documentation CD, and then navigate to view context‑sensitive information. For more information, visit http://support.lexmark.com. Learning about the printer and the MFP option 7 Learning...
... : Documentation > User's Guide and other publications > Networking Guide Windows or Mac Help-Open a printer software program or application, and then click Help. ? Networking Guide-Open the Software and Documentation CD, and then navigate to view context‑sensitive information. For more information, visit http://support.lexmark.com. Learning about the printer and the MFP option 7 Learning...


