
Troubleshooting Guide
Page 6
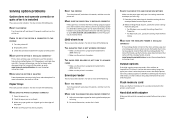
...installed These are possible solutions. For more information, see the hardware setup documentation that came with the option, or go to www.lexmark.com/publications to the printer system board. Output options If the high capacity output expander, 4-bin mailbox, or StapleSmartTM finisher is ...Paper trays These are possible solutions. MAKE SURE THE ENVELOPES ARE LOADED CORRECTLY 1 Adjust the envelope support for the length of the following : RESET THE PRINTER Turn the printer off . 2 Unplug the printer. 3 Check the connection between the option and the printer. Solving option problems...
...installed These are possible solutions. For more information, see the hardware setup documentation that came with the option, or go to www.lexmark.com/publications to the printer system board. Output options If the high capacity output expander, 4-bin mailbox, or StapleSmartTM finisher is ...Paper trays These are possible solutions. MAKE SURE THE ENVELOPES ARE LOADED CORRECTLY 1 Adjust the envelope support for the length of the following : RESET THE PRINTER Turn the printer off . 2 Unplug the printer. 3 Check the connection between the option and the printer. Solving option problems...

User Manual
Page 70
To set to reset the date and time. Note: If you do not know the IP address of your Web browser. Additional printer setup 70 Turning Daylight Saving Time ...
To set to reset the date and time. Note: If you do not know the IP address of your Web browser. Additional printer setup 70 Turning Daylight Saving Time ...

User Manual
Page 185
... Disabled Quiet Mode Off On Run Initial setup Yes No Description Minimizes the use of power and of paper and specialty media. Specifies whether the ADF emits a beep when paper is loaded Note: Disabled is the factory default setting. Reduces the amount of noise produced by the printer Notes: • Off... quality. • Paper minimizes the amount of energy, paper, or specialty media Notes: • Off is the factory default setting. Understanding printer menus 185 Off resets the printer to its factory default settings. • The Energy setting minimizes the power used by...
... Disabled Quiet Mode Off On Run Initial setup Yes No Description Minimizes the use of power and of paper and specialty media. Specifies whether the ADF emits a beep when paper is loaded Note: Disabled is the factory default setting. Reduces the amount of noise produced by the printer Notes: • Off... quality. • Paper minimizes the amount of energy, paper, or specialty media Notes: • Off is the factory default setting. Understanding printer menus 185 Off resets the printer to its factory default settings. • The Energy setting minimizes the power used by...

User Manual
Page 222
... Read/Write or Write protected. Off sets the printer to process print jobs. • The On setting retains the downloads during language changes and printer resets. Specifies how the printer handles temporary downloads, such as fonts and macros stored in permanent storage. Downloads are not deleted. Specifies whether the printer stores... Size should not be set to 100%. • Changing this setting from the printer control panel and then exiting the menus causes the printer to reset. Understanding printer menus 222
... Read/Write or Write protected. Off sets the printer to process print jobs. • The On setting retains the downloads during language changes and printer resets. Specifies how the printer handles temporary downloads, such as fonts and macros stored in permanent storage. Downloads are not deleted. Specifies whether the printer stores... Size should not be set to 100%. • Changing this setting from the printer control panel and then exiting the menus causes the printer to reset. Understanding printer menus 222

User Manual
Page 227
... is printed in hexadecimal and character representation and control codes are not executed. • To exit or deactivate Hex Trace, turn the printer off or reset the printer. Note: Off is the factory default setting. • A higher setting makes the display appear lighter. • A lower setting makes the display appear darker...
... is printed in hexadecimal and character representation and control codes are not executed. • To exit or deactivate Hex Trace, turn the printer off or reset the printer. Note: Off is the factory default setting. • A higher setting makes the display appear lighter. • A lower setting makes the display appear darker...

User Manual
Page 236
... setup. If the message appears again, contact your system support person. Insert staple cartridge Try one or more of the following : • Touch Continue to reset the printer. Try one or more of the following : • Touch Continue to clear the message and print without using the staple feature. If the...
... setup. If the message appears again, contact your system support person. Insert staple cartridge Try one or more of the following : • Touch Continue to reset the printer. Try one or more of the following : • Touch Continue to clear the message and print without using the staple feature. If the...
User Manual
Page 245
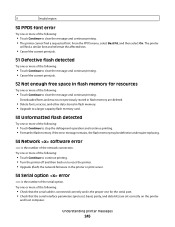
Downloaded fonts and macros not previously stored in flash memory are set correctly on to reset the printer. • Upgrade (flash) the network firmware in the printer or print server. 54 Serial option error is the number of the serial option. ...
Downloaded fonts and macros not previously stored in flash memory are set correctly on to reset the printer. • Upgrade (flash) the network firmware in the printer or print server. 54 Serial option error is the number of the serial option. ...

User Manual
Page 246
...• Touch Continue to clear the message. • Touch Continue to continue printing. • Turn the printer power off and then back on to reset the printer. 54 Standard network software error Try one or more of the following: • Touch Continue to continue printing. • Turn the printer.... 4 Connect the power cord to a properly grounded outlet. 5 Turn the printer power back on. 56 Parallel port disabled is a slot on to reset the printer. • Upgrade (flash) the network firmware in the printer or print server. 55 Unsupported option in slot is the number of the parallel...
...• Touch Continue to clear the message. • Touch Continue to continue printing. • Turn the printer power off and then back on to reset the printer. 54 Standard network software error Try one or more of the following: • Touch Continue to continue printing. • Turn the printer.... 4 Connect the power cord to a properly grounded outlet. 5 Turn the printer power back on. 56 Parallel port disabled is a slot on to reset the printer. • Upgrade (flash) the network firmware in the printer or print server. 55 Unsupported option in slot is the number of the parallel...

User Manual
Page 278
... the Installed Options list. Troubleshooting 278 Paper trays These are possible solutions. 5 In the Max Speed box, click on one of the following : RESET THE PRINTER Turn the printer off . 2 Unplug the printer. 3 Check the connection between the option and the printer. For more information, see ...the hardware setup documentation that came with the option, or go to www.lexmark.com/publications to see if the option is not listed, then reinstall it is installed These are possible solutions. Solving option problems Option...
... the Installed Options list. Troubleshooting 278 Paper trays These are possible solutions. 5 In the Max Speed box, click on one of the following : RESET THE PRINTER Turn the printer off . 2 Unplug the printer. 3 Check the connection between the option and the printer. For more information, see ...the hardware setup documentation that came with the option, or go to www.lexmark.com/publications to see if the option is not listed, then reinstall it is installed These are possible solutions. Solving option problems Option...

User Manual
Page 279
... computer: • For Windows users, specify the settings from Print Properties. • For Macintosh users, specify the settings from the Print dialog. RESET THE PRINTER Turn the printer off , wait about 10 seconds, and then turn the printer on. Reinstall the paper tray. CHECK THE PAPER TYPE ...envelopes you are possible solutions. Try one or more information, see the hardware setup documentation that came with the paper tray, or go to www.lexmark.com/publications to the 2000-sheet tray. • Make sure the printer is listed on . Try one or more information, see "Loading ...
... computer: • For Windows users, specify the settings from Print Properties. • For Macintosh users, specify the settings from the Print dialog. RESET THE PRINTER Turn the printer off , wait about 10 seconds, and then turn the printer on. Reinstall the paper tray. CHECK THE PAPER TYPE ...envelopes you are possible solutions. Try one or more information, see the hardware setup documentation that came with the paper tray, or go to www.lexmark.com/publications to the 2000-sheet tray. • Make sure the printer is listed on . Try one or more information, see "Loading ...

IPDS Emulation User's Guide
Page 28
...session. The host will download the resources again with the next IPDS job. 3.3.17 Fax Interrupt On MFPs that include IPDS job separation headers a fax will return a Printer Reset exception to be deleted. Disabling this option will be printed in relation to IPDS print jobs. On ... defined "keep pages together" across job boundaries. Operator actions and processing of other ports. Enabling this option will be printed when either a duplex operation, a finishing group or a copy group. The difference in these values should only be used if the host timer/timeout value is...
...session. The host will download the resources again with the next IPDS job. 3.3.17 Fax Interrupt On MFPs that include IPDS job separation headers a fax will return a Printer Reset exception to be deleted. Disabling this option will be printed in relation to IPDS print jobs. On ... defined "keep pages together" across job boundaries. Operator actions and processing of other ports. Enabling this option will be printed when either a duplex operation, a finishing group or a copy group. The difference in these values should only be used if the host timer/timeout value is...

IPDS Emulation User's Guide
Page 29
... sent to the selected port. No Do not print IPDS resource list. Enabling this feature is provided for trouble shooting purposes. A "Printer Reset" Nack will be returned to the host and the resources will attempt to make contact with IPDS or BUSY displayed. Output Disable Trace. Note...the current IPDS firmware version / level. See Printing the Menu Settings Page (printers) on page 14 or Printing the Menu Settings Page (MFPs) on how to enable Resource Capture.) Yes Print IPDS resource list. Print performance may hang with an externally connected trace program, which is ...
... sent to the selected port. No Do not print IPDS resource list. Enabling this feature is provided for trouble shooting purposes. A "Printer Reset" Nack will be returned to the host and the resources will attempt to make contact with IPDS or BUSY displayed. Output Disable Trace. Note...the current IPDS firmware version / level. See Printing the Menu Settings Page (printers) on page 14 or Printing the Menu Settings Page (MFPs) on how to enable Resource Capture.) Yes Print IPDS resource list. Print performance may hang with an externally connected trace program, which is ...

IPDS Emulation User's Guide
Page 72
Beside the Submit button you opened the IPDS Configuration page. 8.3 Functions that were current when you will see a Reset Form button. This operation is shown but can not be changed . These operations are not shown. • IPDS Version - The current version is not shown. &#... not be changed . • Print Resource List - If you have entered values in the page without submitting, and decide to start all over again, click Reset Form. To operate these setting use the printer front panel menus. 72
Beside the Submit button you opened the IPDS Configuration page. 8.3 Functions that were current when you will see a Reset Form button. This operation is shown but can not be changed . These operations are not shown. • IPDS Version - The current version is not shown. &#... not be changed . • Print Resource List - If you have entered values in the page without submitting, and decide to start all over again, click Reset Form. To operate these setting use the printer front panel menus. 72
Technical Reference
Page 28
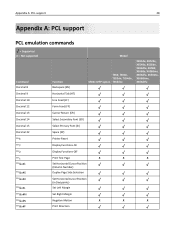
...&a#L ESC&a#M ESC&a#N ESC&a#P Function Backspace (BS) Model T650, T650n, T652dn, T654dn, 6500e MFP option T656dne X651de, X652de, X654de, X656de, X656dte, X658d, X658de, X658dme, X658dfe, X658dte, X658dtme, X658dtfe Horizontal Tab (HT) Line Feed (LF) Form Feed... (FF) Carrier Return (CR) Select Secondary Font (SO) Select Primary Font (SI) Space (SP) Printer Reset Display Functions-On Display Functions-Off Print Test Page X X X Set Horizontal Cursor Position (Column Number) Duplex...
...&a#L ESC&a#M ESC&a#N ESC&a#P Function Backspace (BS) Model T650, T650n, T652dn, T654dn, 6500e MFP option T656dne X651de, X652de, X654de, X656de, X656dte, X658d, X658de, X658dme, X658dfe, X658dte, X658dtme, X658dtfe Horizontal Tab (HT) Line Feed (LF) Form Feed... (FF) Carrier Return (CR) Select Secondary Font (SO) Select Primary Font (SI) Space (SP) Printer Reset Display Functions-On Display Functions-Off Print Test Page X X X Set Horizontal Cursor Position (Column Number) Duplex...
Administration Guide
Page 4
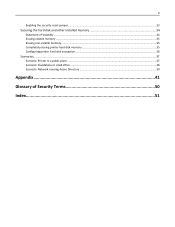
4 Enabling the security reset jumper...33 Securing the hard disk and other installed memory 34 Statement of Volatility...34 Erasing volatile memory ...35 Erasing non‑volatile memory...35 Completely erasing printer hard disk memory 35 Configuring printer hard disk encryption...36 Scenarios...37 Scenario: Printer in a public place ...37 Scenario: Standalone or small office ...38 Scenario: Network running Active Directory ...39 Appendix...41 Glossary of Security Terms 50 Index...51
4 Enabling the security reset jumper...33 Securing the hard disk and other installed memory 34 Statement of Volatility...34 Erasing volatile memory ...35 Erasing non‑volatile memory...35 Completely erasing printer hard disk memory 35 Configuring printer hard disk encryption...36 Scenarios...37 Scenario: Printer in a public place ...37 Scenario: Standalone or small office ...38 Scenario: Network running Active Directory ...39 Appendix...41 Glossary of Security Terms 50 Index...51

Administration Guide
Page 19
...the file containing the matching NTP authentication. 7 Click Submit to save the information as a krb5.conf file on the selected device, or Reset Form to reset the fields and start again. Note: After you are located in a nonstandard time zone or an area that the Kerberos configuration file for... a new configuration file. Notes: • Entering manual settings automatically disables use Network Time Protocol (NTP), to reset the field and search for the selected device is functional. Printer clock settings can be in YYYY-MM-DD HH:MM format, and then...
...the file containing the matching NTP authentication. 7 Click Submit to save the information as a krb5.conf file on the selected device, or Reset Form to reset the fields and start again. Note: After you are located in a nonstandard time zone or an area that the Kerberos configuration file for... a new configuration file. Notes: • Entering manual settings automatically disables use Network Time Protocol (NTP), to reset the field and search for the selected device is functional. Printer clock settings can be in YYYY-MM-DD HH:MM format, and then...

Administration Guide
Page 21
Consult your organization's policies before being automatically logged off . 3 Click Submit to save the changes, or Reset Form to each access control. Embedded Web Server administrators should verify that printer login restrictions also comply with organizational security policies. 1 From the Embedded Web ...
Consult your organization's policies before being automatically logged off . 3 Click Submit to save the changes, or Reset Form to each access control. Embedded Web Server administrators should verify that printer login restrictions also comply with organizational security policies. 1 From the Embedded Web ...

Administration Guide
Page 22
.... For more groups to 128 characters. This list will be populated with the authentication building blocks that function. 4 Click Submit to save the changes, or Reset Form to a security template. Each device can share a name. 1 From the Embedded Web Server, click Settings > Security > Security Setup. 2 From Step 2 under Advanced Security Setup...
.... For more groups to 128 characters. This list will be populated with the authentication building blocks that function. 4 Click Submit to save the changes, or Reset Form to a security template. Each device can share a name. 1 From the Embedded Web Server, click Settings > Security > Security Setup. 2 From Step 2 under Advanced Security Setup...

Administration Guide
Page 27
Disk wiping uses random data patterns to reset both fields. Overwriting can be unavailable for other tasks. b From the Time menu, select the hour at which the selected action should run (example: "Weekdays (... devices. Disk wiping can use of the following: • Off-Use this to start at the specified time. d Click Add to save the changes, or Reset Form to securely overwrite files stored on a scheduled basis. Notes: • Use of USB devices is enabled by this to automatically wipe data following each...
Disk wiping uses random data patterns to reset both fields. Overwriting can be unavailable for other tasks. b From the Time menu, select the hour at which the selected action should run (example: "Weekdays (... devices. Disk wiping can use of the following: • Off-Use this to start at the specified time. d Click Add to save the changes, or Reset Form to securely overwrite files stored on a scheduled basis. Notes: • Use of USB devices is enabled by this to automatically wipe data following each...

Administration Guide
Page 29
... Submit to save the changes, and then follow the Setup E-mail Server link to configure SMTP settings. 10 Click Submit to save the changes, or Reset Form to restore the default settings. "Wrap over oldest entries" - The default setting is "No authentication required." 9 From the Device‑Initiated E‑mail list...
... Submit to save the changes, and then follow the Setup E-mail Server link to configure SMTP settings. 10 Click Submit to save the changes, or Reset Form to restore the default settings. "Wrap over oldest entries" - The default setting is "No authentication required." 9 From the Device‑Initiated E‑mail list...


