
Troubleshooting Guide
Page 4
...from a computer These are connecting to that will support analog use . Cannot scan from the Page Setup dialog. CHECK THE POWER Make sure the printer is plugged in the upper left corner. Solving fax problems Caller ID is on , and Ready appears. 4 CHECK THE PRINTER CONNECTIONS Make sure the ...of the following : CHECK THE DISPLAY FOR ERROR MESSAGES Clear any error messages. Contact your telecommunications company to determine which you want to send a fax to make sure that your DSL provider. • If you are using a PBX telephone service, then make sure you are using DSL, then...
...from a computer These are connecting to that will support analog use . Cannot scan from the Page Setup dialog. CHECK THE POWER Make sure the printer is plugged in the upper left corner. Solving fax problems Caller ID is on , and Ready appears. 4 CHECK THE PRINTER CONNECTIONS Make sure the ...of the following : CHECK THE DISPLAY FOR ERROR MESSAGES Clear any error messages. Contact your telecommunications company to determine which you want to send a fax to make sure that your DSL provider. • If you are using a PBX telephone service, then make sure you are using DSL, then...

Troubleshooting Guide
Page 5
...to Answer box, enter the number of the following : THE PRINTER IS NOT IN FAX MODE On the home screen, touch Fax to put the printer in the TCP/IP section. 2 Click Settings. 3 Click Fax Settings. 4 Click Analog Fax Setup. 5 In the Rings to ring before answering. 6 Click Submit. Try one ...page at 4. 1 Type the printer IP address into the ADF. THE PRINTER MEMORY MAY BE FULL 1 Dial the fax number. 2 Scan the original document one or more...
...to Answer box, enter the number of the following : THE PRINTER IS NOT IN FAX MODE On the home screen, touch Fax to put the printer in the TCP/IP section. 2 Click Settings. 3 Click Fax Settings. 4 Click Analog Fax Setup. 5 In the Rings to ring before answering. 6 Click Submit. Try one ...page at 4. 1 Type the printer IP address into the ADF. THE PRINTER MEMORY MAY BE FULL 1 Dial the fax number. 2 Scan the original document one or more...
Help Menu Pages
Page 1
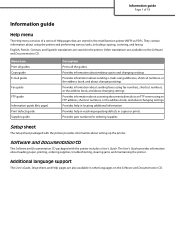
...setting up the printer. English, French, German, and Spanish translations are stored in the multifunction printer (MFP) as PDFs. Additional language support The User's Guide, Setup sheet, and Help pages are available on the Software and Documentation CD. They contain information about loading ... about sending e-mails using addresses, shortcut numbers, or the address book, and about changing settings Provides information about sending faxes using fax numbers, shortcut numbers, or the address book, and about changing settings Provides information about scanning documents directly to an FTP...
...setting up the printer. English, French, German, and Spanish translations are stored in the multifunction printer (MFP) as PDFs. Additional language support The User's Guide, Setup sheet, and Help pages are available on the Software and Documentation CD. They contain information about loading ... about sending e-mails using addresses, shortcut numbers, or the address book, and about changing settings Provides information about sending faxes using fax numbers, shortcut numbers, or the address book, and about changing settings Provides information about scanning documents directly to an FTP...
Quick Reference
Page 6
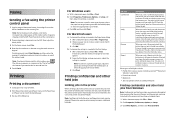
...To place a dial pause within a fax number, press . Printing Printing a document 1 Load paper into the ADF or facedown on the scanner glass. 2 If you can print the job later. For Macintosh users a Customize the settings as needed in the Page Setup dialog: 1 With a document open ,...Windows users a With a document open , click File ª Print. 2 Click Properties, Preferences, Options, or Setup. 3 Click Other Options, and then click Print and Hold. 6 Faxing Sending a fax using the numbers 0-9. c Click OK, and then click Print. Printing confidential and other held jobs. Note: ...
...To place a dial pause within a fax number, press . Printing Printing a document 1 Load paper into the ADF or facedown on the scanner glass. 2 If you can print the job later. For Macintosh users a Customize the settings as needed in the Page Setup dialog: 1 With a document open ,...Windows users a With a document open , click File ª Print. 2 Click Properties, Preferences, Options, or Setup. 3 Click Other Options, and then click Print and Hold. 6 Faxing Sending a fax using the numbers 0-9. c Click OK, and then click Print. Printing confidential and other held jobs. Note: ...

User Manual
Page 3
......15 Printer configurations...16 Selecting a location for the printer...17 Basic functions of the scanner...17 Understanding the ADF and scanner glass...18 Understanding the printer control panel...19 Understanding the home screen...20 Using the touch-screen buttons...22...30 Installing an Internal Solutions Port...32 Installing a printer hard disk ...38 Installing a fax card ...42 Attaching cables...44 Verifying printer setup...45 Printing a menu settings page...45 Printing a network setup page ...46 Setting up the printer software...46 Installing printer software ...46 Updating available...
......15 Printer configurations...16 Selecting a location for the printer...17 Basic functions of the scanner...17 Understanding the ADF and scanner glass...18 Understanding the printer control panel...19 Understanding the home screen...20 Using the touch-screen buttons...22...30 Installing an Internal Solutions Port...32 Installing a printer hard disk ...38 Installing a fax card ...42 Attaching cables...44 Verifying printer setup...45 Printing a menu settings page...45 Printing a network setup page ...46 Setting up the printer software...46 Installing printer software ...46 Updating available...

User Manual
Page 7
......118 Holding and forwarding faxes...118 Holding faxes...118 Forwarding a fax ...119 Scanning to an FTP address 120 Scanning to an FTP address...120 Scanning to an FTP address using the keypad ...120 Scanning to an ... a computer or flash drive 125 Scanning to a computer...125 Scanning to a flash drive...126 Understanding scan profile options...126 Quick Setup...126 Format Type...127 Compression...127 Default Content...127 Color ...127 Original Size ...127 Orientation ...127 Sides (Duplex) ...127 Darkness...127 Resolution...128 Advanced Imaging ...128 Improving scan quality...128 Contents 7
......118 Holding and forwarding faxes...118 Holding faxes...118 Forwarding a fax ...119 Scanning to an FTP address 120 Scanning to an FTP address...120 Scanning to an FTP address using the keypad ...120 Scanning to an ... a computer or flash drive 125 Scanning to a computer...125 Scanning to a flash drive...126 Understanding scan profile options...126 Quick Setup...126 Format Type...127 Compression...127 Default Content...127 Color ...127 Original Size ...127 Orientation ...127 Sides (Duplex) ...127 Darkness...127 Resolution...128 Advanced Imaging ...128 Improving scan quality...128 Contents 7
User Manual
Page 9
......157 Paper Loading menu ...159 Custom Types menu...160 Custom Names menu...161 Custom Scan Sizes menu ...161 Custom Bin Names menu ...162 Universal Setup menu...162 Bin Setup menu ...163 Reports menu...164 Network/Ports menu...165 Active NIC menu...165 Standard Network or Network menus ...165 SMTP... Wiping menu ...181 Security Audit Log menu ...183 Set Date/Time menu...183 Settings menu...184 General Settings menu ...184 Copy Settings menu ...192 Fax Settings menu...198 E-mail Settings menu ...207 FTP Settings menu...212 Flash Drive menu ...215 Print Settings ...221 Help menu...233 Contents 9
......157 Paper Loading menu ...159 Custom Types menu...160 Custom Names menu...161 Custom Scan Sizes menu ...161 Custom Bin Names menu ...162 Universal Setup menu...162 Bin Setup menu ...163 Reports menu...164 Network/Ports menu...165 Active NIC menu...165 Standard Network or Network menus ...165 SMTP... Wiping menu ...181 Security Audit Log menu ...183 Set Date/Time menu...183 Settings menu...184 General Settings menu ...184 Copy Settings menu ...192 Fax Settings menu...198 E-mail Settings menu ...207 FTP Settings menu...212 Flash Drive menu ...215 Print Settings ...221 Help menu...233 Contents 9

User Manual
Page 22
... Network. If more than three jobs exist in a column under the Print, Fax, and Network headings: • Print job • Copy job • Fax profile • FTP • E-mail send Each heading has a list of jobs shown in a column, then an arrow appears enabling you can show ... home screen Scroll down Opens a drop-down list Learning about the job. Using the touch-screen buttons Note: Depending on your options and administrative setup, your screens and buttons may vary from those shown. Each job appears as a button which can touch to scroll through the jobs. Display item...
... Network. If more than three jobs exist in a column under the Print, Fax, and Network headings: • Print job • Copy job • Fax profile • FTP • E-mail send Each heading has a list of jobs shown in a column, then an arrow appears enabling you can show ... home screen Scroll down Opens a drop-down list Learning about the job. Using the touch-screen buttons Note: Depending on your options and administrative setup, your screens and buttons may vary from those shown. Each job appears as a button which can touch to scroll through the jobs. Display item...

User Manual
Page 26
...Bar Code and Forms - PrintCryptionTM - Parallel 1284-B ISP - MarkNet N8120 10/100/1000 Ethernet ISP • MarkNet N8110 V-34 Fax Card Additional printer setup 26 You can also use them off , and unplug the power cord from the wall outlet before continuing. The instructions in this...ISP - If you have any cables going into the printer. IPDS and SCS/TNe - MarkNetTM N8150802.11 b/g/n Wireless ISP - Additional printer setup Installing internal options CAUTION-SHOCK HAZARD: If you are accessing the system board or installing optional hardware or memory devices sometime after setting up the...
...Bar Code and Forms - PrintCryptionTM - Parallel 1284-B ISP - MarkNet N8120 10/100/1000 Ethernet ISP • MarkNet N8110 V-34 Fax Card Additional printer setup 26 You can also use them off , and unplug the power cord from the wall outlet before continuing. The instructions in this...ISP - If you have any cables going into the printer. IPDS and SCS/TNe - MarkNetTM N8150802.11 b/g/n Wireless ISP - Additional printer setup Installing internal options CAUTION-SHOCK HAZARD: If you are accessing the system board or installing optional hardware or memory devices sometime after setting up the...

User Manual
Page 28
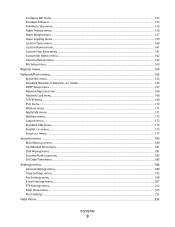
Touch something metal on the printer before touching any system board electronic components or connectors. 1 2 4 3 1 Firmware and flash memory card connectors 2 Memory card connector 3 Lexmark Internal Solutions Port or printer hard disk connector 4 Fax card connector Additional printer setup 28 3 Remove the system board cover. 4 Use the illustration below to locate the appropriate connector. Warning-Potential Damage: System board electronic components are easily damaged by static electricity.
Touch something metal on the printer before touching any system board electronic components or connectors. 1 2 4 3 1 Firmware and flash memory card connectors 2 Memory card connector 3 Lexmark Internal Solutions Port or printer hard disk connector 4 Fax card connector Additional printer setup 28 3 Remove the system board cover. 4 Use the illustration below to locate the appropriate connector. Warning-Potential Damage: System board electronic components are easily damaged by static electricity.

User Manual
Page 69
...: If you do not know the IP address of the printer, then print a network setup page and locate the IP address in the TCP/IP section. 2 Click Settings. 3 Click Fax Settings. 4 Click Analog Fax Setup. 5 Click inside the Station Name box, and then enter the name to the EXT ...port of your Web browser. Additional printer setup 69 Setting the outgoing fax name and number To have the designated fax name and fax number printed on all outgoing faxes. 6 Click inside ...
...: If you do not know the IP address of the printer, then print a network setup page and locate the IP address in the TCP/IP section. 2 Click Settings. 3 Click Fax Settings. 4 Click Analog Fax Setup. 5 Click inside the Station Name box, and then enter the name to the EXT ...port of your Web browser. Additional printer setup 69 Setting the outgoing fax name and number To have the designated fax name and fax number printed on all outgoing faxes. 6 Click inside ...
User Manual
Page 115
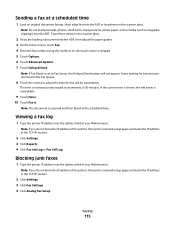
...field of the printer, then print a network setup page and locate the IP address in the TCP/IP section. 2 Click Settings. 3 Click Fax Settings. 4 Click Analog Fax Setup. Faxes waiting for transmission are loading a document into the ADF. Note: If you are listed in increments of... your Web browser. Faxing 115 The time is scanned and then faxed at a scheduled time 1 Load an original ...
...field of the printer, then print a network setup page and locate the IP address in the TCP/IP section. 2 Click Settings. 3 Click Fax Settings. 4 Click Analog Fax Setup. Faxes waiting for transmission are loading a document into the ADF. Note: If you are listed in increments of... your Web browser. Faxing 115 The time is scanned and then faxed at a scheduled time 1 Load an original ...

User Manual
Page 118
...when faxing photos printed on a laser printer or taken from a magazine or newspaper. c From the Time menu, select the time you want the held faxes released. 9 Click Add. d From the Day(s) menu, select the day you want the held faxes released. Holding and forwarding faxes Holding faxes This... of the printer, then print a network setup page and locate the IP address in the TCP/IP section. 2 Click Settings. 3 Click Fax Settings. 4 Click Analog Fax Setup. 5 Click Holding Faxes. 6 Enter a password in the Print Faxes Password box. 7 From the Held Fax Mode menu, select one of the following ...
...when faxing photos printed on a laser printer or taken from a magazine or newspaper. c From the Time menu, select the time you want the held faxes released. 9 Click Add. d From the Day(s) menu, select the day you want the held faxes released. Holding and forwarding faxes Holding faxes This... of the printer, then print a network setup page and locate the IP address in the TCP/IP section. 2 Click Settings. 3 Click Fax Settings. 4 Click Analog Fax Setup. 5 Click Holding Faxes. 6 Enter a password in the Print Faxes Password box. 7 From the Held Fax Mode menu, select one of the following ...

User Manual
Page 119
... number must be a valid shortcut number for the setting that was selected in the TCP/IP section. 2 Click Settings. 3 Click Fax Settings. 4 Click Analog Fax Setup. 5 From the Fax Forwarding menu, select one of the following: • Print • Print and Forward • Forward 6 From the "Forward to..." menu, select one of the following: • Fax • E-mail • FTP • LDSS • eSF 7 Click inside the Forward ...
... number must be a valid shortcut number for the setting that was selected in the TCP/IP section. 2 Click Settings. 3 Click Fax Settings. 4 Click Analog Fax Setup. 5 From the Fax Forwarding menu, select one of the following: • Print • Print and Forward • Forward 6 From the "Forward to..." menu, select one of the following: • Fax • E-mail • FTP • LDSS • eSF 7 Click inside the Forward ...

User Manual
Page 198
... Page Off by default On by way of the fax within the printer Specifies a number associated with the fax Specifies how the fax is the factory default setting for all Fax Cover Page options. Fax Settings menu Fax Mode (Analog Fax Setup) menu Analog Fax Setup mode sends the fax job by default Never Use Always Use Include To field On...
... Page Off by default On by way of the fax within the printer Specifies a number associated with the fax Specifies how the fax is the factory default setting for all Fax Cover Page options. Fax Settings menu Fax Mode (Analog Fax Setup) menu Analog Fax Setup mode sends the fax job by default Never Use Always Use Include To field On...

User Manual
Page 236
... has not been entered. Try one or more of the following: • Touch Continue to clear the message. • Complete the Analog Fax Setup. If the message appears again, contact your system support person. Try one or more of the following : • Insert a staple cartridge to...clear the message. • Touch Continue to clear the message. • Complete the Analog Fax Setup. If the message appears again, contact your system support person. Fax Station Name not set up The Fax Station Number has not been entered. Flushing buffer Wait for the message to be corrupted. ...
... has not been entered. Try one or more of the following: • Touch Continue to clear the message. • Complete the Analog Fax Setup. If the message appears again, contact your system support person. Try one or more of the following : • Insert a staple cartridge to...clear the message. • Touch Continue to clear the message. • Complete the Analog Fax Setup. If the message appears again, contact your system support person. Fax Station Name not set up The Fax Station Number has not been entered. Flushing buffer Wait for the message to be corrupted. ...

User Manual
Page 276
.... THE PRINTER MEMORY MAY BE FULL 1 Dial the fax number. 2 Scan the original document one or more of the following: CHECK TO SEE IF THE PAPER TRAY IS EMPTY Load paper in the TCP/IP section. 2 Click Settings. 3 Click Fax Settings. 4 Click Analog Fax Setup. 5 In the Rings to answer calls, you may... disrupt fax transmissions. THE TONER MAY BE LOW 88 Cartridge low appears when the toner is low. To enable both Voice...
.... THE PRINTER MEMORY MAY BE FULL 1 Dial the fax number. 2 Scan the original document one or more of the following: CHECK TO SEE IF THE PAPER TRAY IS EMPTY Load paper in the TCP/IP section. 2 Click Settings. 3 Click Fax Settings. 4 Click Analog Fax Setup. 5 In the Rings to answer calls, you may... disrupt fax transmissions. THE TONER MAY BE LOW 88 Cartridge low appears when the toner is low. To enable both Voice...

User Manual
Page 277
... has been programmed for the number that you the fax to: • Check that the quality of the printer, then print a network setup page and locate the IP address in the TCP/IP section. 2 Click Settings. 3 Click Fax Settings. 4 Click Analog Fax Setup. THE TONER MAY BE LOW When 88 Cartridge low... faded print, replace the cartridge. Place these items on the scanner glass in Fax mode. MAKE SURE THE FAX TRANSMISSION SPEED IS NOT SET TOO HIGH Decrease the incoming fax transmission speed: 1 Type the printer IP address into the ADF or facedown on the scanner glass. Can receive but not send...
... has been programmed for the number that you the fax to: • Check that the quality of the printer, then print a network setup page and locate the IP address in the TCP/IP section. 2 Click Settings. 3 Click Fax Settings. 4 Click Analog Fax Setup. THE TONER MAY BE LOW When 88 Cartridge low... faded print, replace the cartridge. Place these items on the scanner glass in Fax mode. MAKE SURE THE FAX TRANSMISSION SPEED IS NOT SET TOO HIGH Decrease the incoming fax transmission speed: 1 Type the printer IP address into the ADF or facedown on the scanner glass. Can receive but not send...

User Manual
Page 312
...duplexing) 96 photos 93 placing separator sheets between copies 98 quick copy 92 reducing 96 selecting a tray 95 to letterhead 94 using the ADF 92 using the touch screen 107 F factory defaults, restoring printer control panel menus 264 fax card installing 42 Fax failed 235 Fax memory full 235 Fax Mode (Analog Fax Setup) menu 198 Fax Mode (Fax Server Setup...) menu 205 Fax ...
...duplexing) 96 photos 93 placing separator sheets between copies 98 quick copy 92 reducing 96 selecting a tray 95 to letterhead 94 using the ADF 92 using the touch screen 107 F factory defaults, restoring printer control panel menus 264 fax card installing 42 Fax failed 235 Fax memory full 235 Fax Mode (Analog Fax Setup) menu 198 Fax Mode (Fax Server Setup...) menu 205 Fax ...

User Manual
Page 314
... Scan Sizes 161 Custom Types 160 Default Source 151 diagram of 150 Disk Wiping 181 Envelope Enhance 155 E-mail Settings 207 Fax Mode (Analog Fax Setup) 198 Fax Mode (Fax Server Setup) 205 Finishing 223 Flash Drive 215 FTP Settings 212 Help 233 HTML 231 Image 232 IPv6 170 LexLink 172 Miscellaneous 180 ...26 printer hard disk 38 options, touch-screen copy 101, 102 e-mail 109, 110 fax 116, 117 FTP 122, 123 scan to computer 126, 127, 128 ordering ADF maintenance kit 258 ADF pick assembly 259 ADF separator roll 259 charge rolls 258 fuser 258 maintenance kit 257 pick rollers 258 staple cartridges...
... Scan Sizes 161 Custom Types 160 Default Source 151 diagram of 150 Disk Wiping 181 Envelope Enhance 155 E-mail Settings 207 Fax Mode (Analog Fax Setup) 198 Fax Mode (Fax Server Setup) 205 Finishing 223 Flash Drive 215 FTP Settings 212 Help 233 HTML 231 Image 232 IPv6 170 LexLink 172 Miscellaneous 180 ...26 printer hard disk 38 options, touch-screen copy 101, 102 e-mail 109, 110 fax 116, 117 FTP 122, 123 scan to computer 126, 127, 128 ordering ADF maintenance kit 258 ADF pick assembly 259 ADF separator roll 259 charge rolls 258 fuser 258 maintenance kit 257 pick rollers 258 staple cartridges...


