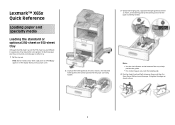
Quick Reference
Page 1
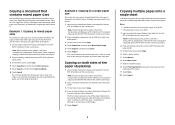
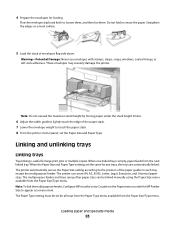
...while a job prints or while Busy appears on a level surface. 1 Doing so may cause a jam. 2 Squeeze the width guide tab inward as shown, and slide the guide to the correct position for loading paper. Straighten the edges on the display. Notes: • Use the size indicators on the ...for the paper size being loaded. 3 Unlock the length guide, squeeze the length guide tab inward as shown, and move the width guide to the correct position for the paper size being loaded. Do not fold or crease the paper. Lexmark™ X65x Quick Reference Loading paper and specialty media ...
...while a job prints or while Busy appears on a level surface. 1 Doing so may cause a jam. 2 Squeeze the width guide tab inward as shown, and slide the guide to the correct position for loading paper. Straighten the edges on the display. Notes: • Use the size indicators on the ...for the paper size being loaded. 3 Unlock the length guide, squeeze the length guide tab inward as shown, and move the width guide to the correct position for the paper size being loaded. Do not fold or crease the paper. Lexmark™ X65x Quick Reference Loading paper and specialty media ...
Quick Reference
Page 2
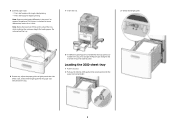
... size being loaded. 2 Do not overload the tray. 7 Insert the tray. 3 Unlock the length guide. 6 If necessary, adjust the paper guides to the correct position for loading paper. For more information, see the User's Guide. 5 Load the paper stack: • Print side facedown for single-sided printing • Print side... panel. Loading the 2000-sheet tray 1 Pull the tray out. 2 Pull up and slide the width guide to lightly touch the sides of the stack, and lock the length guide for the paper sizes indicated on the side of paper was loaded than the type previously loaded in the...
... size being loaded. 2 Do not overload the tray. 7 Insert the tray. 3 Unlock the length guide. 6 If necessary, adjust the paper guides to the correct position for loading paper. For more information, see the User's Guide. 5 Load the paper stack: • Print side facedown for single-sided printing • Print side... panel. Loading the 2000-sheet tray 1 Pull the tray out. 2 Pull up and slide the width guide to lightly touch the sides of the stack, and lock the length guide for the paper sizes indicated on the side of paper was loaded than the type previously loaded in the...
Quick Reference
Page 3
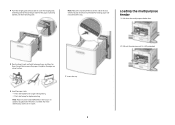
... multipurpose feeder door. 5 Flex the sheets back and forth to the correct position for the paper size being loaded, and then lock the guide. Straighten the edges on the side of the tray which indicates the maximum height for duplex printing Note: Paper must be loaded differently in ...the trays if an optional StapleSmart II Finisher is fully extended. For more information, see the User's Guide. 3 2 Pull out the extension until it is installed. Note: Notice the maximum fill line on a level surface. 7 Insert the tray. 6 Load the paper ...
... multipurpose feeder door. 5 Flex the sheets back and forth to the correct position for the paper size being loaded, and then lock the guide. Straighten the edges on the side of the tray which indicates the maximum height for duplex printing Note: Paper must be loaded differently in ...the trays if an optional StapleSmart II Finisher is fully extended. For more information, see the User's Guide. 3 2 Pull out the extension until it is installed. Note: Notice the maximum fill line on a level surface. 7 Insert the tray. 6 Load the paper ...

Quick Reference
Page 4
...you are loading a document into the ADF. The copy screen appears. 3 Change the copy settings as magazine clippings) into the ADF, then adjust the paper guides. 3 On the home screen, touch Copy. 4 Touch Copy from one size and type of media at a time. • Load envelopes with stamps, clasps...or type setting appears. 6 Touch Submit. 7 Touch to return to the home screen. These envelopes may severely damage the printer. 6 Adjust the width guide to be set the Paper Size and Paper Type. Note: Do not load postcards, photos, small items, transparencies, photo paper, or thin media (...
...you are loading a document into the ADF. The copy screen appears. 3 Change the copy settings as magazine clippings) into the ADF, then adjust the paper guides. 3 On the home screen, touch Copy. 4 Touch Copy from one size and type of media at a time. • Load envelopes with stamps, clasps...or type setting appears. 6 Touch Submit. 7 Touch to return to the home screen. These envelopes may severely damage the printer. 6 Adjust the width guide to be set the Paper Size and Paper Type. Note: Do not load postcards, photos, small items, transparencies, photo paper, or thin media (...
Quick Reference
Page 5
... Note: Do not load postcards, photos, small items, transparencies, photo paper, or thin media (such as magazine clippings) into the ADF, then adjust the paper guides. 3 On the home screen, touch Copy. 4 Select a duplex setting. 5 Touch Options. 6 Touch Paper Saver. 7 Select the desired output. 8 Touch ...Do not load postcards, photos, small items, transparencies, photo paper, or thin media (such as magazine clippings) into the ADF, then adjust the paper guides. 3 On the home screen, touch Copy. 4 Touch Copy from " settings, each page of paper. Example 1: Copying to mixed paper sizes The...
... Note: Do not load postcards, photos, small items, transparencies, photo paper, or thin media (such as magazine clippings) into the ADF, then adjust the paper guides. 3 On the home screen, touch Copy. 4 Select a duplex setting. 5 Touch Options. 6 Touch Paper Saver. 7 Select the desired output. 8 Touch ...Do not load postcards, photos, small items, transparencies, photo paper, or thin media (such as magazine clippings) into the ADF, then adjust the paper guides. 3 On the home screen, touch Copy. 4 Touch Copy from " settings, each page of paper. Example 1: Copying to mixed paper sizes The...
Quick Reference
Page 6
..., and then click Print. For Macintosh users a Customize the settings as needed . Verify When you are loading a document into the ADF, then adjust the paper guides. 3 On the home screen, touch Fax. 4 Enter the fax number or a shortcut using the printer control panel 1 Load an original document faceup, short edge first...
..., and then click Print. For Macintosh users a Customize the settings as needed . Verify When you are loading a document into the ADF, then adjust the paper guides. 3 On the home screen, touch Fax. 4 Enter the fax number or a shortcut using the printer control panel 1 Load an original document faceup, short edge first...

User Guide
Page 1
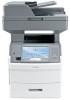
X651de, X652de, X654de, X656de, X656dte, X658d, X658de, X658dme, X658dfe, X658dte, X658dtme, X658dtfe User's Guide July 2008 www.lexmark.com Lexmark and Lexmark with diamond design are the property of Lexmark International, Inc., registered in the United States and/or other trademarks are trademarks of their respective owners. © 2008 Lexmark International, Inc. All other countries. All rights reserved. 740 West New Circle Road Lexington, Kentucky 40550
X651de, X652de, X654de, X656de, X656dte, X658d, X658de, X658dme, X658dfe, X658dte, X658dtme, X658dtfe User's Guide July 2008 www.lexmark.com Lexmark and Lexmark with diamond design are the property of Lexmark International, Inc., registered in the United States and/or other trademarks are trademarks of their respective owners. © 2008 Lexmark International, Inc. All other countries. All rights reserved. 740 West New Circle Road Lexington, Kentucky 40550

User Guide
Page 37
Additional printer setup 37 7 Lower the ISP toward the plastic tee until the ISP is seated between the guides of the plastic tee. 8 Insert the long thumbscrew and turn it clockwise enough to hold the ISP in place, but do not tighten the thumbscrew at this time.
Additional printer setup 37 7 Lower the ISP toward the plastic tee until the ISP is seated between the guides of the plastic tee. 8 Insert the long thumbscrew and turn it clockwise enough to hold the ISP in place, but do not tighten the thumbscrew at this time.
User Guide
Page 49
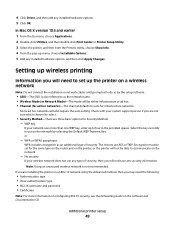
... to do so by selecting the Default WEP Transmit Key. Check with your network uses more information on configuring 802.1X security, see the Networking Guide on the network by the setup software. • SSID-The SSID is not recommended. Setting up menu, choose Installable Options. 5 Add any installed hardware options...
... to do so by selecting the Default WEP Transmit Key. Check with your network uses more information on configuring 802.1X security, see the Networking Guide on the network by the setup software. • SSID-The SSID is not recommended. Setting up menu, choose Installable Options. 5 Add any installed hardware options...

User Guide
Page 72
... the size you print on paper sizes that do not contain plain paper. 1 Make sure the printer is determined by the position of the paper guides in the tray for all of the following Universal size settings for the desired tray until Universal Setup appears, and then touch Universal Setup. 5 Touch...
... the size you print on paper sizes that do not contain plain paper. 1 Make sure the printer is determined by the position of the paper guides in the tray for all of the following Universal size settings for the desired tray until Universal Setup appears, and then touch Universal Setup. 5 Touch...

User Guide
Page 73
... 250-sheet tray and the 550-sheet tray are different in either tray: 1 Pull the tray out. Doing so may cause a jam. 2 Squeeze the width guide tab inward as shown, and move the width...
... 250-sheet tray and the 550-sheet tray are different in either tray: 1 Pull the tray out. Doing so may cause a jam. 2 Squeeze the width guide tab inward as shown, and move the width...

User Guide
Page 74
Straighten the edges on the bottom of the tray to help position the guides. • For standard paper sizes, lock the length guide. 4 Flex the sheets back and forth to the correct position for duplex printing Note: Paper must be loaded differently in the trays if an optional ...StapleSmartTM II Finisher is installed. 3 Unlock the length guide, squeeze the length guide tab inward as shown, and slide the guide to loosen them, and then fan them. Loading paper and specialty media 74 Do not fold or crease the paper...
Straighten the edges on the bottom of the tray to help position the guides. • For standard paper sizes, lock the length guide. 4 Flex the sheets back and forth to the correct position for duplex printing Note: Paper must be loaded differently in the trays if an optional ...StapleSmartTM II Finisher is installed. 3 Unlock the length guide, squeeze the length guide tab inward as shown, and slide the guide to loosen them, and then fan them. Loading paper and specialty media 74 Do not fold or crease the paper...

User Guide
Page 75
Do not overload the tray. 6 If necessary, adjust the paper guides to lightly touch the sides of the tray which indicates the maximum height for the paper sizes indicated on the tray. Loading paper and specialty media 75 Without an optional StapleSmart II Finisher With an optional StapleSmart II Finisher Single-sided printing Single-sided printing Duplex (two-sided) printing Duplex (two-sided) printing Note: Notice the maximum fill line on the side of the stack, and lock the length guide for loading paper.
Do not overload the tray. 6 If necessary, adjust the paper guides to lightly touch the sides of the tray which indicates the maximum height for the paper sizes indicated on the tray. Loading paper and specialty media 75 Without an optional StapleSmart II Finisher With an optional StapleSmart II Finisher Single-sided printing Single-sided printing Duplex (two-sided) printing Duplex (two-sided) printing Note: Notice the maximum fill line on the side of the stack, and lock the length guide for loading paper.

User Guide
Page 76
Loading the 2000-sheet tray 1 Pull the tray out. 2 Pull up and slide the width guide to the correct position for the tray from the printer control panel. 7 Insert the tray. 8 If a different type of paper was loaded than the type previously loaded in the tray, then change the Paper Type setting for the paper size being loaded. Loading paper and specialty media 76
Loading the 2000-sheet tray 1 Pull the tray out. 2 Pull up and slide the width guide to the correct position for the tray from the printer control panel. 7 Insert the tray. 8 If a different type of paper was loaded than the type previously loaded in the tray, then change the Paper Type setting for the paper size being loaded. Loading paper and specialty media 76

User Guide
Page 77
Loading paper and specialty media 77 3 Unlock the length guide. 4 Push the length guide release latch to raise the length guide, slide the guide to the correct position for the paper size being loaded, and then lock the guide.
Loading paper and specialty media 77 3 Unlock the length guide. 4 Push the length guide release latch to raise the length guide, slide the guide to the correct position for the paper size being loaded, and then lock the guide.

User Guide
Page 80
Straighten the edges on a level surface. Be careful not to scratch them . Paper * Avoid touching the print side of paper or specialty media back and forth to loosen them, and then fan them. Do not fold or crease them . Loading paper and specialty media 80 Loading the multipurpose feeder 1 Pull down the multipurpose feeder door. 2 Pull out the extension until it is fully extended. 3 Slide the width guide to the far right. 4 Flex the sheets of transparencies.
Straighten the edges on a level surface. Be careful not to scratch them . Paper * Avoid touching the print side of paper or specialty media back and forth to loosen them, and then fan them. Do not fold or crease them . Loading paper and specialty media 80 Loading the multipurpose feeder 1 Pull down the multipurpose feeder door. 2 Pull out the extension until it is fully extended. 3 Slide the width guide to the far right. 4 Flex the sheets of transparencies.
User Guide
Page 82
...to the middle position. • Long envelopes-Fully open the envelope support. 2 Lift the envelope weight back toward the printer. 3 Slide the width guide to lightly touch the edge of the paper stack. Make sure the paper fits loosely in the multipurpose feeder, lies flat, and is printing. &#...• Load envelopes with stamps, clasps, snaps, windows, coated linings, or self-stick adhesives. These envelopes may severely damage the printer. 6 Adjust the width guide to the right. Loading paper and specialty media 82 Warning-Potential Damage: Never use envelopes with the flap side up.
...to the middle position. • Long envelopes-Fully open the envelope support. 2 Lift the envelope weight back toward the printer. 3 Slide the width guide to lightly touch the edge of the paper stack. Make sure the paper fits loosely in the multipurpose feeder, lies flat, and is printing. &#...• Load envelopes with stamps, clasps, snaps, windows, coated linings, or self-stick adhesives. These envelopes may severely damage the printer. 6 Adjust the width guide to the right. Loading paper and specialty media 82 Warning-Potential Damage: Never use envelopes with the flap side up.
User Guide
Page 83
... Universal paper sizes. Note: Do not exceed the maximum stack height by forcing paper under the stack height limiter. 6 Adjust the width guide to the position of the paper guides in order for all trays from the Paper Type menu available from the Paper Size/Type menu. Linking and unlinking trays Linking...
... Universal paper sizes. Note: Do not exceed the maximum stack height by forcing paper under the stack height limiter. 6 Adjust the width guide to the position of the paper guides in order for all trays from the Paper Type menu available from the Paper Size/Type menu. Linking and unlinking trays Linking...
User Guide
Page 86
... Smoothness Paper smoothness directly affects print quality. For paper smaller than 60 g/m2 (16 lb) might not be stiff enough to curl at www.lexmark.com/publications. If paper is time to printing and can degrade its original wrapper in .), we recommend 90 g/m2 (24 lb) or heavier ... Consider these characteristics when evaluating new paper stock. Note: For detailed information on card stock and labels, see the Card Stock & Label Guide available on the Lexmark Web site at its original wrapper until it properly. Grain is very different from 60-176 g/m2 (16-47 lb bond) grain long...
... Smoothness Paper smoothness directly affects print quality. For paper smaller than 60 g/m2 (16 lb) might not be stiff enough to curl at www.lexmark.com/publications. If paper is time to printing and can degrade its original wrapper in .), we recommend 90 g/m2 (24 lb) or heavier ... Consider these characteristics when evaluating new paper stock. Note: For detailed information on card stock and labels, see the Card Stock & Label Guide available on the Lexmark Web site at its original wrapper until it properly. Grain is very different from 60-176 g/m2 (16-47 lb bond) grain long...
User Guide
Page 89
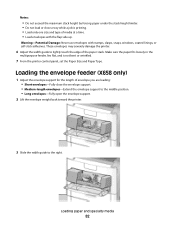
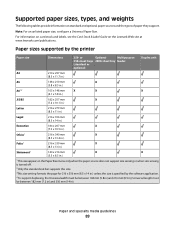
... Size. Universal length must be between 148 mm (5.8 in) and 216 mm (8.5 in ). For information on card stock and labels, see the Card Stock & Label Guide on standard and optional paper sources and the types of paper they support. Paper sizes supported by the software application. 4 To support duplexing, the Universal... width must be between 182 mm (7.2 in) and 356 mm (14 in ); Supported paper sizes, types, and weights The following tables provide information on the Lexmark Web site at www...
... Size. Universal length must be between 148 mm (5.8 in) and 216 mm (8.5 in ). For information on card stock and labels, see the Card Stock & Label Guide on standard and optional paper sources and the types of paper they support. Paper sizes supported by the software application. 4 To support duplexing, the Universal... width must be between 182 mm (7.2 in) and 356 mm (14 in ); Supported paper sizes, types, and weights The following tables provide information on the Lexmark Web site at www...


