
User's Guide
Page 4
...MFP ...8 Using the scanner ...9 Configured models ...10 Understanding the MFP control panel ...11 Using the LCD touch-screen buttons ...17 Menus ...23 Chapter 2: Copying ...24 Quick copy ...24 Multiple page copying ...24 Using the flatbed ...25 Understanding the copy screens and options 25 Copying from one size to another ...27 Making transparencies ...27 Copying to letterhead ...27 Copying photographs ...27 Making copies using media from a selected tray 28 Copying mixed-sized media ...28 Setting the duplex option ...29 Reducing and enlarging copies ...29 Adjusting copy quality ...29 Setting...
...MFP ...8 Using the scanner ...9 Configured models ...10 Understanding the MFP control panel ...11 Using the LCD touch-screen buttons ...17 Menus ...23 Chapter 2: Copying ...24 Quick copy ...24 Multiple page copying ...24 Using the flatbed ...25 Understanding the copy screens and options 25 Copying from one size to another ...27 Making transparencies ...27 Copying to letterhead ...27 Copying photographs ...27 Making copies using media from a selected tray 28 Copying mixed-sized media ...28 Setting the duplex option ...29 Reducing and enlarging copies ...29 Adjusting copy quality ...29 Setting...

User's Guide
Page 9
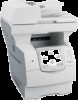
... perform specific copying jobs. • Send an outgoing fax using the MFP control panel. • Send an outgoing fax to multiple fax destinations at the same time. • Scan documents and send them to your PC, an e-mail address, or an FTP destination. • Scan documents and send them to scan or copy single pages or book pages. The ADF has two scanner elements. When using the ADF: • Place the paper in .) thick. • Copy and print documents at 600 dpi Note: Printed output is black...
... perform specific copying jobs. • Send an outgoing fax using the MFP control panel. • Send an outgoing fax to multiple fax destinations at the same time. • Scan documents and send them to your PC, an e-mail address, or an FTP destination. • Scan documents and send them to scan or copy single pages or book pages. The ADF has two scanner elements. When using the ADF: • Place the paper in .) thick. • Copy and print documents at 600 dpi Note: Printed output is black...
User's Guide
Page 11
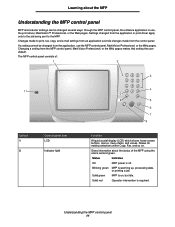
... data, or printing a job. Learning about the status of : Callout 1 2 Control panel item LCD Indicator light Function A liquid crystal display (LCD) which shows home screen buttons, menus, menu items, and values. Changing a setting from the application, use , the print driver, MarkVision™ Professional, or the Web pages. Solid green MFP is required. Allows for making selections within Copy, Fax, and so on , but idle. Gives information about the MFP Understanding the MFP control panel MFP and scanner settings can be changed...
... data, or printing a job. Learning about the status of : Callout 1 2 Control panel item LCD Indicator light Function A liquid crystal display (LCD) which shows home screen buttons, menus, menu items, and values. Changing a setting from the application, use , the print driver, MarkVision™ Professional, or the Web pages. Solid green MFP is required. Allows for making selections within Copy, Fax, and so on , but idle. Gives information about the MFP Understanding the MFP control panel MFP and scanner settings can be changed...
User's Guide
Page 12
... accessed by pressing Backspace numerous times. or three-second dial pause in the automatic document feeder (ADF). Within the Copy menu, which means paper may remain in a fax number. Within the Fax Destination List, press Backspace to the home screen. When in the Copy Count. Stopping appears on the home screen without pressing the # button first, the Copy menu opens and changes the Copy Quantity. Also, use these buttons to dial phone numbers for faxes. During a scan job, the scanner finishes scanning the current page...
... accessed by pressing Backspace numerous times. or three-second dial pause in the automatic document feeder (ADF). Within the Copy menu, which means paper may remain in a fax number. Within the Fax Destination List, press Backspace to the home screen. When in the Copy Count. Stopping appears on the home screen without pressing the # button first, the Copy menu opens and changes the Copy Quantity. Also, use these buttons to dial phone numbers for faxes. During a scan job, the scanner finishes scanning the current page...

User's Guide
Page 23
... Server Setup Address Book Setup Wireless Standard Network Network Standard USB USB Standard Parallel Parallel Standard Serial Serial NetWare AppleTalk LexLink Settings General Settings Copy Settings Fax Settings E-mail Settings FTP Settings Print Settings Security Set Date and Time Help Print all guides Copy guide E-mail guide Fax guide FTP guide Information guide Print defects guide Supplies guide Menus 23 For more information about the MFP Menus A number of the home screen. Learning about menus and menu items, see the Menus and Messages Guide on the Software and Documentation...
... Server Setup Address Book Setup Wireless Standard Network Network Standard USB USB Standard Parallel Parallel Standard Serial Serial NetWare AppleTalk LexLink Settings General Settings Copy Settings Fax Settings E-mail Settings FTP Settings Print Settings Security Set Date and Time Help Print all guides Copy guide E-mail guide Fax guide FTP guide Information guide Print defects guide Supplies guide Menus 23 For more information about the MFP Menus A number of the home screen. Learning about menus and menu items, see the Menus and Messages Guide on the Software and Documentation...

User's Guide
Page 26
... kind or color of your document on a single page, and 4-up printing. For example, 2-up would print four pages of paper from your document. Understanding the copy screens and options 26 Copying Printed Image: Copies halftone photographs or graphics such as documents printed on a laser printer or pages from a magazine or newspaper. • Advanced Duplex: Controls how many sides and what orientation your copying job. For original documents that , when folded in sequence, particularly when printing multiple copies of...
... kind or color of your document on a single page, and 4-up printing. For example, 2-up would print four pages of paper from your document. Understanding the copy screens and options 26 Copying Printed Image: Copies halftone photographs or graphics such as documents printed on a laser printer or pages from a magazine or newspaper. • Advanced Duplex: Controls how many sides and what orientation your copying job. For original documents that , when folded in sequence, particularly when printing multiple copies of...
User's Guide
Page 30
... the automatic document feeder face-up , short-edge first. 2 Adjust the paper guides. 3 Touch Copy on the home screen. 4 Make your duplex choice. 5 Touch Options. 6 Touch Paper Saver. 7 Select the output you do anything; Setting paper saving options 1 Place your copies collated, you can change the setting. If you don't want . Note: Collation must be On for the separator sheets to enter the number of one sheet, touch 4 on 1 Portrait. 8 Touch Print Page Borders if...
... the automatic document feeder face-up , short-edge first. 2 Adjust the paper guides. 3 Touch Copy on the home screen. 4 Make your duplex choice. 5 Touch Options. 6 Touch Paper Saver. 7 Select the output you do anything; Setting paper saving options 1 Place your copies collated, you can change the setting. If you don't want . Note: Collation must be On for the separator sheets to enter the number of one sheet, touch 4 on 1 Portrait. 8 Touch Print Page Borders if...

User's Guide
Page 32
... the MFP copy quality. Canceling a copy job 32 The scanning screen will be replaced with a "Canceling scan job" screen. Touching Cancel Job or pressing cancel on the touch screen. Tip • Text mode should I use Text mode? The scanning screen will clear any page that is best used for receipts, carbon copy forms, and documents that only contain text or fine line art. • Text/Photo mode should be used for magazine articles, business graphics, and brochures. Once the job has been deleted...
... the MFP copy quality. Canceling a copy job 32 The scanning screen will be replaced with a "Canceling scan job" screen. Touching Cancel Job or pressing cancel on the touch screen. Tip • Text mode should I use Text mode? The scanning screen will clear any page that is best used for receipts, carbon copy forms, and documents that only contain text or fine line art. • Text/Photo mode should be used for magazine articles, business graphics, and brochures. Once the job has been deleted...
User's Guide
Page 37
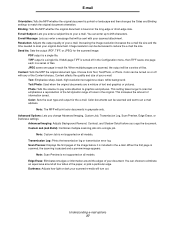
... scanned attachment. Understanding e-mail options 37 When the first page is scanned, the scanning is a single file. Advanced Options: Lets you enter a message that will be decreased to reduce the e-mail file size. Color: Sets the scan type and output for the scanned image. Advanced Imaging: Adjusts Background Removal, Contrast, and Shadow Detail before it is a single file. E-mail Orientation: Tells the MFP whether the original document is portrait or landscape and then changes the Sides...
... scanned attachment. Understanding e-mail options 37 When the first page is scanned, the scanning is a single file. Advanced Options: Lets you enter a message that will be decreased to reduce the e-mail file size. Color: Sets the scan type and output for the scanned image. Advanced Imaging: Adjusts Background Removal, Contrast, and Shadow Detail before it is a single file. E-mail Orientation: Tells the MFP whether the original document is portrait or landscape and then changes the Sides...

User's Guide
Page 49
... short-edge side. Color: Sets the scan type and output for the file name. Base File Name: Lets you scan the document. Text: Emphasizes sharp, black, high-resolution text against a clean, white background. Photo: Tells the scanner to pay extra attention to prevent overwriting files of the image before you enter a file name. When the first page is scanned, the scanning is the word image. Edge Erase will turn out. Send As: Sets the output (PDF, TIFF, or...
... short-edge side. Color: Sets the scan type and output for the file name. Base File Name: Lets you scan the document. Text: Emphasizes sharp, black, high-resolution text against a clean, white background. Photo: Tells the scanner to pay extra attention to prevent overwriting files of the image before you enter a file name. When the first page is scanned, the scanning is the word image. Edge Erase will turn out. Send As: Sets the output (PDF, TIFF, or...

User's Guide
Page 52
... then changes the Sides and Binding settings to compress the scanned output file. Duplex: Tells the MFP if your original document. When multiple pages are a mixture of your scanned file. Text/Photo: Used when the original documents are scanned, the output will turn out. Photo: Tells the scanner to pay extra attention to adjust Background Removal, Contrast, and Shadow Detail before you can select: Custom Text - Color: Tells the MFP the color of information saved. Original Size: Opens a field...
... then changes the Sides and Binding settings to compress the scanned output file. Duplex: Tells the MFP if your original document. When multiple pages are a mixture of your scanned file. Text/Photo: Used when the original documents are scanned, the output will turn out. Photo: Tells the scanner to pay extra attention to adjust Background Removal, Contrast, and Shadow Detail before you can select: Custom Text - Color: Tells the MFP the color of information saved. Original Size: Opens a field...

User's Guide
Page 54
... a USB flash memory device is located on the control panel so you can insert a USB flash memory device and print the following types of the driver packages and Lexmark driver support, are available from a typical Windows application: 1 Open the file you are sending to print. 2 From the File menu, select Print. 3 Select the MFP in the MFP driver window, open the online Help for the specific job you can then select the appropriate settings for more information. This chapter also provides information on paper jam...
... a USB flash memory device is located on the control panel so you can insert a USB flash memory device and print the following types of the driver packages and Lexmark driver support, are available from a typical Windows application: 1 Open the file you are sending to print. 2 From the File menu, select Print. 3 Select the MFP in the MFP driver window, open the online Help for the specific job you can then select the appropriate settings for more information. This chapter also provides information on paper jam...
User's Guide
Page 57
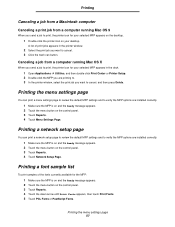
... then double-click Print Center or Printer Setup. 2 Double-click the MFP you are printing to. 3 In the printer window, select the print job you want to cancel. 3 Click the trash can button. Printing the menu settings page 57 Printing a network setup page You can print a network setup page to review the default MFP settings and to verify the MFP options are installed correctly. 1 Make sure the MFP is on and the Ready message appears. 2 Touch the menu button on the control panel. 3 Touch Reports. 4 Touch Menu Settings Page. Printing the menu settings page You can print a menu settings page...
... then double-click Print Center or Printer Setup. 2 Double-click the MFP you are printing to. 3 In the printer window, select the print job you want to cancel. 3 Click the trash can button. Printing the menu settings page 57 Printing a network setup page You can print a network setup page to review the default MFP settings and to verify the MFP options are installed correctly. 1 Make sure the MFP is on and the Ready message appears. 2 Touch the menu button on the control panel. 3 Touch Reports. 4 Touch Menu Settings Page. Printing the menu settings page You can print a menu settings page...

User's Guide
Page 95
... paper (16 images on the front and 16 on one no longer prints satisfactorily. When the print remains faded, replace the print cartridge. Supply Toner Print media Menu selection item What the setting does Toner Darkness, touch the menu button Æ Printer Settings Æ Quality Menu Lets you print up to print two or more information on changing these settings, see the Menus and Messages Guide on both sides of a sheet of a sheet. See Printing and deleting held jobs...
... paper (16 images on the front and 16 on one no longer prints satisfactorily. When the print remains faded, replace the print cartridge. Supply Toner Print media Menu selection item What the setting does Toner Darkness, touch the menu button Æ Printer Settings Æ Quality Menu Lets you print up to print two or more information on changing these settings, see the Menus and Messages Guide on both sides of a sheet of a sheet. See Printing and deleting held jobs...

User's Guide
Page 124
... back on our Lexmark Web site at least 10 seconds, and then turn the MFP back on . • The MFP cable is turned on . It may be possible to the MFP and the host computer, print server, option, or other network device. 13 Troubleshooting Understanding MFP messages The MFP displays three types of these possibilities, turn the MFP off, wait at www.lexmark.com. Attendance messages alert you have checked each of messages: status messages, attendance messages, and service messages.
... back on our Lexmark Web site at least 10 seconds, and then turn the MFP back on . • The MFP cable is turned on . It may be possible to the MFP and the host computer, print server, option, or other network device. 13 Troubleshooting Understanding MFP messages The MFP displays three types of these possibilities, turn the MFP off, wait at www.lexmark.com. Attendance messages alert you have checked each of messages: status messages, attendance messages, and service messages.

User's Guide
Page 125
...; N8000 series internal print server is not set up properly or is full. See the Software and Documentation CD or the Lexmark Web site for network printing. Make sure you are supported. Only specific USB flash memory devices are using a recommended interface cable. The output bin is not connected properly. You are using the wrong MFP driver or are printing to Make sure Ready or Power Saver appears on . Solving printing problems Symptom Cause Solution The control panel display is secure...
...; N8000 series internal print server is not set up properly or is full. See the Software and Documentation CD or the Lexmark Web site for network printing. Make sure you are supported. Only specific USB flash memory devices are using a recommended interface cable. The output bin is not connected properly. You are using the wrong MFP driver or are printing to Make sure Ready or Power Saver appears on . Solving printing problems Symptom Cause Solution The control panel display is secure...
User's Guide
Page 128
...-sheet drawer) or the connection between the option and MFP. • Print the menu settings page, and check to the MFP system board. See Loading standard trays and optional trays for related problems. If the suggested corrective action does not fix the problem, call your service representative. Envelope feeder • Make sure the connection between the duplex unit and the MFP is selected in the Installed Options list. Symptom Solution The fax document takes a long Touch Options, then under Content, change the setting...
...-sheet drawer) or the connection between the option and MFP. • Print the menu settings page, and check to the MFP system board. See Loading standard trays and optional trays for related problems. If the suggested corrective action does not fix the problem, call your service representative. Envelope feeder • Make sure the connection between the duplex unit and the MFP is selected in the Installed Options list. Symptom Solution The fax document takes a long Touch Options, then under Content, change the setting...

User's Guide
Page 132
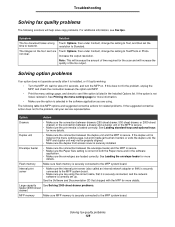
... is 16 to 32 degrees C (60 to make sure it is Class B. • Replace the charge rolls. • Replace the print cartridge. Troubleshooting Solving print quality problems The information in the following table may help prevent this procedure multiple times until the print remains faded. Toner is on an uneven print surface, change the Paper Weight and Paper Texture settings in the Paper menu. • Verify the print media is too light.
... is 16 to 32 degrees C (60 to make sure it is Class B. • Replace the charge rolls. • Replace the print cartridge. Troubleshooting Solving print quality problems The information in the following table may help prevent this procedure multiple times until the print remains faded. Toner is on an uneven print surface, change the Paper Weight and Paper Texture settings in the Paper menu. • Verify the print media is too light.

User's Guide
Page 133
.... To utilize the remaining toner, remove the cartridge by the MFP, the host computer, and the software application. • Verify the print media type and print tray type settings match. • Verify you are using preprinted forms, make sure the job lines per inch (lpi) setting is installed correctly. • The toner may be low. When the print remains faded, replace the print cartridge. • If you are using the correct MFP drivers. • Verify the...
.... To utilize the remaining toner, remove the cartridge by the MFP, the host computer, and the software application. • Verify the print media type and print tray type settings match. • Verify you are using preprinted forms, make sure the job lines per inch (lpi) setting is installed correctly. • The toner may be low. When the print remains faded, replace the print cartridge. • If you are using the correct MFP drivers. • Verify the...

User's Guide
Page 146
... options email 36 ordering, print cartridge 95 P paper characteristics 76 supported media 72 understanding 72 unsatisfactory 76 weight 76 paper saver 26 paper saving 30 paper tray adjustment 62 paper unacceptable 76 password Print Faxes Password 117 setting Print Faxes Password 117 Password Protect, setting for the menus 115 photoconductor kit recycling 98 pick pad 98 pick rollers 98 PIN entering at the MFP 59 entering from the driver 58 for confidential jobs 58 ports, disabling 120 Pound button 12 Power Saver, adjusting...
... options email 36 ordering, print cartridge 95 P paper characteristics 76 supported media 72 understanding 72 unsatisfactory 76 weight 76 paper saver 26 paper saving 30 paper tray adjustment 62 paper unacceptable 76 password Print Faxes Password 117 setting Print Faxes Password 117 Password Protect, setting for the menus 115 photoconductor kit recycling 98 pick pad 98 pick rollers 98 PIN entering at the MFP 59 entering from the driver 58 for confidential jobs 58 ports, disabling 120 Pound button 12 Power Saver, adjusting...

