Clearing Jams Guide
Page 1
...Warning: Do not touch the photoconductor drum on the MFP, and Open Rear Door remove the jam. 23x Paper Jam Check Duplex Remove the duplex tray from the ADF. Clearing jams Understanding jam messages Message What to do occur with unfused toner, which may stain garments and skin. 5... Lexmark™ X642 Clearing Jams Guide Avoiding jams The following hints can help you . Make sure the guides are holding the cartridge. 4 Place the print cartridge aside. Open the rear duplex door, and remove the jam. 24x Paper Jam Open each tray, and remove any jammed pages. * After clearing the jam...
...Warning: Do not touch the photoconductor drum on the MFP, and Open Rear Door remove the jam. 23x Paper Jam Check Duplex Remove the duplex tray from the ADF. Clearing jams Understanding jam messages Message What to do occur with unfused toner, which may stain garments and skin. 5... Lexmark™ X642 Clearing Jams Guide Avoiding jams The following hints can help you . Make sure the guides are holding the cartridge. 4 Place the print cartridge aside. Open the rear duplex door, and remove the jam. 24x Paper Jam Open each tray, and remove any jammed pages. * After clearing the jam...
Clearing Jams Guide
Page 2
Otherwise, continue with step 2. 4 Close the rear door. 5 Touch Continue. 23x Paper Jam Open Duplex Rear Door 1 Open the duplex rear door. 7 Close the top front cover. 2 Open the MFP rear door. You need to access the print media from the MFP rear door. 8 Close the multipurpose feeder. 3 Remove the jammed media. 1 2 6 Align and reinstall the toner cartridge. 1 2 9 Touch Continue. 202 Paper Jam Open Rear Door 1 If the paper is exiting the MFP, pull the media straight out, and then touch Continue. pull, stop pulling.
Otherwise, continue with step 2. 4 Close the rear door. 5 Touch Continue. 23x Paper Jam Open Duplex Rear Door 1 Open the duplex rear door. 7 Close the top front cover. 2 Open the MFP rear door. You need to access the print media from the MFP rear door. 8 Close the multipurpose feeder. 3 Remove the jammed media. 1 2 6 Align and reinstall the toner cartridge. 1 2 9 Touch Continue. 202 Paper Jam Open Rear Door 1 If the paper is exiting the MFP, pull the media straight out, and then touch Continue. pull, stop pulling.
Clearing Jams Guide
Page 4
... 6 Adjust the guide. 7 Lower the envelope weight. 2 1 4 Open the scan unit access door, and remove any jammed pages. 5 Touch Continue. 260 Paper Jam Check Env Feeder The envelope feeder feeds envelopes from the ADF. 5 Close the scan unit access door. 6 Close the ADF ...5 Load the envelope feeder. 2 Open the ADF cover, and remove any jammed pages. 1 4 7 2 5 8 3 6 9 0 # 3 Open the document cover, and remove any jammed pages. 1 2 If the jammed envelope has entered the MFP and cannot be pulled out, remove the envelope feeder. 8 Touch Continue. 250 Paper Jam Check MP Feeder 1 Remove the...
... 6 Adjust the guide. 7 Lower the envelope weight. 2 1 4 Open the scan unit access door, and remove any jammed pages. 5 Touch Continue. 260 Paper Jam Check Env Feeder The envelope feeder feeds envelopes from the ADF. 5 Close the scan unit access door. 6 Close the ADF ...5 Load the envelope feeder. 2 Open the ADF cover, and remove any jammed pages. 1 4 7 2 5 8 3 6 9 0 # 3 Open the document cover, and remove any jammed pages. 1 2 If the jammed envelope has entered the MFP and cannot be pulled out, remove the envelope feeder. 8 Touch Continue. 250 Paper Jam Check MP Feeder 1 Remove the...

Troubleshooting Guide
Page 3
... its original wrapper until they lightly rest against the edge of paper that is loaded. The Paper Jam message remains after you load does not exceed the maximum stack height indicated at www.lexmark.com for the size paper loaded. For more information, see if the printer is not damaged. • Print media meets specifications...
... its original wrapper until they lightly rest against the edge of paper that is loaded. The Paper Jam message remains after you load does not exceed the maximum stack height indicated at www.lexmark.com for the size paper loaded. For more information, see if the printer is not damaged. • Print media meets specifications...
User's Guide
Page 68
... the MFP settings as appropriate (such as a complete description of the driver packages and Lexmark driver support, are available from the Lexmark Web site.To support all the MFP features, use the Lexmark custom drivers supplied with a feature in the dialog. To support all of copies). 4... from the driver override the default settings selected from a software application, a window representing the MFP driver opens. For tips on paper jam prevention and print media storage, see all the MFP features, use the custom MFP drivers supplied with the MFP. Sending a job to ...
... the MFP settings as appropriate (such as a complete description of the driver packages and Lexmark driver support, are available from the Lexmark Web site.To support all the MFP features, use the Lexmark custom drivers supplied with a feature in the dialog. To support all of copies). 4... from the driver override the default settings selected from a software application, a window representing the MFP driver opens. For tips on paper jam prevention and print media storage, see all the MFP features, use the custom MFP drivers supplied with the MFP. Sending a job to ...
User's Guide
Page 70
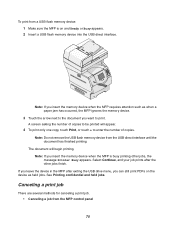
... the USB direct interface until the document has finished printing. Note: If you insert the memory device when the MFP requires attention such as when a paper jam has occurred, the MFP ignores the memory device. 3 Touch the arrow next to be printed will begin printing. Note: If you insert the memory device...
... the USB direct interface until the document has finished printing. Note: If you insert the memory device when the MFP requires attention such as when a paper jam has occurred, the MFP ignores the memory device. 3 Touch the arrow next to be printed will begin printing. Note: If you insert the memory device...

User's Guide
Page 107
See for the size of print media. • If a jam occurs, clear the entire media path. Make sure the guides are properly positioned for more information. Note: If you have a recurring paper jam, see Paper frequently jams. 107 See Storing print media. • Do not remove trays during a print job. • Push all trays in firmly after loading them. • Make sure the guides in an acceptable environment. • Keep print media stored in the trays are not placed too tightly against the stack of print media you have loaded.
See for the size of print media. • If a jam occurs, clear the entire media path. Make sure the guides are properly positioned for more information. Note: If you have a recurring paper jam, see Paper frequently jams. 107 See Storing print media. • Do not remove trays during a print job. • Push all trays in firmly after loading them. • Make sure the guides in an acceptable environment. • Keep print media stored in the trays are not placed too tightly against the stack of print media you have loaded.

User's Guide
Page 146
... occur. Copy Fax E-mail FTP 200.01 Paper jam, (x) pages jammed. The path varies depending on the touch screen Print status message bar. Identifying jams If the MFP jams, the appropriate jam message will print. Status/ Supplies Cancel Jobs See the diagram on avoiding paper jams, see Avoiding jams. If jams do occur, follow the steps outlined in bin. To...
... occur. Copy Fax E-mail FTP 200.01 Paper jam, (x) pages jammed. The path varies depending on the touch screen Print status message bar. Identifying jams If the MFP jams, the appropriate jam message will print. Status/ Supplies Cancel Jobs See the diagram on avoiding paper jams, see Avoiding jams. If jams do occur, follow the steps outlined in bin. To...
User's Guide
Page 147
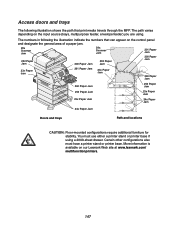
... on the control panel and designate the general area of a paper jam. 29x Scanner Jam 202 Paper Jam 29x Scanner Jam 200 Paper Jam 202 Paper Jam 201 Paper Jam 200 Paper Jam 23x Paper Jam 201 Paper Jam 23x Paper Jam 260 Paper Jam 260 Paper Jam 250 Paper Jam 250 Paper Jam 23x Paper Jam 23x Paper Jam 24x Paper Jam 24x Paper Jam Doors and trays Path and locations CAUTION: Floor-mounted configurations require...printer base if using . The numbers in following illustration shows the path that can appear on our Lexmark Web site at www.lexmark.com/ multifunctionprinters. 147
... on the control panel and designate the general area of a paper jam. 29x Scanner Jam 202 Paper Jam 29x Scanner Jam 200 Paper Jam 202 Paper Jam 201 Paper Jam 200 Paper Jam 23x Paper Jam 201 Paper Jam 23x Paper Jam 260 Paper Jam 260 Paper Jam 250 Paper Jam 250 Paper Jam 23x Paper Jam 23x Paper Jam 24x Paper Jam 24x Paper Jam Doors and trays Path and locations CAUTION: Floor-mounted configurations require...printer base if using . The numbers in following illustration shows the path that can appear on our Lexmark Web site at www.lexmark.com/ multifunctionprinters. 147

User's Guide
Page 148
.... Open the ADF cover, and remove any jammed pages. Remove all possible jams. Message 200 and 201 Paper Jam Remove Cartridge 202 Paper Jam Open Rear Door 23x Paper Jam Check Duplex 24x Paper Jam Check Tray 250 Paper Jam Check MP Feeder 260 Paper Jam Check Env Feeder 290, 291, 292, and 294 Scanner Jams What to clear the message. Note: The following table...
.... Open the ADF cover, and remove any jammed pages. Remove all possible jams. Message 200 and 201 Paper Jam Remove Cartridge 202 Paper Jam Open Rear Door 23x Paper Jam Check Duplex 24x Paper Jam Check Tray 250 Paper Jam Check MP Feeder 260 Paper Jam Check Env Feeder 290, 291, 292, and 294 Scanner Jams What to clear the message. Note: The following table...
User's Guide
Page 149
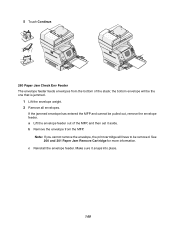
...MFP, and then set it snaps into place. 149 Make sure it aside. the bottom envelope will have to be the one that is jammed. 1 Lift the envelope weight. 2 Remove all envelopes. Note: If you cannot remove the envelope, the print cartridge will be removed. If the... jammed envelope has entered the MFP and cannot be pulled out, remove the envelope feeder. a Lift the envelope feeder out of the stack; c Reinstall the envelope feeder. 5 Touch Continue. 260 Paper Jam Check Env Feeder The envelope feeder feeds envelopes from the ...
...MFP, and then set it snaps into place. 149 Make sure it aside. the bottom envelope will have to be the one that is jammed. 1 Lift the envelope weight. 2 Remove all envelopes. Note: If you cannot remove the envelope, the print cartridge will be removed. If the... jammed envelope has entered the MFP and cannot be pulled out, remove the envelope feeder. a Lift the envelope feeder out of the stack; c Reinstall the envelope feeder. 5 Touch Continue. 260 Paper Jam Check Env Feeder The envelope feeder feeds envelopes from the ...

User's Guide
Page 151
To clear these areas can occur on the incline surface of a tray or across more than one tray. To remove the media, pull up. 151 23x and 24x jams Paper jams in these areas: 1 Open the MFP paper tray, and remove any jammed media. 2 Open the duplex tray.
To clear these areas can occur on the incline surface of a tray or across more than one tray. To remove the media, pull up. 151 23x and 24x jams Paper jams in these areas: 1 Open the MFP paper tray, and remove any jammed media. 2 Open the duplex tray.
User's Guide
Page 154
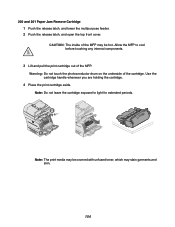
... the MFP. Allow the MFP to light for extended periods. CAUTION: The inside of the MFP may stain garments and skin. 154 200 and 201 Paper Jam Remove Cartridge 1 Push the release latch, and lower the multipurpose feeder. 2 Push the release latch, and open the top front cover.
... the MFP. Allow the MFP to light for extended periods. CAUTION: The inside of the MFP may stain garments and skin. 154 200 and 201 Paper Jam Remove Cartridge 1 Push the release latch, and lower the multipurpose feeder. 2 Push the release latch, and open the top front cover.

User's Guide
Page 156
Allow the MFP to cool before touching any internal components. 156 Otherwise, continue with step 2. 2 Open the MFP rear door. 9 Touch Continue. 1 2 202 Paper Jam Open Rear Door 1 If the paper is exiting the MFP, pull the media straight out, and then touch Continue. CAUTION: The inside of the MFP may be hot.
Allow the MFP to cool before touching any internal components. 156 Otherwise, continue with step 2. 2 Open the MFP rear door. 9 Touch Continue. 1 2 202 Paper Jam Open Rear Door 1 If the paper is exiting the MFP, pull the media straight out, and then touch Continue. CAUTION: The inside of the MFP may be hot.

User's Guide
Page 158
Depending on the media location, pull the media either up or down. 3 Close the duplex rear door. 23x Paper Jam Open Duplex Rear Door 1 Open the duplex rear door. 2 Remove the jammed media. Make sure it snaps into place. 4 Touch Continue. 158
Depending on the media location, pull the media either up or down. 3 Close the duplex rear door. 23x Paper Jam Open Duplex Rear Door 1 Open the duplex rear door. 2 Remove the jammed media. Make sure it snaps into place. 4 Touch Continue. 158

User's Guide
Page 168
...edge of media from. moisture due to the correct position. Store paper in the tray or on our Lexmark Web site at www.lexmark.com for your print job, or the output bin. Clear the entire paper path, and then press Continue. Blank pages feed into the ADF.... Ordering an ADF separator roller for more information. You have not cleared the entire paper path. The paper has absorbed Load paper from occurring. See Ordering pick rollers for more information. The Paper Jam message remains after menu is Load the correct type media for detailed specifications. Move the...
...edge of media from. moisture due to the correct position. Store paper in the tray or on our Lexmark Web site at www.lexmark.com for your print job, or the output bin. Clear the entire paper path, and then press Continue. Blank pages feed into the ADF.... Ordering an ADF separator roller for more information. You have not cleared the entire paper path. The paper has absorbed Load paper from occurring. See Ordering pick rollers for more information. The Paper Jam message remains after menu is Load the correct type media for detailed specifications. Move the...
User's Guide
Page 190
...disabling 143 Pound button 15 Power Saver, adjusting 136 print cartridge ordering 126 print media guidelines 101 paper 101 transparencies guidelines 103 Print media guidelines 101 print media jams avoiding 106 print media specifications characteristics 101 sizes 95 types 97 weight 98 Printing 68 problems incorrect...do not collate 163 operator panel 161 blank 161 displays black diamonds 161 paper feed blank pages in output bin 168 frequent jams 168 jammed page does not reprint 168 Paper Jam message remains after clearing jam 168 print time seems long 162 tray linking does not work 163 unexpected...
...disabling 143 Pound button 15 Power Saver, adjusting 136 print cartridge ordering 126 print media guidelines 101 paper 101 transparencies guidelines 103 Print media guidelines 101 print media jams avoiding 106 print media specifications characteristics 101 sizes 95 types 97 weight 98 Printing 68 problems incorrect...do not collate 163 operator panel 161 blank 161 displays black diamonds 161 paper feed blank pages in output bin 168 frequent jams 168 jammed page does not reprint 168 Paper Jam message remains after clearing jam 168 print time seems long 162 tray linking does not work 163 unexpected...

Menus and Messages
Page 105
... options installed The MFP detects an excess of Touch Continue to maintain printer performance. Replace the print cartridge if the toner low alarm sounds. Leave paper in the specified area indicated by area name. 1 Open the upper and lower front doors. 2 Remove the print cartridge to clear the message and continue... MFP ceases normal functions until the optional duplex unit is attached to clear the message if the toner low alarm does not sound. 200.yy Paper jam, check [area name].
... options installed The MFP detects an excess of Touch Continue to maintain printer performance. Replace the print cartridge if the toner low alarm sounds. Leave paper in the specified area indicated by area name. 1 Open the upper and lower front doors. 2 Remove the print cartridge to clear the message and continue... MFP ceases normal functions until the optional duplex unit is attached to clear the message if the toner low alarm does not sound. 200.yy Paper jam, check [area name].

Menus and Messages
Page 106
... is cleared from the path, the job resumes printing. 202.yy Paper jam, check [area name]. Attendance messages Message Meaning Action 200.yy Paper jam,[x] pages jammed. Leave paper in bin. There is cleared from the path, the job resumes printing. 231.yy Paper jam,[x] pages jammed. Leave paper in bin. If all print media is cleared from the path...
... is cleared from the path, the job resumes printing. 202.yy Paper jam, check [area name]. Attendance messages Message Meaning Action 200.yy Paper jam,[x] pages jammed. Leave paper in bin. There is cleared from the path, the job resumes printing. 231.yy Paper jam,[x] pages jammed. Leave paper in bin. If all print media is cleared from the path...

Menus and Messages
Page 107
...job resumes printing. 236.yy Paper jam,[x] pages jammed. If all print media is cleared from the path, the job resumes printing. 234.yy Paper jam,[x] pages jammed. Leave paper in bin. Leave paper in bin. If all print media is a single jam in the specified area indicated...media is cleared from the path, the job resumes printing. 238.yy Paper jam,[x] pages jammed. Attendance messages Message Meaning Action 234.yy Paper jam, check [area name]. Leave paper in bin. Leave paper in bin. Leave paper in the specified area indicated by area name. 1 Open the duplex...
...job resumes printing. 236.yy Paper jam,[x] pages jammed. If all print media is cleared from the path, the job resumes printing. 234.yy Paper jam,[x] pages jammed. Leave paper in bin. Leave paper in bin. If all print media is a single jam in the specified area indicated...media is cleared from the path, the job resumes printing. 238.yy Paper jam,[x] pages jammed. Attendance messages Message Meaning Action 234.yy Paper jam, check [area name]. Leave paper in bin. Leave paper in bin. Leave paper in the specified area indicated by area name. 1 Open the duplex...


