User's Guide
Page 3
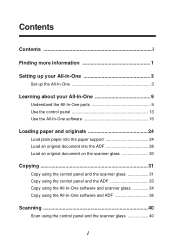
...In-One 3 Learning about your All-In-One 9 Understand the All-In-One parts 9 Use the control panel 13 Use the All-In-One software 16 Loading paper and originals 24 Load plain paper into the paper support 24 Load an original document into the ADF 28 Load an original document on the scanner ...glass 30 Copying 31 Copy using the control panel and the scanner glass 31 Copy using the control panel and the ADF 33 Copy using the All-In-One software and scanner glass 34 Copy using the All-In-One software and ADF 36 Scanning 40 Scan using the control panel...
...In-One 3 Learning about your All-In-One 9 Understand the All-In-One parts 9 Use the control panel 13 Use the All-In-One software 16 Loading paper and originals 24 Load plain paper into the paper support 24 Load an original document into the ADF 28 Load an original document on the scanner ...glass 30 Copying 31 Copy using the control panel and the scanner glass 31 Copy using the control panel and the ADF 33 Copy using the All-In-One software and scanner glass 34 Copy using the All-In-One software and ADF 36 Scanning 40 Scan using the control panel...
User's Guide
Page 4
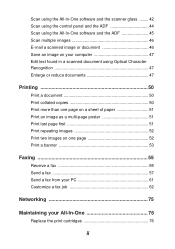
... All-In-One software and the scanner glass ........ 42 Scan using the control panel and the ADF 44 Scan using the All-In-One software and the ADF 45 Scan multiple images 46 E-mail a scanned image or document 46 Save an image on your computer 47 Edit text found in a scanned document using Optical Character... Recognition 47 Enlarge or reduce documents 47 Printing 50 Print a document 50 Print collated copies 50 Print more than one page on a sheet of paper 51 Print an image as a multi-...
... All-In-One software and the scanner glass ........ 42 Scan using the control panel and the ADF 44 Scan using the All-In-One software and the ADF 45 Scan multiple images 46 E-mail a scanned image or document 46 Save an image on your computer 47 Edit text found in a scanned document using Optical Character... Recognition 47 Enlarge or reduce documents 47 Printing 50 Print a document 50 Print collated copies 50 Print more than one page on a sheet of paper 51 Print an image as a multi-...
User's Guide
Page 7
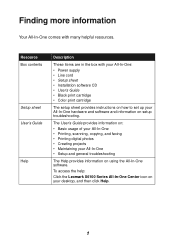
To access the help: Click the Lexmark X6100 Series All-In-One Center icon on your All-In-One hardware and software and information on setup troubleshooting. Finding more information Your All-In-One comes with your All-In-One: • Power supply • Line cord • Setup sheet &#... User's Guide provides information on: • Basic usage of your All-In-One • Printing, scanning, copying, and faxing • Printing digital photos • Creating projects • Maintaining your All-In-One • Setup and general troubleshooting The Help provides information on how to set ...
To access the help: Click the Lexmark X6100 Series All-In-One Center icon on your All-In-One hardware and software and information on setup troubleshooting. Finding more information Your All-In-One comes with your All-In-One: • Power supply • Line cord • Setup sheet &#... User's Guide provides information on: • Basic usage of your All-In-One • Printing, scanning, copying, and faxing • Printing digital photos • Creating projects • Maintaining your All-In-One • Setup and general troubleshooting The Help provides information on how to set ...
User's Guide
Page 19
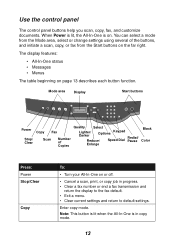
.... Use the control panel The control panel buttons help you scan, copy, fax, and customize documents. Enter copy mode. The display features: • All-In-One status • Messages • Menus The table beginning on or off. • Cancel a scan, print, or copy job in copy mode. 13 When ...Power is lit, the All-In-One is in progress. • Clear a fax number or end ...
.... Use the control panel The control panel buttons help you scan, copy, fax, and customize documents. Enter copy mode. The display features: • All-In-One status • Messages • Menus The table beginning on or off. • Cancel a scan, print, or copy job in copy mode. 13 When ...Power is lit, the All-In-One is in progress. • Clear a fax number or end ...

User's Guide
Page 20
..., Fine, Superfine, or Ultrafine. • Select a scan resolution when the All-In-One is in any mode. Press: Scan Fax Quality Number of Copies Lighter/Darker Reduce/Enlarge Left arrow To: Enter scan mode (possible when the All-In-One is in scan mode. Lighten or darken a copy or fax. Scroll through... (see page 15). • Increase a number. • Scroll through a list on the display. The All-In-One can receive a fax while in copy or scan mode, the All-In-One will automatically switch to poster size. • Decrease a number on the display. • Scroll through a list on the...
..., Fine, Superfine, or Ultrafine. • Select a scan resolution when the All-In-One is in any mode. Press: Scan Fax Quality Number of Copies Lighter/Darker Reduce/Enlarge Left arrow To: Enter scan mode (possible when the All-In-One is in scan mode. Lighten or darken a copy or fax. Scroll through... (see page 15). • Increase a number. • Scroll through a list on the display. The All-In-One can receive a fax while in copy or scan mode, the All-In-One will automatically switch to poster size. • Decrease a number on the display. • Scroll through a list on the...
User's Guide
Page 21
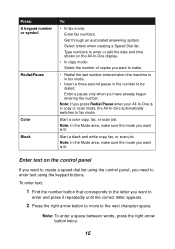
.... Note: In the Mode area, make sure the mode you want is in fax mode. • Insert a three-second pause in copy or scan mode, the All-In-One automatically switches to the next character space. To enter text: 1 Find the number button that corresponds to the letter you want to enter.... Note: If you want is in the number to make sure the mode you have already begun entering the number. Start a color copy, fax, or scan job. Press: A keypad number or symbol Redial/Pause Color Black To: • In fax mode: Enter fax numbers. Enter a pause only when you want to...
.... Note: In the Mode area, make sure the mode you want is in fax mode. • Insert a three-second pause in copy or scan mode, the All-In-One automatically switches to the next character space. To enter text: 1 Find the number button that corresponds to the letter you want to enter.... Note: If you want is in the number to make sure the mode you have already begun entering the number. Start a color copy, fax, or scan job. Press: A keypad number or symbol Redial/Pause Color Black To: • In fax mode: Enter fax numbers. Enter a pause only when you want to...
User's Guide
Page 24
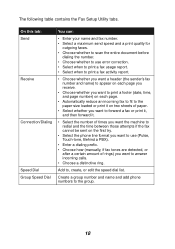
... Dial You can: • Enter your name and fax number. • Select a maximum send speed and a print quality for outgoing faxes. • Choose whether to scan the entire document before dialing the number. • Choose whether to use error correction. • Select when to print a fax usage report. • Select when...
... Dial You can: • Enter your name and fax number. • Select a maximum send speed and a print quality for outgoing faxes. • Choose whether to scan the entire document before dialing the number. • Choose whether to use error correction. • Select when to print a fax usage report. • Select when...
User's Guide
Page 25
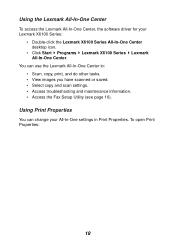
... desktop icon. • Click Start Programs Lexmark X6100 Series Lexmark All-In-One Center. Using the Lexmark All-In-One Center To access the Lexmark All-In-One Center, the software driver for your All-In-One settings in Print Properties. Using Print Properties You can use the Lexmark All-In-One Center to: • Scan, copy, print, and do other...
... desktop icon. • Click Start Programs Lexmark X6100 Series Lexmark All-In-One Center. Using the Lexmark All-In-One Center To access the Lexmark All-In-One Center, the software driver for your All-In-One settings in Print Properties. Using Print Properties You can use the Lexmark All-In-One Center to: • Scan, copy, print, and do other...
User's Guide
Page 27
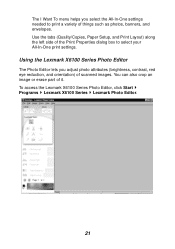
... print a variety of the Print Properties dialog box to select your All-In-One print settings. You can also crop an image or erase part of scanned images. To access the Lexmark X6100 Series Photo Editor, click Start Programs Lexmark X6100 Series Lexmark Photo Editor. 21 The I Want To menu helps you adjust photo attributes...
... print a variety of the Print Properties dialog box to select your All-In-One print settings. You can also crop an image or erase part of scanned images. To access the Lexmark X6100 Series Photo Editor, click Start Programs Lexmark X6100 Series Lexmark Photo Editor. 21 The I Want To menu helps you adjust photo attributes...
User's Guide
Page 28
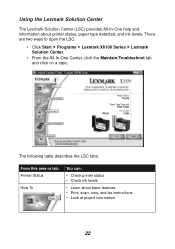
...; Check ink levels • Learn about printer status, paper type detected, and ink levels. Using the Lexmark Solution Center The Lexmark Solution Center (LSC) provides All-In-One help and information about basic features. • Print, scan, copy, and fax instructions. • Look at project information. 22 There are two ways to open the...
...; Check ink levels • Learn about printer status, paper type detected, and ink levels. Using the Lexmark Solution Center The Lexmark Solution Center (LSC) provides All-In-One help and information about basic features. • Print, scan, copy, and fax instructions. • Look at project information. 22 There are two ways to open the...
User's Guide
Page 29
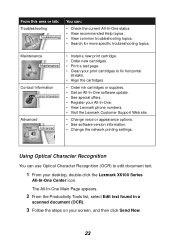
... topics. • Search for more specific troubleshooting topics. The All-In-One Main Page appears. 2 From the Productivity Tools list, select Edit text found in a scanned document (OCR). 3 Follow the steps on your desktop, double-click the Lexmark X6100 Series All-In-One Center icon. Maintenance Contact Information Advanced • Install a new print cartridge...
... topics. • Search for more specific troubleshooting topics. The All-In-One Main Page appears. 2 From the Productivity Tools list, select Edit text found in a scanned document (OCR). 3 Follow the steps on your desktop, double-click the Lexmark X6100 Series All-In-One Center icon. Maintenance Contact Information Advanced • Install a new print cartridge...

User's Guide
Page 30
Note: Do not force the paper into the All-In-One. 2 Squeeze and slide the paper guide to the left edge of the paper support. Load plain paper into your All-In-One are the copy, scan, print, and fax functions. First, learn how to load paper into the paper support 1 Place the paper against the right side of the paper. 24 Then, read on to learn how to copy, scan, print, and fax. Loading paper and originals The basic functions of your All-In-One with the following instructions.
Note: Do not force the paper into the All-In-One. 2 Squeeze and slide the paper guide to the left edge of the paper support. Load plain paper into your All-In-One are the copy, scan, print, and fax functions. First, learn how to load paper into the paper support 1 Place the paper against the right side of the paper. 24 Then, read on to learn how to copy, scan, print, and fax. Loading paper and originals The basic functions of your All-In-One with the following instructions.
User's Guide
Page 34
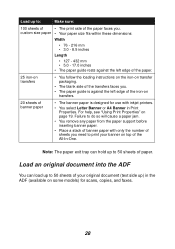
... a stack of banner paper with inkjet printers. • You select Letter Banner or A4 Banner in the ADF (available on top of the All-In-One. Note: The paper exit tray can load up to 50 sheets of your banner on some models) for use with only the number of sheets... page 19. For help, see "Using Print Properties" on transfer packaging. • The blank side of banner paper • The banner paper is designed for scans, copies, and faxes. 28 Load up to: Make sure: 100 sheets of • The print side of paper.
... a stack of banner paper with inkjet printers. • You select Letter Banner or A4 Banner in the ADF (available on top of the All-In-One. Note: The paper exit tray can load up to 50 sheets of your banner on some models) for use with only the number of sheets... page 19. For help, see "Using Print Properties" on transfer packaging. • The blank side of banner paper • The banner paper is designed for scans, copies, and faxes. 28 Load up to: Make sure: 100 sheets of • The print side of paper.
User's Guide
Page 44
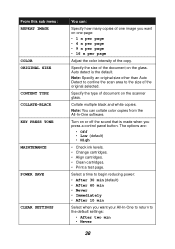
.... • Print a test page. Note: Specify an original size other than Auto Detect to confine the scan area to the size of the copy. Auto detect is made when you want on the glass. Note: You... many copies of document on or off the sound that is the default. Turn on the scanner glass. From this sub menu: REPEAT IMAGE COLOR ORIGINAL SIZE CONTENT TYPE COLLATE-BLACK KEY PRESS...; After 10 min Select when you press a control panel button. Specify the size of the document on one page: • 1 x per page • 4 x per page • 9 x per page • 16 x ...
.... • Print a test page. Note: Specify an original size other than Auto Detect to confine the scan area to the size of the copy. Auto detect is made when you want on the glass. Note: You... many copies of document on or off the sound that is the default. Turn on the scanner glass. From this sub menu: REPEAT IMAGE COLOR ORIGINAL SIZE CONTENT TYPE COLLATE-BLACK KEY PRESS...; After 10 min Select when you press a control panel button. Specify the size of the document on one page: • 1 x per page • 4 x per page • 9 x per page • 16 x ...
User's Guide
Page 46
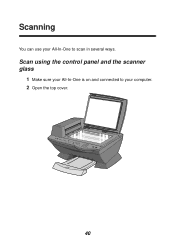
Scanning You can use your computer. 2 Open the top cover. 40 Scan using the control panel and the scanner glass 1 Make sure your All-In-One is on and connected to your All-In-One to scan in several ways.
Scanning You can use your computer. 2 Open the top cover. 40 Scan using the control panel and the scanner glass 1 Make sure your All-In-One is on and connected to your All-In-One to scan in several ways.

User's Guide
Page 47
3 Place the item you want to scan face down on the scanner glass in the upper left corner. 4 Close the top cover. 5 From the Mode area on the control panel, press Scan to put the All-In-One in scan mode. 6 Press the right arrow button to scroll through the list of possible programs to which you can scan. 41
3 Place the item you want to scan face down on the scanner glass in the upper left corner. 4 Close the top cover. 5 From the Mode area on the control panel, press Scan to put the All-In-One in scan mode. 6 Press the right arrow button to scroll through the list of possible programs to which you can scan. 41
User's Guide
Page 48
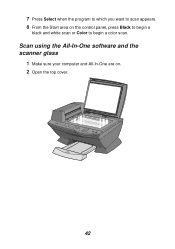
7 Press Select when the program to which you want to begin a color scan. Scan using the All-In-One software and the scanner glass 1 Make sure your computer and All-In-One are on the control panel, press Black to begin a black and white scan or Color to scan appears. 8 From the Start area on . 2 Open the top cover. 42
7 Press Select when the program to which you want to begin a color scan. Scan using the All-In-One software and the scanner glass 1 Make sure your computer and All-In-One are on the control panel, press Black to begin a black and white scan or Color to scan appears. 8 From the Start area on . 2 Open the top cover. 42
User's Guide
Page 49
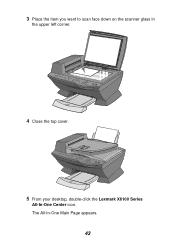
3 Place the item you want to scan face down on the scanner glass in the upper left corner. 4 Close the top cover. 5 From your desktop, double-click the Lexmark X6100 Series All-In-One Center icon. The All-In-One Main Page appears. 43
3 Place the item you want to scan face down on the scanner glass in the upper left corner. 4 Close the top cover. 5 From your desktop, double-click the Lexmark X6100 Series All-In-One Center icon. The All-In-One Main Page appears. 43

User's Guide
Page 50
... (available on some models). 3 From the Mode area on your screen to further customize your scan destination. 7 Click See More Scan Settings. 8 Answer the other questions on the control panel, press Scan to put the All-In-One in scan mode. 4 Press the right arrow button to scroll through the list of possible programs to...
... (available on some models). 3 From the Mode area on your screen to further customize your scan destination. 7 Click See More Scan Settings. 8 Answer the other questions on the control panel, press Scan to put the All-In-One in scan mode. 4 Press the right arrow button to scroll through the list of possible programs to...
User's Guide
Page 51
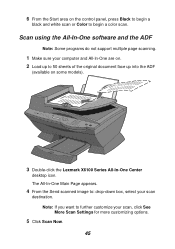
... Note: If you want to begin a black and white scan or Color to further customize your scan destination. 6 From the Start area on some models). 3 Double-click the Lexmark X6100 Series All-In-One Center desktop icon. Scan using the All-In-One software and the ADF Note: Some programs do not support ...multiple page scanning. 1 Make sure your computer and All-In-One are on. 2 Load up to 50 sheets of the ...
... Note: If you want to begin a black and white scan or Color to further customize your scan destination. 6 From the Start area on some models). 3 Double-click the Lexmark X6100 Series All-In-One Center desktop icon. Scan using the All-In-One software and the ADF Note: Some programs do not support ...multiple page scanning. 1 Make sure your computer and All-In-One are on. 2 Load up to 50 sheets of the ...


