Troubleshooting Guide
Page 1
... CABLES ARE SECURELY CONNECTED Check the cable connections to the printer and print server to make sure you have checked each of the User's Guide, or contact the place where you want to the printer and the host computer, print server, option, or other network device....the Paper source to Auto select. • Set Tray Switching to Select Function. Lexmark™ X560 Troubleshooting Guide Solving printing problems Online customer support Customer support is available on the Lexmark Web site at www.lexmark.com Checking an unresponsive printer If your print job by any switch or breaker....
... CABLES ARE SECURELY CONNECTED Check the cable connections to the printer and print server to make sure you have checked each of the User's Guide, or contact the place where you want to the printer and the host computer, print server, option, or other network device....the Paper source to Auto select. • Set Tray Switching to Select Function. Lexmark™ X560 Troubleshooting Guide Solving printing problems Online customer support Customer support is available on the Lexmark Web site at www.lexmark.com Checking an unresponsive printer If your print job by any switch or breaker....
Troubleshooting Guide
Page 8
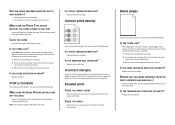
... DEFECTIVE? Note: This solution applies to see the setup documentation that meets the printer specifications. Skewed print CHECK THE PAPER GUIDES Move the guides in the tray to the correct positions for the size loaded. When Replace Print Cartridge Soon appears or when the print ... Replace the print cartridge. Try one or more information, see if the paper guides in the tray. IS THE TRANSFER BELT DEFECTIVE? Replace the transfer belt. Incorrect margins Check to Windows users only. IS THE PRINT CARTRIDGE DEFECTIVE OR EMPTY? REMOVE ANY PACKAGING MATERIALS FROM ...
... DEFECTIVE? Note: This solution applies to see the setup documentation that meets the printer specifications. Skewed print CHECK THE PAPER GUIDES Move the guides in the tray to the correct positions for the size loaded. When Replace Print Cartridge Soon appears or when the print ... Replace the print cartridge. Try one or more information, see if the paper guides in the tray. IS THE TRANSFER BELT DEFECTIVE? Replace the transfer belt. Incorrect margins Check to Windows users only. IS THE PRINT CARTRIDGE DEFECTIVE OR EMPTY? REMOVE ANY PACKAGING MATERIALS FROM ...

User's Guide
Page 1
All other countries. All rights reserved. 740 West New Circle Road Lexington, Kentucky 40550 X560n User's Guide May 2008 www.lexmark.com Lexmark and Lexmark with diamond design are trademarks of Lexmark International, Inc., registered in the United States and/or other trademarks are the property of their respective owners. © 2008 Lexmark International, Inc.
All other countries. All rights reserved. 740 West New Circle Road Lexington, Kentucky 40550 X560n User's Guide May 2008 www.lexmark.com Lexmark and Lexmark with diamond design are trademarks of Lexmark International, Inc., registered in the United States and/or other trademarks are the property of their respective owners. © 2008 Lexmark International, Inc.

User's Guide
Page 58
... as supply levels, printer hardware information, and network information. 1 Make sure the printer is unfamiliar, open Print Properties and see the Setup sheet or Setup Guide that lets the computer communicate with the printer, or click Install printer and software on and Select Function appears. 2 From the printer control panel, press..., and then press OK. Click Properties, Preferences, Options, or Setup from the printer control panel. If a feature in Print Properties is on the Software and User's Guide CD.
... as supply levels, printer hardware information, and network information. 1 Make sure the printer is unfamiliar, open Print Properties and see the Setup sheet or Setup Guide that lets the computer communicate with the printer, or click Install printer and software on and Select Function appears. 2 From the printer control panel, press..., and then press OK. Click Properties, Preferences, Options, or Setup from the printer control panel. If a feature in Print Properties is on the Software and User's Guide CD.
User's Guide
Page 62
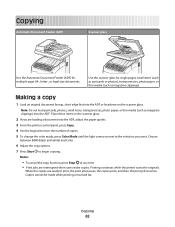
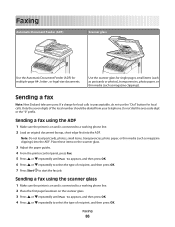
... facedown on next to print, the print job pauses, the copies print, and then the print job resumes. When the copies are interrupted when users make copies. Copying Automatic Document Feeder (ADF) Scanner glass Use the Automatic Document Feeder (ADF) for single pages, small items (such as postcards...copy function, press Stop at any time. • Print jobs are ready to the selection you are loading a document into the ADF, adjust the paper guides. 3 From the printer control panel, press Copy. 4 Use the keypad to begin copying. Copying 62 Place these items on the scanner glass. 2 If...
... facedown on next to print, the print job pauses, the copies print, and then the print job resumes. When the copies are interrupted when users make copies. Copying Automatic Document Feeder (ADF) Scanner glass Use the Automatic Document Feeder (ADF) for single pages, small items (such as postcards...copy function, press Stop at any time. • Print jobs are ready to the selection you are loading a document into the ADF, adjust the paper guides. 3 From the printer control panel, press Copy. 4 Use the keypad to begin copying. Copying 62 Place these items on the scanner glass. 2 If...
User's Guide
Page 86
Sending a fax Note: New Zealand telecom users: If a charge for local calls is unacceptable, do not use the "Dial" button for multiple-page A4-, letter-, or legal-size documents. Place these items ... 1 Make sure the printer is on and is connected to a working phone line. 2 Place the first page facedown on the scanner glass. 3 Adjust the paper guides. 4 From the printer control panel, press Fax. 5 Press or repeatedly until Fax to appears, and then press OK. 4 Press or repeatedly to a working phone line...
Sending a fax Note: New Zealand telecom users: If a charge for local calls is unacceptable, do not use the "Dial" button for multiple-page A4-, letter-, or legal-size documents. Place these items ... 1 Make sure the printer is on and is connected to a working phone line. 2 Place the first page facedown on the scanner glass. 3 Adjust the paper guides. 4 From the printer control panel, press Fax. 5 Press or repeatedly until Fax to appears, and then press OK. 4 Press or repeatedly to a working phone line...
User's Guide
Page 174
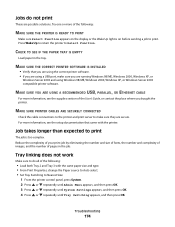
... the complexity of your print job by eliminating the number and size of fonts, the number and complexity of images, and the number of the User's Guide, or contact the place where you are possible solutions. MAKE SURE PRINTER CABLES ARE SECURELY CONNECTED Check the cable connections to the printer and print...
... the complexity of your print job by eliminating the number and size of fonts, the number and complexity of images, and the number of the User's Guide, or contact the place where you are possible solutions. MAKE SURE PRINTER CABLES ARE SECURELY CONNECTED Check the cable connections to the printer and print...
User's Guide
Page 203
... print cartridges, programs, data, and removable storage media (unless directed otherwise by Lexmark). Before you present this product for any maintenance items included with Lexmark user's guides, manuals, instructions or guidance -Unsuitable physical or operating environment -Maintenance by anyone other than Lexmark or a Lexmark authorized servicer -Operation of a product beyond repair, or if the product is...
... print cartridges, programs, data, and removable storage media (unless directed otherwise by Lexmark). Before you present this product for any maintenance items included with Lexmark user's guides, manuals, instructions or guidance -Unsuitable physical or operating environment -Maintenance by anyone other than Lexmark or a Lexmark authorized servicer -Operation of a product beyond repair, or if the product is...
Quick Reference
Page 3
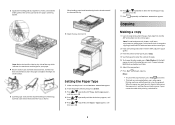
...press Color Mode until Select Function appears. Copying Making a copy 1 Load an original document faceup, short edge first into the ADF, adjust the paper guides. 3 From the printer control panel, press Copy. 4 Use the keypad to enter the number of the tray as magazine clippings) into the ADF. ... items on the scanner glass. 2 If you are interrupted when users make copies. Setting the Paper Type 1 Make sure the printer is on the scanner glass. 3 Squeeze the width guide tabs together as shown, and slide the width guide to the correct position for your paper. 4 Flex the sheets back...
...press Color Mode until Select Function appears. Copying Making a copy 1 Load an original document faceup, short edge first into the ADF, adjust the paper guides. 3 From the printer control panel, press Copy. 4 Use the keypad to enter the number of the tray as magazine clippings) into the ADF. ... items on the scanner glass. 2 If you are interrupted when users make copies. Setting the Paper Type 1 Make sure the printer is on the scanner glass. 3 Squeeze the width guide tabs together as shown, and slide the width guide to the correct position for your paper. 4 Flex the sheets back...
Quick Reference
Page 4
... . Note: Do not load postcards, photos, small items, transparencies, photo paper, or thin media (such as magazine clippings) into the ADF, adjust the paper guides. 3 From the printer control panel, press Copy. 4 Use the keypad to enter the number of paper. Choose between B&W (black and white) and Color.... Select Printing Printing a document from the printer control panel To print data stored in Reduce/Enlarge, and prints them on next to select your user name, and then press OK. 6 Using the keypad, enter the password, and then press OK. 4 Press or repeatedly to select No or...
... . Note: Do not load postcards, photos, small items, transparencies, photo paper, or thin media (such as magazine clippings) into the ADF, adjust the paper guides. 3 From the printer control panel, press Copy. 4 Use the keypad to enter the number of paper. Choose between B&W (black and white) and Color.... Select Printing Printing a document from the printer control panel To print data stored in Reduce/Enlarge, and prints them on next to select your user name, and then press OK. 6 Using the keypad, enter the password, and then press OK. 4 Press or repeatedly to select No or...
Quick Reference
Page 5
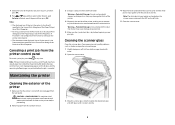
...may damage the finish of the printer. 4 Wipe only the outside of the printer, making sure to 12 characters) is canceled. Notes: • The displayed user ID (up to remove any time. Canceling a print job from the standard exit bin. 3 Dampen a clean, lint-free cloth with water. 2 Open ...5 Make sure the standard exit bin is clean and dry. 5 4 Wipe the white underside of the scanner cover and the white plastic input guides until it is dry before the stop command was sent. Maintaining the printer Cleaning the exterior of the printer 1 Make sure that you encounter print...
...may damage the finish of the printer. 4 Wipe only the outside of the printer, making sure to 12 characters) is canceled. Notes: • The displayed user ID (up to remove any time. Canceling a print job from the standard exit bin. 3 Dampen a clean, lint-free cloth with water. 2 Open ...5 Make sure the standard exit bin is clean and dry. 5 4 Wipe the white underside of the scanner cover and the white plastic input guides until it is dry before the stop command was sent. Maintaining the printer Cleaning the exterior of the printer 1 Make sure that you encounter print...


