
User's Guide
Page 17
... information Use only the power supply and power supply cord provided with the use of fire or electrical shock results. Do not pinch the power cord between objects such as the power supply cord or telephone, during a lightning storm. SAVE THESE INSTRUCTIONS. Connect the power supply cord to a properly grounded ...and easily accessible. If the power cord is not responsible for signs of some parts may not always be obvious. The safety features of misuse. CAUTION-POTENTIAL INJURY: Do not twist, bind, crush, or place heavy objects on the power cord. Lexmark is misused, a risk of ...
... information Use only the power supply and power supply cord provided with the use of fire or electrical shock results. Do not pinch the power cord between objects such as the power supply cord or telephone, during a lightning storm. SAVE THESE INSTRUCTIONS. Connect the power supply cord to a properly grounded ...and easily accessible. If the power cord is not responsible for signs of some parts may not always be obvious. The safety features of misuse. CAUTION-POTENTIAL INJURY: Do not twist, bind, crush, or place heavy objects on the power cord. Lexmark is misused, a risk of ...
User's Guide
Page 18
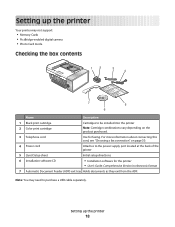
... cartridge Note: Cartridge combinations vary depending on page 30. 4 Power cord Attaches to purchase a USB cable separately. For more information about connecting this cord, see "Choosing a fax connection" on the product purchased. 3 Telephone cord Use for the printer • User's Guide: Comprehensive Version ...in electronic format 7 Automatic Document Feeder (ADF) exit tray Holds documents as they exit from the ADF. Setting up the printer Your printer may need to the power supply port located...
... cartridge Note: Cartridge combinations vary depending on page 30. 4 Power cord Attaches to purchase a USB cable separately. For more information about connecting this cord, see "Choosing a fax connection" on the product purchased. 3 Telephone cord Use for the printer • User's Guide: Comprehensive Version ...in electronic format 7 Automatic Document Feeder (ADF) exit tray Holds documents as they exit from the ADF. Setting up the printer Your printer may need to the power supply port located...
User's Guide
Page 21
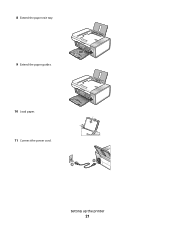
8 Extend the paper exit tray. 9 Extend the paper guides. 10 Load paper. 1 2 11 Connect the power cord. Setting up the printer 21
8 Extend the paper exit tray. 9 Extend the paper guides. 10 Load paper. 1 2 11 Connect the power cord. Setting up the printer 21
User's Guide
Page 125
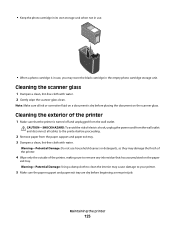
...: Do not use household cleaners or detergents, as they may damage the finish of the printer. 4 Wipe only the outside of electric shock, unplug the power cord from the wall outlet and disconnect all ink or corrective fluid on a document is dry before placing the document on the paper exit tray. •...
...: Do not use household cleaners or detergents, as they may damage the finish of the printer. 4 Wipe only the outside of electric shock, unplug the power cord from the wall outlet and disconnect all ink or corrective fluid on a document is dry before placing the document on the paper exit tray. •...
User's Guide
Page 129
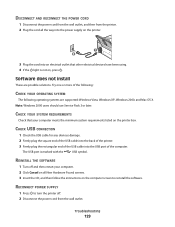
... the software. Try one or more of the computer. REINSTALL THE SOFTWARE 1 Turn off . 2 Disconnect the power cord from the printer. 2 Plug the cord all the way into the power supply on the printer. 3 Plug the cord into the USB port of the following: CHECK YOUR OPERATING SYSTEM The following operating systems are possible solutions. CHECK...
... the software. Try one or more of the computer. REINSTALL THE SOFTWARE 1 Turn off . 2 Disconnect the power cord from the printer. 2 Plug the cord all the way into the power supply on the printer. 3 Plug the cord into the USB port of the following: CHECK YOUR OPERATING SYSTEM The following operating systems are possible solutions. CHECK...
User's Guide
Page 130
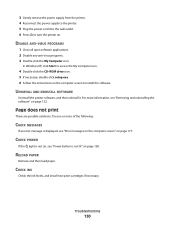
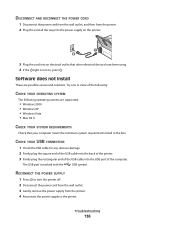
...page 128. Troubleshooting 130 For more of the following: CHECK MESSAGES If an error message is not lit" on . CHECK POWER If the light is not on, see "Power button is displayed, see "Removing and reinstalling the software" on page 177. RELOAD PAPER Remove and then load paper. ...does not print These are possible solutions. UNINSTALL AND REINSTALL SOFTWARE Uninstall the printer software, and then reinstall it. 3 Gently remove the power supply from the printer. 4 Reconnect the power supply to the printer. 5 Plug the power cord into the wall outlet. 6 Press to install the software.
...page 128. Troubleshooting 130 For more of the following: CHECK MESSAGES If an error message is not lit" on . CHECK POWER If the light is not on, see "Power button is displayed, see "Removing and reinstalling the software" on page 177. RELOAD PAPER Remove and then load paper. ...does not print These are possible solutions. UNINSTALL AND REINSTALL SOFTWARE Uninstall the printer software, and then reinstall it. 3 Gently remove the power supply from the printer. 4 Reconnect the power supply to the printer. 5 Plug the power cord into the wall outlet. 6 Press to install the software.
User's Guide
Page 131
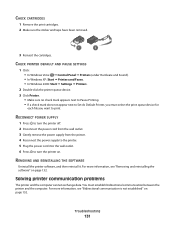
... appear next to Set As Default Printer, you want to turn the printer off. 2 Disconnect the power cord from the wall outlet. 3 Gently remove the power supply from the printer. 4 Reconnect the power supply to the printer. 5 Plug the power cord into the wall outlet. 6 Press to print. REMOVING AND REINSTALLING THE SOFTWARE Uninstall the printer...
... appear next to Set As Default Printer, you want to turn the printer off. 2 Disconnect the power cord from the wall outlet. 3 Gently remove the power supply from the printer. 4 Reconnect the power supply to the printer. 5 Plug the power cord into the wall outlet. 6 Press to print. REMOVING AND REINSTALLING THE SOFTWARE Uninstall the printer...
User's Guide
Page 159
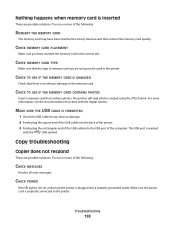
...rectangular end of the USB cable into a properly grounded outlet. Troubleshooting 159 Copy troubleshooting Copier does not respond These are using the JPEG format. CHECK POWER If the light is not on, make sure the printer is inserted These are possible solutions. Make sure the power cord is no obvious ... Make sure you are possible solutions. Remove and then reinsert the memory card quickly. Nothing happens when memory card is plugged into the USB port of the computer. Try one or more of the following : CHECK MESSAGES Resolve all error messages. CHECK TO SEE IF THE ...
...rectangular end of the USB cable into a properly grounded outlet. Troubleshooting 159 Copy troubleshooting Copier does not respond These are using the JPEG format. CHECK POWER If the light is not on, make sure the printer is inserted These are possible solutions. Make sure the power cord is no obvious ... Make sure you are possible solutions. Remove and then reinsert the memory card quickly. Nothing happens when memory card is plugged into the USB port of the computer. Try one or more of the following : CHECK MESSAGES Resolve all error messages. CHECK TO SEE IF THE ...
User's Guide
Page 172
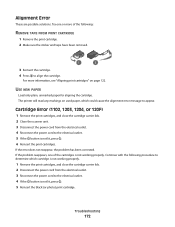
... properly. 1 Remove the print cartridges, and close the cartridge carrier lids. 2 Close the scanner unit. 3 Disconnect the power cord from the electrical outlet. 3 Reconnect the power cord to appear. Cartridge Error (1102, 1203, 1204, or 120F) 1 Remove the print cartridges, and close the cartridge carrier... lids. 2 Disconnect the power cord from the electrical outlet. 4 Reconnect the power cord to align the cartridge. If the error does not reappear, the problem has been corrected. The printer will ...
... properly. 1 Remove the print cartridges, and close the cartridge carrier lids. 2 Close the scanner unit. 3 Disconnect the power cord from the electrical outlet. 3 Reconnect the power cord to appear. Cartridge Error (1102, 1203, 1204, or 120F) 1 Remove the print cartridges, and close the cartridge carrier... lids. 2 Disconnect the power cord from the electrical outlet. 4 Reconnect the power cord to align the cartridge. If the error does not reappear, the problem has been corrected. The printer will ...

User's Guide
Page 174
.... • Send fewer pages. Left Cartridge Incorrect / Right Cartridge Incorrect 1 Remove the indicated print cartridge. 2 Disconnect the power cord from the electrical outlet. 3 Reconnect the power cord to the electrical outlet. 4 If the button is not lit, press . 5 Reinsert the print cartridge. 6 If the ...as Error 1205 (Left Cartridge) or Error 1206 (Right Cartridge). 1 Remove the indicated print cartridge. 2 Disconnect the power cord from the electrical outlet. 3 Reconnect the power cord to the electrical outlet. 4 If the button is not lit, press . 5 Reinsert the print cartridge. 6 If ...
.... • Send fewer pages. Left Cartridge Incorrect / Right Cartridge Incorrect 1 Remove the indicated print cartridge. 2 Disconnect the power cord from the electrical outlet. 3 Reconnect the power cord to the electrical outlet. 4 If the button is not lit, press . 5 Reinsert the print cartridge. 6 If the ...as Error 1205 (Left Cartridge) or Error 1206 (Right Cartridge). 1 Remove the indicated print cartridge. 2 Disconnect the power cord from the electrical outlet. 3 Reconnect the power cord to the electrical outlet. 4 If the button is not lit, press . 5 Reinsert the print cartridge. 6 If ...

User's Guide
Page 5
...or stress. Lexmark is not responsible for signs of misuse. Safety information 5 Safety information Use only the power supply and power supply cord provided with the use of fire or electrical shock results. Do not subject the power cord to a professional service person. If the power cord is near the...approved to a properly grounded electrical outlet that is misused, a risk of specific Lexmark components. CAUTION-SHOCK HAZARD: Do not use of some parts may not always be obvious. Remove the power cord from the electrical outlet before inspecting it. Use only a 26 AWG or larger ...
...or stress. Lexmark is not responsible for signs of misuse. Safety information 5 Safety information Use only the power supply and power supply cord provided with the use of fire or electrical shock results. Do not subject the power cord to a professional service person. If the power cord is near the...approved to a properly grounded electrical outlet that is misused, a risk of specific Lexmark components. CAUTION-SHOCK HAZARD: Do not use of some parts may not always be obvious. Remove the power cord from the electrical outlet before inspecting it. Use only a 26 AWG or larger ...

User's Guide
Page 94
... 1 Black print cartridge 2 Color print cartridge Cartridges to purchase a USB cable separately. For more information about connecting this cord, see "Choosing a fax connection" on page 48. 4 Power cord Attaches to the power supply port located at the back of the printer" on the product... purchased. 3 Telephone cord Use for the printer • User's Guide: Comprehensive Version in electronic format 7 Automatic Document Feeder (ADF...
... 1 Black print cartridge 2 Color print cartridge Cartridges to purchase a USB cable separately. For more information about connecting this cord, see "Choosing a fax connection" on page 48. 4 Power cord Attaches to the power supply port located at the back of the printer" on the product... purchased. 3 Telephone cord Use for the printer • User's Guide: Comprehensive Version in electronic format 7 Automatic Document Feeder (ADF...

User's Guide
Page 128
... the finish of the printer. 4 Wipe only the outside of failures or damage caused by a refilled cartridge. Warning-Potential Damage: Do not use Lexmark supplies. Related topics: • "Cleaning the scanner glass" on page 128 Refilling a print cartridge The warranty does not cover repair of the printer... the interior may cause damage to the printer before placing the document on page 122 Cleaning the exterior of electric shock, unplug the power cord from the wall outlet and disconnect all ink or corrective fluid on a document is turned off and unplugged from the paper support and...
... the finish of the printer. 4 Wipe only the outside of failures or damage caused by a refilled cartridge. Warning-Potential Damage: Do not use Lexmark supplies. Related topics: • "Cleaning the scanner glass" on page 128 Refilling a print cartridge The warranty does not cover repair of the printer... the interior may cause damage to the printer before placing the document on page 122 Cleaning the exterior of electric shock, unplug the power cord from the wall outlet and disconnect all ink or corrective fluid on a document is turned off and unplugged from the paper support and...
User's Guide
Page 136
... to turn the printer off. 2 Disconnect the power cord from the wall outlet. 3 Gently remove the power supply from the printer. 2 Plug the cord all the way into the power supply on , press . The USB port is not on the printer. 3 Plug the cord into the USB port of the USB cable into an electrical outlet that your computer...
... to turn the printer off. 2 Disconnect the power cord from the wall outlet. 3 Gently remove the power supply from the printer. 2 Plug the cord all the way into the power supply on , press . The USB port is not on the printer. 3 Plug the cord into the USB port of the USB cable into an electrical outlet that your computer...

User's Guide
Page 137
... then reinstall it. For more of the following: CHECK POWER If the light is not on, see "Removing and reinstalling the software" on page 175. 2 If the software still does not install correctly, visit our Web site at www.lexmark.com to download, and then follow the directions on the...e Select your country or region. d Select your printer family. f Select the file you want to check for drivers or downloads. Troubleshooting 137 5 Plug the power cord into the wall outlet. 6 Press to install the software. The CD icon is not lit" on . b Click the links for the latest software. Page does...
... then reinstall it. For more of the following: CHECK POWER If the light is not on, see "Removing and reinstalling the software" on page 175. 2 If the software still does not install correctly, visit our Web site at www.lexmark.com to download, and then follow the directions on the...e Select your country or region. d Select your printer family. f Select the file you want to check for drivers or downloads. Troubleshooting 137 5 Plug the power cord into the wall outlet. 6 Press to install the software. The CD icon is not lit" on . b Click the links for the latest software. Page does...

User's Guide
Page 138
... printer back on the operating system version you want to turn off the printer. 2 Disconnect the power cord from the wall outlet. 3 Gently remove the power supply from the printer. 4 Reconnect the power supply to the printer. 5 Plug the power cord into the wall outlet. 6 Press to resume all print jobs in the queue; To resume...
... printer back on the operating system version you want to turn off the printer. 2 Disconnect the power cord from the wall outlet. 3 Gently remove the power supply from the printer. 4 Reconnect the power supply to the printer. 5 Plug the power cord into the wall outlet. 6 Press to resume all print jobs in the queue; To resume...
User's Guide
Page 151
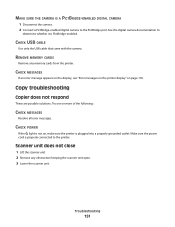
...USB cable that came with the camera. Troubleshooting 151 Try one or more of the following: CHECK MESSAGES Resolve all error messages. CHECK MESSAGES If an error message appears on the display, see "Error messages on the printer display" on , make sure the printer is not on page 170. CHECK POWER... outlet. Scanner unit does not close 1 Lift the scanner unit. 2 Remove any memory cards from the printer. Make sure the power cord is PictBridge-enabled. REMOVE MEMORY CARDS Remove any obstruction keeping the scanner unit open. 3 Lower the scanner unit. Copy troubleshooting Copier ...
...USB cable that came with the camera. Troubleshooting 151 Try one or more of the following: CHECK MESSAGES Resolve all error messages. CHECK MESSAGES If an error message appears on the display, see "Error messages on the printer display" on , make sure the printer is not on page 170. CHECK POWER... outlet. Scanner unit does not close 1 Lift the scanner unit. 2 Remove any memory cards from the printer. Make sure the power cord is PictBridge-enabled. REMOVE MEMORY CARDS Remove any obstruction keeping the scanner unit open. 3 Lower the scanner unit. Copy troubleshooting Copier ...
User's Guide
Page 170
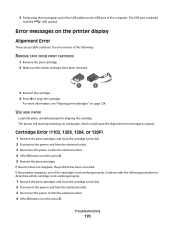
... solutions. Cartridge Error (1102, 1203, 1204, or 120F) 1 Remove the print cartridges, and close the cartridge carrier lids. 2 Disconnect the power cord from the electrical outlet. 3 Reconnect the power cord to appear. The USB port is marked with the following : REMOVE TAPE FROM PRINT CARTRIDGE 1 Remove the print cartridge. 2 Make sure the sticker and tape...
... solutions. Cartridge Error (1102, 1203, 1204, or 120F) 1 Remove the print cartridges, and close the cartridge carrier lids. 2 Disconnect the power cord from the electrical outlet. 3 Reconnect the power cord to appear. The USB port is marked with the following : REMOVE TAPE FROM PRINT CARTRIDGE 1 Remove the print cartridge. 2 Make sure the sticker and tape...

User's Guide
Page 171
... / Right Cartridge Error This message may also appear as Error 1205 (Left Cartridge) or Error 1206 (Right Cartridge). 1 Remove the indicated print cartridge. 2 Disconnect the power cord from the electrical outlet. Troubleshooting 171
... / Right Cartridge Error This message may also appear as Error 1205 (Left Cartridge) or Error 1206 (Right Cartridge). 1 Remove the indicated print cartridge. 2 Disconnect the power cord from the electrical outlet. Troubleshooting 171
User's Guide
Page 172
...Lexmark X5400 Series folder. 2 Double-click the Fax Setup Utility icon. Notes: • You can make a color copy with only the color cartridge installed. • You can print a black-and-white document with a new one or more information, see "Installing print cartridges" on page 122. 3 Reconnect the power cord..., press . Left Cartridge Incorrect / Right Cartridge Incorrect 1 Remove the indicated print cartridge. 2 Disconnect the power cord from the electrical outlet. 3 Reconnect the power cord to the electrical outlet. 4 If the button is not lit, press . 5 Reinsert the print cartridge....
...Lexmark X5400 Series folder. 2 Double-click the Fax Setup Utility icon. Notes: • You can make a color copy with only the color cartridge installed. • You can print a black-and-white document with a new one or more information, see "Installing print cartridges" on page 122. 3 Reconnect the power cord..., press . Left Cartridge Incorrect / Right Cartridge Incorrect 1 Remove the indicated print cartridge. 2 Disconnect the power cord from the electrical outlet. 3 Reconnect the power cord to the electrical outlet. 4 If the button is not lit, press . 5 Reinsert the print cartridge....


