
User's Guide
Page 17
... safety features of fire or electrical shock results. Safety information 17 SAVE THESE INSTRUCTIONS. Safety information Use only the power supply and power supply cord provided with the use of specific Lexmark components. If the power cord is not responsible for signs of other than those described in the user documentation, to meet strict global safety...
... safety features of fire or electrical shock results. Safety information 17 SAVE THESE INSTRUCTIONS. Safety information Use only the power supply and power supply cord provided with the use of specific Lexmark components. If the power cord is not responsible for signs of other than those described in the user documentation, to meet strict global safety...
User's Guide
Page 18
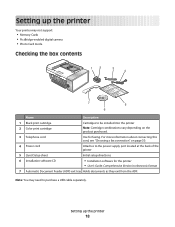
...into the printer 2 Color print cartridge Note: Cartridge combinations vary depending on page 30. 4 Power cord Attaches to purchase a USB cable separately. Setting up the printer 18 Setting up the printer Your printer may need to the power supply port located at the back of the printer 5 Quick Setup sheet Initial setup directions 6 ...see "Choosing a fax connection" on the product purchased. 3 Telephone cord Use for the printer • User's Guide: Comprehensive Version in electronic format 7 Automatic Document Feeder (ADF) exit tray Holds documents as they exit from the...
...into the printer 2 Color print cartridge Note: Cartridge combinations vary depending on page 30. 4 Power cord Attaches to purchase a USB cable separately. Setting up the printer 18 Setting up the printer Your printer may need to the power supply port located at the back of the printer 5 Quick Setup sheet Initial setup directions 6 ...see "Choosing a fax connection" on the product purchased. 3 Telephone cord Use for the printer • User's Guide: Comprehensive Version in electronic format 7 Automatic Document Feeder (ADF) exit tray Holds documents as they exit from the...
User's Guide
Page 26
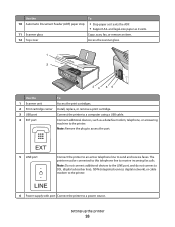
... print cartridges. 2 Print cartridge carrier Install, replace, or remove a print cartridge. 3 USB port Connect the printer to a computer using a USB cable. 4 EXT port Connect additional devices, such as it exits the ADF. • Support A4- EXT 5 LINE port Connect the printer to an active telephone ... must be connected to this telephone line to a power source. Use the To 10 Automatic Document Feeder (ADF) paper stop • Stop paper as a data/fax modem, telephone, or answering machine to the printer. LINE 6 Power supply with port Connect the printer to receive incoming fax ...
... print cartridges. 2 Print cartridge carrier Install, replace, or remove a print cartridge. 3 USB port Connect the printer to a computer using a USB cable. 4 EXT port Connect additional devices, such as it exits the ADF. • Support A4- EXT 5 LINE port Connect the printer to an active telephone ... must be connected to this telephone line to a power source. Use the To 10 Automatic Document Feeder (ADF) paper stop • Stop paper as a data/fax modem, telephone, or answering machine to the printer. LINE 6 Power supply with port Connect the printer to receive incoming fax ...

User's Guide
Page 27
... the adapter to the telephone line that came with the printer. Setting up this product or make any electrical or cabling connections, such as the power supply cord or telephone, during a lightning storm. Note: The UK adapter is shown. Do not set up the printer 27 Using an RJ11 adapter Country/region...
... the adapter to the telephone line that came with the printer. Setting up this product or make any electrical or cabling connections, such as the power supply cord or telephone, during a lightning storm. Note: The UK adapter is shown. Do not set up the printer 27 Using an RJ11 adapter Country/region...
User's Guide
Page 102
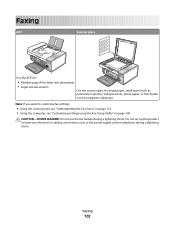
... 109. Faxing 102 Use the scanner glass for : • Multiple-page A4 or letter-size documents. • Legal-size documents. Faxing ADF Scanner glass Use the ADF for single pages, small items (such as postcards or photos), transparencies, photo paper, or thin media (such as the power supply cord or telephone, during a lightning storm.
... 109. Faxing 102 Use the scanner glass for : • Multiple-page A4 or letter-size documents. • Legal-size documents. Faxing ADF Scanner glass Use the ADF for single pages, small items (such as postcards or photos), transparencies, photo paper, or thin media (such as the power supply cord or telephone, during a lightning storm.
User's Guide
Page 129
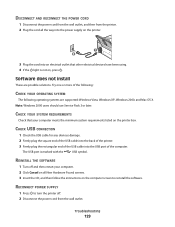
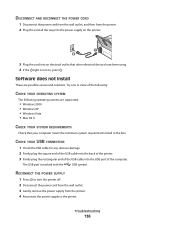
... into the back of the printer. 3 Firmly plug the rectangular end of the USB cable into an electrical outlet that your computer. 2 Click Cancel on all the way into the power supply on , press . CHECK YOUR SYSTEM REQUIREMENTS Check that other electrical devices have been using. 4 If the... light is marked with the USB symbol. Troubleshooting 129 The USB port is not on the printer. 3 Plug the cord into...
... into the back of the printer. 3 Firmly plug the rectangular end of the USB cable into an electrical outlet that your computer. 2 Click Cancel on all the way into the power supply on , press . CHECK YOUR SYSTEM REQUIREMENTS Check that other electrical devices have been using. 4 If the... light is marked with the USB symbol. Troubleshooting 129 The USB port is not on the printer. 3 Plug the cord into...
User's Guide
Page 130
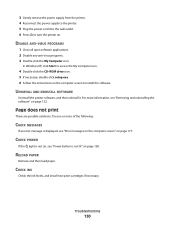
... My Computer icon. 4 Double-click the CD-ROM drive icon. 5 If necessary, double-click setup.exe. 6 Follow the instructions on page 132. 3 Gently remove the power supply from the printer. 4 Reconnect the power supply to the printer. 5 Plug the power cord into the wall outlet. 6 Press to turn the printer on page 177. CHECK...
... My Computer icon. 4 Double-click the CD-ROM drive icon. 5 If necessary, double-click setup.exe. 6 Follow the instructions on page 132. 3 Gently remove the power supply from the printer. 4 Reconnect the power supply to the printer. 5 Plug the power cord into the wall outlet. 6 Press to turn the printer on page 177. CHECK...
User's Guide
Page 131
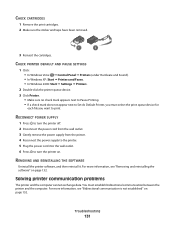
... Set As Default Printer, you want to turn the printer off. 2 Disconnect the power cord from the wall outlet. 3 Gently remove the power supply from the printer. 4 Reconnect the power supply to the printer. 5 Plug the power cord into the wall outlet. 6 Press to print. You must select the print ... 131 CHECK CARTRIDGES 1 Remove the print cartridges. 2 Make sure the sticker and tape have been removed. 1 2 3 Reinsert the cartridges. RECONNECT POWER SUPPLY 1 Press to turn the printer on. Solving printer communication problems The printer and the computer cannot exchange data.
... Set As Default Printer, you want to turn the printer off. 2 Disconnect the power cord from the wall outlet. 3 Gently remove the power supply from the printer. 4 Reconnect the power supply to the printer. 5 Plug the power cord into the wall outlet. 6 Press to print. You must select the print ... 131 CHECK CARTRIDGES 1 Remove the print cartridges. 2 Make sure the sticker and tape have been removed. 1 2 3 Reinsert the cartridges. RECONNECT POWER SUPPLY 1 Press to turn the printer on. Solving printer communication problems The printer and the computer cannot exchange data.
User's Guide
Page 164
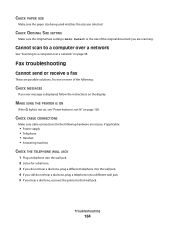
... the size you selected. MAKE SURE THE PRINTER IS ON If the light is not on, see "Power button is Auto Detect or the size of the following hardware are secure, if applicable: • Power supply • Telephone • Handset • Answering machine CHECK THE TELEPHONE WALL JACK 1 Plug a telephone into the wall...
... the size you selected. MAKE SURE THE PRINTER IS ON If the light is not on, see "Power button is Auto Detect or the size of the following hardware are secure, if applicable: • Power supply • Telephone • Handset • Answering machine CHECK THE TELEPHONE WALL JACK 1 Plug a telephone into the wall...

User's Guide
Page 171
... device, wait until the other device is an analog device. For more information, contact your ISDN provider. • If you are secure, if applicable: • Power supply • Telephone • Handset • Answering machine Error messages on an ISDN terminal adapter. Try one or more information and to request an R-interface port...
... device, wait until the other device is an analog device. For more information, contact your ISDN provider. • If you are secure, if applicable: • Power supply • Telephone • Handset • Answering machine Error messages on an ISDN terminal adapter. Try one or more information and to request an R-interface port...

User's Guide
Page 188
...Lexmark for a specified period of time, called Power Saver. Mode Description Power consumption (Watts) Off The product is plugged into a wall outlet, but the power switch n/a is turned off mode which still consumes a small amount of power, then to completely stop product power consumption, disconnect the power supply...is used for repair or replacement (at Lexmark's option). Power Saver This product is not used with your use , free from the wall outlet. The power consumption levels listed in power units of Limited Warranty Lexmark International, Inc., Lexington, KY This ...
...Lexmark for a specified period of time, called Power Saver. Mode Description Power consumption (Watts) Off The product is plugged into a wall outlet, but the power switch n/a is turned off mode which still consumes a small amount of power, then to completely stop product power consumption, disconnect the power supply...is used for repair or replacement (at Lexmark's option). Power Saver This product is not used with your use , free from the wall outlet. The power consumption levels listed in power units of Limited Warranty Lexmark International, Inc., Lexington, KY This ...
User's Guide
Page 198
... Feeder (ADF) 25 Automatic Document Feeder (ADF) paper exit tray 25 Automatic Document Feeder (ADF) paper guide 25 Automatic Document Feeder (ADF) paper stop 26 control panel 25 EXT port 26 LINE port 26 memory card slots 25 paper exit tray 25 paper guide 25 paper support 25 PictBridge port 25 power supply port 26... print cartridge carrier 26 scanner glass 26 scanner unit 26 top cover 26 USB port 26 pausing...
... Feeder (ADF) 25 Automatic Document Feeder (ADF) paper exit tray 25 Automatic Document Feeder (ADF) paper guide 25 Automatic Document Feeder (ADF) paper stop 26 control panel 25 EXT port 26 LINE port 26 memory card slots 25 paper exit tray 25 paper guide 25 paper support 25 PictBridge port 25 power supply port 26... print cartridge carrier 26 scanner glass 26 scanner unit 26 top cover 26 USB port 26 pausing...

User's Guide
Page 199
... graphic quality 134 port setting checking 48 postcards loading 52 printing 61 poster 62 Poster button 43 posters, printing 62 power button is not lit 128 power supply port 26 preferences, e-mail screen changing 101 preferences, library changing 75 preferences, searched folders changing 74 preferences, temporary... nozzles, cleaning 123 print cartridges aligning 122 cleaning 123 installing 120 ordering 126 preserving 124 refilling 122 removing 121 using genuine Lexmark 122 wiping 123 print is dark or smudged 141 print jobs canceling 60 print quality, improving 133 print settings saving and ...
... graphic quality 134 port setting checking 48 postcards loading 52 printing 61 poster 62 Poster button 43 posters, printing 62 power button is not lit 128 power supply port 26 preferences, e-mail screen changing 101 preferences, library changing 75 preferences, searched folders changing 74 preferences, temporary... nozzles, cleaning 123 print cartridges aligning 122 cleaning 123 installing 120 ordering 126 preserving 124 refilling 122 removing 121 using genuine Lexmark 122 wiping 123 print is dark or smudged 141 print jobs canceling 60 print quality, improving 133 print settings saving and ...

User's Guide
Page 5
... parts. The safety features of fire or electrical shock results. Safety information Use only the power supply and power supply cord provided with the use of specific Lexmark components. Remove the power cord from the electrical outlet before inspecting it. Connect the power supply cord to abrasion or stress. Use only a 26 AWG or larger telecommunications (RJ-11...
... parts. The safety features of fire or electrical shock results. Safety information Use only the power supply and power supply cord provided with the use of specific Lexmark components. Remove the power cord from the electrical outlet before inspecting it. Connect the power supply cord to abrasion or stress. Use only a 26 AWG or larger telecommunications (RJ-11...
User's Guide
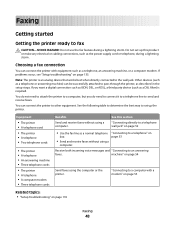
Page 48
... need to connect it to a telephone line to set up the printer. See this product or make any electrical or cabling connections, such as the power supply cord or telephone, during a lightning storm. If problems occur, see "Setup troubleshooting" on page 54 Send faxes using a computer. Note: The printer is required. You...
... need to connect it to a telephone line to set up the printer. See this product or make any electrical or cabling connections, such as the power supply cord or telephone, during a lightning storm. If problems occur, see "Setup troubleshooting" on page 54 Send faxes using a computer. Note: The printer is required. You...

User's Guide
Page 61
... how to a group of the Speed Dial entry (1- 89) or Group Dial entry (90-99). Notes: • You can include a calling card number as the power supply cord or telephone, during a lightning storm. Sending a fax Entering a fax number 1 From the control panel, press Fax Mode. 2 Enter a fax number using: The text box...
... how to a group of the Speed Dial entry (1- 89) or Group Dial entry (90-99). Notes: • You can include a calling card number as the power supply cord or telephone, during a lightning storm. Sending a fax Entering a fax number 1 From the control panel, press Fax Mode. 2 Enter a fax number using: The text box...

User's Guide
Page 94
... cord, see "Choosing a fax connection" on page 48. 4 Power cord Attaches to the power supply port located at the back of the printer" on the product purchased. 3 Telephone cord Use for the printer • User's Guide: Comprehensive Version in electronic format 7 Automatic Document Feeder (ADF) exit tray Holds documents as they exit from the... the parts of the printer 5 Quick Setup sheet Initial setup directions 6 Installation software CD • Installation software for faxing. Note: You may need to purchase a USB cable separately.
... cord, see "Choosing a fax connection" on page 48. 4 Power cord Attaches to the power supply port located at the back of the printer" on the product purchased. 3 Telephone cord Use for the printer • User's Guide: Comprehensive Version in electronic format 7 Automatic Document Feeder (ADF) exit tray Holds documents as they exit from the... the parts of the printer 5 Quick Setup sheet Initial setup directions 6 Installation software CD • Installation software for faxing. Note: You may need to purchase a USB cable separately.

User's Guide
Page 96
Note: Remove the plug to a power source. LINE 6 Power supply with port Connect the printer to access the port. 1 2 34 56 Use the To 1 Scanner unit Access the print cartridges. 2 Print cartridge carrier Install, replace, or remove a print cartridge. 3 USB port Connect the printer to a computer using a USB cable. 4 EXT port Connect additional devices, such as...
Note: Remove the plug to a power source. LINE 6 Power supply with port Connect the printer to access the port. 1 2 34 56 Use the To 1 Scanner unit Access the print cartridges. 2 Print cartridge carrier Install, replace, or remove a print cartridge. 3 USB port Connect the printer to a computer using a USB cable. 4 EXT port Connect additional devices, such as...
User's Guide
Page 136
...wall outlet. 3 Gently remove the power supply from the printer. 2 Plug the cord all the way into the power supply on , press . Try one or more of the following: CHECK YOUR OPERATING SYSTEM The following operating systems are possible causes and solutions. The USB port is not on the printer.... in the box. CHECK YOUR USB CONNECTION 1 Check the USB cable for any obvious damage. 2 Firmly plug the square end of the USB cable into the back of the printer. 3 Firmly plug the rectangular end of the computer. Troubleshooting 136 RECONNECT THE POWER SUPPLY 1 Press to the printer. ...
...wall outlet. 3 Gently remove the power supply from the printer. 2 Plug the cord all the way into the power supply on , press . Try one or more of the following: CHECK YOUR OPERATING SYSTEM The following operating systems are possible causes and solutions. The USB port is not on the printer.... in the box. CHECK YOUR USB CONNECTION 1 Check the USB cable for any obvious damage. 2 Firmly plug the square end of the USB cable into the back of the printer. 3 Firmly plug the rectangular end of the computer. Troubleshooting 136 RECONNECT THE POWER SUPPLY 1 Press to the printer. ...

User's Guide
Page 138
... system version you want to turn the printer back on. RECONNECT THE POWER SUPPLY 1 Press to turn off the printer. 2 Disconnect the power cord from the wall outlet. 3 Gently remove the power supply from the printer. 4 Reconnect the power supply to the printer. 5 Plug the power cord into the wall outlet. 6 Press to resume a particular print job, select...
... system version you want to turn the printer back on. RECONNECT THE POWER SUPPLY 1 Press to turn off the printer. 2 Disconnect the power cord from the wall outlet. 3 Gently remove the power supply from the printer. 4 Reconnect the power supply to the printer. 5 Plug the power cord into the wall outlet. 6 Press to resume a particular print job, select...


