User's Guide
Page 5
... Tips for installing a network printer...87 Maintaining the printer 89 Changing print cartridges...89 Achieving better print quality...91 Preserving the print cartridges...93 Cleaning the scanner glass...94 Ordering supplies...94 Using genuine Lexmark print cartridges...95 Refilling a print cartridge...95 Recycling Lexmark products...95 Troubleshooting 96 Setup troubleshooting...96 Print troubleshooting...99 Copy troubleshooting...
... Tips for installing a network printer...87 Maintaining the printer 89 Changing print cartridges...89 Achieving better print quality...91 Preserving the print cartridges...93 Cleaning the scanner glass...94 Ordering supplies...94 Using genuine Lexmark print cartridges...95 Refilling a print cartridge...95 Recycling Lexmark products...95 Troubleshooting 96 Setup troubleshooting...96 Print troubleshooting...99 Copy troubleshooting...
User's Guide
Page 11
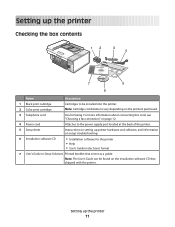
... into the printer. Setting up printer hardware and software, and information on the installation software CD that serves as a guide. Note: Cartridge combinations vary depending on the product purchased. 3 Telephone cord Use for the printer • Help • User's Guide in electronic ...shipped with the printer. Setting up the printer Checking the box contents 12 3 4 7 5 6 Name Description 1 Black print cartridge 2 Color print cartridge Cartridges to the power supply port located at the back of the printer. 5 Setup sheet Instructions on setting up the printer 11
... into the printer. Setting up printer hardware and software, and information on the installation software CD that serves as a guide. Note: Cartridge combinations vary depending on the product purchased. 3 Telephone cord Use for the printer • Help • User's Guide in electronic ...shipped with the printer. Setting up the printer Checking the box contents 12 3 4 7 5 6 Name Description 1 Black print cartridge 2 Color print cartridge Cartridges to the power supply port located at the back of the printer. 5 Setup sheet Instructions on setting up the printer 11
User's Guide
Page 22
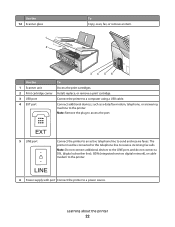
... Use the 12 Scanner glass 1 2 To Copy, scan, fax, or remove an item. 34 5 6 Use the To 1 Scanner unit Access the print cartridges. 2 Print cartridge carrier Install, replace, or remove a print cartridge. 3 USB port Connect the printer to a computer using a USB cable. 4 EXT port Connect additional devices, such as a data/fax modem, telephone...
... Use the 12 Scanner glass 1 2 To Copy, scan, fax, or remove an item. 34 5 6 Use the To 1 Scanner unit Access the print cartridges. 2 Print cartridge carrier Install, replace, or remove a print cartridge. 3 USB port Connect the printer to a computer using a USB cable. 4 EXT port Connect additional devices, such as a data/fax modem, telephone...
User's Guide
Page 26
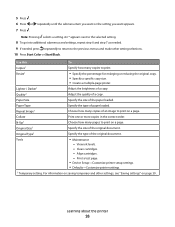
... pages to the previous menus and make other settings, see "Saving settings" on page 30. Paper Type Specify the type of the original document. Align cartridges. - Original Size1 Specify the size of paper loaded. Tools • Maintenance - 5 Press . 6 Press or repeatedly until the submenu item you want or the setting you... of the paper loaded. For information on saving temporary and other setting selections. 10 Press Start Color or Start Black. Note: Pressing selects a setting. Clean cartridges. - Paper Size Specify the size of a copy.
... pages to the previous menus and make other settings, see "Saving settings" on page 30. Paper Type Specify the type of the original document. Align cartridges. - Original Size1 Specify the size of paper loaded. Tools • Maintenance - 5 Press . 6 Press or repeatedly until the submenu item you want or the setting you... of the paper loaded. For information on saving temporary and other setting selections. 10 Press Start Color or Start Black. Note: Pressing selects a setting. Clean cartridges. - Paper Size Specify the size of a copy.
User's Guide
Page 27
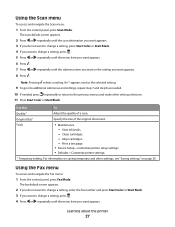
...to change a setting, press . 4 Press or repeatedly until the submenu item you want or the setting you want appears. 8 Press . Align cartridges. - Learning about the printer 27 An * appears next to the selected setting. 9 To go into additional submenus and settings, repeat step 7 ... the control panel, press Fax Mode. Note: Pressing selects a setting. Use this To Quality1 Adjust the quality of the original document. Clean cartridges. - For information on saving temporary and other setting selections. 11 Press Start Color or Start Black. View ink levels. - Print a test...
...to change a setting, press . 4 Press or repeatedly until the submenu item you want or the setting you want appears. 8 Press . Align cartridges. - Learning about the printer 27 An * appears next to the selected setting. 9 To go into additional submenus and settings, repeat step 7 ... the control panel, press Fax Mode. Note: Pressing selects a setting. Use this To Quality1 Adjust the quality of the original document. Clean cartridges. - For information on saving temporary and other setting selections. 11 Press Start Color or Start Black. View ink levels. - Print a test...
User's Guide
Page 28
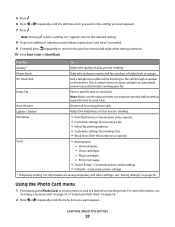
.... Note: Pressing selects a setting. Delay Fax Enter a specific time to the call through a speaker on page 30. Tools • Maintenance - Clean cartridges. - Print a test page. • Device Setup-Customize printer setup settings. • Defaults-Customize printer settings. 1 Temporary setting. Auto Answer Answer all... setting. 8 To go into the printer. This is useful when you want or the setting you specify. View ink levels. - Align cartridges. - On Hook Dial Dial a telephone number while listening to send a fax. Use this To Quality1 Adjust the quality of a fax ...
.... Note: Pressing selects a setting. Delay Fax Enter a specific time to the call through a speaker on page 30. Tools • Maintenance - Clean cartridges. - Print a test page. • Device Setup-Customize printer setup settings. • Defaults-Customize printer settings. 1 Temporary setting. Auto Answer Answer all... setting. 8 To go into the printer. This is useful when you want or the setting you specify. View ink levels. - Align cartridges. - On Hook Dial Dial a telephone number while listening to send a fax. Use this To Quality1 Adjust the quality of a fax ...
User's Guide
Page 29
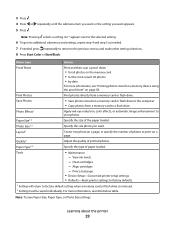
... Adjust the quality of the paper loaded. Paper Size1 2 Specify the size of printed photos. Clean cartridges. - 3 Press . 4 Press or repeatedly until the submenu item you want or the setting you want appears. 5 Press . Align cartridges. - Note: To save Paper Size, Paper Type, or Photo Size settings: Learning about the printer 29...
... Adjust the quality of the paper loaded. Paper Size1 2 Specify the size of printed photos. Clean cartridges. - 3 Press . 4 Press or repeatedly until the submenu item you want or the setting you want appears. 5 Press . Align cartridges. - Note: To save Paper Size, Paper Type, or Photo Size settings: Learning about the printer 29...
User's Guide
Page 32
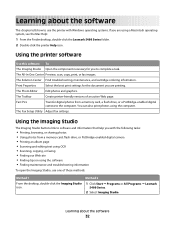
...-In-One Center Preview, scan, copy, print, or fax images. Method 2 1 Click Start ΠPrograms or All Programs ΠLexmark 5400 Series. 2 Select Imaging Studio. The Solution Center Find troubleshooting, maintenance, and cartridge ordering information. Print Properties Select the best print settings for you to software and information that help you with...
...-In-One Center Preview, scan, copy, print, or fax images. Method 2 1 Click Start ΠPrograms or All Programs ΠLexmark 5400 Series. 2 Select Imaging Studio. The Solution Center Find troubleshooting, maintenance, and cartridge ordering information. Print Properties Select the best print settings for you to software and information that help you with...

User's Guide
Page 37
...Clean to fix horizontal streaks. • Align to fix blurry edges. • Troubleshoot other ink problems. • View ink levels and order new print cartridges. • Learn how to : - Print projects such as photos, envelopes, cards, banners, iron- Note: For more information. • View ink levels.... - Print, scan, copy, and fax. - Note: Wait until scanning is Busy Printing. • View ink levels and order new print cartridges. • Learn how to contact us regarding how you use the printer. • Obtain software version information. • View ink levels and ...
...Clean to fix horizontal streaks. • Align to fix blurry edges. • Troubleshoot other ink problems. • View ink levels and order new print cartridges. • Learn how to : - Print projects such as photos, envelopes, cards, banners, iron- Note: For more information. • View ink levels.... - Print, scan, copy, and fax. - Note: Wait until scanning is Busy Printing. • View ink levels and order new print cartridges. • Learn how to contact us regarding how you use the printer. • Obtain software version information. • View ink levels and ...
User's Guide
Page 89
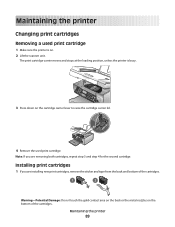
... back and bottom of the cartridges. Maintaining the printer 89 The print cartridge carrier moves and stops at the loading position, unless the printer is busy. 3 Press down on the cartridge carrier lever to raise the cartridge carrier lid. 4 Remove the used print cartridge 1 Make sure the printer... is on the bottom of the cartridges. 1 2 Warning-Potential Damage: Do not touch the gold contact area on...
... back and bottom of the cartridges. Maintaining the printer 89 The print cartridge carrier moves and stops at the loading position, unless the printer is busy. 3 Press down on the cartridge carrier lever to raise the cartridge carrier lid. 4 Remove the used print cartridge 1 Make sure the printer... is on the bottom of the cartridges. 1 2 Warning-Potential Damage: Do not touch the gold contact area on...

User's Guide
Page 90
Maintaining the printer 90 Insert the color cartridge in the left carrier. The control panel display will prompt you to load paper and press to keep your hands out from underneath the scanner unit. Note: The scanner unit must be closed to raise the cartridge carrier lids. 3 Insert the black cartridge or the photo cartridge in the right carrier. 4 Close the lids. 5 Close the scanner unit, making sure to print an alignment page. 2 Press down on the cartridge carrier levers to start a new scan, print, copy, or fax job.
Maintaining the printer 90 Insert the color cartridge in the left carrier. The control panel display will prompt you to load paper and press to keep your hands out from underneath the scanner unit. Note: The scanner unit must be closed to raise the cartridge carrier lids. 3 Insert the black cartridge or the photo cartridge in the right carrier. 4 Close the lids. 5 Close the scanner unit, making sure to print an alignment page. 2 Press down on the cartridge carrier levers to start a new scan, print, copy, or fax job.
User's Guide
Page 91
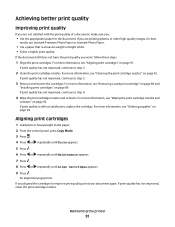
...the print quality you aligned the cartridges to step 3. 3 Remove and reinsert the cartridges. If you are not satisfied with the print quality of a document, make sure you: • Use the appropriate paper for best results use Lexmark Premium Photo Paper or Lexmark Photo Paper. • Use ...a paper that is still not satisfactory, replace the cartridge. Achieving better print quality Improving print quality If you are printing photos or other ...
...the print quality you aligned the cartridges to step 3. 3 Remove and reinsert the cartridges. If you are not satisfied with the print quality of a document, make sure you: • Use the appropriate paper for best results use Lexmark Premium Photo Paper or Lexmark Photo Paper. • Use ...a paper that is still not satisfactory, replace the cartridge. Achieving better print quality Improving print quality If you are printing photos or other ...
User's Guide
Page 92
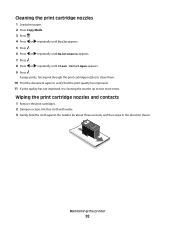
... Tools appears. 5 Press . 6 Press or repeatedly until Maintenance appears. 7 Press . 8 Press or repeatedly until Clean Cartridges appears. 9 Press . A page prints, forcing ink through the print cartridge nozzles to clean them. 10 Print the document again to verify that the print quality has improved. 11 If print quality... has not improved, try cleaning the nozzles up to two more times. Wiping the print cartridge nozzles and contacts 1 Remove the print cartridges. 2 Dampen a clean, lint-free cloth with water. 3 Gently hold the cloth against the nozzles for about three...
... Tools appears. 5 Press . 6 Press or repeatedly until Maintenance appears. 7 Press . 8 Press or repeatedly until Clean Cartridges appears. 9 Press . A page prints, forcing ink through the print cartridge nozzles to clean them. 10 Print the document again to verify that the print quality has improved. 11 If print quality... has not improved, try cleaning the nozzles up to two more times. Wiping the print cartridge nozzles and contacts 1 Remove the print cartridges. 2 Dampen a clean, lint-free cloth with water. 3 Gently hold the cloth against the nozzles for about three...

User's Guide
Page 93
... 4. 6 Let the nozzles and contacts dry completely. 7 Reinsert the print cartridges. 8 Print the document again. 9 If the print quality does not improve, clean the print nozzles. Preserving the print cartridges • Keep a new cartridge in its own storage unit when not in use. 4 Using another clean section... of time. • Keep the photo cartridge in its packaging until you are ready to install it in an...
... 4. 6 Let the nozzles and contacts dry completely. 7 Reinsert the print cartridges. 8 Print the document again. 9 If the print quality does not improve, clean the print nozzles. Preserving the print cartridges • Keep a new cartridge in its own storage unit when not in use. 4 Using another clean section... of time. • Keep the photo cartridge in its packaging until you are ready to install it in an...

User's Guide
Page 94
.... Cleaning the scanner glass 1 Dampen a clean, lint-free cloth with ISO/IEC 24711 (FDIS). 2 Licensed Return Program Cartridge Lexmark 5400 Series models (except Lexmark 5490) Item Black cartridge Color cartridge High-yield black cartridge High-yield color cartridge Photo cartridge Part number 32 33 34 35 31 Ordering paper and other supplies To order paper and other high...
.... Cleaning the scanner glass 1 Dampen a clean, lint-free cloth with ISO/IEC 24711 (FDIS). 2 Licensed Return Program Cartridge Lexmark 5400 Series models (except Lexmark 5490) Item Black cartridge Color cartridge High-yield black cartridge High-yield color cartridge Photo cartridge Part number 32 33 34 35 31 Ordering paper and other supplies To order paper and other high...
User's Guide
Page 95
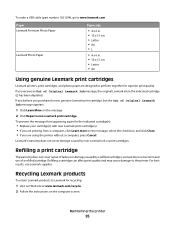
... again for superior print quality. Lexmark's warranty does not cover damage caused by a refilled cartridge. If you receive an Out of a refilled cartridge. For best results, use of Original Lexmark Ink message, the original Lexmark ink in . • 10 x 15 cm • Letter • A4 Using genuine Lexmark print cartridges Lexmark printers, print cartridges, and photo paper are printing...
... again for superior print quality. Lexmark's warranty does not cover damage caused by a refilled cartridge. If you receive an Out of a refilled cartridge. For best results, use of Original Lexmark Ink message, the original Lexmark ink in . • 10 x 15 cm • Letter • A4 Using genuine Lexmark print cartridges Lexmark printers, print cartridges, and photo paper are printing...
User's Guide
Page 98
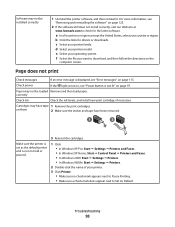
.... b Click the links for the latest software. Page does not print Check messages If an error message is not on hold or paused. 3 Reinsert the cartridges. 1 Click: • In Windows XP Pro: Start Œ Settings Œ Printers and Faxes. • In Windows XP Home: Start Œ Control Panel Œ ... to download, and then follow the directions on page 123. 2 If the software still does not install correctly, visit our Web site at www.lexmark.com to check for drivers or downloads. Software may not be loaded Remove and then load paper. For more information, see "Error messages" on ...
.... b Click the links for the latest software. Page does not print Check messages If an error message is not on hold or paused. 3 Reinsert the cartridges. 1 Click: • In Windows XP Pro: Start Œ Settings Œ Printers and Faxes. • In Windows XP Home: Start Œ Control Panel Œ ... to download, and then follow the directions on page 123. 2 If the software still does not install correctly, visit our Web site at www.lexmark.com to check for drivers or downloads. Software may not be loaded Remove and then load paper. For more information, see "Error messages" on ...
User's Guide
Page 100
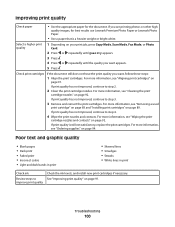
... quality Check paper • Use the appropriate paper for best results use Lexmark Premium Photo Paper or Lexmark Photo Paper. • Use a paper that is still not satisfactory, replace the print cartridges. Check print cartridges If the document still does not have the print quality you are printing ...document. If print quality has not improved, continue to step 4. 4 Wipe the print nozzles and contacts. For more information, see "Cleaning the print cartridge nozzles" on page 92. See "Improving print quality" on your print job, press Copy Mode, Scan Mode, Fax Mode, or Photo Card. ...
... quality Check paper • Use the appropriate paper for best results use Lexmark Premium Photo Paper or Lexmark Photo Paper. • Use a paper that is still not satisfactory, replace the print cartridges. Check print cartridges If the document still does not have the print quality you are printing ...document. If print quality has not improved, continue to step 4. 4 Wipe the print nozzles and contacts. For more information, see "Cleaning the print cartridge nozzles" on page 92. See "Improving print quality" on your print job, press Copy Mode, Scan Mode, Fax Mode, or Photo Card. ...
User's Guide
Page 103
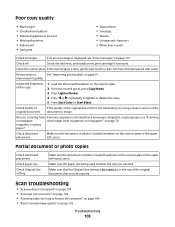
..." on page 104 • "Poor scanned image quality" on page 70. magazine, or glossy paper? Check ink Check the ink levels, and install a new print cartridge if necessary. Clean the scanner glass If the scanner glass is loaded facedown on page 115. Are you scanning from magazines or newspapers" on page...
..." on page 104 • "Poor scanned image quality" on page 70. magazine, or glossy paper? Check ink Check the ink levels, and install a new print cartridge if necessary. Clean the scanner glass If the scanner glass is loaded facedown on page 115. Are you scanning from magazines or newspapers" on page...
User's Guide
Page 107
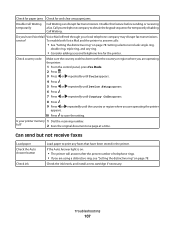
... are operating the printer 10 Press to answer calls: • See "Setting the distinctive ring" on page 78. Check the ink levels, and install a new cartridge if necessary. Call your telephone company to print any paper jams. Disable Call Waiting temporarily Call Waiting can disrupt fax transmissions. To enable both Voice...
... are operating the printer 10 Press to answer calls: • See "Setting the distinctive ring" on page 78. Check the ink levels, and install a new cartridge if necessary. Call your telephone company to print any paper jams. Disable Call Waiting temporarily Call Waiting can disrupt fax transmissions. To enable both Voice...


