Quick Reference
Page 1
...the e-mail address. Otherwise, press 2 on the numeric keypad. for a black only copy or Copying using the Embedded Web Server 1 Type the printer IP address into the ADF or facedown on the scanner glass and have a valid IP address or gateway address. Note: Do not load postcards, ... photos, small items, transparencies, photo paper, or thin media (such as magazine clippings) into the ADF. To cancel a copy job: 1 From the printer control, panel press . Once the job is printing. E-mailing Getting ready to e-mail Setting up the e-mail function For e-mail to operate, it must...
...the e-mail address. Otherwise, press 2 on the numeric keypad. for a black only copy or Copying using the Embedded Web Server 1 Type the printer IP address into the ADF or facedown on the scanner glass and have a valid IP address or gateway address. Note: Do not load postcards, ... photos, small items, transparencies, photo paper, or thin media (such as magazine clippings) into the ADF. To cancel a copy job: 1 From the printer control, panel press . Once the job is printing. E-mailing Getting ready to e-mail Setting up the e-mail function For e-mail to operate, it must...
Quick Reference
Page 2
...scanner glass. Note: Separate each time you can create a permanent fax destination and assign a shortcut number. The dial pause appears as a fax: a From the Printer pop-up menu, choose Fax PDF. 3 Type the fax number in the group with a semicolon (;). 6 Assign a shortcut number. Then, press . 5 ... document into the ADF. To create a multiple-number shortcut, enter the fax numbers for the shortcut, and then enter the fax number. The printer clears all pages in the TCP/IP section. 2 Click Settings. 3 Click Manage Destinations. Faxing Sending a fax Sending a fax using the computer...
...scanner glass. Note: Separate each time you can create a permanent fax destination and assign a shortcut number. The dial pause appears as a fax: a From the Printer pop-up menu, choose Fax PDF. 3 Type the fax number in the group with a semicolon (;). 6 Assign a shortcut number. Then, press . 5 ... document into the ADF. To create a multiple-number shortcut, enter the fax numbers for the shortcut, and then enter the fax number. The printer clears all pages in the TCP/IP section. 2 Click Settings. 3 Click Manage Destinations. Faxing Sending a fax Sending a fax using the computer...
Quick Reference
Page 3
... in the TCP/IP section. 2 Click Settings. 3 Under Other Settings, click Manage Destinations. Save as magazine clippings) into the address field of the printer, then print a network setup page and locate the IP address in the TCP/IP section. 2 Click Scan Profile. 3 Click Create Scan Profile. 4... and then press . 7 Enter the fax number, and then press . 8 Press 1 to enter another number. Creating an FTP shortcut using the printer control panel 1 Load an original document faceup, short edge first into the address field of your Web browser. Creating a fax destination shortcut using the ...
... in the TCP/IP section. 2 Click Settings. 3 Under Other Settings, click Manage Destinations. Save as magazine clippings) into the address field of the printer, then print a network setup page and locate the IP address in the TCP/IP section. 2 Click Scan Profile. 3 Click Create Scan Profile. 4... and then press . 7 Enter the fax number, and then press . 8 Press 1 to enter another number. Creating an FTP shortcut using the printer control panel 1 Load an original document faceup, short edge first into the address field of your Web browser. Creating a fax destination shortcut using the ...
Quick Reference
Page 4
... The output file is sent in the program you are unavailable. 2 Press 1 on the display. 7 Click Submit. 8 Scan your documents. All other printer functions are loading a document into the ADF, then adjust the paper guides. Note: The scan settings determine if the image is saved in the location...Scanning to USB appears, and then press . Press Start To Begin appears. 4 Load an original document faceup, short edge first into the printer, the printer can only scan to send the scanned image. g Press or to the USB device or print files from the USB device. Pressing the ...
... The output file is sent in the program you are unavailable. 2 Press 1 on the display. 7 Click Submit. 8 Scan your documents. All other printer functions are loading a document into the ADF, then adjust the paper guides. Note: The scan settings determine if the image is saved in the location...Scanning to USB appears, and then press . Press Start To Begin appears. 4 Load an original document faceup, short edge first into the printer, the printer can only scan to send the scanned image. g Press or to the USB device or print files from the USB device. Pressing the ...
Enhanced Number Pad Mode User's Guide
Page 5
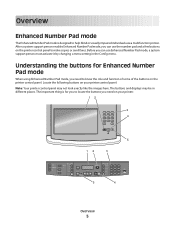
...Number Pad mode, a system support person must activate it by changing a menu setting in different places. Before you can use a multifunction printer. The important thing is designed to make copies or send faxes. After a system support person enables Enhanced Number Pad mode, you need on... menu. Understanding the buttons for you to locate the buttons you need to know the role and function of some of the buttons on your printer. 12 1 2 3 ABC DEF 4 5 6 GHI JKL MNO 7 8 9 PQRS TUV WXYZ * 0 # 3 4 5 12 3 Copy Scan/Email Content Darkness Text Text/Photo Photo...
...Number Pad mode, a system support person must activate it by changing a menu setting in different places. Before you can use a multifunction printer. The important thing is designed to make copies or send faxes. After a system support person enables Enhanced Number Pad mode, you need on... menu. Understanding the buttons for you to locate the buttons you need to know the role and function of some of the buttons on your printer. 12 1 2 3 ABC DEF 4 5 6 GHI JKL MNO 7 8 9 PQRS TUV WXYZ * 0 # 3 4 5 12 3 Copy Scan/Email Content Darkness Text Text/Photo Photo...

Enhanced Number Pad Mode User's Guide
Page 6
... where you are on the number pad without looking. • Number pads vary in appearance and in numbers of keys. 4 Start button Note: Some color printers have a dedicated Understanding display messages When you use the enhanced number pad, they provide useful prompting and setting information. When you press * 1 * 2 Incorrect codes This... entry Note: The amount of information on Copies: [number of copies you do not need to read them to the size of the . when the printer does not have an additional Start button. 5 Home button or Back button Note: The is only used instead of the...
... where you are on the number pad without looking. • Number pads vary in appearance and in numbers of keys. 4 Start button Note: Some color printers have a dedicated Understanding display messages When you use the enhanced number pad, they provide useful prompting and setting information. When you press * 1 * 2 Incorrect codes This... entry Note: The amount of information on Copies: [number of copies you do not need to read them to the size of the . when the printer does not have an additional Start button. 5 Home button or Back button Note: The is only used instead of the...
Enhanced Number Pad Mode User's Guide
Page 8
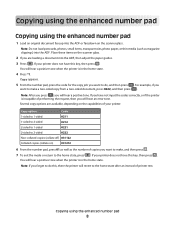
... these items on the capabilities of copies you want to make a two-sided copy from a two-sided document, press 0222, and then press . If your printer does not have this key, then press . Several copy options are available, depending on the scanner glass. 2 If you are loading a document into the ADF.... Note: If you will revert to the home state after an interval of performing the request, then you will hear a positive tone when the printer is in the home state. 4 Press *1. Note: After you press , you forget to do , and then press . If your...
... these items on the capabilities of copies you want to make a two-sided copy from a two-sided document, press 0222, and then press . If your printer does not have this key, then press . Several copy options are available, depending on the scanner glass. 2 If you are loading a document into the ADF.... Note: If you will revert to the home state after an interval of performing the request, then you will hear a positive tone when the printer is in the home state. 4 Press *1. Note: After you press , you forget to do , and then press . If your...
Enhanced Number Pad Mode User's Guide
Page 9
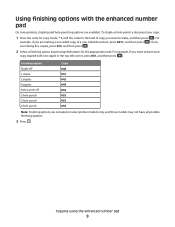
... Code 040 041 042 044 050 052 053 054 Note: Finishing options are included on select printer models only, and those models may not have each copy stapled with the enhanced number pad On some printers, stapling and hole-punching options are available. To staple or hole-punch a document you are making...
... Code 040 041 042 044 050 052 053 054 Note: Finishing options are included on select printer models only, and those models may not have each copy stapled with the enhanced number pad On some printers, stapling and hole-punching options are available. To staple or hole-punch a document you are making...

Enhanced Number Pad Mode User's Guide
Page 10
...then press . . If you have this button, then press You will hear a positive tone when the printer is in the home state. If your printer does not have not input the codes correctly, or if the printer is incapable of the whole fax number. 7 If you loaded your document into the ADF or... document faceup into the ADF, then the pages will scan automatically and, after a few seconds, the fax will be sent. If you have this , the printer will revert to the home state after a few seconds, the fax will hear a positive tone. If you loaded your single-page document on the scanner...
...then press . . If you have this button, then press You will hear a positive tone when the printer is in the home state. If your printer does not have not input the codes correctly, or if the printer is incapable of the whole fax number. 7 If you loaded your document into the ADF or... document faceup into the ADF, then the pages will scan automatically and, after a few seconds, the fax will be sent. If you have this , the printer will revert to the home state after a few seconds, the fax will hear a positive tone. If you loaded your single-page document on the scanner...
Enhanced Number Pad Mode User's Guide
Page 12
Index C copying using the enhanced number pad 8 D display messages Enhanced Number Pad mode 6 E Enhanced Number Pad mode 5 display messages 6 printer control panel buttons 5 F faxing using shortcuts 11 using the enhanced number pad 10 H hole-punching using the enhanced number pad 9 N notices 2 number pad enhanced 5 P printer control panel buttons for Enhanced Number Pad mode 5 S stapling using the enhanced number pad 9 Index 12
Index C copying using the enhanced number pad 8 D display messages Enhanced Number Pad mode 6 E Enhanced Number Pad mode 5 display messages 6 printer control panel buttons 5 F faxing using shortcuts 11 using the enhanced number pad 10 H hole-punching using the enhanced number pad 9 N notices 2 number pad enhanced 5 P printer control panel buttons for Enhanced Number Pad mode 5 S stapling using the enhanced number pad 9 Index 12
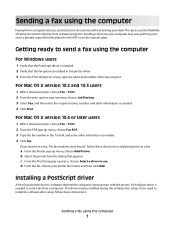
Sending a fax using the computer
Page 1
.... For Mac OS X version 10.2 and 10.3 users 1 With a document open , choose File > Print. 2 From the PDF pop-up menu, choose Add Printer. c From the Print Using pop-up menu, choose Job Routing. 3 Select Fax, and then enter the recipient name, number, and other information as needed to... needed . 4 Click Print. A PostScript driver is installed in the ADF or on the scanner glass. If you send electronic documents without leaving your printer fax model, and then click Add. Getting ready to send a fax using the computer 1 This driver may save printing costs since a printed copy ...
.... For Mac OS X version 10.2 and 10.3 users 1 With a document open , choose File > Print. 2 From the PDF pop-up menu, choose Add Printer. c From the Print Using pop-up menu, choose Job Routing. 3 Select Fax, and then enter the recipient name, number, and other information as needed to... needed . 4 Click Print. A PostScript driver is installed in the ADF or on the scanner glass. If you send electronic documents without leaving your printer fax model, and then click Add. Getting ready to send a fax using the computer 1 This driver may save printing costs since a printed copy ...
Sending a fax using the computer
Page 2
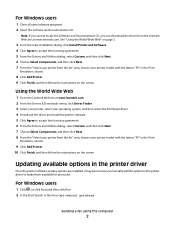
... , or click Start and then click Run. 2 In the Start Search or Run box, type control printers. Using the World Wide Web 1 Go to the Lexmark Web site at www.lexmark.com. Note: If you cannot locate the Software and Documentation CD, you can download the driver from the... list" area, choose your printer from the Lexmark Web site at www.lexmark.com. 2 From the Drivers & Downloads menu, click Driver Finder. 3 Select your printer, select your operating system, and then select the PostScript driver. 4 Download the driver ...
... , or click Start and then click Run. 2 In the Start Search or Run box, type control printers. Using the World Wide Web 1 Go to the Lexmark Web site at www.lexmark.com. Note: If you cannot locate the Software and Documentation CD, you can download the driver from the... list" area, choose your printer from the Lexmark Web site at www.lexmark.com. 2 From the Drivers & Downloads menu, click Driver Finder. 3 Select your printer, select your operating system, and then select the PostScript driver. 4 Download the driver ...
Sending a fax using the computer
Page 3
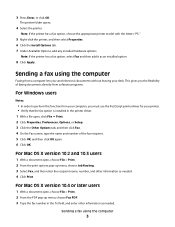
... documents directly from software programs. For Windows users Notes: • In order to perform this function from a computer lets you must use the PostScript printer driver for your desk. Sending a fax using the computer 3 For Mac OS X version 10.4 or later users 1 With a document open , choose... File > Print. 2 From the print options pop-up menu, choose Fax PDF. 3 Type the fax number in the printer driver. 1 With a file open, click File Print. 2 Click Properties, Preferences, Options, or Setup. 3 Click the Other Options tab, and then click...
... documents directly from software programs. For Windows users Notes: • In order to perform this function from a computer lets you must use the PostScript printer driver for your desk. Sending a fax using the computer 3 For Mac OS X version 10.4 or later users 1 With a document open , choose... File > Print. 2 From the print options pop-up menu, choose Fax PDF. 3 Type the fax number in the printer driver. 1 With a file open, click File Print. 2 Click Properties, Preferences, Options, or Setup. 3 Click the Other Options tab, and then click...

Sending a fax using the computer
Page 4
c From the Print Using pop-up menu, choose Add Printer. 4 Click Fax. Sending a fax using the computer 4 b Select the printer from the dialog that appears. d From the list, choose your printer as a fax: a From the Printer pop-up menu, choose Select a driver to add your printer fax model, and then click Add. If you receive an error, "No fax modems were found", follow these directions to use.
c From the Print Using pop-up menu, choose Add Printer. 4 Click Fax. Sending a fax using the computer 4 b Select the printer from the dialog that appears. d From the list, choose your printer as a fax: a From the Printer pop-up menu, choose Select a driver to add your printer fax model, and then click Add. If you receive an error, "No fax modems were found", follow these directions to use.
Compatibility Guide
Page 1
Printer, Option, and Stand Compatibility Guide Laser Printers January 2012 www.lexmark.com
Printer, Option, and Stand Compatibility Guide Laser Printers January 2012 www.lexmark.com

Compatibility Guide
Page 3
...configurations 6 Lexmark C546dtn and X546dtn with desktop or swivel cabinet 6 Lexmark C73x...7 Lexmark C792...8 Lexmark C925...10 Lexmark C950...11 Lexmark T65x with caster base 39V3588 15 Lexmark X792...17 Lexmark X925...19 Lexmark X95x...21 Lexmark X65x...25 Lexmark X651e, X652e, X654e, and X656e with caster base 16M1216 25 Lexmark X651,...Desktop...35 Furniture stand 16C0389...36 Furniture stand 16C0369 and 16C0379 37 Printer stand 16N1708...39 Printer stand 16N1708 with or without scanner shelf 10B1755 39 Printer stand 16N1708 with or without scanner shelf 21J0055 39 Scanner shelf...40
...configurations 6 Lexmark C546dtn and X546dtn with desktop or swivel cabinet 6 Lexmark C73x...7 Lexmark C792...8 Lexmark C925...10 Lexmark C950...11 Lexmark T65x with caster base 39V3588 15 Lexmark X792...17 Lexmark X925...19 Lexmark X95x...21 Lexmark X65x...25 Lexmark X651e, X652e, X654e, and X656e with caster base 16M1216 25 Lexmark X651,...Desktop...35 Furniture stand 16C0389...36 Furniture stand 16C0369 and 16C0379 37 Printer stand 16N1708...39 Printer stand 16N1708 with or without scanner shelf 10B1755 39 Printer stand 16N1708 with or without scanner shelf 21J0055 39 Scanner shelf...40

Compatibility Guide
Page 5
... options listed in this guide: Supported printers: T630, T630n, T632, T632n, T634, and T634n-This section identifies the printers supported by this furniture or option. For example, in the printer configuration B, the supported configuration shows that: • A printer with a duplex unit, one option,..., and one 500‑sheet drawer is one or more of the maximum configurations possible on how to read the tables found in the chart. Printer configuration Option Duplex 250‑sheet drawers unit 1 23 4 A Optional 500‑sheet drawers 1 2 34 Optional 2,000‑sheet drawer B...
... options listed in this guide: Supported printers: T630, T630n, T632, T632n, T634, and T634n-This section identifies the printers supported by this furniture or option. For example, in the printer configuration B, the supported configuration shows that: • A printer with a duplex unit, one option,..., and one 500‑sheet drawer is one or more of the maximum configurations possible on how to read the tables found in the chart. Printer configuration Option Duplex 250‑sheet drawers unit 1 23 4 A Optional 500‑sheet drawers 1 2 34 Optional 2,000‑sheet drawer B...
Compatibility Guide
Page 6
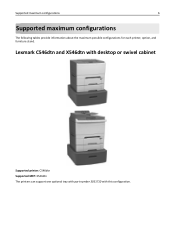
Lexmark C546dtn and X546dtn with desktop or swivel cabinet Supported printer: C546dtn Supported MFP: X546dtn The printers can support one optional tray with part number 3051710 with this configuration. Supported maximum configurations 6 Supported maximum configurations The following tables provide information about the maximum possible configurations for each printer, option, and furniture stand.
Lexmark C546dtn and X546dtn with desktop or swivel cabinet Supported printer: C546dtn Supported MFP: X546dtn The printers can support one optional tray with part number 3051710 with this configuration. Supported maximum configurations 6 Supported maximum configurations The following tables provide information about the maximum possible configurations for each printer, option, and furniture stand.

Compatibility Guide
Page 7
Supported maximum configurations 7 Lexmark C73x Lexmark C73x with caster base: Swivel cabinet 3052765: Supported printers: C734 and C736 Placement Floor Optional caster base Optional 550-sheet drawers or 4.8-inch spacers Optional 2,000-sheet 39V3425 1 2 3 4 drawer Floor * * An optional caster base may be used, but is not required for a safe operation.
Supported maximum configurations 7 Lexmark C73x Lexmark C73x with caster base: Swivel cabinet 3052765: Supported printers: C734 and C736 Placement Floor Optional caster base Optional 550-sheet drawers or 4.8-inch spacers Optional 2,000-sheet 39V3425 1 2 3 4 drawer Floor * * An optional caster base may be used, but is not required for a safe operation.

Compatibility Guide
Page 8
Lexmark C792 Base printer: Supported maximum configurations 8 Placement Optional caster base Optional 550-sheet drawers or 4.8-inch spacers Optional 2,000-sheet 39V3425 1 2 3 4 drawer Desktop or swivel cabinet * An optional caster base may be used, but is not required for a safe operation.
Lexmark C792 Base printer: Supported maximum configurations 8 Placement Optional caster base Optional 550-sheet drawers or 4.8-inch spacers Optional 2,000-sheet 39V3425 1 2 3 4 drawer Desktop or swivel cabinet * An optional caster base may be used, but is not required for a safe operation.


