User's Guide
Page 7
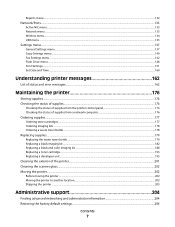
... of supplies from a network computer 176 Ordering supplies...177 Ordering toner cartridges...177 Ordering imaging kits ...178 Ordering a waste toner bottle...178 Replacing supplies...179 Replacing the waste toner bottle ...179 Replacing a black imaging kit ...182 Replacing a black and color imaging kit ...188 Replacing a toner cartridge...193 Replacing a developer unit ...195 Cleaning the exterior of the printer...201 Cleaning the scanner glass...
... of supplies from a network computer 176 Ordering supplies...177 Ordering toner cartridges...177 Ordering imaging kits ...178 Ordering a waste toner bottle...178 Replacing supplies...179 Replacing the waste toner bottle ...179 Replacing a black imaging kit ...182 Replacing a black and color imaging kit ...188 Replacing a toner cartridge...193 Replacing a developer unit ...195 Cleaning the exterior of the printer...201 Cleaning the scanner glass...
User's Guide
Page 123
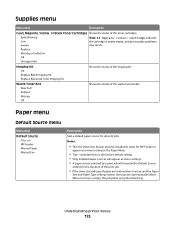
...and Paper Type settings match, the trays are automatically linked. Understanding printer menus 123 Replace Missing or Defective OK Unsupported Imaging Kit OK Replace Black Imaging Kit Replace Black and Color Imaging Kit Shows the status of the imaging kit Waste Toner Box Near Full Replace Missing OK Shows the status of the waste toner bottle Paper menu Default Source ...for the duration of the print job. • If the same size and type of the toner cartridges Early Warning Low Note: 88 Replace Cartridge indicates the cartridge is empty, the job prints using the linked tray.
...and Paper Type settings match, the trays are automatically linked. Understanding printer menus 123 Replace Missing or Defective OK Unsupported Imaging Kit OK Replace Black Imaging Kit Replace Black and Color Imaging Kit Shows the status of the imaging kit Waste Toner Box Near Full Replace Missing OK Shows the status of the waste toner bottle Paper menu Default Source ...for the duration of the print job. • If the same size and type of the toner cartridges Early Warning Low Note: 88 Replace Cartridge indicates the cartridge is empty, the job prints using the linked tray.
User's Guide
Page 163
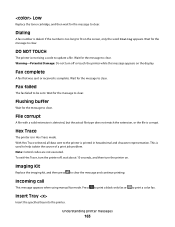
... printer. Fax failed The fax failed to print a color fax. Note: Control codes are not executed. Wait for the message to clear. Imaging Kit Replace the imaging kit, and then press to help isolate the source of a print job problem. File corrupt A file with a valid extension is detected, but ...the actual file type does not match the extension, or the file is complete. Low Replace the toner cartridge, and then wait for the message to...
... printer. Fax failed The fax failed to print a color fax. Note: Control codes are not executed. Wait for the message to clear. Imaging Kit Replace the imaging kit, and then press to help isolate the source of a print job problem. File corrupt A file with a valid extension is detected, but ...the actual file type does not match the extension, or the file is complete. Low Replace the toner cartridge, and then wait for the message to...
User's Guide
Page 168
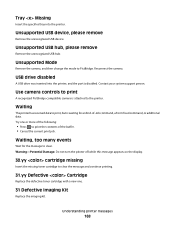
Unsupported USB hub, please remove Remove the unrecognized USB hub. Reconnect the camera. Try one . 31 Defective Imaging Kit Replace the imaging kit. Unsupported Mode Remove the camera, and then change the mode to print the contents of the buffer. • Cancel the current print... the printer. Contact your system support person. Waiting The printer has received data to clear the message and continue printing. 31.yy Defective Cartridge Replace the defective toner cartridge with a new one or more of -Job command, a Form Feed command, or additional data. Tray Missing Insert the...
Unsupported USB hub, please remove Remove the unrecognized USB hub. Reconnect the camera. Try one . 31 Defective Imaging Kit Replace the imaging kit. Unsupported Mode Remove the camera, and then change the mode to print the contents of the buffer. • Cancel the current print... the printer. Contact your system support person. Waiting The printer has received data to clear the message and continue printing. 31.yy Defective Cartridge Replace the defective toner cartridge with a new one or more of -Job command, a Form Feed command, or additional data. Tray Missing Insert the...
User's Guide
Page 178
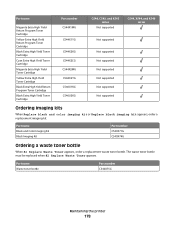
... Black Extra High Yield Toner Cartridge Part number C544X1MG C544X1YG C544X2KG C544X2CG C544X2MG C544X2YG C546U1KG C546U2KG C540, C543, and X543 series Not supported C544, X544, and X546 series Not supported Not supported Not supported Not supported Not supported Not supported Not supported Ordering imaging kits When Replace black and color imaging kit or Replace black imaging kit appears, order a replacement imaging kit.
... Black Extra High Yield Toner Cartridge Part number C544X1MG C544X1YG C544X2KG C544X2CG C544X2MG C544X2YG C546U1KG C546U2KG C540, C543, and X543 series Not supported C544, X544, and X546 series Not supported Not supported Not supported Not supported Not supported Not supported Not supported Ordering imaging kits When Replace black and color imaging kit or Replace black imaging kit appears, order a replacement imaging kit.

User's Guide
Page 182
CAUTION-HOT SURFACE: The inside of injury from a hot component, allow the surface to cool before touching. 2 Open the top door. Maintaining the printer 182 To reduce the risk of the printer might be hot. Replacing a black imaging kit Replace the black imaging kit when Replace Black Imaging Kit appears. 1 Grasp the front door at the side handholds, and then pull it toward you.
CAUTION-HOT SURFACE: The inside of injury from a hot component, allow the surface to cool before touching. 2 Open the top door. Maintaining the printer 182 To reduce the risk of the printer might be hot. Replacing a black imaging kit Replace the black imaging kit when Replace Black Imaging Kit appears. 1 Grasp the front door at the side handholds, and then pull it toward you.

User's Guide
Page 184
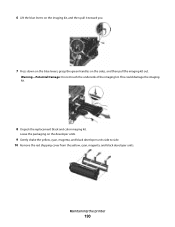
6 Lift the blue levers on the imaging kit, and then pull it toward you. 7 Press down on the blue levers, grasp the green handles on the black developer unit. 10 Gently shake the black developer unit side to side. Warning-Potential Damage: Do not touch the underside of the imaging kit. Leave the packaging on the sides, and then pull the imaging kit out. Maintaining the printer 184 This could damage the imaging kit. 8 Remove the yellow, cyan, and magenta developer units. 9 Unpack the replacement black imaging kit.
6 Lift the blue levers on the imaging kit, and then pull it toward you. 7 Press down on the blue levers, grasp the green handles on the black developer unit. 10 Gently shake the black developer unit side to side. Warning-Potential Damage: Do not touch the underside of the imaging kit. Leave the packaging on the sides, and then pull the imaging kit out. Maintaining the printer 184 This could damage the imaging kit. 8 Remove the yellow, cyan, and magenta developer units. 9 Unpack the replacement black imaging kit.
User's Guide
Page 185
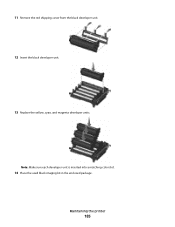
11 Remove the red shipping cover from the black developer unit. 12 Insert the black developer unit. 13 Replace the yellow, cyan, and magenta developer units. Note: Make sure each developer unit is inserted into a matching color slot. 14 Place the used black imaging kit in the enclosed package. Maintaining the printer 185
11 Remove the red shipping cover from the black developer unit. 12 Insert the black developer unit. 13 Replace the yellow, cyan, and magenta developer units. Note: Make sure each developer unit is inserted into a matching color slot. 14 Place the used black imaging kit in the enclosed package. Maintaining the printer 185

User's Guide
Page 186
15 Align and insert the imaging kit. 16 Rotate the blue levers down until the imaging kit drops into place. 17 Replace the waste toner bottle. Maintaining the printer 186
15 Align and insert the imaging kit. 16 Rotate the blue levers down until the imaging kit drops into place. 17 Replace the waste toner bottle. Maintaining the printer 186
User's Guide
Page 188
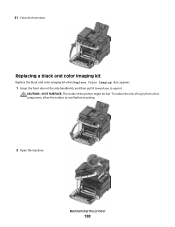
Maintaining the printer 188 To reduce the risk of the printer might be hot. 21 Close the front door. CAUTION-HOT SURFACE: The inside of injury from a hot component, allow the surface to open it toward you to cool before touching. 2 Open the top door. Replacing a black and color imaging kit Replace the black and color imaging kit when Replace Color Imaging Kit appears. 1 Grasp the front door at the side handholds, and then pull it .
Maintaining the printer 188 To reduce the risk of the printer might be hot. 21 Close the front door. CAUTION-HOT SURFACE: The inside of injury from a hot component, allow the surface to open it toward you to cool before touching. 2 Open the top door. Replacing a black and color imaging kit Replace the black and color imaging kit when Replace Color Imaging Kit appears. 1 Grasp the front door at the side handholds, and then pull it .
User's Guide
Page 190
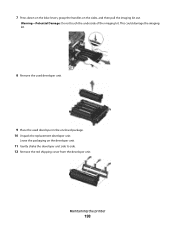
Maintaining the printer 190 Warning-Potential Damage: Do not touch the underside of the imaging kit. This could damage the imaging kit. 8 Unpack the replacement black and color imaging kit. 6 Lift the blue levers on the imaging kit, and then pull it toward you. 7 Press down on the blue levers, grasp the green handles on the developer units. 9 Gently shake the yellow, cyan, magenta, and black developer units side to side. 10 Remove the red shipping cover from the yellow, cyan, magenta, and black developer units. Leave the packaging on the sides, and then pull the imaging kit out.
Maintaining the printer 190 Warning-Potential Damage: Do not touch the underside of the imaging kit. This could damage the imaging kit. 8 Unpack the replacement black and color imaging kit. 6 Lift the blue levers on the imaging kit, and then pull it toward you. 7 Press down on the blue levers, grasp the green handles on the developer units. 9 Gently shake the yellow, cyan, magenta, and black developer units side to side. 10 Remove the red shipping cover from the yellow, cyan, magenta, and black developer units. Leave the packaging on the sides, and then pull the imaging kit out.
User's Guide
Page 198
This could damage the imaging kit. 8 Remove the used developer unit. 9 Place the used developer in the enclosed package. 10 Unpack the replacement developer unit. Warning-Potential Damage: Do not touch the underside of the imaging kit. Leave the packaging on the sides, and then pull the imaging kit out. Maintaining the printer 198 7 Press down on the blue levers, grasp the handles on the developer unit. 11 Gently shake the developer unit side to side. 12 Remove the red shipping cover from the developer unit.
This could damage the imaging kit. 8 Remove the used developer unit. 9 Place the used developer in the enclosed package. 10 Unpack the replacement developer unit. Warning-Potential Damage: Do not touch the underside of the imaging kit. Leave the packaging on the sides, and then pull the imaging kit out. Maintaining the printer 198 7 Press down on the blue levers, grasp the handles on the developer unit. 11 Gently shake the developer unit side to side. 12 Remove the red shipping cover from the developer unit.
User's Guide
Page 221
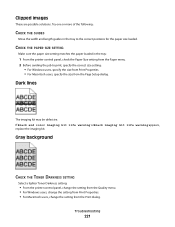
... the setting from Print Properties. • For Macintosh users, change the setting from the Page Setup dialog. If Black and color imaging kit life warning orBlack imaging kit life warning appears, replace the imaging kit. CHECK THE PAPER SIZE SETTING Make sure the paper size setting matches the paper loaded in the tray to print, specify the...; For Windows users, specify the size from Print Properties. • For Macintosh users, specify the size from the Print dialog. Troubleshooting 221 Dark lines The imaging kit may be defective. Clipped images These are possible solutions.
... the setting from Print Properties. • For Macintosh users, change the setting from the Page Setup dialog. If Black and color imaging kit life warning orBlack imaging kit life warning appears, replace the imaging kit. CHECK THE PAPER SIZE SETTING Make sure the paper size setting matches the paper loaded in the tray to print, specify the...; For Windows users, specify the size from Print Properties. • For Macintosh users, specify the size from the Print dialog. Troubleshooting 221 Dark lines The imaging kit may be defective. Clipped images These are possible solutions.
User's Guide
Page 222
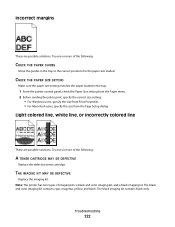
...line, or incorrectly colored line These are possible solutions. The black imaging kit contains black only. Troubleshooting 222 Try one or more of imaging kits: a black and color imaging kit, and a black imaging kit. The black and color imaging kit contains cyan, magenta, yellow, and black. CHECK THE PAPER SIZE ...sending the job to the correct positions for the paper size loaded. THE IMAGING KIT MAY BE DEFECTIVE Replace the imaging kit. Try one or more of the following : A TONER CARTRIDGE MAY BE DEFECTIVE Replace the defective toner cartridge. Note: The printer has two types of the ...
...line, or incorrectly colored line These are possible solutions. The black imaging kit contains black only. Troubleshooting 222 Try one or more of imaging kits: a black and color imaging kit, and a black imaging kit. The black and color imaging kit contains cyan, magenta, yellow, and black. CHECK THE PAPER SIZE ...sending the job to the correct positions for the paper size loaded. THE IMAGING KIT MAY BE DEFECTIVE Replace the imaging kit. Try one or more of the following : A TONER CARTRIDGE MAY BE DEFECTIVE Replace the defective toner cartridge. Note: The printer has two types of the ...

User's Guide
Page 224
... instructions on one or more of the vertical lines. Try one of the following: CALIBRATE THE COLOR The printer automatically calibrates the colors whenever a new imaging kit is replaced, then you are possible solutions.
... instructions on one or more of the vertical lines. Try one of the following: CALIBRATE THE COLOR The printer automatically calibrates the colors whenever a new imaging kit is replaced, then you are possible solutions.
User's Guide
Page 225
... THE PAPER Avoid textured paper with rough finishes. A TONER CARTRIDGE MAY BE DEFECTIVE Replace the toner cartridge. THE IMAGING KIT MAY BE WORN OR DEFECTIVE Replace the imaging kit. Troubleshooting 225 The black imaging kit contains black only. CHECK THE PAPER TYPE SETTING Make sure the Paper Type setting ... Saver may be set to a lower value, and then press . Note: The printer has two types of imaging kits: a black and color imaging kit, and a black imaging kit. CHECK THE DARKNESS, BRIGHTNESS, AND CONTRAST SETTINGS The Toner Darkness setting is too light, the RGB Brightness setting is...
... THE PAPER Avoid textured paper with rough finishes. A TONER CARTRIDGE MAY BE DEFECTIVE Replace the toner cartridge. THE IMAGING KIT MAY BE WORN OR DEFECTIVE Replace the imaging kit. Troubleshooting 225 The black imaging kit contains black only. CHECK THE PAPER TYPE SETTING Make sure the Paper Type setting ... Saver may be set to a lower value, and then press . Note: The printer has two types of imaging kits: a black and color imaging kit, and a black imaging kit. CHECK THE DARKNESS, BRIGHTNESS, AND CONTRAST SETTINGS The Toner Darkness setting is too light, the RGB Brightness setting is...

User's Guide
Page 226
Try one or more of the following: CALIBRATE THE COLOR The printer automatically calibrates the colors whenever a new imaging kit is too dark These are possible solutions. Calibrating appears. If a cartridge is too high. 1 From the printer control panel, press . 2 From the Admin ... DARKNESS, BRIGHTNESS, AND CONTRAST SETTINGS The Toner Darkness setting is too dark, the RGB Brightness setting is too dark, or the RGB Contrast setting is replaced, then you can calibrate the colors manually: 1 From the printer control panel, press . 2 From the Admin menu, press the arrow buttons until ...
Try one or more of the following: CALIBRATE THE COLOR The printer automatically calibrates the colors whenever a new imaging kit is too dark These are possible solutions. Calibrating appears. If a cartridge is too high. 1 From the printer control panel, press . 2 From the Admin ... DARKNESS, BRIGHTNESS, AND CONTRAST SETTINGS The Toner Darkness setting is too dark, the RGB Brightness setting is too dark, or the RGB Contrast setting is replaced, then you can calibrate the colors manually: 1 From the printer control panel, press . 2 From the Admin menu, press the arrow buttons until ...

User's Guide
Page 227
...are possible solutions. THE PRINT CARTRIDGE MAY BE DEFECTIVE OR LOW ON TONER Replace the used print cartridge with a new one or more of imaging kits: a black and color imaging kit, and a black imaging kit. Note: The printer has two types of the following : Troubleshooting 227 ...For more of the following : THE IMAGING KIT MAY BE WORN OR DEFECTIVE Replace the imaging kit. Contact Customer Support. Toner fog...
...are possible solutions. THE PRINT CARTRIDGE MAY BE DEFECTIVE OR LOW ON TONER Replace the used print cartridge with a new one or more of imaging kits: a black and color imaging kit, and a black imaging kit. Note: The printer has two types of the following : Troubleshooting 227 ...For more of the following : THE IMAGING KIT MAY BE WORN OR DEFECTIVE Replace the imaging kit. Contact Customer Support. Toner fog...

Maintenance Manual
Page 9
Maintaining the printer 9 To reduce the risk of the printer might be hot. Replacing a black imaging kit Replace the black imaging kit when Replace Black Imaging Kit appears. 1 Grasp the front door at the side handholds, and then pull it toward you. CAUTION-HOT SURFACE: The inside of injury from a hot component, allow the surface to cool before touching. 2 Open the top door.
Maintaining the printer 9 To reduce the risk of the printer might be hot. Replacing a black imaging kit Replace the black imaging kit when Replace Black Imaging Kit appears. 1 Grasp the front door at the side handholds, and then pull it toward you. CAUTION-HOT SURFACE: The inside of injury from a hot component, allow the surface to cool before touching. 2 Open the top door.

Maintenance Manual
Page 15
21 Close the front door. To reduce the risk of the printer might be hot. CAUTION-HOT SURFACE: The inside of injury from a hot component, allow the surface to open it toward you to cool before touching. Maintaining the printer 15 Replacing a black and color imaging kit Replace the black and color imaging kit when Replace Color Imaging Kit appears. 1 Grasp the front door at the side handholds, and then pull it .
21 Close the front door. To reduce the risk of the printer might be hot. CAUTION-HOT SURFACE: The inside of injury from a hot component, allow the surface to open it toward you to cool before touching. Maintaining the printer 15 Replacing a black and color imaging kit Replace the black and color imaging kit when Replace Color Imaging Kit appears. 1 Grasp the front door at the side handholds, and then pull it .


