User's Guide
Page 7
... Ordering a waste toner bottle...178 Replacing supplies...179 Replacing the waste toner bottle ...179 Replacing a black imaging kit ...182 Replacing a black and color imaging kit ...188 Replacing a toner cartridge...193 Replacing a developer unit ...195 Cleaning the exterior of the printer...201 Cleaning the scanner glass...202 Moving the printer...202 Before moving the...
... Ordering a waste toner bottle...178 Replacing supplies...179 Replacing the waste toner bottle ...179 Replacing a black imaging kit ...182 Replacing a black and color imaging kit ...188 Replacing a toner cartridge...193 Replacing a developer unit ...195 Cleaning the exterior of the printer...201 Cleaning the scanner glass...202 Moving the printer...202 Before moving the...

User's Guide
Page 184
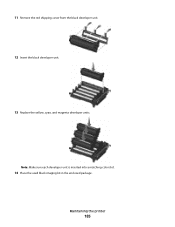
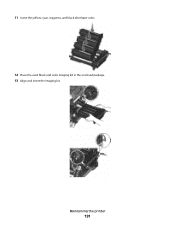
Warning-Potential Damage: Do not touch the underside of the imaging kit. This could damage the imaging kit. 8 Remove the yellow, cyan, and magenta developer units. 9 Unpack the replacement black imaging kit. Maintaining the printer 184 Leave the packaging on the sides, and then pull the imaging kit out. 6 Lift the blue levers on the imaging kit, and then pull it toward you. 7 Press down on the blue levers, grasp the green handles on the black developer unit. 10 Gently shake the black developer unit side to side.
Warning-Potential Damage: Do not touch the underside of the imaging kit. This could damage the imaging kit. 8 Remove the yellow, cyan, and magenta developer units. 9 Unpack the replacement black imaging kit. Maintaining the printer 184 Leave the packaging on the sides, and then pull the imaging kit out. 6 Lift the blue levers on the imaging kit, and then pull it toward you. 7 Press down on the blue levers, grasp the green handles on the black developer unit. 10 Gently shake the black developer unit side to side.
User's Guide
Page 185
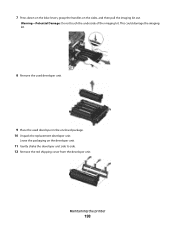
Maintaining the printer 185 Note: Make sure each developer unit is inserted into a matching color slot. 14 Place the used black imaging kit in the enclosed package. 11 Remove the red shipping cover from the black developer unit. 12 Insert the black developer unit. 13 Replace the yellow, cyan, and magenta developer units.
Maintaining the printer 185 Note: Make sure each developer unit is inserted into a matching color slot. 14 Place the used black imaging kit in the enclosed package. 11 Remove the red shipping cover from the black developer unit. 12 Insert the black developer unit. 13 Replace the yellow, cyan, and magenta developer units.
User's Guide
Page 190
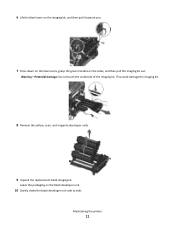
Warning-Potential Damage: Do not touch the underside of the imaging kit. Maintaining the printer 190 This could damage the imaging kit. 8 Unpack the replacement black and color imaging kit. 6 Lift the blue levers on the imaging kit, and then pull it toward you. 7 Press down on the blue levers, grasp the green handles on the developer units. 9 Gently shake the yellow, cyan, magenta, and black developer units side to side. 10 Remove the red shipping cover from the yellow, cyan, magenta, and black developer units. Leave the packaging on the sides, and then pull the imaging kit out.
Warning-Potential Damage: Do not touch the underside of the imaging kit. Maintaining the printer 190 This could damage the imaging kit. 8 Unpack the replacement black and color imaging kit. 6 Lift the blue levers on the imaging kit, and then pull it toward you. 7 Press down on the blue levers, grasp the green handles on the developer units. 9 Gently shake the yellow, cyan, magenta, and black developer units side to side. 10 Remove the red shipping cover from the yellow, cyan, magenta, and black developer units. Leave the packaging on the sides, and then pull the imaging kit out.
User's Guide
Page 191
Maintaining the printer 191 11 Insert the yellow, cyan, magenta, and black developer units. 12 Place the used black and color imaging kit in the enclosed package. 13 Align and insert the imaging kit.
Maintaining the printer 191 11 Insert the yellow, cyan, magenta, and black developer units. 12 Place the used black and color imaging kit in the enclosed package. 13 Align and insert the imaging kit.
User's Guide
Page 198
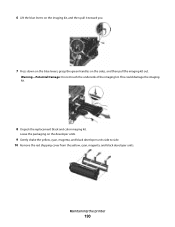
7 Press down on the blue levers, grasp the handles on the developer unit. 11 Gently shake the developer unit side to side. 12 Remove the red shipping cover from the developer unit. This could damage the imaging kit. 8 Remove the used developer unit. 9 Place the used developer in the enclosed package. 10 Unpack the replacement developer unit. Leave the packaging on the sides, and then pull the imaging kit out. Warning-Potential Damage: Do not touch the underside of the imaging kit. Maintaining the printer 198
7 Press down on the blue levers, grasp the handles on the developer unit. 11 Gently shake the developer unit side to side. 12 Remove the red shipping cover from the developer unit. This could damage the imaging kit. 8 Remove the used developer unit. 9 Place the used developer in the enclosed package. 10 Unpack the replacement developer unit. Leave the packaging on the sides, and then pull the imaging kit out. Warning-Potential Damage: Do not touch the underside of the imaging kit. Maintaining the printer 198

User's Guide
Page 199
Maintaining the printer 199 13 Insert the developer unit. 14 Align and insert the imaging kit.
Maintaining the printer 199 13 Insert the developer unit. 14 Align and insert the imaging kit.
User's Guide
Page 255
... from Macintosh 73 canceling from the printer control panel 73 canceling from Windows 73 print quality cleaning the scanner glass 202 replacing developer unit 195 replacing imaging kits 182, 188 replacing the waste toner bottle 179 print quality test pages, printing 72 print quality troubleshooting blank pages 220 characters ...Jams 173 293 Paper Missing 173 293.02 Flatbed Cover Open 173 294 ADF Jam 174 30.yy cartridge missing 168 31 Defective Imaging Kit 168 34 Short paper 169 35 Insufficient memory to support Resource Save feature 169 37 Insufficient memory to collate job 169 38 Memory Full...
... from Macintosh 73 canceling from the printer control panel 73 canceling from Windows 73 print quality cleaning the scanner glass 202 replacing developer unit 195 replacing imaging kits 182, 188 replacing the waste toner bottle 179 print quality test pages, printing 72 print quality troubleshooting blank pages 220 characters ...Jams 173 293 Paper Missing 173 293.02 Flatbed Cover Open 173 294 ADF Jam 174 30.yy cartridge missing 168 31 Defective Imaging Kit 168 34 Short paper 169 35 Insufficient memory to support Resource Save feature 169 37 Insufficient memory to collate job 169 38 Memory Full...

Print Defects
Page 1
....5 mm (3.1 in.) Replace the photoconductor. 94.2 mm (3.71 in.) Replace the fuser. 95 mm (3.74 in.) Replace the developer. 43.9 mm (1.7 in.) Replace the image unit kit. 55 mm (2.2 in.) Replace the image unit kit. 37.7 mm (1.5 in.) Replace the photoconductor. 34.6 mm (1.4 in .), which particular part may need to the marks on...
....5 mm (3.1 in.) Replace the photoconductor. 94.2 mm (3.71 in.) Replace the fuser. 95 mm (3.74 in.) Replace the developer. 43.9 mm (1.7 in.) Replace the image unit kit. 55 mm (2.2 in.) Replace the image unit kit. 37.7 mm (1.5 in.) Replace the photoconductor. 34.6 mm (1.4 in .), which particular part may need to the marks on...

Maintenance Manual
Page 2
... of supplies from a network computer 3 Ordering supplies...4 Ordering toner cartridges...4 Ordering imaging kits...5 Ordering a waste toner bottle...5 Replacing supplies...6 Replacing the waste toner bottle...6 Replacing a black imaging kit...9 Replacing a black and color imaging kit...15 Replacing a toner cartridge...21 Replacing a developer unit...22 Cleaning the exterior of the printer...28 Cleaning the scanner glass...
... of supplies from a network computer 3 Ordering supplies...4 Ordering toner cartridges...4 Ordering imaging kits...5 Ordering a waste toner bottle...5 Replacing supplies...6 Replacing the waste toner bottle...6 Replacing a black imaging kit...9 Replacing a black and color imaging kit...15 Replacing a toner cartridge...21 Replacing a developer unit...22 Cleaning the exterior of the printer...28 Cleaning the scanner glass...
Maintenance Manual
Page 11
Leave the packaging on the sides, and then pull the imaging kit out. This could damage the imaging kit. 8 Remove the yellow, cyan, and magenta developer units. 9 Unpack the replacement black imaging kit. Warning-Potential Damage: Do not touch the underside of the imaging kit. Maintaining the printer 11 6 Lift the blue levers on the imaging kit, and then pull it toward you. 7 Press down on the blue levers, grasp the green handles on the black developer unit. 10 Gently shake the black developer unit side to side.
Leave the packaging on the sides, and then pull the imaging kit out. This could damage the imaging kit. 8 Remove the yellow, cyan, and magenta developer units. 9 Unpack the replacement black imaging kit. Warning-Potential Damage: Do not touch the underside of the imaging kit. Maintaining the printer 11 6 Lift the blue levers on the imaging kit, and then pull it toward you. 7 Press down on the blue levers, grasp the green handles on the black developer unit. 10 Gently shake the black developer unit side to side.

Maintenance Manual
Page 12
11 Remove the red shipping cover from the black developer unit. 12 Insert the black developer unit. 13 Replace the yellow, cyan, and magenta developer units. Note: Make sure each developer unit is inserted into a matching color slot. 14 Place the used black imaging kit in the enclosed package. Maintaining the printer 12
11 Remove the red shipping cover from the black developer unit. 12 Insert the black developer unit. 13 Replace the yellow, cyan, and magenta developer units. Note: Make sure each developer unit is inserted into a matching color slot. 14 Place the used black imaging kit in the enclosed package. Maintaining the printer 12

Maintenance Manual
Page 17
Maintaining the printer 17 This could damage the imaging kit. 8 Unpack the replacement black and color imaging kit. Warning-Potential Damage: Do not touch the underside of the waste toner bottle, and remove it. 6 Lift the blue levers on the imaging kit, and then pull it toward you. 7 Press down on the blue levers, grasp the green handles on the sides, and then pull the imaging kit out. 5 Press the green levers on each side of the imaging kit. Leave the packaging on the developer units. 9 Gently shake the yellow, cyan, magenta, and black developer units side to side.
Maintaining the printer 17 This could damage the imaging kit. 8 Unpack the replacement black and color imaging kit. Warning-Potential Damage: Do not touch the underside of the waste toner bottle, and remove it. 6 Lift the blue levers on the imaging kit, and then pull it toward you. 7 Press down on the blue levers, grasp the green handles on the sides, and then pull the imaging kit out. 5 Press the green levers on each side of the imaging kit. Leave the packaging on the developer units. 9 Gently shake the yellow, cyan, magenta, and black developer units side to side.

Maintenance Manual
Page 18
10 Remove the red shipping cover from the yellow, cyan, magenta, and black developer units. 11 Insert the yellow, cyan, magenta, and black developer units. 12 Place the used black and color imaging kit in the enclosed package. 13 Align and insert the imaging kit. Maintaining the printer 18
10 Remove the red shipping cover from the yellow, cyan, magenta, and black developer units. 11 Insert the yellow, cyan, magenta, and black developer units. 12 Place the used black and color imaging kit in the enclosed package. 13 Align and insert the imaging kit. Maintaining the printer 18

Maintenance Manual
Page 26
13 Insert the developer unit. 14 Align and insert the imaging kit. Maintaining the printer 26
13 Insert the developer unit. 14 Align and insert the imaging kit. Maintaining the printer 26


