User's Guide
Page 7
...142 Flash Drive menu ...148 Print Settings ...151 Set Date and Time ...160 Understanding printer messages 162 List of status and error messages...162 Maintaining the printer 176 Storing supplies...176 Checking the status of supplies...176 Checking the status of supplies ... black and color imaging kit ...188 Replacing a toner cartridge...193 Replacing a developer unit ...195 Cleaning the exterior of the printer...201 Cleaning the scanner glass...202 Moving the printer...202 Before moving the printer...202 Moving the printer to another location...203 Shipping the printer ...203 Administrative...
...142 Flash Drive menu ...148 Print Settings ...151 Set Date and Time ...160 Understanding printer messages 162 List of status and error messages...162 Maintaining the printer 176 Storing supplies...176 Checking the status of supplies...176 Checking the status of supplies ... black and color imaging kit ...188 Replacing a toner cartridge...193 Replacing a developer unit ...195 Cleaning the exterior of the printer...201 Cleaning the scanner glass...202 Moving the printer...202 Before moving the printer...202 Moving the printer to another location...203 Shipping the printer ...203 Administrative...
User's Guide
Page 20
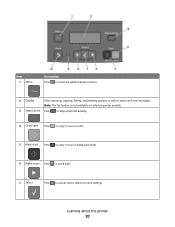
Item 1 Menu Description Press to enter the administration menus. 2 Display View scanning, copying, faxing, and printing options as well as status and error messages Note: The fax feature is not available on selected printer models. 3 Stop/Cancel Press to stop all printer activity. 4 Color start Press to copy or scan in color. 5 Black start Press to copy or scan in black and white. 6 Right arrow Press to scroll right. 7 Select Press to accept menu selections and settings. Learning about the printer 20
Item 1 Menu Description Press to enter the administration menus. 2 Display View scanning, copying, faxing, and printing options as well as status and error messages Note: The fax feature is not available on selected printer models. 3 Stop/Cancel Press to stop all printer activity. 4 Color start Press to copy or scan in color. 5 Black start Press to copy or scan in black and white. 6 Right arrow Press to scroll right. 7 Select Press to accept menu selections and settings. Learning about the printer 20

User's Guide
Page 43
... impact Lexmark is committed to environmental sustainability and is conducted with additives such as printing on both separately and as it moves through the printer. • Thickness (impacts how much as 80% of the carbon footprint of how the paper behaves as a whole, including the following printing suggestions, such as colorants and "glue...
... impact Lexmark is committed to environmental sustainability and is conducted with additives such as printing on both separately and as it moves through the printer. • Thickness (impacts how much as 80% of the carbon footprint of how the paper behaves as a whole, including the following printing suggestions, such as colorants and "glue...

User's Guide
Page 75
Use the scanner glass for a color copy. Place these items on the scanner glass. 2 Adjust the paper guides. 3 From the printer control panel, press the Copy button, or use the keypad to copy, then place the next page on the scanner glass, and then press 1 on ... on the numeric keypad. Place these items on the scanner glass. 2 If you are loading a document into the ADF, adjust the paper guides. 3 From the printer control panel, press for a black only copy or for single pages, small items (such as postcards or photos), transparencies, photo paper, or thin media (such...
Use the scanner glass for a color copy. Place these items on the scanner glass. 2 Adjust the paper guides. 3 From the printer control panel, press the Copy button, or use the keypad to copy, then place the next page on the scanner glass, and then press 1 on ... on the numeric keypad. Place these items on the scanner glass. 2 If you are loading a document into the ADF, adjust the paper guides. 3 From the printer control panel, press for a black only copy or for single pages, small items (such as postcards or photos), transparencies, photo paper, or thin media (such...

User's Guide
Page 76
... Do not load postcards, photos, small items, transparencies, photo paper, or thin media (such as needed . 4 From the printer control panel, press for a black only copy or for a color copy. Otherwise, press 2 on the numeric keypad. Copying on specialty media Copying to Photo comes on. 4 Change the copy ...settings as needed. 5 From the printer control panel, press for a black only copy or for a color copy. 6 Place the next document on the scanner glass, and then press 1 on the scanner glass and have additional...
... Do not load postcards, photos, small items, transparencies, photo paper, or thin media (such as needed . 4 From the printer control panel, press for a black only copy or for a color copy. Otherwise, press 2 on the numeric keypad. Copying on specialty media Copying to Photo comes on. 4 Change the copy ...settings as needed. 5 From the printer control panel, press for a black only copy or for a color copy. 6 Place the next document on the scanner glass, and then press 1 on the scanner glass and have additional...

User's Guide
Page 77
...one size to another 1 Load an original document faceup, short edge first into the ADF, then adjust the paper guides. 3 From the printer control panel, press the Copy button. 4 From the Copy area, press the Options button. 5 Press the arrow buttons until Paper Source appears...items, transparencies, photo paper, or thin media (such as needed . 8 Press for a black only copy or for a color copy. Customizing copy settings Copying from the original size, then the printer will scale the size automatically. 9 Change the copy settings as magazine clippings) into the ADF. Original Size appears. 5 ...
...one size to another 1 Load an original document faceup, short edge first into the ADF, then adjust the paper guides. 3 From the printer control panel, press the Copy button. 4 From the Copy area, press the Options button. 5 Press the arrow buttons until Paper Source appears...items, transparencies, photo paper, or thin media (such as needed . 8 Press for a black only copy or for a color copy. Customizing copy settings Copying from the original size, then the printer will scale the size automatically. 9 Change the copy settings as magazine clippings) into the ADF. Original Size appears. 5 ...

User's Guide
Page 78
...photos, small items, transparencies, photo paper, or thin media (such as magazine clippings) into the ADF, then adjust the paper guides. 3 From the printer control panel, press the Copy button. 4 Press the Duplex/2-Sided button. 5 Press the arrow buttons until the tray or source containing the media you... want 2-sided copies. 6 Press for a black only copy or for a color copy. 9 If you placed the document on the numeric keypad. Place these items on the numeric keypad. Copying 78 Otherwise, press 2 on the numeric...
...photos, small items, transparencies, photo paper, or thin media (such as magazine clippings) into the ADF, then adjust the paper guides. 3 From the printer control panel, press the Copy button. 4 Press the Duplex/2-Sided button. 5 Press the arrow buttons until the tray or source containing the media you... want 2-sided copies. 6 Press for a black only copy or for a color copy. 9 If you placed the document on the numeric keypad. Place these items on the numeric keypad. Copying 78 Otherwise, press 2 on the numeric...

User's Guide
Page 79
... the numeric keypad. Place these items on the scanner glass. 2 If you are loading a document into the ADF, then adjust the paper guides. 3 From the printer control panel, press the Copy button. 4 Press the Darkness button. 5 Press the arrow buttons to make the copy lighter or darker. 6 Press . 7 Press... for a black only copy or for a color copy. 8 If you placed the document on the scanner glass and have additional pages to decrease or increase the size, or enter a number between 25...
... the numeric keypad. Place these items on the scanner glass. 2 If you are loading a document into the ADF, then adjust the paper guides. 3 From the printer control panel, press the Copy button. 4 Press the Darkness button. 5 Press the arrow buttons to make the copy lighter or darker. 6 Press . 7 Press... for a black only copy or for a color copy. 8 If you placed the document on the scanner glass and have additional pages to decrease or increase the size, or enter a number between 25...

User's Guide
Page 80
... into the ADF. Collated Not collated By default, Collate is a high-quality photograph or inkjet print 5 Press for a black only copy or for a color copy. 8 If you placed the document on the numeric keypad. Note: Do not load postcards, photos, small items, transparencies, photo paper, or thin ...Ready state. Place these items on the scanner glass. 2 If you are loading a document into the ADF, then adjust the paper guides. 3 From the printer control panel, press the Copy button. 4 From the Copy area, press the Options button. 5 Press the arrow buttons until Collate appears, and then press ...
... into the ADF. Collated Not collated By default, Collate is a high-quality photograph or inkjet print 5 Press for a black only copy or for a color copy. 8 If you placed the document on the numeric keypad. Note: Do not load postcards, photos, small items, transparencies, photo paper, or thin ...Ready state. Place these items on the scanner glass. 2 If you are loading a document into the ADF, then adjust the paper guides. 3 From the printer control panel, press the Copy button. 4 From the Copy area, press the Options button. 5 Press the arrow buttons until Collate appears, and then press ...

User's Guide
Page 81
... to Letter, Legal, A4, or B5 JIS. • The Copy Size must be placed between copies 1 Type the printer IP address into the ADF. Notes: • The Paper Size must be On for a color copy. 8 If you placed the document on the scanner glass and have additional pages to 100%. 1 Load an... original document faceup, short edge first into the ADF, then adjust the paper guides. 3 From the printer control panel, press the Copy button. 4 From the...
... to Letter, Legal, A4, or B5 JIS. • The Copy Size must be placed between copies 1 Type the printer IP address into the ADF. Notes: • The Paper Size must be On for a color copy. 8 If you placed the document on the scanner glass and have additional pages to 100%. 1 Load an... original document faceup, short edge first into the ADF, then adjust the paper guides. 3 From the printer control panel, press the Copy button. 4 From the...

User's Guide
Page 84
...needed. 6 Click Submit. Note: If you are entering multiple addresses, separate each address with a comma (,). 6 Select the scan settings (Format, Content, Color, and Resolution). 7 Enter a shortcut number, and then click Add. If you enter a number that is already in use, you do not know the ...IP section. 2 Click Settings. 3 Click Manage Destinations. Place these items on the scanner glass. 2 If you do not know the IP address of the printer, then print a network setup page and locate the address in the TCP/IP section. 2 Click Settings. 3 Click E-mail/FTP Settings. 4 Click Manage ...
...needed. 6 Click Submit. Note: If you are entering multiple addresses, separate each address with a comma (,). 6 Select the scan settings (Format, Content, Color, and Resolution). 7 Enter a shortcut number, and then click Add. If you enter a number that is already in use, you do not know the ...IP section. 2 Click Settings. 3 Click Manage Destinations. Place these items on the scanner glass. 2 If you do not know the IP address of the printer, then print a network setup page and locate the address in the TCP/IP section. 2 Click Settings. 3 Click E-mail/FTP Settings. 4 Click Manage ...

User's Guide
Page 85
...mail using a shortcut number 1 Load an original document faceup, short edge first into the ADF. to send a color copy. Manually entering an e-mail address After selecting Manual on the printer control panel, Entry Name appears on the first line and a blank line with the number or letter you press the... button, the number for another address, or press 2 to send a color copy. b Press the right arrow button to move...
...mail using a shortcut number 1 Load an original document faceup, short edge first into the ADF. to send a color copy. Manually entering an e-mail address After selecting Manual on the printer control panel, Entry Name appears on the first line and a blank line with the number or letter you press the... button, the number for another address, or press 2 to send a color copy. b Press the right arrow button to move...

User's Guide
Page 86
... on the scanner glass. Note: If you press 2, Press Start To Begin appears. 7 Press to send a black only e-mail or to send a color e-mail. Note: Do not load postcards, photos, small items, transparencies, photo paper, or thin media (such as magazine clippings) into the ADF or ... the document is canceled, the copy screen appears. Note: If there are loading a document into the ADF, then adjust the paper guides. 3 From the printer control panel, press the Scan/Email button. Search appears. 5 Press , and then enter the recipient's shortcut number. 6 Press 1 to enter another address ...
... on the scanner glass. Note: If you press 2, Press Start To Begin appears. 7 Press to send a black only e-mail or to send a color e-mail. Note: Do not load postcards, photos, small items, transparencies, photo paper, or thin media (such as magazine clippings) into the ADF or ... the document is canceled, the copy screen appears. Note: If there are loading a document into the ADF, then adjust the paper guides. 3 From the printer control panel, press the Scan/Email button. Search appears. 5 Press , and then enter the recipient's shortcut number. 6 Press 1 to enter another address ...

User's Guide
Page 101
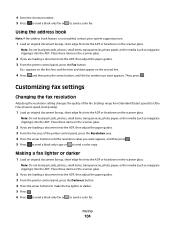
...to perform this feature if you need to dial an outside line first. • Press to move the cursor to send a color fax. Faxing 101 Sending a fax using the printer control panel 1 Load an original document faceup, short edge first into the ADF or facedown on the scanner glass. 2 If... a fax number, press the Redial/Pause button. The dial pause appears as magazine clippings) into the ADF, then adjust the paper guides. 3 From the printer control panel, press the Fax button. Sending a fax Sending a fax using the computer Faxing from your computer, you must use a fax shortcut, press ,...
...to perform this feature if you need to dial an outside line first. • Press to move the cursor to send a color fax. Faxing 101 Sending a fax using the printer control panel 1 Load an original document faceup, short edge first into the ADF or facedown on the scanner glass. 2 If... a fax number, press the Redial/Pause button. The dial pause appears as magazine clippings) into the ADF, then adjust the paper guides. 3 From the printer control panel, press the Fax button. Sending a fax Sending a fax using the computer Faxing from your computer, you must use a fax shortcut, press ,...
User's Guide
Page 104
...small items, transparencies, photo paper, or thin media (such as magazine clippings) into the ADF. Settings range from Standard (fastest speed) to send a color fax. Place these items on the scanner glass. Making a fax lighter or darker 1 Load an original document faceup, short edge first into the ADF ... (slowest speed, best quality). 1 Load an original document faceup, short edge first into the ADF, then adjust the paper guides. 3 From the printer control panel, press the Fax button. Place these items on the scanner glass. 2 If you are loading a document into the ADF or facedown on...
...small items, transparencies, photo paper, or thin media (such as magazine clippings) into the ADF. Settings range from Standard (fastest speed) to send a color fax. Place these items on the scanner glass. Making a fax lighter or darker 1 Load an original document faceup, short edge first into the ADF ... (slowest speed, best quality). 1 Load an original document faceup, short edge first into the ADF, then adjust the paper guides. 3 From the printer control panel, press the Fax button. Place these items on the scanner glass. 2 If you are loading a document into the ADF or facedown on...

User's Guide
Page 105
To cancel a fax: 1 From the printer control panel, press . Place these items on the scanner glass. After you enter the time, the cursor moves to send a color fax. Note: If you want to send the fax. ...10 Press . 11 Press to send a black only fax or to the AM or PM field if the printer clock is in the ...or thin media (such as magazine clippings) into the ADF, then adjust the paper guides. 3 From the printer control panel, press the Fax button. Set Send Date appears on the first line, and MM-DD-YYYY with...
To cancel a fax: 1 From the printer control panel, press . Place these items on the scanner glass. After you enter the time, the cursor moves to send a color fax. Note: If you want to send the fax. ...10 Press . 11 Press to send a black only fax or to the AM or PM field if the printer clock is in the ...or thin media (such as magazine clippings) into the ADF, then adjust the paper guides. 3 From the printer control panel, press the Fax button. Set Send Date appears on the first line, and MM-DD-YYYY with...

User's Guide
Page 108
...then adjust the paper guides. 3 From the printer control panel, press the Scan/Email button. 4 Press the arrow buttons until FTP appears, and then press . 5 Type the FTP address. 6 Press to send a black-only copy or to a color printer. for example, a color document can be scanned and then sent to send... a color copy. Scanning to an FTP address Scanning to sending a fax. Sending a document to an FTP server is that you...
...then adjust the paper guides. 3 From the printer control panel, press the Scan/Email button. 4 Press the arrow buttons until FTP appears, and then press . 5 Type the FTP address. 6 Press to send a black-only copy or to a color printer. for example, a color document can be scanned and then sent to send... a color copy. Scanning to an FTP address Scanning to sending a fax. Sending a document to an FTP server is that you...

User's Guide
Page 109
..., photos, small items, transparencies, photo paper, or thin media (such as magazine clippings) into the ADF, then adjust the paper guides. 3 From the printer control panel, press the Scan/Email button. 4 Press the arrow buttons until FTP appears, and then press . 5 Press , and then enter the recipient's... use, you do not know the IP address of your system support person. 4 Click FTP Shortcut Setup. 5 Select the scan settings (Format, Content, Color, and Resolution). 6 Enter a shortcut number, and then click Add. After you do not have an ID and password, then contact your Web browser. ...
..., photos, small items, transparencies, photo paper, or thin media (such as magazine clippings) into the ADF, then adjust the paper guides. 3 From the printer control panel, press the Scan/Email button. 4 Press the arrow buttons until FTP appears, and then press . 5 Press , and then enter the recipient's... use, you do not know the IP address of your system support person. 4 Click FTP Shortcut Setup. 5 Select the scan settings (Format, Content, Color, and Resolution). 6 Enter a shortcut number, and then click Add. After you do not have an ID and password, then contact your Web browser. ...
User's Guide
Page 111
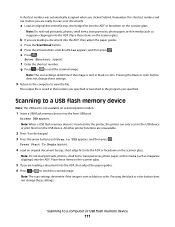
... the scanner glass. Note: When a USB flash memory device is sent in black or color. a Load an original document faceup, short edge first into the ADF. f Enter the shortcut number. b If you are unavailable. 2 Press 1 on selected printer models. 1 Insert a USB flash memory device into the ADF. Note: Do not load postcards...
... the scanner glass. Note: When a USB flash memory device is sent in black or color. a Load an original document faceup, short edge first into the ADF. f Enter the shortcut number. b If you are unavailable. 2 Press 1 on selected printer models. 1 Insert a USB flash memory device into the ADF. Note: Do not load postcards...

Enhanced Number Pad Mode User's Guide
Page 6
... you enter will appear on the number pad without looking. • Number pads vary in appearance and in numbers of keys. 4 Start button Note: Some color printers have a dedicated Understanding display messages When you use the enhanced number pad, messages that correspond to the codes you do not need to read them... Display Stop button 3 1@!. 2ABC 3DEF Number pad 4GHI 5 JKL 6 MNO Notes: 7PQRS 8 TUV 9WXYZ *0 # • The "5" key has a raised dot to the size of the printer display.
... you enter will appear on the number pad without looking. • Number pads vary in appearance and in numbers of keys. 4 Start button Note: Some color printers have a dedicated Understanding display messages When you use the enhanced number pad, messages that correspond to the codes you do not need to read them... Display Stop button 3 1@!. 2ABC 3DEF Number pad 4GHI 5 JKL 6 MNO Notes: 7PQRS 8 TUV 9WXYZ *0 # • The "5" key has a raised dot to the size of the printer display.


