User's Guide
Page 13
... you instructions for setting up hardware and software (on the Lexmark Web site at www.lexmark.com. Note: If your printer supports Macintosh operating systems, see the Mac Help: 1 From the Finder desktop, double-click the Lexmark X5400 Series folder. 2 Double-click the printer Help icon. Where to find You can find this document in...
... you instructions for setting up hardware and software (on the Lexmark Web site at www.lexmark.com. Note: If your printer supports Macintosh operating systems, see the Mac Help: 1 From the Finder desktop, double-click the Lexmark X5400 Series folder. 2 Double-click the printer Help icon. Where to find You can find this document in...
User's Guide
Page 14
...network (if supported by The installation screen appears. systems, see the Mac Help: 2 Click Documentation. 1 From the Finder desktop, double-click the Lexmark 3 Click View User's Guide (including Setup X5400 Series folder. Lexmark Solution Center Description Where to find this document on To access the..., faxing, paper jams, and misfeeds Run, and then type D:\setup, where D is included on the Lexmark Web site at www.lexmark.com. Troubleshooting). 2 Double-click the printer Help icon. 4 Click Yes. It installs with the other information Comprehensive Version will be installed.
...network (if supported by The installation screen appears. systems, see the Mac Help: 2 Click Documentation. 1 From the Finder desktop, double-click the Lexmark 3 Click View User's Guide (including Setup X5400 Series folder. Lexmark Solution Center Description Where to find this document on To access the..., faxing, paper jams, and misfeeds Run, and then type D:\setup, where D is included on the Lexmark Web site at www.lexmark.com. Troubleshooting). 2 Double-click the printer Help icon. 4 Click Yes. It installs with the other information Comprehensive Version will be installed.
User's Guide
Page 16
...For complete descriptions: • Windows users-See the User's Guide. • Macintosh users-If your this limited warranty, see the Mac Help installed with the printer software. Introduction 16 period of the printer), and have it ready when you faster: • Machine Type number ... purchased • Store where purchased Operating system notice All features and functions are operating system-dependent. materials and workmanship for a www.lexmark.com. this printer will be free of defects in printer, or set forth at printer. Limited Warranty Description Where to find (rest...
...For complete descriptions: • Windows users-See the User's Guide. • Macintosh users-If your this limited warranty, see the Mac Help installed with the printer software. Introduction 16 period of the printer), and have it ready when you faster: • Machine Type number ... purchased • Store where purchased Operating system notice All features and functions are operating system-dependent. materials and workmanship for a www.lexmark.com. this printer will be free of defects in printer, or set forth at printer. Limited Warranty Description Where to find (rest...
User's Guide
Page 77
Changing the Gamma Value of a photo or image Adjusting the gamma value helps you want to edit. 2 With an image open, click Advanced. 3 Type a value in the text box, or use the up or down arrows to reject ...
Changing the Gamma Value of a photo or image Adjusting the gamma value helps you want to edit. 2 With an image open, click Advanced. 3 Type a value in the text box, or use the up or down arrows to reject ...
User's Guide
Page 79
... Photos to your computer using the Productivity Studio. • If you want Windows to do?" Removing wavy patterns from scanned photos, magazines, or newspapers Descreening helps to remove wavy (moire) patterns from images scanned from magazines or newspapers. 1 Make sure the printer is updated. Printing photos Printing photos from a CD or...
... Photos to your computer using the Productivity Studio. • If you want Windows to do?" Removing wavy patterns from scanned photos, magazines, or newspapers Descreening helps to remove wavy (moire) patterns from images scanned from magazines or newspapers. 1 Make sure the printer is updated. Printing photos Printing photos from a CD or...
User's Guide
Page 90
... are copying photos, use photo or heavyweight matte paper, with the glossy or printable side facing you. (If you are not sure which side is helpful in creating labels, decals, flyers, and handouts. 1 Load paper. 4 Press . 5 Press or repeatedly until Collate appears. 6 Press . 7 Press or repeatedly until the number of copies...
... are copying photos, use photo or heavyweight matte paper, with the glossy or printable side facing you. (If you are not sure which side is helpful in creating labels, decals, flyers, and handouts. 1 Load paper. 4 Press . 5 Press or repeatedly until Collate appears. 6 Press . 7 Press or repeatedly until the number of copies...

User's Guide
Page 117
... you subscribe to this service, you can include up a dialing prefix You can program your printer to be dialed before each number dialed. Faxing 117 Help Locate information on faxing, fax settings, and so on page 109 5 After changing settings, click OK. 6 Close the Fax Solutions Software. Setting up to save...
... you subscribe to this service, you can include up a dialing prefix You can program your printer to be dialed before each number dialed. Faxing 117 Help Locate information on faxing, fax settings, and so on page 109 5 After changing settings, click OK. 6 Close the Fax Solutions Software. Setting up to save...

User's Guide
Page 136
... size you are possible solutions. CHECK PAPER LOADING • Load a smaller amount of media. Try one or more RAM. Troubleshooting 136 Print speed is sometimes helpful to remove the existing printer software and reinstall it.
... size you are possible solutions. CHECK PAPER LOADING • Load a smaller amount of media. Try one or more RAM. Troubleshooting 136 Print speed is sometimes helpful to remove the existing printer software and reinstall it.
User's Guide
Page 151
... front of the scanner glass. • Place the item you want to run properly. 1 Start Windows. 2 When the desktop appears, insert the software CD for help attaching the printer. RESTART THE HOST COMPUTER AND THE REMOTE COMPUTER Try printing again. Troubleshooting 151 Updating the printer software The printer software needs to...
... front of the scanner glass. • Place the item you want to run properly. 1 Start Windows. 2 When the desktop appears, insert the software CD for help attaching the printer. RESTART THE HOST COMPUTER AND THE REMOTE COMPUTER Try printing again. Troubleshooting 151 Updating the printer software The printer software needs to...
User's Guide
Page 177
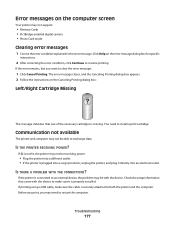
... message: 1 Click Cancel Printing. You need to restart the computer. Error messages on the computer screen Your printer may need to install a print cartridge. Click Help on the Canceling Printing dialog box. Communication not available The printer and computer may be receiving power. • Plug the printer into a different outlet. •...
... message: 1 Click Cancel Printing. You need to restart the computer. Error messages on the computer screen Your printer may need to install a print cartridge. Click Help on the Canceling Printing dialog box. Communication not available The printer and computer may be receiving power. • Plug the printer into a different outlet. •...

User's Guide
Page 188
The Power Saver Mode is sometimes helpful to calculate the total product energy usage. Total energy usage...Is, during normal use , and not for a specified period of time, called Power Saver. Limited warranty Lexmark warrants that came with an energy-saving mode called the Power Saver Timeout. To obtain warranty service, you may... be multiplied by lowering power consumption during the warranty period, contact a Remarketer or Lexmark for current values. Values are provided in power units of Watts, the power consumption should be substantially higher...
The Power Saver Mode is sometimes helpful to calculate the total product energy usage. Total energy usage...Is, during normal use , and not for a specified period of time, called Power Saver. Limited warranty Lexmark warrants that came with an energy-saving mode called the Power Saver Timeout. To obtain warranty service, you may... be multiplied by lowering power consumption during the warranty period, contact a Remarketer or Lexmark for current values. Values are provided in power units of Watts, the power consumption should be substantially higher...

User's Guide
Page 28
..., press Copy Mode. 4 Press . 5 Press or repeatedly until Repeat Image appears. 6 Press . 7 Press or repeatedly until the setting you are not sure which side is helpful in creating labels, decals, flyers, and handouts. 1 Load paper. Related topics: • "Loading paper" on page 6 • "Loading original documents on the scanner glass" on...
..., press Copy Mode. 4 Press . 5 Press or repeatedly until Repeat Image appears. 6 Press . 7 Press or repeatedly until the setting you are not sure which side is helpful in creating labels, decals, flyers, and handouts. 1 Load paper. Related topics: • "Loading paper" on page 6 • "Loading original documents on the scanner glass" on...

User's Guide
Page 37
...scanner glass 1 Load an original document facedown on the scanner glass. 2 From the Finder desktop, double-click the Lexmark X5400 Series folder. 3 Double-click the Lexmark X5400 Series Center icon. 4 Select Prompt for multiple pages. 5 Click Scan. 6 In the Save dialog, enter... a filename for your scan job. 7 From the Where pop-up menu, choose a destination for every original document you want to remove wavy patterns from images scanned from magazines or newspapers Descreening helps...
...scanner glass 1 Load an original document facedown on the scanner glass. 2 From the Finder desktop, double-click the Lexmark X5400 Series folder. 3 Double-click the Lexmark X5400 Series Center icon. 4 Select Prompt for multiple pages. 5 Click Scan. 6 In the Save dialog, enter... a filename for your scan job. 7 From the Where pop-up menu, choose a destination for every original document you want to remove wavy patterns from images scanned from magazines or newspapers Descreening helps...
User's Guide
Page 40
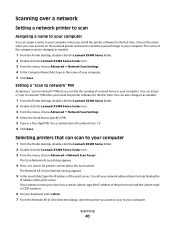
..., choose Advanced ŒNetwork Scan Access. Selecting printers that can also change it as needed . 1 From the Finder desktop, double-click the Lexmark X5400 Series folder. 2 Double-click the Lexmark X5400 Series Center icon. 3 From the menu, choose Advanced Œ Network Scan Settings. 4 Select the check box to your keyboard, press ...in the name of the print server. The name of the computer can assign a "scan to network" PIN when you install the printer software for help finding the IP address of the print server and the subnet mask in CIDR notation. 6 On your computer.
..., choose Advanced ŒNetwork Scan Access. Selecting printers that can also change it as needed . 1 From the Finder desktop, double-click the Lexmark X5400 Series folder. 2 Double-click the Lexmark X5400 Series Center icon. 3 From the menu, choose Advanced Œ Network Scan Settings. 4 Select the check box to your keyboard, press ...in the name of the print server. The name of the computer can assign a "scan to network" PIN when you install the printer software for help finding the IP address of the print server and the subnet mask in CIDR notation. 6 On your computer.
User's Guide
Page 107
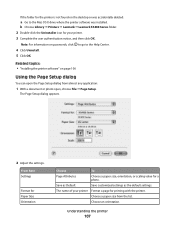
..., choose File Œ Page Setup. Related topics: • "Installing the printer software" on the desktop or was accidentally deleted: a Go to the Help Center. 4 Click Uninstall. 5 Click OK. Choose an orientation. Understanding the printer 107 The name of your printer. 3 Complete the user authentication notice, ... drive where the printer software was installed. The Page Setup dialog appears. 2 Adjust the settings. b Choose Library Œ Printers Œ Lexmark Œ Lexmark X5400 Series folder. 2 Double-click the Uninstaller icon for your printer Format a page for a photo.
..., choose File Œ Page Setup. Related topics: • "Installing the printer software" on the desktop or was accidentally deleted: a Go to the Help Center. 4 Click Uninstall. 5 Click OK. Choose an orientation. Understanding the printer 107 The name of your printer. 3 Complete the user authentication notice, ... drive where the printer software was installed. The Page Setup dialog appears. 2 Adjust the settings. b Choose Library Œ Printers Œ Lexmark Œ Lexmark X5400 Series folder. 2 Double-click the Uninstaller icon for your printer Format a page for a photo.

User's Guide
Page 108
... application: 1 With a document open the Print dialog from almost any changes to the settings. From here Scale Choose To Reduce or enlarge a photo to the Help Center for more information. Note: Recommended values are at the bottom of the Page Setup dialog: Click Cancel OK To Go to a percentage of the...
... application: 1 With a document open the Print dialog from almost any changes to the settings. From here Scale Choose To Reduce or enlarge a photo to the Help Center for more information. Note: Recommended values are at the bottom of the Page Setup dialog: Click Cancel OK To Go to a percentage of the...
User's Guide
Page 111
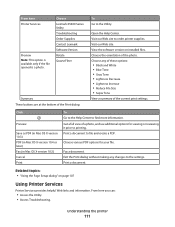
...dialog" on installed files. From here you can: • Access the Utility. • Access Troubleshooting. Choose Lexmark X5400 Series Utility Troubleshooting Order Supplies Contact Lexmark Software Version Rotate Quartz Filter Summary These buttons are at the bottom of a photo, and see additional options for ...your file. View the software version on page 107 Using Printer Services Printer Services provides helpful Web links and ...
...dialog" on installed files. From here you can: • Access the Utility. • Access Troubleshooting. Choose Lexmark X5400 Series Utility Troubleshooting Order Supplies Contact Lexmark Software Version Rotate Quartz Filter Summary These buttons are at the bottom of a photo, and see additional options for ...your file. View the software version on page 107 Using Printer Services Printer Services provides helpful Web links and ...
User's Guide
Page 114
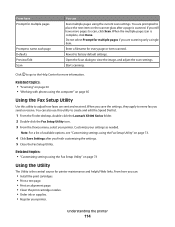
...For a list of available options, see "Customizing settings using the computer" on page 85 Using the Fax Setup Utility Use this utility to the Help Center for every page or item scanned. When the multiple-page scan is complete, click Done. Revert to view the image, and adjust the scan... the Scan dialog to factory default settings. Click to go to create and edit the Speed Dial list. 1 From the Finder desktop, double-click the Lexmark X5400 Series folder. 2 Double-click the Fax Setup Utility icon. 3 From the Device menu, select your settings as needed. Related topics: • "Scanning...
...For a list of available options, see "Customizing settings using the computer" on page 85 Using the Fax Setup Utility Use this utility to the Help Center for every page or item scanned. When the multiple-page scan is complete, click Done. Revert to view the image, and adjust the scan... the Scan dialog to factory default settings. Click to go to create and edit the Speed Dial list. 1 From the Finder desktop, double-click the Lexmark X5400 Series folder. 2 Double-click the Fax Setup Utility icon. 3 From the Device menu, select your settings as needed. Related topics: • "Scanning...

User's Guide
Page 116
... your selected application. To modify the Preferences setting: 1 From the Finder desktop, double-click the Lexmark X5400 Series folder. 2 Double-click the Lexmark X5400 Series Center icon. 3 From the menu bar, click Lexmark All-In-One Center. 4 Choose Preferences. 5 Select or unselect Show preview when Scan button pressed...Start Black on page 112. • You can indicate that you want the Scan dialog to your scan settings applied and go to the Help Center for more information, see "Using the All-In-One Center" on the control panel. For more information. Note: By default, Show...
... your selected application. To modify the Preferences setting: 1 From the Finder desktop, double-click the Lexmark X5400 Series folder. 2 Double-click the Lexmark X5400 Series Center icon. 3 From the menu bar, click Lexmark All-In-One Center. 4 Choose Preferences. 5 Select or unselect Show preview when Scan button pressed...Start Black on page 112. • You can indicate that you want the Scan dialog to your scan settings applied and go to the Help Center for more information, see "Using the All-In-One Center" on the control panel. For more information. Note: By default, Show...
User's Guide
Page 118
Using the Printer Setup Complete dialog The Printer Setup Complete dialog provides helpful options after successful installation. Related topics: • "Installing the printer software" on page 106 Understanding the printer 118 From here you can: • Check for special offers. • Print a test page.
Using the Printer Setup Complete dialog The Printer Setup Complete dialog provides helpful options after successful installation. Related topics: • "Installing the printer software" on page 106 Understanding the printer 118 From here you can: • Check for special offers. • Print a test page.

