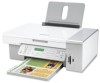

User's Guide
Page 2
...during a lightning storm. Inspect the power cord regularly for the use of specific Lexmark components. Remove the power cord from the electrical outlet before inspecting it. The safety features of misuse. Lexmark is designed, tested, and approved to meet strict global safety standards with this ...or place heavy objects on the power cord. Refer service or repairs, other replacement parts. CAUTION-SHOCK HAZARD: Do not use the fax feature during a lightning storm. Safety information Use only the power supply and power supply cord provided with the use of other than those...
...during a lightning storm. Inspect the power cord regularly for the use of specific Lexmark components. Remove the power cord from the electrical outlet before inspecting it. The safety features of misuse. Lexmark is designed, tested, and approved to meet strict global safety standards with this ...or place heavy objects on the power cord. Refer service or repairs, other replacement parts. CAUTION-SHOCK HAZARD: Do not use the fax feature during a lightning storm. Safety information Use only the power supply and power supply cord provided with the use of other than those...
User's Guide
Page 3
... up the printer for standalone use...18 Understanding the parts of the printer...23 Getting the printer ready to fax...25 Using an RJ11 adapter ...25 Choosing a fax connection...28 Connecting to an answering machine...29 Connecting directly to a telephone wall jack ...30 Connecting directly to... a telephone wall jack in Germany 31 Connecting to a computer with a modem...32 Connecting to a telephone ...33 Setting up to fax while behind a PBX ...34 Using a digital phone service ...35 Understanding the control panel...35 Using the control panel ...35 Saving settings...39 Installing...
... up the printer for standalone use...18 Understanding the parts of the printer...23 Getting the printer ready to fax...25 Using an RJ11 adapter ...25 Choosing a fax connection...28 Connecting to an answering machine...29 Connecting directly to a telephone wall jack ...30 Connecting directly to... a telephone wall jack in Germany 31 Connecting to a computer with a modem...32 Connecting to a telephone ...33 Setting up to fax while behind a PBX ...34 Using a digital phone service ...35 Understanding the control panel...35 Using the control panel ...35 Saving settings...39 Installing...
User's Guide
Page 6
... the Productivity Studio e-mail screen preferences 94 Faxing 96 Sending a fax...96 Entering a fax number ...96 Sending a fax using the software...96 Sending a fax using the control panel ...97 Sending a fax while listening to a call (On Hook Dial)...97 Sending a broadcast fax at a scheduled time...98 Receiving a fax...98 Receiving a fax manually...98 Setting a fax manual answer code...99 Contents 6
... the Productivity Studio e-mail screen preferences 94 Faxing 96 Sending a fax...96 Entering a fax number ...96 Sending a fax using the software...96 Sending a fax using the control panel ...97 Sending a fax while listening to a call (On Hook Dial)...97 Sending a broadcast fax at a scheduled time...98 Receiving a fax...98 Receiving a fax manually...98 Setting a fax manual answer code...99 Contents 6

User's Guide
Page 7
... dialing prefix ...110 Setting the distinctive ring...110 Setting the number of rings before receiving a fax automatically 111 Setting up Speed Dial...111 Printing fax activity reports...112 Maintaining the printer 113 Replacing print cartridges...113 Installing print cartridges...113 Removing a... used print cartridge ...114 Refilling print cartridges...115 Using genuine Lexmark print cartridges...115 Aligning print cartridges...
... dialing prefix ...110 Setting the distinctive ring...110 Setting the number of rings before receiving a fax automatically 111 Setting up Speed Dial...111 Printing fax activity reports...112 Maintaining the printer 113 Replacing print cartridges...113 Installing print cartridges...113 Removing a... used print cartridge ...114 Refilling print cartridges...115 Using genuine Lexmark print cartridges...115 Aligning print cartridges...
User's Guide
Page 9
... ...154 Partial document or photo scans...155 Cannot scan to a computer over a network...155 Fax troubleshooting...155 Cannot send or receive a fax...155 Can send but not receive faxes...158 Can receive but not send faxes...158 Printer receives a blank fax...160 Received fax has poor print quality...160 Caller ID information is not displayed...160...
... ...154 Partial document or photo scans...155 Cannot scan to a computer over a network...155 Fax troubleshooting...155 Cannot send or receive a fax...155 Can send but not receive faxes...158 Can receive but not send faxes...158 Printer receives a blank fax...160 Received fax has poor print quality...160 Caller ID information is not displayed...160...
User's Guide
Page 14
...8226; Maintaining the printer 1 Insert the CD. • Connecting the printer to find this document on the Lexmark Web site at www.lexmark.com. It installs with printing, copying, scanning, faxing, paper jams, and misfeeds The installation screen appears. Troubleshooting). 2 Double-click the printer Help icon. 4 ...if supported by your printer) If the link to the User's Guide is not on your desktop, follow • Faxing (if supported by your CD. To access the Lexmark Solution Center: 1 Do one of your CD-ROM drive. 2 Click Documentation. 1 From the Finder desktop, double-click...
...8226; Maintaining the printer 1 Insert the CD. • Connecting the printer to find this document on the Lexmark Web site at www.lexmark.com. It installs with printing, copying, scanning, faxing, paper jams, and misfeeds The installation screen appears. Troubleshooting). 2 Double-click the printer Help icon. 4 ...if supported by your printer) If the link to the User's Guide is not on your desktop, follow • Faxing (if supported by your CD. To access the Lexmark Solution Center: 1 Do one of your CD-ROM drive. 2 Click Documentation. 1 From the Finder desktop, double-click...

User's Guide
Page 17
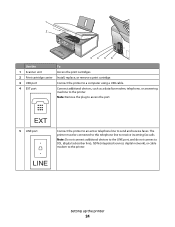
... to the power supply port located at the back of the printer 5 Quick Setup sheet Initial setup directions 6 Installation software CD • Installation software for faxing. Note: You may not support: • Memory Cards • PictBridge-enabled digital camera • Photo Card mode Checking the box contents 12 3 4 1 2 3 7 5 6 Name Description 1 Black...
... to the power supply port located at the back of the printer 5 Quick Setup sheet Initial setup directions 6 Installation software CD • Installation software for faxing. Note: You may not support: • Memory Cards • PictBridge-enabled digital camera • Photo Card mode Checking the box contents 12 3 4 1 2 3 7 5 6 Name Description 1 Black...

User's Guide
Page 23
.... 5 Paper exit tray Hold paper as it exits. 6 Paper guide Keep paper straight when feeding. 7 Top cover Access the scanner glass. 8 Scanner glass Copy, scan, fax, or remove an item. Setting up the printer 23 For more information, see "Using the control panel" on the alignment page are normal, and do...
.... 5 Paper exit tray Hold paper as it exits. 6 Paper guide Keep paper straight when feeding. 7 Top cover Access the scanner glass. 8 Scanner glass Copy, scan, fax, or remove an item. Setting up the printer 23 For more information, see "Using the control panel" on the alignment page are normal, and do...
User's Guide
Page 24
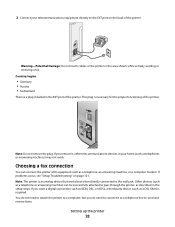
... devices to the LINE port, and do not connect a DSL (digital subscriber line), ISDN (integrated services digital network), or cable modem to send and receive faxes. The printer must be connected to this telephone line to access the port. Note: Remove the plug to receive incoming... fax calls. 1 2 34 5 6 Use the To 1 Scanner unit Access the print cartridges. 2 Print cartridge carrier Install, replace, or remove a print cartridge. 3 USB port Connect the printer ...
... devices to the LINE port, and do not connect a DSL (digital subscriber line), ISDN (integrated services digital network), or cable modem to send and receive faxes. The printer must be connected to this telephone line to access the port. Note: Remove the plug to receive incoming... fax calls. 1 2 34 5 6 Use the To 1 Scanner unit Access the print cartridges. 2 Print cartridge carrier Install, replace, or remove a print cartridge. 3 USB port Connect the printer ...

User's Guide
Page 25
...or make any electrical or cabling connections, such as the power supply cord or telephone, during a lightning storm. Getting the printer ready to fax CAUTION-SHOCK HAZARD: Do not use the telephone line adapter included in the box with port Connect the printer to an answering machine or other... telecommunications equipment, use the fax feature during a lightning storm. Do not set up the printer 25 Use the To 6 Power supply with the printer. 1 Connect one end of...
...or make any electrical or cabling connections, such as the power supply cord or telephone, during a lightning storm. Getting the printer ready to fax CAUTION-SHOCK HAZARD: Do not use the telephone line adapter included in the box with port Connect the printer to an answering machine or other... telecommunications equipment, use the fax feature during a lightning storm. Do not set up the printer 25 Use the To 6 Power supply with the printer. 1 Connect one end of...

User's Guide
Page 27
Warning-Potential Damage: Do not touch cables or the printer in the area shown while actively sending or receiving a fax. Note: Once this plug is removed, any country- 2 Connect your telecommunications equipment directly to the EXT port on the back of the printer. or region-...
Warning-Potential Damage: Do not touch cables or the printer in the area shown while actively sending or receiving a fax. Note: Once this plug is removed, any country- 2 Connect your telecommunications equipment directly to the EXT port on the back of the printer. or region-...
User's Guide
Page 28
...modem. If you remove it to a telephone line to pass through the printer, as described in the area shown while actively sending or receiving a fax. Country/region • Germany • Austria • Switzerland There is required. This plug is an analog device that works best when directly ...connected to the EXT port on page 121. Choosing a fax connection You can be successfully attached to send and receive faxes. Note: The printer is necessary for the proper functioning of the printer. 2 Connect your home (such as...
...modem. If you remove it to a telephone line to pass through the printer, as described in the area shown while actively sending or receiving a fax. Country/region • Germany • Austria • Switzerland There is required. This plug is an analog device that works best when directly ...connected to the EXT port on page 121. Choosing a fax connection You can be successfully attached to send and receive faxes. Note: The printer is necessary for the proper functioning of the printer. 2 Connect your home (such as...

User's Guide
Page 29
... on page 33 Receive both incoming voice messages and faxes. "Connecting to a computer with a modem" on connecting the printer to an answering faxes. machine" on page 30 • Use the fax line as a normal telephone line. • Send and receive faxes without using the computer or the printer. For more...; An answering machine • Three telephone cords • The printer • A telephone • A computer modem • Three telephone cords Benefits Send and receive faxes without using a computer. You can connect the printer to a telephone wall jack" on page 29 Send...
... on page 33 Receive both incoming voice messages and faxes. "Connecting to a computer with a modem" on connecting the printer to an answering faxes. machine" on page 30 • Use the fax line as a normal telephone line. • Send and receive faxes without using the computer or the printer. For more...; An answering machine • Three telephone cords • The printer • A telephone • A computer modem • Three telephone cords Benefits Send and receive faxes without using a computer. You can connect the printer to a telephone wall jack" on page 29 Send...

User's Guide
Page 30
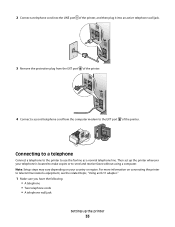
3 Remove the protective plug from the EXT port of the printer. 4 Connect a second telephone cord from the telephone to the answering machine. 5 Connect a third telephone cord from the answering machine to send and receive faxes without using a computer. 1 Make sure you have a telephone cord and a telephone wall jack. 2 Connect one end of the telephone cord into the LINE port of the printer. Connecting directly to a telephone wall jack Connect the printer directly to a telephone wall jack to make copies or to the EXT port of the printer. Setting up the printer 30
3 Remove the protective plug from the EXT port of the printer. 4 Connect a second telephone cord from the telephone to the answering machine. 5 Connect a third telephone cord from the answering machine to send and receive faxes without using a computer. 1 Make sure you have a telephone cord and a telephone wall jack. 2 Connect one end of the telephone cord into the LINE port of the printer. Connecting directly to a telephone wall jack Connect the printer directly to a telephone wall jack to make copies or to the EXT port of the printer. Setting up the printer 30

User's Guide
Page 31
3 Connect the other end of the telephone cord into the N slot of the telephone cord into an active telephone wall jack. Connecting directly to a telephone wall jack in Germany Connect the printer directly to a telephone wall jack to send and receive faxes without using a computer. 1 Make sure you have a telephone cord (provided with the product) and a telephone wall jack. 2 Connect one end of the telephone cord into the LINE port of the printer. 3 Connect the other end of an active telephone wall jack. Setting up the printer 31
3 Connect the other end of the telephone cord into the N slot of the telephone cord into an active telephone wall jack. Connecting directly to a telephone wall jack in Germany Connect the printer directly to a telephone wall jack to send and receive faxes without using a computer. 1 Make sure you have a telephone cord (provided with the product) and a telephone wall jack. 2 Connect one end of the telephone cord into the LINE port of the printer. 3 Connect the other end of an active telephone wall jack. Setting up the printer 31
User's Guide
Page 32
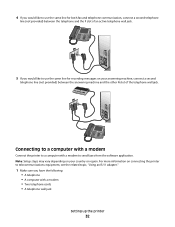
...modem to telecommunications equipment, see the related topic, "Using an RJ11 adapter." 1 Make sure you would like to use the same line for both fax and telephone communication, connect a second telephone line (not provided) between the telephone and the F slot of the telephone wall jack. For more ...information on connecting the printer to send faxes from the software application. 4 If you would like to use the same line for recording messages on your country or region. Note: Setup...
...modem to telecommunications equipment, see the related topic, "Using an RJ11 adapter." 1 Make sure you would like to use the same line for both fax and telephone communication, connect a second telephone line (not provided) between the telephone and the F slot of the telephone wall jack. For more ...information on connecting the printer to send faxes from the software application. 4 If you would like to use the same line for recording messages on your country or region. Note: Setup...
User's Guide
Page 33
... wall jack Setting up the printer wherever your country or region. Note: Setup steps may vary depending on connecting the printer to send and receive faxes without using a computer. Then set up the printer 33 2 Connect a telephone cord into the LINE port of the printer, and then plug it into an... to a telephone Connect a telephone to the printer to the EXT port of the printer. 4 Connect a second telephone cord from the computer modem to use the fax line as a normal telephone line.
... wall jack Setting up the printer wherever your country or region. Note: Setup steps may vary depending on connecting the printer to send and receive faxes without using a computer. Then set up the printer 33 2 Connect a telephone cord into the LINE port of the printer, and then plug it into an... to a telephone Connect a telephone to the printer to the EXT port of the printer. 4 Connect a second telephone cord from the computer modem to use the fax line as a normal telephone line.

User's Guide
Page 34
... used in a business or office, it into the EXT port of the Welcome Screen, click Fax History and Settings. Setting up to fax while behind a PBX" feature enables the printer to dial the fax number without waiting to recognize the dial tone. 1 From the desktop, double-click the Productivity ...cord to a telephone, and then plug it may be connected to a Private Branch Exchange (PBX) telephone system. Ordinarily, when dialing a fax number, the printer waits to most fax machines. The "Dialing while behind a PBX If the printer is not recognizable to recognize the dial tone and then dials the...
... used in a business or office, it into the EXT port of the Welcome Screen, click Fax History and Settings. Setting up to fax while behind a PBX" feature enables the printer to dial the fax number without waiting to recognize the dial tone. 1 From the desktop, double-click the Productivity ...cord to a telephone, and then plug it may be connected to a Private Branch Exchange (PBX) telephone system. Ordinarily, when dialing a fax number, the printer waits to most fax machines. The "Dialing while behind a PBX If the printer is not recognizable to recognize the dial tone and then dials the...
User's Guide
Page 35
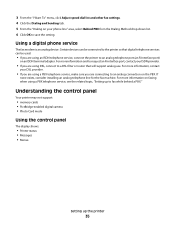
... an ISDN telephone service, connect the printer to an analog telephone port (an R-interface port) on an ISDN terminal adapter. For more information on faxing when using a PBX telephone service, see the related topic, "Setting up the printer 35 Certain devices can be connected to the printer so that ... the Dialing Method drop-down list. 6 Click OK to save the setting. If none exists, consider installing an analog telephone line for the fax machine. Using a digital phone service The fax modem is an analog device. 3 From the "I Want To" menu, click Adjust speed dial list and other...
... an ISDN telephone service, connect the printer to an analog telephone port (an R-interface port) on an ISDN terminal adapter. For more information on faxing when using a PBX telephone service, see the related topic, "Setting up the printer 35 Certain devices can be connected to the printer so that ... the Dialing Method drop-down list. 6 Click OK to save the setting. If none exists, consider installing an analog telephone line for the fax machine. Using a digital phone service The fax modem is an analog device. 3 From the "I Want To" menu, click Adjust speed dial list and other...

User's Guide
Page 36
Note: The mode is selected when the button light is on . 4 Fax Mode Access the fax default screen and send faxes. Setting up the printer 36 Note: The mode is selected when the button light is on . 5 Photo Card Access the photo default screen and print ...; In Copy mode: Change the size of a copy. • In Photo Card mode: Change the size of a photo. 7 Lighter / Darker Adjust the brightness of a copy, fax, or photo. 8 Display the Copy, Scan, Fax, or Photo Card menu, depending on which mode is on and off. • Stop the print, copy, scan, or...
Note: The mode is selected when the button light is on . 4 Fax Mode Access the fax default screen and send faxes. Setting up the printer 36 Note: The mode is selected when the button light is on . 5 Photo Card Access the photo default screen and print ...; In Copy mode: Change the size of a copy. • In Photo Card mode: Change the size of a photo. 7 Lighter / Darker Adjust the brightness of a copy, fax, or photo. 8 Display the Copy, Scan, Fax, or Photo Card menu, depending on which mode is on and off. • Stop the print, copy, scan, or...


