
User's Guide
Page 7
... Maintaining the printer 113 Replacing print cartridges...113 Installing print cartridges...113 Removing a used print cartridge ...114 Refilling print cartridges...115 Using genuine Lexmark print cartridges...115 Aligning print cartridges...115 Cleaning the print cartridge nozzles...116 Wiping the print cartridge nozzles and contacts 116 Preserving the print cartridges...117 Cleaning the...
... Maintaining the printer 113 Replacing print cartridges...113 Installing print cartridges...113 Removing a used print cartridge ...114 Refilling print cartridges...115 Using genuine Lexmark print cartridges...115 Aligning print cartridges...115 Cleaning the print cartridge nozzles...116 Wiping the print cartridge nozzles and contacts 116 Preserving the print cartridges...117 Cleaning the...
User's Guide
Page 8
... transparencies stick together ...133 Page prints with different fonts...133 Print is too dark or smudged ...134 Printed characters are improperly formed or are not aligned correctly 134 Printouts have alternating bands of light and dark print 135 Transparencies or photos contain white lines ...135 Vertical straight lines are not smooth...
... transparencies stick together ...133 Page prints with different fonts...133 Print is too dark or smudged ...134 Printed characters are improperly formed or are not aligned correctly 134 Printouts have alternating bands of light and dark print 135 Transparencies or photos contain white lines ...135 Vertical straight lines are not smooth...

User's Guide
Page 10
... ...170 Ink Low ...170 Out of Memory...170 Out of Paper...170 Fixing a printing failure...170 Unsupported file types found on the printer display...163 Alignment Error...164 Cartridge Error (1102, 1203, 1204, or 120F)...164 Black Ink Low / Color Ink Low / Photo Ink Low ...165 Clear Carrier Jam ...165 Cover...
... ...170 Ink Low ...170 Out of Memory...170 Out of Paper...170 Fixing a printing failure...170 Unsupported file types found on the printer display...163 Alignment Error...164 Cartridge Error (1102, 1203, 1204, or 120F)...164 Black Ink Low / Color Ink Low / Photo Ink Low ...165 Clear Carrier Jam ...165 Cover...
User's Guide
Page 22
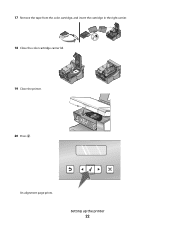
An alignment page prints. Setting up the printer 22 17 Remove the tape from the color cartridge, and insert the cartridge in the right carrier. 18 Close the color cartridge carrier lid. 19 Close the printer. 20 Press .
An alignment page prints. Setting up the printer 22 17 Remove the tape from the color cartridge, and insert the cartridge in the right carrier. 18 Close the color cartridge carrier lid. 19 Close the printer. 20 Press .

User's Guide
Page 23
For more information, see "Using the control panel" on the alignment page are normal, and do not indicate a problem. Understanding the parts of the printer 1 6 7 8 5 43 2 Use the To 1 Paper support Load paper. 2 PictBridge port Connect a ... or a flash drive to the printer. 3 Memory card slots Insert a memory card. 4 Control panel Operate the printer. Setting up the printer 23 Notes: • The alignment page may differ from the one shown. • Streaks on page 35. 5 Paper exit tray Hold paper as it exits. 6 Paper guide Keep paper straight...
For more information, see "Using the control panel" on the alignment page are normal, and do not indicate a problem. Understanding the parts of the printer 1 6 7 8 5 43 2 Use the To 1 Paper support Load paper. 2 PictBridge port Connect a ... or a flash drive to the printer. 3 Memory card slots Insert a memory card. 4 Control panel Operate the printer. Setting up the printer 23 Notes: • The alignment page may differ from the one shown. • Streaks on page 35. 5 Paper exit tray Hold paper as it exits. 6 Paper guide Keep paper straight...
User's Guide
Page 40
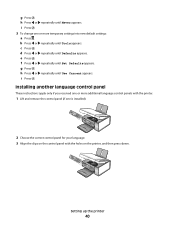
... or repeatedly until Tools appears. Setting up the printer 40 g Press . i Press . 3 To change one is installed). 2 Choose the correct control panel for your language. 3 Align the clips on the control panel with the holes on the printer, and then press down. b Press or repeatedly until Use Current appears. f Press or...
... or repeatedly until Tools appears. Setting up the printer 40 g Press . i Press . 3 To change one is installed). 2 Choose the correct control panel for your language. 3 Align the clips on the control panel with the holes on the printer, and then press down. b Press or repeatedly until Use Current appears. f Press or...

User's Guide
Page 44
... new print cartridge. • Order new print cartridges. • Print a test page. • Clean print cartridges to fix horizontal streaks. • Align print cartridges to run on or off : 1 Do one of the following: • In Windows Vista, click . • In Windows XP and earlier..., click Start. 2 Click Programs or All Programs Œ Lexmark 5300 Series. 3 Click Solution Center. 4 Click Advanced. 5 Click Printing Status. 6 Select or clear Play voice notification for printing events. 7 Click OK. ...
... new print cartridge. • Order new print cartridges. • Print a test page. • Clean print cartridges to fix horizontal streaks. • Align print cartridges to run on or off : 1 Do one of the following: • In Windows Vista, click . • In Windows XP and earlier..., click Start. 2 Click Programs or All Programs Œ Lexmark 5300 Series. 3 Click Solution Center. 4 Click Advanced. 5 Click Printing Status. 6 Select or clear Play voice notification for printing events. 7 Click OK. ...
User's Guide
Page 66
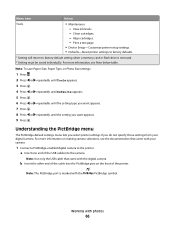
Print a test page. • Device Setup-Customize printer setup settings. • Defaults-Reset printer settings to factory defaults. 1 Setting will return to the printer. Align cartridges. - Understanding the PictBridge menu The PictBridge default settings menu lets you select printer settings if you want appears. 7 Press . 8 Press or repeatedly until the ...
Print a test page. • Device Setup-Customize printer setup settings. • Defaults-Reset printer settings to factory defaults. 1 Setting will return to the printer. Align cartridges. - Understanding the PictBridge menu The PictBridge default settings menu lets you select printer settings if you want appears. 7 Press . 8 Press or repeatedly until the ...
User's Guide
Page 86
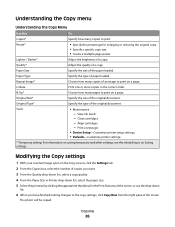
... list, select the paper size. 5 Select the print size by clicking the appropriate thumbnail in the correct order. Specify the size of the original document. Align cartridges. - Print a test page. • Device Setup-Customize printer setup settings. • Defaults-Customize printer settings. * Temporary setting. For information on saving temporary and other...
... list, select the paper size. 5 Select the print size by clicking the appropriate thumbnail in the correct order. Specify the size of the original document. Align cartridges. - Print a test page. • Device Setup-Customize printer setup settings. • Defaults-Customize printer settings. * Temporary setting. For information on saving temporary and other...
User's Guide
Page 92
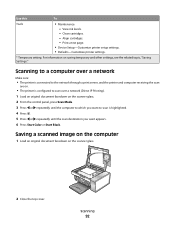
... the computer 1 Load an original document facedown on saving temporary and other settings, see the related topic, "Saving Settings." Use this To Tools • Maintenance - Align cartridges. - Scanning to a computer over a network Make sure: • The printer is connected to the network through a print server, and the printer and computer receiving...
... the computer 1 Load an original document facedown on saving temporary and other settings, see the related topic, "Saving Settings." Use this To Tools • Maintenance - Align cartridges. - Scanning to a computer over a network Make sure: • The printer is connected to the network through a print server, and the printer and computer receiving...
User's Guide
Page 106
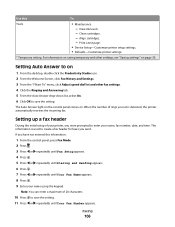
... setting. Note: You can enter a maximum of rings you set is used to create a fax header for faxes you were prompted to save the setting. Align cartridges. - When the number of 20 characters. 10 Press to enter your printer, you send. Faxing 106 For information on .
... setting. Note: You can enter a maximum of rings you set is used to create a fax header for faxes you were prompted to save the setting. Align cartridges. - When the number of 20 characters. 10 Press to enter your printer, you send. Faxing 106 For information on .
User's Guide
Page 114
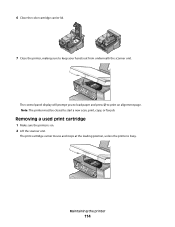
The control panel display will prompt you to load paper and press to start a new scan, print, copy, or fax job. The print cartridge carrier moves and stops at the loading position, unless the printer is on. 2 Lift the scanner unit. Maintaining the printer 114 Removing a used print cartridge 1 Make sure the printer is busy. Note: The printer must be closed to print an alignment page. 6 Close the color cartridge carrier lid. 7 Close the printer, making sure to keep your hands out from underneath the scanner unit.
The control panel display will prompt you to load paper and press to start a new scan, print, copy, or fax job. The print cartridge carrier moves and stops at the loading position, unless the printer is on. 2 Lift the scanner unit. Maintaining the printer 114 Removing a used print cartridge 1 Make sure the printer is busy. Note: The printer must be closed to print an alignment page. 6 Close the color cartridge carrier lid. 7 Close the printer, making sure to keep your hands out from underneath the scanner unit.

User's Guide
Page 115
..., and photo paper are using the printer without a computer, press Cancel. Lexmark's warranty does not cover damage caused by a refilled cartridge. Lexmark does not recommend use Lexmark supplies. For best results, use of failures or damage caused by non-Lexmark ink or print cartridges. Aligning print cartridges 1 Load plain or heavyweight matte paper. 2 From the...
..., and photo paper are using the printer without a computer, press Cancel. Lexmark's warranty does not cover damage caused by a refilled cartridge. Lexmark does not recommend use Lexmark supplies. For best results, use of failures or damage caused by non-Lexmark ink or print cartridges. Aligning print cartridges 1 Load plain or heavyweight matte paper. 2 From the...

User's Guide
Page 116
... the printer 116 6 Press or repeatedly until Maintenance appears. 7 Press . 8 Press or repeatedly until Clean Cartridges appears. 9 Press . An alignment page prints. Cleaning the print cartridge nozzles 1 Load plain paper. 2 Press Copy Mode. 3 Press . 4 Press or repeatedly until Tools appears.... 5 Press . 6 Press or repeatedly until Maintenance appears. 7 Press . 8 Press or repeatedly until Align Cartridges appears 9 Press . If print quality has not improved, clean the print cartridge nozzles. A page prints, forcing ink through the print cartridge...
... the printer 116 6 Press or repeatedly until Maintenance appears. 7 Press . 8 Press or repeatedly until Clean Cartridges appears. 9 Press . An alignment page prints. Cleaning the print cartridge nozzles 1 Load plain paper. 2 Press Copy Mode. 3 Press . 4 Press or repeatedly until Tools appears.... 5 Press . 6 Press or repeatedly until Maintenance appears. 7 Press . 8 Press or repeatedly until Align Cartridges appears 9 Press . If print quality has not improved, clean the print cartridge nozzles. A page prints, forcing ink through the print cartridge...
User's Guide
Page 127
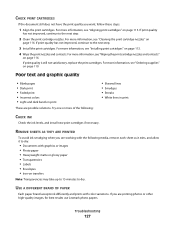
...remove each sheet as it exits, and allow it to dry: • Documents with color variations. Try one or more information, see "Aligning print cartridges" on transfers Note: Transparencies may take up to 15 minutes to dry. CHECK PRINT CARTRIDGES If the document still does not have...Skewed lines • Smudges • Streaks • White lines in print These are printing photos or other high-quality images, for best results use Lexmark photo papers. For more information, see "Wiping the print cartridge nozzles and contacts" on page 113. 4 Wipe the print nozzles and contacts. For ...
...remove each sheet as it exits, and allow it to dry: • Documents with color variations. Try one or more information, see "Aligning print cartridges" on transfers Note: Transparencies may take up to 15 minutes to dry. CHECK PRINT CARTRIDGES If the document still does not have...Skewed lines • Smudges • Streaks • White lines in print These are printing photos or other high-quality images, for best results use Lexmark photo papers. For more information, see "Wiping the print cartridge nozzles and contacts" on page 113. 4 Wipe the print nozzles and contacts. For ...

User's Guide
Page 134
... You may need to clean the print cartridge nozzles. The cartridges may cause smearing if used with plain paper. DO YOU NEED TO ALIGN THE PRINT CARTRIDGES? Troubleshooting 134 If the print is too dark or smudged These are using plain paper, try using the Normal setting.... XP or 2000, click Start. 2 Click Programs or All Programs ΠLexmark 5300 Series. 3 Click Solution Center. 4 Click the Maintenance tab. 5 Click Align to fix blurry edges. Printed characters are improperly formed or are not aligned correctly HAVE YOU ADDED SPACES AT THE LEFT MARGIN? MAKE SURE THE QUALITY/SPEED...
... You may need to clean the print cartridge nozzles. The cartridges may cause smearing if used with plain paper. DO YOU NEED TO ALIGN THE PRINT CARTRIDGES? Troubleshooting 134 If the print is too dark or smudged These are using plain paper, try using the Normal setting.... XP or 2000, click Start. 2 Click Programs or All Programs ΠLexmark 5300 Series. 3 Click Solution Center. 4 Click the Maintenance tab. 5 Click Align to fix blurry edges. Printed characters are improperly formed or are not aligned correctly HAVE YOU ADDED SPACES AT THE LEFT MARGIN? MAKE SURE THE QUALITY/SPEED...

User's Guide
Page 136
... when printing photos • Normal when printing transparencies ALIGN THE PRINT CARTRIDGES 1 Do one of the following: • In Windows Vista, click Œ Control Panel. • In Windows XP or 2000, click Start. 2 Click Programs or All Programs Œ Lexmark 5300 Series. 3 Click Solution Center. 4 Click ...the Maintenance tab. 5 Click Align to clean the print cartridge nozzles. If the printer is not, right-click the icon, and then click ...
... when printing photos • Normal when printing transparencies ALIGN THE PRINT CARTRIDGES 1 Do one of the following: • In Windows Vista, click Œ Control Panel. • In Windows XP or 2000, click Start. 2 Click Programs or All Programs Œ Lexmark 5300 Series. 3 Click Solution Center. 4 Click ...the Maintenance tab. 5 Click Align to clean the print cartridge nozzles. If the printer is not, right-click the icon, and then click ...
User's Guide
Page 145
... not established The printer and computer may not be with different fonts • Printed characters are improperly formed or are possible solutions. These are not aligned correctly at the left margin • Transparencies or photos contain white lines • Glossy photo paper or transparencies stick together Troubleshooting 145 MAKE SURE THE...
... not established The printer and computer may not be with different fonts • Printed characters are improperly formed or are possible solutions. These are not aligned correctly at the left margin • Transparencies or photos contain white lines • Glossy photo paper or transparencies stick together Troubleshooting 145 MAKE SURE THE...
User's Guide
Page 164
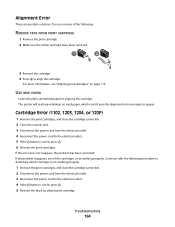
Try one of the following procedure to determine which could cause the alignment error message to align the cartridge. If the error does not reappear, the problem has been corrected. Continue with the following : REMOVE TAPE FROM PRINT CARTRIDGE 1 ... printer will read any markings on page 115. USE NEW PAPER Load only plain, unmarked paper for aligning the cartridge. Alignment Error These are possible solutions. If the problem reappears, one or more information, see "Aligning print cartridges" on used paper, which cartridge is not lit, press . 6 Reinsert the print cartridges...
Try one of the following procedure to determine which could cause the alignment error message to align the cartridge. If the error does not reappear, the problem has been corrected. Continue with the following : REMOVE TAPE FROM PRINT CARTRIDGE 1 ... printer will read any markings on page 115. USE NEW PAPER Load only plain, unmarked paper for aligning the cartridge. Alignment Error These are possible solutions. If the problem reappears, one or more information, see "Aligning print cartridges" on used paper, which cartridge is not lit, press . 6 Reinsert the print cartridges...
User's Guide
Page 186
...adjusting brightness automatically 72, 74 adjusting the hue of a photo 73 adjusting the saturation of a photo 73 Advanced button 43 aligning print cartridges 115 alignment error 164 answering machine receiving a fax with 100 assigning IP address 45 Auto Answer 106 B banner paper jams 149 banner paper...printing 57 carrier jam error 165 cartridge error 164 cartridge missing error 169 cartridges, print aligning 115 cleaning 116 installing 113 ordering 119 preserving 117 removing 114 using genuine Lexmark 115 wiping 116 CD printing photos from 75 transferring all photos and documents using the ...
...adjusting brightness automatically 72, 74 adjusting the hue of a photo 73 adjusting the saturation of a photo 73 Advanced button 43 aligning print cartridges 115 alignment error 164 answering machine receiving a fax with 100 assigning IP address 45 Auto Answer 106 B banner paper jams 149 banner paper...printing 57 carrier jam error 165 cartridge error 164 cartridge missing error 169 cartridges, print aligning 115 cleaning 116 installing 113 ordering 119 preserving 117 removing 114 using genuine Lexmark 115 wiping 116 CD printing photos from 75 transferring all photos and documents using the ...


