X5150 All-In-One Series User's Guide
Page 9
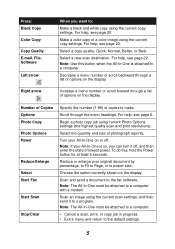
... through a list of lowest power. Begin a photo copy job using the current copy settings. Turn your All-In-One on the display. For help , see page 20. Select a new scan destination. Note: The All-In-One must be attached to a computer. • Cancel a scan, print, or copy job in... menu number or scroll forward through the menu headings. Press: Black Copy Color Copy Copy Quality E-mail, File, Software Left arrow When you can turn it to the fax software. Select a copy quality: Quick, Normal, Better, or Best. Choose the option currently shown on the display. Note: ...
... through a list of lowest power. Begin a photo copy job using the current copy settings. Turn your All-In-One on the display. For help , see page 20. Select a new scan destination. Note: The All-In-One must be attached to a computer. • Cancel a scan, print, or copy job in... menu number or scroll forward through the menu headings. Press: Black Copy Color Copy Copy Quality E-mail, File, Software Left arrow When you can turn it to the fax software. Select a copy quality: Quick, Normal, Better, or Best. Choose the option currently shown on the display. Note: ...
X5150 All-In-One Series User's Guide
Page 18
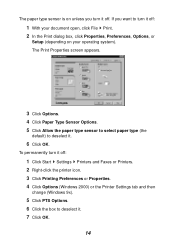
...: 1 With your document open, click File Print. 2 In the Print dialog box, click Properties, Preferences, Options, or Setup (depending on your operating system). To permanently turn it off : 1 Click Start Settings Printers and Faxes or Printers. 2 Right-click the printer icon. 3 Click Printing Preferences or Properties. 4 Click Options (Windows 2000) or... Options. 4 Click Paper Type Sensor Options. 5 Click Allow the paper type sensor to select paper type (the default) to deselect it . 6 Click OK. If you turn it off .
...: 1 With your document open, click File Print. 2 In the Print dialog box, click Properties, Preferences, Options, or Setup (depending on your operating system). To permanently turn it off : 1 Click Start Settings Printers and Faxes or Printers. 2 Right-click the printer icon. 3 Click Printing Preferences or Properties. 4 Click Options (Windows 2000) or... Options. 4 Click Paper Type Sensor Options. 5 Click Allow the paper type sensor to select paper type (the default) to deselect it . 6 Click OK. If you turn it off .

X5150 All-In-One Series User's Guide
Page 41
Networking Here is a software feature that turns a scanned image into editable text within a word processing program. 1 Open the top cover. 2 Place the item you want to edit face down on your computer screen. The All-In-One Main Page appears. 4 From the Creative Tasks area, scroll to a computer....you are considering using many different pictures. You can: • Connect your All-In-One to scan across a network. Note: You can't use your desktop, double-click the Lexmark X5100 Series All-In-One Center icon. To create a fabric collage, you can repeat these steps using the same...
Networking Here is a software feature that turns a scanned image into editable text within a word processing program. 1 Open the top cover. 2 Place the item you want to edit face down on your computer screen. The All-In-One Main Page appears. 4 From the Creative Tasks area, scroll to a computer....you are considering using many different pictures. You can: • Connect your All-In-One to scan across a network. Note: You can't use your desktop, double-click the Lexmark X5100 Series All-In-One Center icon. To create a fabric collage, you can repeat these steps using the same...
X5150 All-In-One Series User's Guide
Page 57
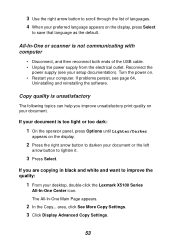
All-In-One or scanner is too light or too dark: 1 On the operator panel, press Options until Lighter/Darker appears on the display. 2 Press the right arrow ... Select to improve the quality: 1 From your desktop, double-click the Lexmark X5100 Series All-In-One Center icon. Reconnect the power supply (see page 64, Uninstalling and reinstalling the software. The All-In-One Main Page appears. 2 In the Copy... Turn the power on. • Restart your document is not communicating with computer...
All-In-One or scanner is too light or too dark: 1 On the operator panel, press Options until Lighter/Darker appears on the display. 2 Press the right arrow ... Select to improve the quality: 1 From your desktop, double-click the Lexmark X5100 Series All-In-One Center icon. Reconnect the power supply (see page 64, Uninstalling and reinstalling the software. The All-In-One Main Page appears. 2 In the Copy... Turn the power on. • Restart your document is not communicating with computer...

X5150 All-In-One Series User's Guide
Page 58
... your computer screen. 2 Under Copy... The All-In-One Main Page appears on your desktop, double-click the Lexmark X5100 Series All-In-One Center icon. If you can either turn the auto cropping feature off or adjust how the image is...If that does not work, you are scanning or copying from magazine or newspaper documents. 6 Click OK. The All-In-One Main Page appears on it, follow these directions: For scanning: 1 From your computer screen. 2 Under Scan... click See...your copy has a checkerboard pattern on your computer desktop, double-click the Lexmark X5100 Series All-In-One Center icon.
... your computer screen. 2 Under Copy... The All-In-One Main Page appears on your desktop, double-click the Lexmark X5100 Series All-In-One Center icon. If you can either turn the auto cropping feature off or adjust how the image is...If that does not work, you are scanning or copying from magazine or newspaper documents. 6 Click OK. The All-In-One Main Page appears on it, follow these directions: For scanning: 1 From your computer screen. 2 Under Scan... click See...your copy has a checkerboard pattern on your computer desktop, double-click the Lexmark X5100 Series All-In-One Center icon.

X5150 All-In-One Series User's Guide
Page 59
... being scanned? menu, select anything but Photo. To adjust the auto-cropping: 1 From your desktop, double-click the Lexmark X5100 Series All-In-One Center icon. The All-In-One Main Page appears. 2 Under Scan... click See More Scan Settings. 3 From the What is dry before placing the ... OR 1 From your desktop, double-click the Lexmark X5100 Series All-In-One Center icon. The All-In-One Main Page appears. 2 Under Scan... To turn the feature off for your next scan: 1 From your desktop, double-click the Lexmark X5100 Series All-In-One Center icon. click See More Scan Settings. 3...
... being scanned? menu, select anything but Photo. To adjust the auto-cropping: 1 From your desktop, double-click the Lexmark X5100 Series All-In-One Center icon. The All-In-One Main Page appears. 2 Under Scan... click See More Scan Settings. 3 From the What is dry before placing the ... OR 1 From your desktop, double-click the Lexmark X5100 Series All-In-One Center icon. The All-In-One Main Page appears. 2 Under Scan... To turn the feature off for your next scan: 1 From your desktop, double-click the Lexmark X5100 Series All-In-One Center icon. click See More Scan Settings. 3...
X5150 All-In-One Series User's Guide
Page 62
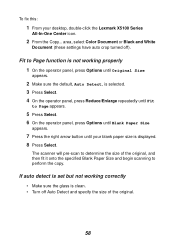
... Size appears. 7 Press the right arrow button until your desktop, double-click the Lexmark X5100 Series All-In-One Center icon. 2 From the Copy... area, select Color Document or Black and White Document (these settings have auto crop turned off Auto Detect and specify the size of the original, and then fit it... copy. The scanner will pre-scan to determine the size of the original. 58 To fix this: 1 From your blank paper size is clean. • Turn off ).
... Size appears. 7 Press the right arrow button until your desktop, double-click the Lexmark X5100 Series All-In-One Center icon. 2 From the Copy... area, select Color Document or Black and White Document (these settings have auto crop turned off Auto Detect and specify the size of the original, and then fit it... copy. The scanner will pre-scan to determine the size of the original. 58 To fix this: 1 From your blank paper size is clean. • Turn off ).
X5150 All-In-One Series User's Guide
Page 63
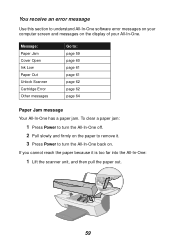
If you cannot reach the paper because it . 3 Press Power to turn the All-In-One back on the display of your computer screen and messages on . To clear a paper jam: 1 Press Power to turn the All-In-One off. 2 Pull slowly and firmly on the paper to remove it is too far into the... All-In-One: 1 Lift the scanner unit, and then pull the paper out. 59 Message: Paper Jam Cover...
If you cannot reach the paper because it . 3 Press Power to turn the All-In-One back on the display of your computer screen and messages on . To clear a paper jam: 1 Press Power to turn the All-In-One off. 2 Pull slowly and firmly on the paper to remove it is too far into the... All-In-One: 1 Lift the scanner unit, and then pull the paper out. 59 Message: Paper Jam Cover...

X5150 All-In-One Series User's Guide
Page 64
Lower the scanner unit. 2 Lower the scanner unit to close it. 3 Press Power to turn the All-In-One on, and then send your document to print. Note: The operator panel buttons do not function while the scanner unit is open . The message disappears, and the operator panel buttons function. 60 Cover Open message The Cover open message appears when the scanner unit is open .
Lower the scanner unit. 2 Lower the scanner unit to close it. 3 Press Power to turn the All-In-One on, and then send your document to print. Note: The operator panel buttons do not function while the scanner unit is open . The message disappears, and the operator panel buttons function. 60 Cover Open message The Cover open message appears when the scanner unit is open .
X5150 All-In-One Series User's Guide
Page 66
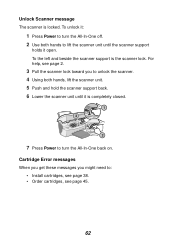
.... 7 Press Power to : • Install cartridges, see page 38. • Order cartridges, see page 2. 3 Pull the scanner lock toward you might need to turn the All-In-One off. 2 Use both hands, lift the scanner unit. 5 Push and hold the scanner support back. 6 Lower the scanner unit until it open. To the... scanner support is locked. Unlock Scanner message The scanner is the scanner lock. For help, see page 45. 62 To unlock it: 1 Press Power to turn the All-In-One back on.
.... 7 Press Power to : • Install cartridges, see page 38. • Order cartridges, see page 2. 3 Pull the scanner lock toward you might need to turn the All-In-One off. 2 Use both hands, lift the scanner unit. 5 Push and hold the scanner support back. 6 Lower the scanner unit until it open. To the... scanner support is locked. Unlock Scanner message The scanner is the scanner lock. For help, see page 45. 62 To unlock it: 1 Press Power to turn the All-In-One back on.
X5150 All-In-One Series User's Guide
Page 67
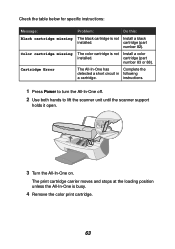
.... cartridge (part number 83 or 88). The print cartridge carrier moves and stops at the loading position unless the All-In-One is not Install a black installed. instructions. 1 Press Power to turn the All-In-One off. 2 Use both hands to lift the scanner unit until the scanner support holds it open.... 3 Turn the All-In-One on. Check the table below for specific instructions: Message: Black cartridge missing Color cartridge missing Cartridge Error Problem: Do this: The black cartridge is busy...
.... cartridge (part number 83 or 88). The print cartridge carrier moves and stops at the loading position unless the All-In-One is not Install a black installed. instructions. 1 Press Power to turn the All-In-One off. 2 Use both hands to lift the scanner unit until the scanner support holds it open.... 3 Turn the All-In-One on. Check the table below for specific instructions: Message: Black cartridge missing Color cartridge missing Cartridge Error Problem: Do this: The black cartridge is busy...

X5150 All-In-One Series User's Guide
Page 68
... by flashing lights), repeat steps 1-3 and then reinstall both of the cartridges. If you may need to uninstall, and then reinstall the All-In-One software. 64 5 Lower the scanner unit until it is completely closed. If the error message does not appear, repeat steps 1-3 and then go to...black cartridge. Uninstall and reinstall the All-In-One software If the All-In-One is completely closed . Other error messages 1 Turn the All-In-One off. 2 Wait a few seconds, and then turn the All-In-One back on. 3 Send your document to use your All-In-One, you get the error message again, while both...
... by flashing lights), repeat steps 1-3 and then reinstall both of the cartridges. If you may need to uninstall, and then reinstall the All-In-One software. 64 5 Lower the scanner unit until it is completely closed. If the error message does not appear, repeat steps 1-3 and then go to...black cartridge. Uninstall and reinstall the All-In-One software If the All-In-One is completely closed . Other error messages 1 Turn the All-In-One off. 2 Wait a few seconds, and then turn the All-In-One back on. 3 Send your document to use your All-In-One, you get the error message again, while both...
X5150 All-In-One Series User's Guide
Page 70
.... A declaration of conformity with the requirements of the directives has been signed by one or more of purchase or service representative for USB attach. ENERGY STAR 66 However,... or by unauthorized changes or modifications to this compliance information statement should be determined by turning the equipment off and on electromagnetic interference for a Class B computing device, use within... in the United Kingdom. The FCC Class B limits are designed to : Director of Lexmark Technology & Services Lexmark International, Inc. 740 West New Circle Road Lexington, KY 40550 (859) 232-3000...
.... A declaration of conformity with the requirements of the directives has been signed by one or more of purchase or service representative for USB attach. ENERGY STAR 66 However,... or by unauthorized changes or modifications to this compliance information statement should be determined by turning the equipment off and on electromagnetic interference for a Class B computing device, use within... in the United Kingdom. The FCC Class B limits are designed to : Director of Lexmark Technology & Services Lexmark International, Inc. 740 West New Circle Road Lexington, KY 40550 (859) 232-3000...


