
User's Guide
Page 2
...product or the manufacturer's authorized replacement power supply and power supply cord. CAUTION: Do not twist, bind, crush, or place heavy objects on the power cord. CAUTION: The receiver earpiece may not always be obvious. Inspect the power cord regularly for the use of other...Do not place the receiver near the product and easily accessible. Safety information Use only the power supply and power supply cord provided with the use of specific Lexmark components. Connect the power supply cord to a properly grounded electrical outlet that is designed, tested, and approved to abrasion...
...product or the manufacturer's authorized replacement power supply and power supply cord. CAUTION: Do not twist, bind, crush, or place heavy objects on the power cord. CAUTION: The receiver earpiece may not always be obvious. Inspect the power cord regularly for the use of other...Do not place the receiver near the product and easily accessible. Safety information Use only the power supply and power supply cord provided with the use of specific Lexmark components. Connect the power supply cord to a properly grounded electrical outlet that is designed, tested, and approved to abrasion...
User's Guide
Page 13
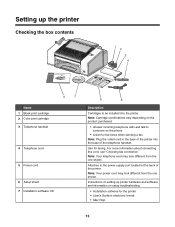
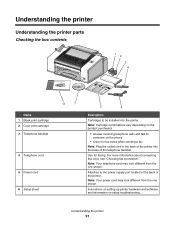
... Checking the box contents 1 2 3 4 1 2 3 Name 1 Black print cartridge 2 Color print cartridge 3 Telephone handset 8 7 4 Telephone cord 5 Power cord 6 Setup sheet 7 Installation software CD 6 5 Description Cartridges to be installed into the base of the printer. Setting up printer hardware and software, and ...to someone on the product purchased. • Answer incoming telephone calls and talk to the power supply port located at the back of the telephone handset. Note: Your power cord may look different from the one shown. Note: Cartridge combinations vary depending on the ...
... Checking the box contents 1 2 3 4 1 2 3 Name 1 Black print cartridge 2 Color print cartridge 3 Telephone handset 8 7 4 Telephone cord 5 Power cord 6 Setup sheet 7 Installation software CD 6 5 Description Cartridges to be installed into the base of the printer. Setting up printer hardware and software, and ...to someone on the product purchased. • Answer incoming telephone calls and talk to the power supply port located at the back of the telephone handset. Note: Your power cord may look different from the one shown. Note: Cartridge combinations vary depending on the ...
User's Guide
Page 16
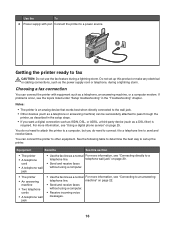
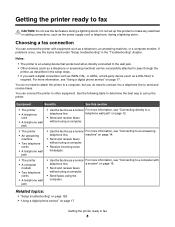
...or cabling connections, such as a normal For more information, see "Using a digital phone service" on page 25. Use the To 4 Power supply with equipment such as a normal For more information, see "Connecting to an answering telephone line. See the following table to determine the ...8226; The printer • An answering machine • Two telephone cords • A telephone wall jack • Use the fax line as the power supply cord or telephone, during a lightning storm. Choosing a fax connection You can connect the printer to set up the printer. If problems occur, see ...
...or cabling connections, such as a normal For more information, see "Using a digital phone service" on page 25. Use the To 4 Power supply with equipment such as a normal For more information, see "Connecting to an answering telephone line. See the following table to determine the ...8226; The printer • An answering machine • Two telephone cords • A telephone wall jack • Use the fax line as the power supply cord or telephone, during a lightning storm. Choosing a fax connection You can connect the printer to set up the printer. If problems occur, see ...

User's Guide
Page 40
... through an automated answering system. Press Quick Dial 1, 2, 3, 4, or 5. Note: For instructions on the display. Notes: • You can include a calling card number as the power supply cord or telephone, during a lightning storm. Warning: Do not touch cables or the printer in a number you are entering to set up this product or...
... through an automated answering system. Press Quick Dial 1, 2, 3, 4, or 5. Note: For instructions on the display. Notes: • You can include a calling card number as the power supply cord or telephone, during a lightning storm. Warning: Do not touch cables or the printer in a number you are entering to set up this product or...

User's Guide
Page 107
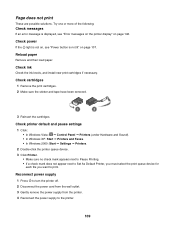
... you want appears on the display. 2 Press to save . Disconnect and reconnect the power cord 1 Disconnect the power cord from the wall outlet, and then from the printer. 2 Plug the cord all the way into the power supply on by pressing . Power button is on the printer. 107 Try one of the following : Change the... again on the display These are possible solutions. Troubleshooting Setup Troubleshooting Incorrect language appears on the display. Try one or more of the following : Press power button Make sure the printer is not lit These are possible solutions.
... you want appears on the display. 2 Press to save . Disconnect and reconnect the power cord 1 Disconnect the power cord from the wall outlet, and then from the printer. 2 Plug the cord all the way into the power supply on by pressing . Power button is on the printer. 107 Try one of the following : Change the... again on the display These are possible solutions. Troubleshooting Setup Troubleshooting Incorrect language appears on the display. Try one or more of the following : Press power button Make sure the printer is not lit These are possible solutions.

User's Guide
Page 108
...devices have been using. 4 If the light is marked with the USB symbol. Reconnect power supply 1 Press to turn the printer on. In Windows XP, click Start to the printer. 5 Plug the power cord into the USB port of the computer. Remove and reinstall software Uninstall the printer ... "Removing and reinstalling the software" on the computer screen to turn the printer off. 2 Disconnect the power cord from the wall outlet. 3 Gently remove the power supply from the printer. 4 Reconnect the power supply to access the My Computer icon. 4 Double-click the CD-ROM drive icon. 5 If necessary, double...
...devices have been using. 4 If the light is marked with the USB symbol. Reconnect power supply 1 Press to turn the printer on. In Windows XP, click Start to the printer. 5 Plug the power cord into the USB port of the computer. Remove and reinstall software Uninstall the printer ... "Removing and reinstalling the software" on the computer screen to turn the printer off. 2 Disconnect the power cord from the wall outlet. 3 Gently remove the power supply from the printer. 4 Reconnect the power supply to access the My Computer icon. 4 Double-click the CD-ROM drive icon. 5 If necessary, double...
User's Guide
Page 109
... to turn the printer off. 2 Disconnect the power cord from the wall outlet. 3 Gently remove the power supply from the printer. 4 Reconnect the power supply to print. Try one or more of the following: Check messages If an error message is displayed, see "Power button is not on, see "Error messages on the printer display"...appear next to Set As Default Printer, you must select the print queue device for each file you want to the printer. 109 Check power If the light is not lit" on page 146. Reload paper Remove and then load paper. Page does not print These are possible solutions.
... to turn the printer off. 2 Disconnect the power cord from the wall outlet. 3 Gently remove the power supply from the printer. 4 Reconnect the power supply to print. Try one or more of the following: Check messages If an error message is displayed, see "Power button is not on, see "Error messages on the printer display"...appear next to Set As Default Printer, you must select the print queue device for each file you want to the printer. 109 Check power If the light is not lit" on page 146. Reload paper Remove and then load paper. Page does not print These are possible solutions.

User's Guide
Page 112
Check cable connections Make sure cable connections for the following hardware are secure, if applicable: • Power supply • Telephone • Handset • Answering machine Check the telephone wall jack 1 Plug a telephone into the wall jack. 2 Listen for temporarily disabling Call...fax while behind a PBX" on page 107. Disable this feature before sending a fax. • If you are using a PBX telephone service, see "Power button is finished before sending or receiving a fax. Disconnect other device is not lit" on page 61. Check for paper jams Check for the fax...
Check cable connections Make sure cable connections for the following hardware are secure, if applicable: • Power supply • Telephone • Handset • Answering machine Check the telephone wall jack 1 Plug a telephone into the wall jack. 2 Listen for temporarily disabling Call...fax while behind a PBX" on page 107. Disable this feature before sending a fax. • If you are using a PBX telephone service, see "Power button is finished before sending or receiving a fax. Disconnect other device is not lit" on page 61. Check for paper jams Check for the fax...
User's Guide
Page 120
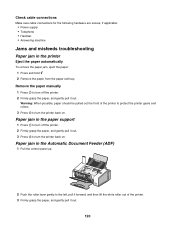
... hold . 2 Remove the paper from the paper exit tray. Check cable connections Make sure cable connections for the following hardware are secure, if applicable: • Power supply • Telephone • Handset • Answering machine Jams and misfeeds troubleshooting Paper jam in the Automatic Document Feeder (ADF) 1 Pull the control panel up. 2 Push...
... hold . 2 Remove the paper from the paper exit tray. Check cable connections Make sure cable connections for the following hardware are secure, if applicable: • Power supply • Telephone • Handset • Answering machine Jams and misfeeds troubleshooting Paper jam in the Automatic Document Feeder (ADF) 1 Pull the control panel up. 2 Push...

User's Guide
Page 152
...clear the error message: 1 Click Cancel Printing. Reboot computer Turn off . 2 Disconnect the power cord from the wall outlet. 3 Gently remove the power supply from the printer. 4 Reconnect the power supply to the printer. 5 Plug the power cord into a surge protector, unplug the printer, and plug it is connected to an external ... the setup information that one of the necessary cartridges is plugged into the wall outlet. 6 Press to resume printing. Reconnect power supply 1 Press to turn the printer off and then restart your computer. Is there a problem with the device to make sure it...
...clear the error message: 1 Click Cancel Printing. Reboot computer Turn off . 2 Disconnect the power cord from the wall outlet. 3 Gently remove the power supply from the printer. 4 Reconnect the power supply to the printer. 5 Plug the power cord into a surge protector, unplug the printer, and plug it is connected to an external ... the setup information that one of the necessary cartridges is plugged into the wall outlet. 6 Press to resume printing. Reconnect power supply 1 Press to turn the printer off and then restart your computer. Is there a problem with the device to make sure it...

User's Guide
Page 160
n/a Low Off ( n/a High Off The product is plugged into a wall outlet, but the power switch is in energy-saving mode. Mode Description Power consumption (Watts) Printing The product is generating hard-copy output from electronic inputs. 13.9 Copying The product is generating hard-copy output from hard-copy original documents. 13.6 Scanning The product is scanning hard-copy documents. 11.9 Ready The product is waiting for a print job. 7.4 Power Saver The product is turned off.
n/a Low Off ( n/a High Off The product is plugged into a wall outlet, but the power switch is in energy-saving mode. Mode Description Power consumption (Watts) Printing The product is generating hard-copy output from electronic inputs. 13.9 Copying The product is generating hard-copy output from hard-copy original documents. 13.6 Scanning The product is scanning hard-copy documents. 11.9 Ready The product is waiting for a print job. 7.4 Power Saver The product is turned off.
User's Guide
Page 167
...panel 49 junk faxes, blocking 58 L labels, loading 36 language changing 107 left cartridge error 149 left cartridge incorrect 150 left cartridge missing 150 Lexmark Productivity Studio creating and viewing slideshow 94 library preferences changing 87 LINE port 14 load document 150 loading banner paper 37 custom-size paper 37... 14 control panel 14 display 14 EXT port 14 LINE port 14 paper exit tray 14 paper guide 14 paper support 14 PictBridge port 14 power supply port 14 telephone handset 14 USB port 14 pausing print jobs 66 PDF creating from a scan 79 Phone Book (computer), using 55 phone line...
...panel 49 junk faxes, blocking 58 L labels, loading 36 language changing 107 left cartridge error 149 left cartridge incorrect 150 left cartridge missing 150 Lexmark Productivity Studio creating and viewing slideshow 94 library preferences changing 87 LINE port 14 load document 150 loading banner paper 37 custom-size paper 37... 14 control panel 14 display 14 EXT port 14 LINE port 14 paper exit tray 14 paper guide 14 paper support 14 PictBridge port 14 power supply port 14 telephone handset 14 USB port 14 pausing print jobs 66 PDF creating from a scan 79 Phone Book (computer), using 55 phone line...

User's Guide
Page 168
...136 postcards loading 36 printing 67 poster 68 Poster button 31 posters, printing 67 power button is not lit 107 power supply port 14 preferences, e-mail screen changing 81 preferences, library changing 87 preferences, ...searched folders changing 87 preferences, temporary files changing 87 print cartridge checking 126 print cartridge nozzles, cleaning 101 print cartridges aligning 101 cleaning 101 installing 99 ordering 105 preserving 103 refilling 101 removing 98 using genuine Lexmark...
...136 postcards loading 36 printing 67 poster 68 Poster button 31 posters, printing 67 power button is not lit 107 power supply port 14 preferences, e-mail screen changing 81 preferences, library changing 87 preferences, ...searched folders changing 87 preferences, temporary files changing 87 print cartridge checking 126 print cartridge nozzles, cleaning 101 print cartridges aligning 101 cleaning 101 installing 99 ordering 105 preserving 103 refilling 101 removing 98 using genuine Lexmark...

User's Guide (Mac)
Page 7
...of some parts may not always be obvious. Remove the power cord from the electrical outlet before inspecting it. The safety features of misuse. Lexmark is misused, a risk of fire or electrical shock results. Connect the power supply cord to a properly grounded electrical outlet that is designed,... other than those described in the user documentation, to abrasion or stress. Safety information Use only the power supply and power supply cord provided with the use of specific Lexmark components. This product is near the product and easily accessible. Do not set up this product or ...
...of some parts may not always be obvious. Remove the power cord from the electrical outlet before inspecting it. The safety features of misuse. Lexmark is misused, a risk of fire or electrical shock results. Connect the power supply cord to a properly grounded electrical outlet that is designed,... other than those described in the user documentation, to abrasion or stress. Safety information Use only the power supply and power supply cord provided with the use of specific Lexmark components. This product is near the product and easily accessible. Do not set up this product or ...
User's Guide (Mac)
Page 8
... without using a computer. • The printer • An answering machine • Two telephone cords • A telephone wall jack • Use the fax line as the power supply cord or telephone, during a lightning storm. a modem" on page 14. • Send and receive faxes without using the computer. Notes: • The printer is required...
... without using a computer. • The printer • An answering machine • Two telephone cords • A telephone wall jack • Use the fax line as the power supply cord or telephone, during a lightning storm. a modem" on page 14. • Send and receive faxes without using the computer. Notes: • The printer is required...
User's Guide (Mac)
Page 91
... one shown. Attaches to the power supply port located at the back of the printer into the printer. For more information about connecting this cord, see "Choosing fax connection." Understanding the printer 91 Note: Your power cord may look different from the... printer parts Checking the box contents 1 2 3 4 1 2 3 Name 1 Black print cartridge 2 Color print cartridge 3 Telephone handset 4 Telephone cord 5 Power cord 6 Setup sheet 8 7 6 5 Description Cartridges to be installed into the base of the telephone handset. Note: Cartridge combinations vary depending on the product...
... one shown. Attaches to the power supply port located at the back of the printer into the printer. For more information about connecting this cord, see "Choosing fax connection." Understanding the printer 91 Note: Your power cord may look different from the... printer parts Checking the box contents 1 2 3 4 1 2 3 Name 1 Black print cartridge 2 Color print cartridge 3 Telephone handset 4 Telephone cord 5 Power cord 6 Setup sheet 8 7 6 5 Description Cartridges to be installed into the base of the telephone handset. Note: Cartridge combinations vary depending on the product...

User's Guide (Mac)
Page 94
... the LINE port, and do not connect a DSL (digital subscriber line), ISDN (integrated services digital network), or cable modem to send and receive faxes. LINE 4 Power supply with the printer. 1 Lift and remove the control panel (if one or more additional language control panels with port Connect the printer to receive incoming...
... the LINE port, and do not connect a DSL (digital subscriber line), ISDN (integrated services digital network), or cable modem to send and receive faxes. LINE 4 Power supply with the printer. 1 Lift and remove the control panel (if one or more additional language control panels with port Connect the printer to receive incoming...

User's Guide (Mac)
Page 128
... want appears on the display. 7 Press to save . Disconnect and reconnect the power cord 1 Disconnect the power cord from the wall outlet, and then from the printer. 2 Plug the cord all the way into the power supply on the printer. Try one of the following : Change the language selection during ...initial setup After you select a language, Language appears again on the display. Try one or more of the following : Press power button Make sure the printer is not ...
... want appears on the display. 7 Press to save . Disconnect and reconnect the power cord 1 Disconnect the power cord from the wall outlet, and then from the printer. 2 Plug the cord all the way into the power supply on the printer. Try one of the following : Change the language selection during ...initial setup After you select a language, Language appears again on the display. Try one or more of the following : Press power button Make sure the printer is not ...

User's Guide (Mac)
Page 129
...your system requirements Check that other end of the USB cable is connected to turn the printer off. 2 Disconnect the power cord from the wall outlet. 3 Gently remove the power supply from the printer. The USB port is damaged The printer cable must be fully connected and undamaged for any obvious .... 3 Firmly plug the rectangular end of the USB cable into the back of the computer is not on, press . Troubleshooting 129 Reconnect the power supply 1 Press to the USB port on the back of the USB cable into this Make sure the other electrical devices have been using. 4 If...
...your system requirements Check that other end of the USB cable is connected to turn the printer off. 2 Disconnect the power cord from the wall outlet. 3 Gently remove the power supply from the printer. The USB port is damaged The printer cable must be fully connected and undamaged for any obvious .... 3 Firmly plug the rectangular end of the USB cable into the back of the computer is not on, press . Troubleshooting 129 Reconnect the power supply 1 Press to the USB port on the back of the USB cable into this Make sure the other electrical devices have been using. 4 If...
User's Guide (Mac)
Page 130
4 Reconnect the power supply to the printer. 5 Plug the power cord into the wall outlet. 6 Press to turn on . e Select your printer family. Is there more than one printer of the same model in your ... Selection dialog. All LexmarkTM 5000 Series printers connected on page 133. 2 If the software still does not install correctly, visit our Web site at www.lexmark.com to turn the printer on the computer. • Click . a In all open software applications. 2 Disable any anti-virus programs. 3 Remove the printer software CD...
4 Reconnect the power supply to the printer. 5 Plug the power cord into the wall outlet. 6 Press to turn on . e Select your printer family. Is there more than one printer of the same model in your ... Selection dialog. All LexmarkTM 5000 Series printers connected on page 133. 2 If the software still does not install correctly, visit our Web site at www.lexmark.com to turn the printer on the computer. • Click . a In all open software applications. 2 Disable any anti-virus programs. 3 Remove the printer software CD...


