
User's Guide
Page 3
... Saving settings ...28 Understanding the Settings menu ...28 Installing another language control panel 30 Installing the printer software...30 Understanding the printer software 31 Turning printing voice notification on or off 33 Security Information...34 Loading paper and original documents 35 Loading paper...35 Using the automatic paper type sensor 35...
... Saving settings ...28 Understanding the Settings menu ...28 Installing another language control panel 30 Installing the printer software...30 Understanding the printer software 31 Turning printing voice notification on or off 33 Security Information...34 Loading paper and original documents 35 Loading paper...35 Using the automatic paper type sensor 35...
User's Guide
Page 4
... panel 51 Setting the number of rings before receiving a fax automatically using the control panel 51 Changing Caller ID pattern using the control panel 52 Printing fax activity reports using the control panel 52 Canceling a fax after a document is loaded using the control panel 52 Faxing using the computer 53 Sending...
... panel 51 Setting the number of rings before receiving a fax automatically using the control panel 51 Changing Caller ID pattern using the control panel 52 Printing fax activity reports using the control panel 52 Canceling a fax after a document is loaded using the control panel 52 Faxing using the computer 53 Sending...
User's Guide
Page 5
... automatically 60 Setting up Speed Dial...61 Setting up to fax while behind a PBX ...61 Printing fax activity reports...62 Printing...63 Printing basic documents...63 Printing a document...63 Printing a Web page ...63 Printing photos or images from a Web page 64 Printing multiple copies of a document...64 Printing on both sides of the paper...65 Collating copies ...65...
... automatically 60 Setting up Speed Dial...61 Setting up to fax while behind a PBX ...61 Printing fax activity reports...62 Printing...63 Printing basic documents...63 Printing a document...63 Printing a Web page ...63 Printing photos or images from a Web page 64 Printing multiple copies of a document...64 Printing on both sides of the paper...65 Collating copies ...65...
User's Guide
Page 7
... Ping the printer...96 Maintaining the printer 98 Removing a used print cartridge...98 Installing print cartridges...99 Refilling print cartridges...101 Using genuine Lexmark print cartridges 101 Aligning print cartridges...101 Cleaning the print cartridge nozzles 101 Wiping the print cartridge nozzles and contacts 102 Preserving the print cartridges...103 Cleaning the scan lens and white roller 103 Cleaning...
... Ping the printer...96 Maintaining the printer 98 Removing a used print cartridge...98 Installing print cartridges...99 Refilling print cartridges...101 Using genuine Lexmark print cartridges 101 Aligning print cartridges...101 Cleaning the print cartridge nozzles 101 Wiping the print cartridge nozzles and contacts 102 Preserving the print cartridges...103 Cleaning the scan lens and white roller 103 Cleaning...

User's Guide
Page 10
...; In Windows Vista, click . • In Windows XP and earlier, click Start. 2 Click Programs or All Programs Œ Lexmark 5000 Series. 3 Select Lexmark Solution Center. 10 In Windows XP and earlier versions, click scanning, faxing, paper jams, and misfeeds Start Œ Run, and then...) • In Windows Vista, click . • Loading paper • In Windows XP and earlier, click Start. • Printing 2 Click Programs or All Programs Œ Lexmark 5000 • Working with photos Series. • Scanning (if supported by your printer) 3 Click User's Guide. • Making...
...; In Windows Vista, click . • In Windows XP and earlier, click Start. 2 Click Programs or All Programs Œ Lexmark 5000 Series. 3 Select Lexmark Solution Center. 10 In Windows XP and earlier versions, click scanning, faxing, paper jams, and misfeeds Start Œ Run, and then...) • In Windows Vista, click . • Loading paper • In Windows XP and earlier, click Start. • Printing 2 Click Programs or All Programs Œ Lexmark 5000 • Working with photos Series. • Scanning (if supported by your printer) 3 Click User's Guide. • Making...
User's Guide
Page 11
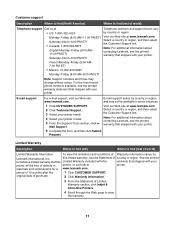
Visit our Web site at www.lexmark.com. Note: For additional information about contacting Lexmark, see the Statement of 12 months after the 1 Click CUSTOMER SUPPORT. For the most recent phone numbers available, see the printed warranty that shipped with your printer model. 5 From... a country or region, and then select the Customer Support link. materials and workmanship for a www.lexmark.com. Note: For additional information about contacting Lexmark, see the printed warranty statement that shipped with your printer will be available in printer, or set forth at •...
Visit our Web site at www.lexmark.com. Note: For additional information about contacting Lexmark, see the Statement of 12 months after the 1 Click CUSTOMER SUPPORT. For the most recent phone numbers available, see the printed warranty that shipped with your printer model. 5 From... a country or region, and then select the Customer Support link. materials and workmanship for a www.lexmark.com. Note: For additional information about contacting Lexmark, see the printed warranty statement that shipped with your printer will be available in printer, or set forth at •...
User's Guide
Page 13
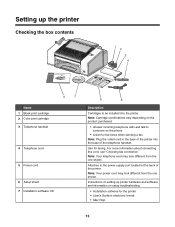
... on the product purchased. • Answer incoming telephone calls and talk to someone on setting up the printer Checking the box contents 1 2 3 4 1 2 3 Name 1 Black print cartridge 2 Color print cartridge 3 Telephone handset 8 7 4 Telephone cord 5 Power cord 6 Setup sheet 7 Installation software CD 6 5 Description Cartridges to the power supply port located at the back of...
... on the product purchased. • Answer incoming telephone calls and talk to someone on setting up the printer Checking the box contents 1 2 3 4 1 2 3 Name 1 Black print cartridge 2 Color print cartridge 3 Telephone handset 8 7 4 Telephone cord 5 Power cord 6 Setup sheet 7 Installation software CD 6 5 Description Cartridges to the power supply port located at the back of...
User's Guide
Page 14
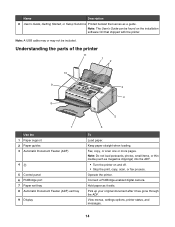
Keep paper straight when loading. Name Description 8 User's Guide, Getting Started, or Setup Solutions Printed booklet that shipped with the printer. Fax, copy, or scan one or more pages. Operate the printer. View menus, settings options, printer status, and messages. ...14 Note: A USB cable may or may not be found on and off. • Stop the print, copy, scan, or fax process. Note: Do not load postcards, photos, small items, or thin media (such as magazine clippings) into the ADF. • Turn...
Keep paper straight when loading. Name Description 8 User's Guide, Getting Started, or Setup Solutions Printed booklet that shipped with the printer. Fax, copy, or scan one or more pages. Operate the printer. View menus, settings options, printer status, and messages. ...14 Note: A USB cable may or may not be found on and off. • Stop the print, copy, scan, or fax process. Note: Do not load postcards, photos, small items, or thin media (such as magazine clippings) into the ADF. • Turn...
User's Guide
Page 26
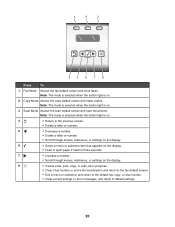
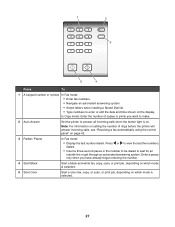
Note: The mode is selected when the button light is on the display. 8 • Cancel a fax, print, copy, or scan job in progress. • Clear a fax number or end a fax transmission and return to the fax default screen. • Exit a menu or ...
Note: The mode is selected when the button light is on the display. 8 • Cancel a fax, print, copy, or scan job in progress. • Clear a fax number or end a fax transmission and return to the fax default screen. • Exit a menu or ...
User's Guide
Page 27
... have already begun entering the number. 4 Start Black Start a black-and-white fax, copy, scan, or print job, depending on which mode is selected. 5 Start Color Start a color fax, copy, or scan, or print job, depending on which mode is on. Press or to view the last five numbers dialed. • Insert...
... have already begun entering the number. 4 Start Black Start a black-and-white fax, copy, scan, or print job, depending on which mode is selected. 5 Start Color Start a color fax, copy, or scan, or print job, depending on which mode is on. Press or to view the last five numbers dialed. • Insert...

User's Guide
Page 29
... to choose from one of the black (or photo) cartridge. • Clean Cartridges to clean the print cartridge nozzles. • Align Cartridges to align the cartridge. • Print Test Page to make other selections. If phones in your telecommunications company to either On or Off. Note...: When you selected during initial setup. For more information, see "Using Caller ID from the computer to print a test page. On is pressed to determine their subscribed pattern. - 5 Press . From here Maintenance Paper Setup Device Setup Defaults You can...
... to choose from one of the black (or photo) cartridge. • Clean Cartridges to clean the print cartridge nozzles. • Align Cartridges to align the cartridge. • Print Test Page to make other selections. If phones in your telecommunications company to either On or Off. Note...: When you selected during initial setup. For more information, see "Using Caller ID from the computer to print a test page. On is pressed to determine their subscribed pattern. - 5 Press . From here Maintenance Paper Setup Device Setup Defaults You can...
User's Guide
Page 32
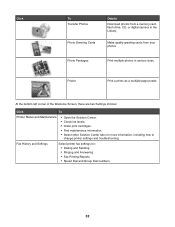
...troubleshooting. Fax History and Settings Select printer fax settings for more information, including how to the Library. Photo Packages Print multiple photos in various sizes. Poster Print a photo as a multiple-page poster. At the bottom left corner of the Welcome Screen, there are two ...Settings choices: Click To Printer Status and Maintenance • Open the Solution Center. • Check ink levels. • Order print cartridges. • Find maintenance information. • Select other Solution Center tabs for : • Dialing and Sending • Ringing and Answering &#...
...troubleshooting. Fax History and Settings Select printer fax settings for more information, including how to the Library. Photo Packages Print multiple photos in various sizes. Poster Print a photo as a multiple-page poster. At the bottom left corner of the Welcome Screen, there are two ...Settings choices: Click To Printer Status and Maintenance • Open the Solution Center. • Check ink levels. • Order print cartridges. • Find maintenance information. • Select other Solution Center tabs for : • Dialing and Sending • Ringing and Answering &#...
User's Guide
Page 33
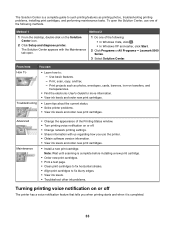
...print cartridge. • Order new print cartridges. • Print a test page. • Clean print cartridges to fix horizontal streaks. • Align print... ink levels and order new print cartridges. Method 1 Method 2...print cartridges. Print projects such as printing photos, troubleshooting printing problems, installing print cartridges, and performing maintenance tasks. To open . 1 Do one of the Printing Status window. • Turn printing voice notification on or off . • Change network printing... order new print cartridges. • Install a new print cartridge. Advanced...
...print cartridge. • Order new print cartridges. • Print a test page. • Clean print cartridges to fix horizontal streaks. • Align print... ink levels and order new print cartridges. Method 1 Method 2...print cartridges. Print projects such as printing photos, troubleshooting printing problems, installing print cartridges, and performing maintenance tasks. To open . 1 Do one of the Printing Status window. • Turn printing voice notification on or off . • Change network printing... order new print cartridges. • Install a new print cartridge. Advanced...
User's Guide
Page 34
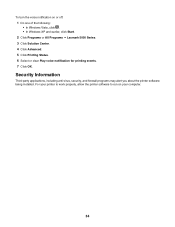
... Windows Vista, click . • In Windows XP and earlier, click Start. 2 Click Programs or All Programs Œ Lexmark 5000 Series. 3 Click Solution Center. 4 Click Advanced. 5 Click Printing Status. 6 Select or clear Play voice notification for printing events. 7 Click OK. For your computer. 34 Security Information Third-party applications, including anti-virus, security, and...
... Windows Vista, click . • In Windows XP and earlier, click Start. 2 Click Programs or All Programs Œ Lexmark 5000 Series. 3 Click Solution Center. 4 Click Advanced. 5 Click Printing Status. 6 Select or clear Play voice notification for printing events. 7 Click OK. For your computer. 34 Security Information Third-party applications, including anti-virus, security, and...
User's Guide
Page 35
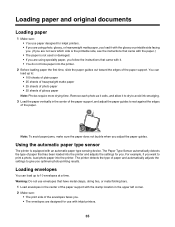
...exits, and allow it to dry to avoid ink smudging. 3 Load the paper vertically in the upper left corner. 2 Make sure: • The print side of the envelopes faces you. • The envelopes are using photo, glossy, or heavyweight matte paper, you load it with the glossy or ... slide the paper guides out toward the edges of the paper support. The printer detects the type of paper and automatically adjusts the settings to print a photo, load photo paper into the printer and adjusts the settings for use with inkjet printers. 35 Loading paper and original documents Loading paper...
...exits, and allow it to dry to avoid ink smudging. 3 Load the paper vertically in the upper left corner. 2 Make sure: • The print side of the envelopes faces you. • The envelopes are using photo, glossy, or heavyweight matte paper, you load it with the glossy or ... slide the paper guides out toward the edges of the paper support. The printer detects the type of paper and automatically adjusts the settings to print a photo, load photo paper into the printer and adjusts the settings for use with inkjet printers. 35 Loading paper and original documents Loading paper...

User's Guide
Page 36
...greeting cards, index cards, photo cards, or postcards at a time. 1 Load labels with areas exposed by missing labels) may cause labels to peel off during printing, resulting in a paper jam. • The labels are loaded in the center of the paper support. • The paper guides rest against the edges of... dry to avoid ink smudging. • The paper guides rest against the edges of the envelopes. 1 2 Notes: • Do not load envelopes with the print side facing you . • The top of the labels feeds into the printer first. • The adhesive on the labels does not extend to within...
...greeting cards, index cards, photo cards, or postcards at a time. 1 Load labels with areas exposed by missing labels) may cause labels to peel off during printing, resulting in a paper jam. • The labels are loaded in the center of the paper support. • The paper guides rest against the edges of... dry to avoid ink smudging. • The paper guides rest against the edges of the envelopes. 1 2 Notes: • Do not load envelopes with the print side facing you . • The top of the labels feeds into the printer first. • The adhesive on the labels does not extend to within...
User's Guide
Page 37
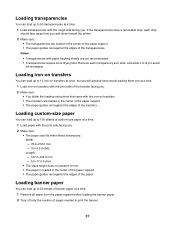
... edges of the transfers. Loading banner paper You can load up to avoid ink smudging. Loading custom-size paper You can load up to print the banner. 37 Remove each strip should face away from the paper support before loading the banner paper. 2 Tear off only the number... of the transparencies. Loading iron-on transfers You can load up to 20 sheets of banner paper at a time. 1 Load transparencies with the print side facing you. 2 Make sure: • The paper size fits within these dimensions: Width: - 76.0-216.0 mm - 3.0-8.5 inches Length: - 127.0-432.0 mm - 5.0-17...
... edges of the transfers. Loading banner paper You can load up to avoid ink smudging. Loading custom-size paper You can load up to print the banner. 37 Remove each strip should face away from the paper support before loading the banner paper. 2 Tear off only the number... of the transparencies. Loading iron-on transfers You can load up to 20 sheets of banner paper at a time. 1 Load transparencies with the print side facing you. 2 Make sure: • The paper size fits within these dimensions: Width: - 76.0-216.0 mm - 3.0-8.5 inches Length: - 127.0-432.0 mm - 5.0-17...
User's Guide
Page 39
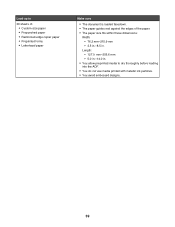
...: - 76.2 mm-215.9 mm - 3.5 in.-8.5 in . • You allow preprinted media to dry thoroughly before loading into the ADF. • You do not use media printed with metallic ink particles. • You avoid embossed designs. 39 Length: - 127.0 mm-355.6 mm - 5.0 in.-14.0 in .
...: - 76.2 mm-215.9 mm - 3.5 in.-8.5 in . • You allow preprinted media to dry thoroughly before loading into the ADF. • You do not use media printed with metallic ink particles. • You avoid embossed designs. 39 Length: - 127.0 mm-355.6 mm - 5.0 in.-14.0 in .

User's Guide
Page 44
... to, you are three fax forwarding settings: • Off-(Default) • Forward-The printer sends the fax to the designated fax number. • Print & Forward-The printer prints the fax and then sends it receives the fax and disconnects the answering machine. • If the printer does not detect a fax, the answering...
... to, you are three fax forwarding settings: • Off-(Default) • Forward-The printer sends the fax to the designated fax number. • Print & Forward-The printer prints the fax and then sends it receives the fax and disconnects the answering machine. • If the printer does not detect a fax, the answering...

User's Guide
Page 45
... repeatedly until Phone Book appears, and press . 4 Press or repeatedly until the setting you select Forward or Print & Forward, Forward will appear in the Phone Book. Use this View Add Remove Modify Print To View Phonebook entries. or Use the keypad to enter the number of Speed Dial entries (1-89) and... Group Dial entries (90-99). Create a new Speed Dial or Group Dial entry. Print all Speed Dial and Group Dial entries in the second line of the Fax Mode default menu on the display. Note: If you want appears...
... repeatedly until Phone Book appears, and press . 4 Press or repeatedly until the setting you select Forward or Print & Forward, Forward will appear in the Phone Book. Use this View Add Remove Modify Print To View Phonebook entries. or Use the keypad to enter the number of Speed Dial entries (1-89) and... Group Dial entries (90-99). Create a new Speed Dial or Group Dial entry. Print all Speed Dial and Group Dial entries in the second line of the Fax Mode default menu on the display. Note: If you want appears...


