User's Guide
Page 4
... using the computer 54 Forwarding faxes...55 Using the computer Phone Book...55 Customizing fax settings using the computer 56 Customizing settings using the Fax Setup Utility 56 Setting Auto Answer to on ...57 Setting up Quick Dial buttons using the computer 58 Creating a fax cover page using the Productivity Studio...
... using the computer 54 Forwarding faxes...55 Using the computer Phone Book...55 Customizing fax settings using the computer 56 Customizing settings using the Fax Setup Utility 56 Setting Auto Answer to on ...57 Setting up Quick Dial buttons using the computer 58 Creating a fax cover page using the Productivity Studio...
User's Guide
Page 7
... the printer 98 Removing a used print cartridge...98 Installing print cartridges...99 Refilling print cartridges...101 Using genuine Lexmark print cartridges 101 Aligning print cartridges...101 Cleaning the print cartridge nozzles 101 Wiping the print cartridge nozzles and ...of the printer 104 Ordering supplies...105 Ordering print cartridges...105 Ordering paper and other supplies ...105 Troubleshooting...107 Setup Troubleshooting...107 Fax troubleshooting...111 Jams and misfeeds troubleshooting 120 Print troubleshooting...123 Copy troubleshooting...141 Scan troubleshooting...143...
... the printer 98 Removing a used print cartridge...98 Installing print cartridges...99 Refilling print cartridges...101 Using genuine Lexmark print cartridges 101 Aligning print cartridges...101 Cleaning the print cartridge nozzles 101 Wiping the print cartridge nozzles and ...of the printer 104 Ordering supplies...105 Ordering print cartridges...105 Ordering paper and other supplies ...105 Troubleshooting...107 Setup Troubleshooting...107 Fax troubleshooting...111 Jams and misfeeds troubleshooting 120 Print troubleshooting...123 Copy troubleshooting...141 Scan troubleshooting...143...
User's Guide
Page 9
...) and some basic instructions for setting up hardware and software. Finding more information Finding information about the printer Quick Setup sheet Description The Quick Setup sheet gives you instructions for using the printer. User's Guide Description Where to find You can find The User's... Guide gives you instructions for setting up You can find this document in the printer box or on Windows operating Lexmark Web site at www.lexmark.com...
...) and some basic instructions for setting up hardware and software. Finding more information Finding information about the printer Quick Setup sheet Description The Quick Setup sheet gives you instructions for using the printer. User's Guide Description Where to find You can find The User's... Guide gives you instructions for setting up You can find this document in the printer box or on Windows operating Lexmark Web site at www.lexmark.com...

User's Guide
Page 10
...An icon of the User's Guide appears on your desktop, and the User's Guide: Comprehensive Version appears on the Lexmark Web site at www.lexmark.com. Lexmark Solution Center Description Where to a network (if supported by your printer) follow these instructions: • Maintaining the ...the screen. systems, see the Mac Help: 2 Click Documentation. 1 From the Finder desktop, double-click the Lexmark 3 Click View User's Guide (including Setup 5000 Series folder. User's Guide: Comprehensive Version Description Where to find The User's Guide: Comprehensive Version gives you...
...An icon of the User's Guide appears on your desktop, and the User's Guide: Comprehensive Version appears on the Lexmark Web site at www.lexmark.com. Lexmark Solution Center Description Where to a network (if supported by your printer) follow these instructions: • Maintaining the ...the screen. systems, see the Mac Help: 2 Click Documentation. 1 From the Finder desktop, double-click the Lexmark 3 Click View User's Guide (including Setup 5000 Series folder. User's Guide: Comprehensive Version Description Where to find The User's Guide: Comprehensive Version gives you...
User's Guide
Page 13
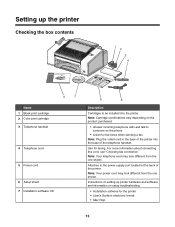
...shown. Note: Cartridge combinations vary depending on the product purchased. • Answer incoming telephone calls and talk to someone on setup troubleshooting. • Installation software for fax tones when sending a fax Note: Plug the coiled cord in electronic format •... contents 1 2 3 4 1 2 3 Name 1 Black print cartridge 2 Color print cartridge 3 Telephone handset 8 7 4 Telephone cord 5 Power cord 6 Setup sheet 7 Installation software CD 6 5 Description Cartridges to the power supply port located at the back of the telephone handset. Use for faxing. Attaches to be...
...shown. Note: Cartridge combinations vary depending on the product purchased. • Answer incoming telephone calls and talk to someone on setup troubleshooting. • Installation software for fax tones when sending a fax Note: Plug the coiled cord in electronic format •... contents 1 2 3 4 1 2 3 Name 1 Black print cartridge 2 Color print cartridge 3 Telephone handset 8 7 4 Telephone cord 5 Power cord 6 Setup sheet 7 Installation software CD 6 5 Description Cartridges to the power supply port located at the back of the telephone handset. Use for faxing. Attaches to be...
User's Guide
Page 14
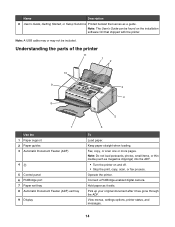
... the ADF. • Turn the printer on and off. • Stop the print, copy, scan, or fax process. Name Description 8 User's Guide, Getting Started, or Setup Solutions Printed booklet that shipped with the printer. Note: The User's Guide can be included. Keep paper straight when loading.
... the ADF. • Turn the printer on and off. • Stop the print, copy, scan, or fax process. Name Description 8 User's Guide, Getting Started, or Setup Solutions Printed booklet that shipped with the printer. Note: The User's Guide can be included. Keep paper straight when loading.
User's Guide
Page 16
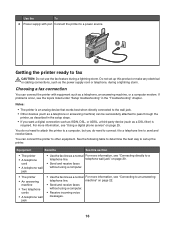
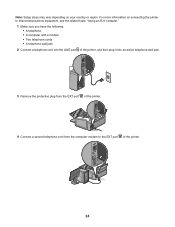
... 22. • Send and receive faxes without using a computer. • Receive incoming voice messages. 16 For more information, see the topics listed under "Setup troubleshooting" in the setup steps. • If you do not need to connect it to a telephone line to a telephone line. Equipment Benefits See this product or make any...
... 22. • Send and receive faxes without using a computer. • Receive incoming voice messages. 16 For more information, see the topics listed under "Setup troubleshooting" in the setup steps. • If you do not need to connect it to a telephone line to a telephone line. Equipment Benefits See this product or make any...
User's Guide
Page 21
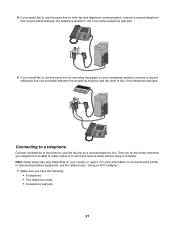
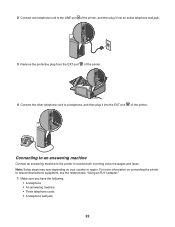
... other N slot of an active telephone wall jack. 5 If you have the following: • A telephone • Two telephone cords • A telephone wall jack 21 Note: Setup steps may vary depending on your answering machine, connect a second telephone line (not provided) between the telephone and the F slot of the telephone wall jack.
... other N slot of an active telephone wall jack. 5 If you have the following: • A telephone • Two telephone cords • A telephone wall jack 21 Note: Setup steps may vary depending on your answering machine, connect a second telephone line (not provided) between the telephone and the F slot of the telephone wall jack.
User's Guide
Page 22
For more information on your country or region. Note: Setup steps may vary depending on connecting the printer to telecommunications equipment, see the related topic, "Using an RJ11 adapter." 1 Make sure you have the following: &#...
For more information on your country or region. Note: Setup steps may vary depending on connecting the printer to telecommunications equipment, see the related topic, "Using an RJ11 adapter." 1 Make sure you have the following: &#...
User's Guide
Page 24
For more information on your country or region. Note: Setup steps may vary depending on connecting the printer to telecommunications equipment, see the related topic, "Using an RJ11 adapter." 1 Make sure you have the following: &#...
For more information on your country or region. Note: Setup steps may vary depending on connecting the printer to telecommunications equipment, see the related topic, "Using an RJ11 adapter." 1 Make sure you have the following: &#...

User's Guide
Page 25
If none exists, consider installing an analog telephone line for maintenance functions, paper size and type, printer setup, and printer defaults. 4 Quality Adjust the quality of a fax, copy, or scan. 5 Display the Fax, Copy, or Scan menu, depending on which mode is an ...
If none exists, consider installing an analog telephone line for maintenance functions, paper size and type, printer setup, and printer defaults. 4 Quality Adjust the quality of a fax, copy, or scan. 5 Display the Fax, Copy, or Scan menu, depending on which mode is an ...
User's Guide
Page 28
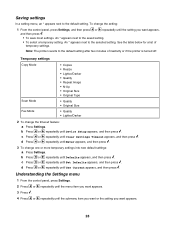
... a list of inactivity or if the printer is turned off. b Press or repeatedly until Set Defaults appears, and then press . c Press or repeatedly until Device Setup appears, and then press . Temporary settings Copy Mode Scan Mode Fax Mode • Copies • Resize • Lighter/Darker • Quality • Repeat Image •...
... a list of inactivity or if the printer is turned off. b Press or repeatedly until Set Defaults appears, and then press . c Press or repeatedly until Device Setup appears, and then press . Temporary settings Copy Mode Scan Mode Fax Mode • Copies • Resize • Lighter/Darker • Quality • Repeat Image •...

User's Guide
Page 29
...company to view the ink level of paper loaded. Select: • Photo Print Size to make other selections. Note: When you selected during initial setup. Pattern 2 (DTMF) For more information, see "Saving settings" on the country or region you choose a value selection, an asterisk (*) appears ...the size of the color cartridge. On is pressed to the factory default settings. Pattern 1 (FSK) - 5 Press . From here Maintenance Paper Setup Device Setup Defaults You can Select: • Ink Level to view the ink level of photo(s) to print. • Set Defaults to change the timeout...
...company to view the ink level of paper loaded. Select: • Photo Print Size to make other selections. Note: When you selected during initial setup. Pattern 2 (DTMF) For more information, see "Saving settings" on the country or region you choose a value selection, an asterisk (*) appears ...the size of the color cartridge. On is pressed to the factory default settings. Pattern 1 (FSK) - 5 Press . From here Maintenance Paper Setup Device Setup Defaults You can Select: • Ink Level to view the ink level of photo(s) to print. • Set Defaults to change the timeout...
User's Guide
Page 33
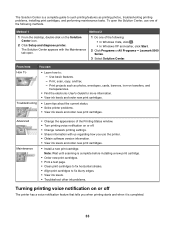
... You can: How To • Learn how to such printing features as photos, envelopes, cards, banners, iron-on the Solution Center icon. 2 Click Setup and diagnose printer. Print, scan, copy, and fax. - Troubleshooting • Learn tips about the current status. • Solve printer problems. •... : • In Windows Vista, click . • In Windows XP and earlier, click Start. 2 Click Programs or All Programs Œ Lexmark 5000 Series. 3 Select Solution Center. The Solution Center appears with us regarding how you when printing starts and when it is completed. 33 Use ...
... You can: How To • Learn how to such printing features as photos, envelopes, cards, banners, iron-on the Solution Center icon. 2 Click Setup and diagnose printer. Print, scan, copy, and fax. - Troubleshooting • Learn tips about the current status. • Solve printer problems. •... : • In Windows Vista, click . • In Windows XP and earlier, click Start. 2 Click Programs or All Programs Œ Lexmark 5000 Series. 3 Select Solution Center. The Solution Center appears with us regarding how you when printing starts and when it is completed. 33 Use ...

User's Guide
Page 42
e Press or repeatedly until Fax Setup appears. or press Phonebook to use an automated answering system. 5 Press Start Color or Start Black. Note: Press the keypad numbers to select a number from ...
e Press or repeatedly until Fax Setup appears. or press Phonebook to use an automated answering system. 5 Press Start Color or Start Black. Note: Press the keypad numbers to select a number from ...

User's Guide
Page 43
...: For information on . Setting a fax manual answer code using the control panel 1 From the control panel, press Fax Mode. 2 Press . 3 Press or repeatedly until Fax Setup appears. 4 Press . 5 Press or repeatedly until Ringing and Answering appears. 6 Press . 7 Press or repeatedly until the setting you want up a manual answer code, enter the...
...: For information on . Setting a fax manual answer code using the control panel 1 From the control panel, press Fax Mode. 2 Press . 3 Press or repeatedly until Fax Setup appears. 4 Press . 5 Press or repeatedly until Ringing and Answering appears. 6 Press . 7 Press or repeatedly until the setting you want up a manual answer code, enter the...

User's Guide
Page 44
... on." 2 Make sure you have set up fax forwarding: 1 From the control panel, press Fax Mode. 2 Press . 3 Press or repeatedly until Fax Setup appears. 4 Press . 5 Press or repeatedly until the setting you are three fax forwarding settings: • Off-(Default) • Forward-The printer sends the...if you set the answering machine to display Caller ID information. 1 From the control panel, press Settings. 2 Press or repeatedly until Device Setup appears. 3 Press . 4 Press or repeatedly until Caller ID Pattern appears. 5 Press . 6 Press or repeatedly until Ringing and Answering appears. 6 Press ....
... on." 2 Make sure you have set up fax forwarding: 1 From the control panel, press Fax Mode. 2 Press . 3 Press or repeatedly until Fax Setup appears. 4 Press . 5 Press or repeatedly until the setting you are three fax forwarding settings: • Off-(Default) • Forward-The printer sends the...if you set the answering machine to display Caller ID information. 1 From the control panel, press Settings. 2 Press or repeatedly until Device Setup appears. 3 Press . 4 Press or repeatedly until Caller ID Pattern appears. 5 Press . 6 Press or repeatedly until Ringing and Answering appears. 6 Press ....
User's Guide
Page 46
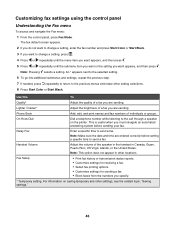
... Add, edit, and print names and fax numbers of the speaker in the handset in other setting selections. 8 Press Start Color or Start Black. Fax Setup • Print fax history or transmission status reports. • Customize settings for receiving a fax. • Select fax printing options. • Customize settings for sending a fax...
... Add, edit, and print names and fax numbers of the speaker in the handset in other setting selections. 8 Press Start Color or Start Black. Fax Setup • Print fax history or transmission status reports. • Customize settings for receiving a fax. • Select fax printing options. • Customize settings for sending a fax...

User's Guide
Page 47
... the control panel 1 From the control panel, press Fax Mode. 2 Enter a fax number. Setting up Quick Dial buttons using the control panel During the initial setup of your printer, you were prompted to enter your name, fax number, date, and time. The last 20 digits of 24 characters. 10 Press to... Press Settings. 16 Press . 47 If you have not entered this information: 1 From the control panel, press Fax Mode. 2 Press . 3 Press or repeatedly until Fax Setup appears. 4 Press . 5 Press or repeatedly until Your Fax Number appears. 12 Press . 13 Enter your name using the keypad.
... the control panel 1 From the control panel, press Fax Mode. 2 Enter a fax number. Setting up Quick Dial buttons using the control panel During the initial setup of your printer, you were prompted to enter your name, fax number, date, and time. The last 20 digits of 24 characters. 10 Press to... Press Settings. 16 Press . 47 If you have not entered this information: 1 From the control panel, press Fax Mode. 2 Press . 3 Press or repeatedly until Fax Setup appears. 4 Press . 5 Press or repeatedly until Your Fax Number appears. 12 Press . 13 Enter your name using the keypad.

User's Guide
Page 48
... is 12 or less, press or repeatedly until On appears. 10 Press . 11 During the initial setup of your printer, you have not entered this information: a Press Settings. e Press or repeatedly until Device Setup appears. i Enter the time using the control panel 1 From the control panel, press Fax Mode.... 2 Press . 3 Press or repeatedly until Fax Setup appears. 4 Press . 5 Press or repeatedly until Fax Printing appears. 6 Press . 7 Press or repeatedly until Fax Footer appears. 8 Press . 9 Press or repeatedly...
... is 12 or less, press or repeatedly until On appears. 10 Press . 11 During the initial setup of your printer, you have not entered this information: a Press Settings. e Press or repeatedly until Device Setup appears. i Enter the time using the control panel 1 From the control panel, press Fax Mode.... 2 Press . 3 Press or repeatedly until Fax Setup appears. 4 Press . 5 Press or repeatedly until Fax Printing appears. 6 Press . 7 Press or repeatedly until Fax Footer appears. 8 Press . 9 Press or repeatedly...


