
User's Guide
Page 4
... sizes...44 Supported paper types ...45 Supported paper weights...46 Paper capacities ...46 Printing...48 Installing printer software...48 Printing a document from Windows 48 Printing a document from a Macintosh computer 48 Printing the configuration page...48 Printing the demo page...49 Canceling a print job...49 ...Canceling a print job from the control panel 49 Canceling a print job from the Windows taskbar 49 Canceling a print job from the Windows desktop 49 Canceling a print job from Mac OS 9...49 Canceling a print job from Mac OS X ...50 Copying......
... sizes...44 Supported paper types ...45 Supported paper weights...46 Paper capacities ...46 Printing...48 Installing printer software...48 Printing a document from Windows 48 Printing a document from a Macintosh computer 48 Printing the configuration page...48 Printing the demo page...49 Canceling a print job...49 ...Canceling a print job from the control panel 49 Canceling a print job from the Windows taskbar 49 Canceling a print job from the Windows desktop 49 Canceling a print job from Mac OS 9...49 Canceling a print job from Mac OS X ...50 Copying......
User's Guide
Page 41
...Print Properties, or the control panel, set the Paper Size and Paper Type. • Use envelopes designed specifically for laser printers. Have windows, holes, perforations, cutouts, or embossing - Have metal clasps, string ties, or folding bars - Using envelopes You can withstand temperatures up ...to Transparency could damage the printer. • Feed transparencies from sticking together. • We recommend Lexmark part number 12A8240 for letter-size and Lexmark part number 12A8241 for A4-size transparencies. Are stuck together or damaged in the standard tray. Have excessive ...
...Print Properties, or the control panel, set the Paper Size and Paper Type. • Use envelopes designed specifically for laser printers. Have windows, holes, perforations, cutouts, or embossing - Have metal clasps, string ties, or folding bars - Using envelopes You can withstand temperatures up ...to Transparency could damage the printer. • Feed transparencies from sticking together. • We recommend Lexmark part number 12A8240 for letter-size and Lexmark part number 12A8241 for A4-size transparencies. Are stuck together or damaged in the standard tray. Have excessive ...

User's Guide
Page 48
.... If a feature in Print Properties is on the Software and Documentation CD. When Print is typically installed during the initial printer setup. Printing a document from Windows 1 With a document open the online Help for more information, see Avoiding jams and Storing print media. Printing This chapter covers printing, printer reports, and job...
.... If a feature in Print Properties is on the Software and Documentation CD. When Print is typically installed during the initial printer setup. Printing a document from Windows 1 With a document open the online Help for more information, see Avoiding jams and Storing print media. Printing This chapter covers printing, printer reports, and job...
User's Guide
Page 49
...or repeatedly until Reports Print appears, and then press . 4 Press or repeatedly until Demo Page appears, and then press . Canceling a print job from the Windows desktop 1 Minimize all programs to reveal the desktop. 2 Double-click the My Computer icon. 3 Double-click the Printers icon. 4 Double-click the printer... icon. 5 Select the job to cancel. 49 Canceling a print job from the Windows taskbar When you send a job to the printer buffer before the job is on the operating system. A list of the taskbar. 1 Double-...
...or repeatedly until Reports Print appears, and then press . 4 Press or repeatedly until Demo Page appears, and then press . Canceling a print job from the Windows desktop 1 Minimize all programs to reveal the desktop. 2 Double-click the My Computer icon. 3 Double-click the Printers icon. 4 Double-click the printer... icon. 5 Select the job to cancel. 49 Canceling a print job from the Windows taskbar When you send a job to the printer buffer before the job is on the operating system. A list of the taskbar. 1 Double-...

User's Guide
Page 50
Canceling a print job from Mac OS X 1 Choose Applications ΠUtilities, and then double-click Print Center or Printer Setup Utility. 2 Double-click the printer you are printing to. 3 From the printer window, select the job to cancel. 4 From the icon bar at the top of the window, click the Delete icon. 50 3 Click the trash icon.
Canceling a print job from Mac OS X 1 Choose Applications ΠUtilities, and then double-click Print Center or Printer Setup Utility. 2 Double-click the printer you are printing to. 3 From the printer window, select the job to cancel. 4 From the icon bar at the top of the window, click the Delete icon. 50 3 Click the trash icon.

User's Guide
Page 57
...Saturation / Hue • Adjust the intensity of the screen. Note: For more information, click Help at the bottom of the colors in the preview window or to select an auto-crop setting. Brightness / Contrast Adjust the brightness of the overall image or of the image. Note: For more information,..., or Black and White). • Select the scan resolution. • Select a preset size, or use the dotted line box in the preview window to select a specific area of the screen. 10 Click Scan. 57 Moire Reduction Remove image patterns from the General tab or the Advanced tab: General...
...Saturation / Hue • Adjust the intensity of the screen. Note: For more information, click Help at the bottom of the colors in the preview window or to select an auto-crop setting. Brightness / Contrast Adjust the brightness of the overall image or of the image. Note: For more information,..., or Black and White). • Select the scan resolution. • Select a preset size, or use the dotted line box in the preview window to select a specific area of the screen. 10 Click Scan. 57 Moire Reduction Remove image patterns from the General tab or the Advanced tab: General...

User's Guide
Page 118
... seconds), or use the keypad to directly enter the value, and then press . 8 Press to return to make sure you are running Windows 98/ME, Windows 2000, Windows XP, or Windows Server 2003 and using a recommended USB, serial, or Ethernet cable For more information, see the setup documentation that the printer is connected to... cables, and then try printing the network setup page again. For more information about installing a network printer, click View User's Guide and Documentation on the Lexmark Web site at www.lexmark.com. Unexpected page breaks occur The job has timed out.
... seconds), or use the keypad to directly enter the value, and then press . 8 Press to return to make sure you are running Windows 98/ME, Windows 2000, Windows XP, or Windows Server 2003 and using a recommended USB, serial, or Ethernet cable For more information, see the setup documentation that the printer is connected to... cables, and then try printing the network setup page again. For more information about installing a network printer, click View User's Guide and Documentation on the Lexmark Web site at www.lexmark.com. Unexpected page breaks occur The job has timed out.
User's Guide
Page 130
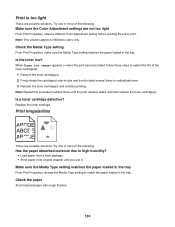
... one or more of the toner cartridge(s): 1 Remove the toner cartridge(s). 2 Firmly shake the cartridge(s) side-to-side and front-to-back several times to Windows users only. Is the toner low? Note: Repeat this procedure multiple times until you use it. Replace the toner cartridge. Check the paper Avoid textured...
... one or more of the toner cartridge(s): 1 Remove the toner cartridge(s). 2 Firmly shake the cartridge(s) side-to-side and front-to-back several times to Windows users only. Is the toner low? Note: Repeat this procedure multiple times until you use it. Replace the toner cartridge. Check the paper Avoid textured...
User's Guide
Page 131
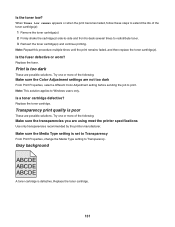
... Adjustment settings are possible solutions. Note: This solution applies to Transparency. Print is set to Transparency From Print Properties, change the Media Type setting to Windows users only.
... Adjustment settings are possible solutions. Note: This solution applies to Transparency. Print is set to Transparency From Print Properties, change the Media Type setting to Windows users only.

User's Guide
Page 146
... 54 fax job 63 scan job 59 canceling a job from Mac OS 9 49 from Mac OSX 50 from the control panel 49 from Windows desktop 49 from Windows taskbar 49 Cannot Copy: Cancel 2in1/4in1-Copy to Exec/B5 94 Cannot Copy: Cancel Copy to Small Paper 94 card stock guidelines 43... options, fax 67 display troubleshooting display is blank 117 display, control panel 13 documents scanning text for editing 56 documents, printing from Macintosh 48 from Windows 48 drawer, 530-sheet removing 109 securing 28 Duplicate IP: Duplicate IP Address Found 95 dust-proof glass cleaning 101 E editing document text (OCR) 56...
... 54 fax job 63 scan job 59 canceling a job from Mac OS 9 49 from Mac OSX 50 from the control panel 49 from Windows desktop 49 from Windows taskbar 49 Cannot Copy: Cancel 2in1/4in1-Copy to Exec/B5 94 Cannot Copy: Cancel Copy to Small Paper 94 card stock guidelines 43... options, fax 67 display troubleshooting display is blank 117 display, control panel 13 documents scanning text for editing 56 documents, printing from Macintosh 48 from Windows 48 drawer, 530-sheet removing 109 securing 28 Duplicate IP: Duplicate IP Address Found 95 dust-proof glass cleaning 101 E editing document text (OCR) 56...

User's Guide
Page 148
... Set 97 Please Wait 97 Power Saver adjusting 114 print job canceling from Mac OS 9 49 canceling from Mac OSX 50 canceling from Windows desktop 49 canceling from Windows taskbar 49 print quality cleaning the dust-proof glass 101 cleaning the scanner glass 100 print quality troubleshooting blank pages 133 clipped images...
... Set 97 Please Wait 97 Power Saver adjusting 114 print job canceling from Mac OS 9 49 canceling from Mac OSX 50 canceling from Windows desktop 49 canceling from Windows taskbar 49 print quality cleaning the dust-proof glass 101 cleaning the scanner glass 100 print quality troubleshooting blank pages 133 clipped images...

User's Guide
Page 149
...: Replace Toner Y 94 printer options troubleshooting drawers 126 option not working 126 Printing 97 printing configuration page 48 demo page 49 from Macintosh 48 from Windows 48 installing printer software 48 network information 48 supply information 48 Pulse dialing mode 67 Q Quick Dial editing Quick Dial numbers 65 setting up Quick...
...: Replace Toner Y 94 printer options troubleshooting drawers 126 option not working 126 Printing 97 printing configuration page 48 demo page 49 from Macintosh 48 from Windows 48 installing printer software 48 network information 48 supply information 48 Pulse dialing mode 67 Q Quick Dial editing Quick Dial numbers 65 setting up Quick...

Scan Destination and Alert Message Setup Guide
Page 3
Contents Chapter 1: Overview ...4 Chapter 2: Scanning to e-mail 6 Sample e-mails ...7 Chapter 3: Scanning to FTP 8 Chapter 4: Scanning to a computer 10 Sharing a folder in Windows XP ...10 Setting up Scan to PC on the Embedded Web Server 11 Chapter 5: Setting up the fax dial settings 13 Chapter 6: Setting up an alerts message 15 Sample alert message ...16 Chapter 7: Configuring SMTP 17 3
Contents Chapter 1: Overview ...4 Chapter 2: Scanning to e-mail 6 Sample e-mails ...7 Chapter 3: Scanning to FTP 8 Chapter 4: Scanning to a computer 10 Sharing a folder in Windows XP ...10 Setting up Scan to PC on the Embedded Web Server 11 Chapter 5: Setting up the fax dial settings 13 Chapter 6: Setting up an alerts message 15 Sample alert message ...16 Chapter 7: Configuring SMTP 17 3
Scan Destination and Alert Message Setup Guide
Page 10
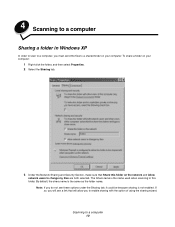
... when scanning to this folder on the network and Allow network users to change my files are both selected. 4 Scanning to a computer Sharing a folder in Windows XP In order to scan to a computer, you will see these options under the Sharing tab, it could be because sharing is not enabled. To...
... when scanning to this folder on the network and Allow network users to change my files are both selected. 4 Scanning to a computer Sharing a folder in Windows XP In order to scan to a computer, you will see these options under the Sharing tab, it could be because sharing is not enabled. To...
Card Stock & Label Guide
Page 10
... materials such as it in the printer. Perforations closer to the edge may develop uneven moisture content that curl not exceed 3 mm (0.125 in a jam. Lexmark printers are ready to load it moves through the printer, the perforations should stop 1.6 mm (0.06 in.) from peeling off the liner while in the... of the print material, ties are preferred. When designing labels, round all corners to create shapes in poor print quality. Back splits and pop-out windows are not recommended. For areas with die-cuts or perforations that go through the liner (anvil cuts).
... materials such as it in the printer. Perforations closer to the edge may develop uneven moisture content that curl not exceed 3 mm (0.125 in a jam. Lexmark printers are ready to load it moves through the printer, the perforations should stop 1.6 mm (0.06 in.) from peeling off the liner while in the... of the print material, ties are preferred. When designing labels, round all corners to create shapes in poor print quality. Back splits and pop-out windows are not recommended. For areas with die-cuts or perforations that go through the liner (anvil cuts).

Network Scan Drivers
Page 3
... using a network printer...6 Removing the network scan driver...6 Scanning...7 Scanning using applications...7 Scanning using XSane...7 Scanning using OpenOffice.org...7 Scanning using GIMP ...8 Scanning using a terminal window ...8 Scanning multiple pages...8 Scanning both sides of a page...10 Canceling a scan...11 Adjusting scan settings...12 Adjusting scan settings using XSane or OpenOffice.org 12...
... using a network printer...6 Removing the network scan driver...6 Scanning...7 Scanning using applications...7 Scanning using XSane...7 Scanning using OpenOffice.org...7 Scanning using GIMP ...8 Scanning using a terminal window ...8 Scanning multiple pages...8 Scanning both sides of a page...10 Canceling a scan...11 Adjusting scan settings...12 Adjusting scan settings using XSane or OpenOffice.org 12...
Network Scan Drivers
Page 6
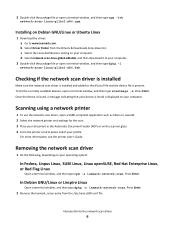
... operating system: In Fedora, Linpus Linux, SUSE Linux, Linux openSUSE, Red Hat Enterprise Linux, or Red Flag Linux Open a terminal window, and then type rpm -e lexmark-network-scan. For more information, see the printer User's Guide. b Select Driver Finder from the /etc/sane.d/dll.conf file. ...added to the network scan driver 6 In Debian GNU/Linux or Linspire Linux Open a terminal window, and then type dpkg -r lexmark-network-scan. To list the currently available devices, open a terminal window, and then type rpm -ivh network-scan-linux-glibc2-x86.rpm. Introduction to the dll....
... operating system: In Fedora, Linpus Linux, SUSE Linux, Linux openSUSE, Red Hat Enterprise Linux, or Red Flag Linux Open a terminal window, and then type rpm -e lexmark-network-scan. For more information, see the printer User's Guide. b Select Driver Finder from the /etc/sane.d/dll.conf file. ...added to the network scan driver 6 In Debian GNU/Linux or Linspire Linux Open a terminal window, and then type dpkg -r lexmark-network-scan. To list the currently available devices, open a terminal window, and then type rpm -ivh network-scan-linux-glibc2-x86.rpm. Introduction to the dll....
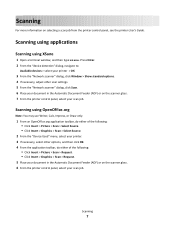
Network Scan Drivers
Page 7
... then type xsane. Press Enter. 2 From the "device detection" dialog, navigate to: Available devices > select your printer > OK 3 From the "Network:scanner" dialog, click Window > Show standard options. 4 If necessary, adjust other options, and then click OK. 4 From the application toolbar, do either of the following: • Click Insert > Picture > ...
... then type xsane. Press Enter. 2 From the "device detection" dialog, navigate to: Available devices > select your printer > OK 3 From the "Network:scanner" dialog, click Window > Show standard options. 4 If necessary, adjust other options, and then click OK. 4 From the application toolbar, do either of the following: • Click Insert > Picture > ...

Network Scan Drivers
Page 8
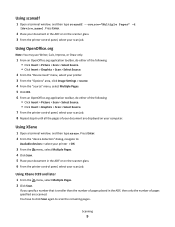
...(ADF) or on the application. Scanning using existing scanning tools (xscanimage and XSane) used as plug-ins. Using scanimage 1 Open a terminal window, and then type scanimage -b --source="Multiple Pages" -d [device_name]. You can scan multiple pages in several ways depending on the scanner glass....using GIMP GNU Image Manipulation Program (GIMP) is the standard paint program for UNIX/Linux systems. It supports scanning by using a terminal window 1 Open a terminal window, and then type scanimage -d [device_name] > /tmp/scan.pnm. The GIMP plug-in the ADF, the printer scans from the ...
...(ADF) or on the application. Scanning using existing scanning tools (xscanimage and XSane) used as plug-ins. Using scanimage 1 Open a terminal window, and then type scanimage -b --source="Multiple Pages" -d [device_name]. You can scan multiple pages in several ways depending on the scanner glass....using GIMP GNU Image Manipulation Program (GIMP) is the standard paint program for UNIX/Linux systems. It supports scanning by using a terminal window 1 Open a terminal window, and then type scanimage -d [device_name] > /tmp/scan.pnm. The GIMP plug-in the ADF, the printer scans from the ...
Network Scan Drivers
Page 9
... Scan. 5 Place your document in the ADF or on the scanner glass. 6 From the printer control panel, select your scan job. Using XSane 1 Open a terminal window, and then type xsane. Using XSane 0.99 and later 1 From the menu, select Multiple Pages. 2 Click Scan. Using scanadf 1 Open a terminal... window, and then type scanadf --source="Multiple Pages" -d [device_name]. If you specify a number that is smaller than the number of pages placed in the ADF or ...
... Scan. 5 Place your document in the ADF or on the scanner glass. 6 From the printer control panel, select your scan job. Using XSane 1 Open a terminal window, and then type xsane. Using XSane 0.99 and later 1 From the menu, select Multiple Pages. 2 Click Scan. Using scanadf 1 Open a terminal... window, and then type scanadf --source="Multiple Pages" -d [device_name]. If you specify a number that is smaller than the number of pages placed in the ADF or ...


