User's Guide
Page 8
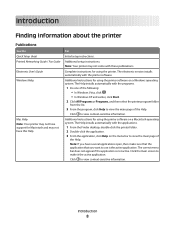
... printer Publications See the Quick Setup sheet Printed Networking Guide / Fax Guide Electronic User's Guide Windows Help Mac Help Note: Your printer may not have support for Macintosh and may not come with these publications. Note: Your printer may not have several applications open, then make it the active application. Click...
... printer Publications See the Quick Setup sheet Printed Networking Guide / Fax Guide Electronic User's Guide Windows Help Mac Help Note: Your printer may not have support for Macintosh and may not come with these publications. Note: Your printer may not have several applications open, then make it the active application. Click...
User's Guide
Page 9
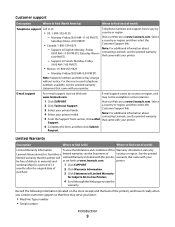
... after the original date of purchase. 2 Click Warranty Information. 3 Click Statement of Limited Warranty for a period of 12 1 Click SUPPORT. E-mail support varies by Lexmark International, Inc. Select Saturday (Noon-6:00 PM ET) a country or region, and then select the • Canada: 1-800-539-6275...-11:00 PM ET), Visit our Web site at www.lexmark.com. Support in some instances. 1 Click SUPPORT. Support in materials and or set forth at www.lexmark.com. Monday-Friday (8:00 AM-8:00 PM ET) Note: Support numbers and times may not be free of defects in French...
... after the original date of purchase. 2 Click Warranty Information. 3 Click Statement of Limited Warranty for a period of 12 1 Click SUPPORT. E-mail support varies by Lexmark International, Inc. Select Saturday (Noon-6:00 PM ET) a country or region, and then select the • Canada: 1-800-539-6275...-11:00 PM ET), Visit our Web site at www.lexmark.com. Support in some instances. 1 Click SUPPORT. Support in materials and or set forth at www.lexmark.com. Monday-Friday (8:00 AM-8:00 PM ET) Note: Support numbers and times may not be free of defects in French...
User's Guide
Page 12
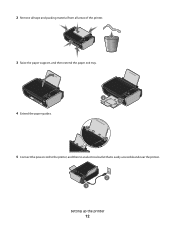
2 Remove all tape and packing material from all areas of the printer. WI F I PRINTING 5 Connect the power cord to the printer, and then to an electrical outlet that is easily accessible and near the printer. 2 1 Setting up the printer 12 WI F I PRINTING 4 Extend the paper guides. 2 1 W I F I PRINTING 3 Raise the paper support, and then extend the paper exit tray.
2 Remove all tape and packing material from all areas of the printer. WI F I PRINTING 5 Connect the power cord to the printer, and then to an electrical outlet that is easily accessible and near the printer. 2 1 Setting up the printer 12 WI F I PRINTING 4 Extend the paper guides. 2 1 W I F I PRINTING 3 Raise the paper support, and then extend the paper exit tray.

User's Guide
Page 18
... to indicate that no wireless option is connected for wireless printing - Understanding the parts of the printer 11 10 1 9 8 WI F I PRINTING 2 7 6 5 3 4 Use the To 1 Paper support Load paper. 2 Printer control panel Operate the printer. 3 Wi-Fi indicator Note: Your printer model may not have wireless capability and may not have this...
... to indicate that no wireless option is connected for wireless printing - Understanding the parts of the printer 11 10 1 9 8 WI F I PRINTING 2 7 6 5 3 4 Use the To 1 Paper support Load paper. 2 Printer control panel Operate the printer. 3 Wi-Fi indicator Note: Your printer model may not have wireless capability and may not have this...
User's Guide
Page 30
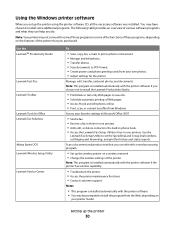
... or some additional programs. The following table provides an overview of the printer that you can help you do. Use the LexmarkTM Productivity Studio Lexmark Fast Pics Lexmark Toolbar Lexmark Tools for the printer. Scan a document and produce text that you purchased. Access your printer model. Setting up the wireless printer on your... installed automatically with the printer software if the printer has wireless capability. • Troubleshoot the printer. • Access the printer maintenance functions. • Contact customer support.
... or some additional programs. The following table provides an overview of the printer that you can help you do. Use the LexmarkTM Productivity Studio Lexmark Fast Pics Lexmark Toolbar Lexmark Tools for the printer. Scan a document and produce text that you purchased. Access your printer model. Setting up the wireless printer on your... installed automatically with the printer software if the printer has wireless capability. • Troubleshoot the printer. • Access the printer maintenance functions. • Contact customer support.
User's Guide
Page 32
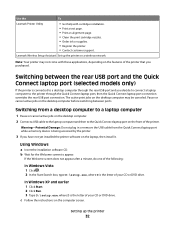
... alignment page. • Clean the print cartridge nozzles. • Order ink or supplies. • Register the printer. • Contact customer support. Lexmark Wireless Setup Assistant Set up the printer 32 Switching from the Quick Connect laptop port while a memory device is connected to a desktop computer through ...2 In the Start Search box, type D:\setup.exe, where D is the letter of your CD or DVD drive. Use the To Lexmark Printer Utility • Get help with these applications, depending on the features of the printer that you have not yet installed the printer ...
... alignment page. • Clean the print cartridge nozzles. • Order ink or supplies. • Register the printer. • Contact customer support. Lexmark Wireless Setup Assistant Set up the printer 32 Switching from the Quick Connect laptop port while a memory device is connected to a desktop computer through ...2 In the Start Search box, type D:\setup.exe, where D is the letter of your CD or DVD drive. Use the To Lexmark Printer Utility • Get help with these applications, depending on the features of the printer that you have not yet installed the printer ...

User's Guide
Page 34
... the computer network adapter and look for future reference. Use the table provided below to , launch the wireless utility of the network that your system support person. Item SSID (name of your network. ASCII characters are case-sensitive. or • Exactly 64 hexadecimal characters. Information you do not know : • The...
... the computer network adapter and look for future reference. Use the table provided below to , launch the wireless utility of the network that your system support person. Item SSID (name of your network. ASCII characters are case-sensitive. or • Exactly 64 hexadecimal characters. Information you do not know : • The...
User's Guide
Page 36
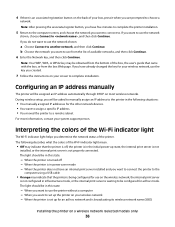
... your wireless network, use the network shown, choose Connect to complete installation. The light should be in this state: - For more information, contact your system support person. When the printer does not have five minutes to complete the printer installation. 5 Return to the computer screen, and choose the network you will...
... your wireless network, use the network shown, choose Connect to complete installation. The light should be in this state: - For more information, contact your system support person. When the printer does not have five minutes to complete the printer installation. 5 Return to the computer screen, and choose the network you will...

User's Guide
Page 49
.... REMOVE SOURCES OF INTERFERENCE Other types of interference can block the signal, including: • Cubicle walls • Ducts • Window frames • Poles and interior support columns • Metal office furniture and cabinets • Elevators • Steel doors • Walls and other structural elements reinforced by rebar Arrange your printer and...
.... REMOVE SOURCES OF INTERFERENCE Other types of interference can block the signal, including: • Cubicle walls • Ducts • Window frames • Poles and interior support columns • Metal office furniture and cabinets • Elevators • Steel doors • Walls and other structural elements reinforced by rebar Arrange your printer and...

User's Guide
Page 50
... key is a MAC address? MAC address filtering can contain up the printer for use the printer as the password for security reasons. If your system support person.
... key is a MAC address? MAC address filtering can contain up the printer for use the printer as the password for security reasons. If your system support person.

User's Guide
Page 54
Heavyweight matte paper, photo paper, glossy paper You can load up to rest against the edges of the paper support. Loading paper 54 Make sure: • The paper is designed for inkjet printers. • If you are using photo, glossy, or heavyweight matte paper, you ... into the printer. 2 Before loading paper the first time, slide the paper guides out toward the edges of the paper support. 3 Load the paper vertically in the center of the paper support, and adjust the paper guides to 25 sheets. Loading paper Loading paper 1 Make sure: • You use paper designed for...
Heavyweight matte paper, photo paper, glossy paper You can load up to rest against the edges of the paper support. Loading paper 54 Make sure: • The paper is designed for inkjet printers. • If you are using photo, glossy, or heavyweight matte paper, you ... into the printer. 2 Before loading paper the first time, slide the paper guides out toward the edges of the paper support. 3 Load the paper vertically in the center of the paper support, and adjust the paper guides to 25 sheets. Loading paper Loading paper 1 Make sure: • You use paper designed for...
User's Guide
Page 55
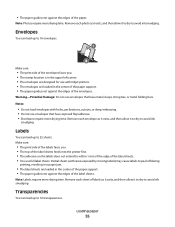
... missing labels) may cause labels to avoid ink smudging. Partial sheets (with inkjet printers. • The envelopes are loaded in the center of the paper support. • The paper guides rest against the edges of the envelopes. Loading paper 55 • The paper guides rest against the edges of the label... allow it to dry to peel off during printing, resulting in a paper jam. • The label sheets are loaded in the center of the paper support. • The paper guides rest against the edges of labels as it exits, and then allow it to dry to avoid ink smudging.
... missing labels) may cause labels to avoid ink smudging. Partial sheets (with inkjet printers. • The envelopes are loaded in the center of the paper support. • The paper guides rest against the edges of the envelopes. Loading paper 55 • The paper guides rest against the edges of the label... allow it to dry to peel off during printing, resulting in a paper jam. • The label sheets are loaded in the center of the paper support. • The paper guides rest against the edges of labels as it exits, and then allow it to dry to avoid ink smudging.

User's Guide
Page 56
...ink smudging. Make sure: • You follow the loading instructions that came with paper backing sheets are loaded in the center of the paper support. • The paper guides rest against the edges of the transfers. Iron-on transfers You can load up to 100 sheets (depending on transfers.... • The print side of the transfers faces you. • The transfers are loaded in the center of the paper support. • The paper guides rest against the edges of the transparencies. Custom-size paper You can load up to 10 transfers. Make sure: •...
...ink smudging. Make sure: • You follow the loading instructions that came with paper backing sheets are loaded in the center of the paper support. • The paper guides rest against the edges of the transfers. Iron-on transfers You can load up to 100 sheets (depending on transfers.... • The print side of the transfers faces you. • The transfers are loaded in the center of the paper support. • The paper guides rest against the edges of the transparencies. Custom-size paper You can load up to 10 transfers. Make sure: •...

User's Guide
Page 57
WI F I PRINTING Make sure: • You remove all the paper from the paper support before loading the banner paper. • You tear off only the number of pages needed to 20 sheets. Loading paper 57 Banner paper You can ... printer. • The leading edge of the banner paper feeds into the printer first. • The paper is loaded in the center of the paper support. • The paper guides rest against the edges of the paper. Width: - 76.2-215.9 mm - 3.0-8.5 inches Length: - 127.0-355.6 mm - 5.0-17.0 inches • The paper...
WI F I PRINTING Make sure: • You remove all the paper from the paper support before loading the banner paper. • You tear off only the number of pages needed to 20 sheets. Loading paper 57 Banner paper You can ... printer. • The leading edge of the banner paper feeds into the printer first. • The paper is loaded in the center of the paper support. • The paper guides rest against the edges of the paper. Width: - 76.2-215.9 mm - 3.0-8.5 inches Length: - 127.0-355.6 mm - 5.0-17.0 inches • The paper...
User's Guide
Page 60
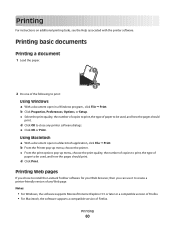
...the print options pop-up menu, choose the printer. Notes: • For Windows, the software supports Microsoft Internet Explorer 5.5 or later or a compatible version of Firefox. • For Macintosh, the software supports a compatible version of paper to be used , and how the pages should print. Printing 60... c Select the print quality, the number of copies to print, the type of Firefox. Printing Web pages If you chose to install the Lexmark Toolbar software for ...
...the print options pop-up menu, choose the printer. Notes: • For Windows, the software supports Microsoft Internet Explorer 5.5 or later or a compatible version of Firefox. • For Macintosh, the software supports a compatible version of paper to be used , and how the pages should print. Printing 60... c Select the print quality, the number of copies to print, the type of Firefox. Printing Web pages If you chose to install the Lexmark Toolbar software for ...

User's Guide
Page 61
..., Options, or Setup. 3 From the Copies section of the Print Setup tab, enter the number of pages (not collated). 1 Load paper. 2 Open a Web page using a supported browser. 3 Select a print option to print, and then select Collate Copies. Printing 61
..., Options, or Setup. 3 From the Copies section of the Print Setup tab, enter the number of pages (not collated). 1 Load paper. 2 Open a Web page using a supported browser. 3 Select a print option to print, and then select Collate Copies. Printing 61

User's Guide
Page 63
... computer must be on. • The memory card or flash drive must contain document files that support the file types in the memory device. 1 Insert a memory card or flash drive. The following file types are supported by a border, then select Print Page Borders. 5 Click OK to close any printer software dialogs. 6 Click...
... computer must be on. • The memory card or flash drive must contain document files that support the file types in the memory device. 1 Insert a memory card or flash drive. The following file types are supported by a border, then select Print Page Borders. 5 Click OK to close any printer software dialogs. 6 Click...

User's Guide
Page 74
... mode. 2 From the printer control panel, press . 3 Press the arrow buttons until Network appears, and then press . Notes: • You may require that does not support memory device connection. • The printer may be prompted to recognize. Retrieving and managing photos Transferring photos from a memory device to the computer Using the...
... mode. 2 From the printer control panel, press . 3 Press the arrow buttons until Network appears, and then press . Notes: • You may require that does not support memory device connection. • The printer may be prompted to recognize. Retrieving and managing photos Transferring photos from a memory device to the computer Using the...

User's Guide
Page 81
..., displaying, or storing. Scan Proof Sheet appears on the scanner glass. Note: If this option, use the camera to print, the number of the paper support, with the paper.) Note: Make sure that the paper matches the size that came with the glossy or printable side facing you. (If you selected...
..., displaying, or storing. Scan Proof Sheet appears on the scanner glass. Note: If this option, use the camera to print, the number of the paper support, with the paper.) Note: Make sure that the paper matches the size that came with the glossy or printable side facing you. (If you selected...

User's Guide
Page 82
... see the instructions that came with the paper.) 2 Insert a memory card. Note: To prevent smudging or scratching, avoid touching the printed surface with your camera supports DPOF, then you specify in the camera. Printing photos from the paper exit tray, and allow the prints to the printer. Note: If you specify...
... see the instructions that came with the paper.) 2 Insert a memory card. Note: To prevent smudging or scratching, avoid touching the printed surface with your camera supports DPOF, then you specify in the camera. Printing photos from the paper exit tray, and allow the prints to the printer. Note: If you specify...

