
Getting Started
Page 2
...service person. Refer service or repairs, other replacement parts. The safety features of specific Lexmark components. CAUTION: Do not set up this product or the manufacturer's authorized replacement power supply and power supply cord. This product is designed, tested, and approved to an electrical outlet that is ...not responsible for the use of some parts may not always be obvious. Lexmark is near the product and easily accessible. Connect the power supply cord to meet strict global safety standards with this product or make any electrical or cabling ...
...service person. Refer service or repairs, other replacement parts. The safety features of specific Lexmark components. CAUTION: Do not set up this product or the manufacturer's authorized replacement power supply and power supply cord. This product is designed, tested, and approved to an electrical outlet that is ...not responsible for the use of some parts may not always be obvious. Lexmark is near the product and easily accessible. Connect the power supply cord to meet strict global safety standards with this product or make any electrical or cabling ...
Getting Started
Page 4
... and other supplies...45 Troubleshooting...47 Setup troubleshooting...47 Incorrect language appears on the display 47 Power button is not lit ...47 Software does not install ...48 Page does not print ...49 Cannot print from digital camera using PictBridge 50 Wireless troubleshooting...50 ...Fi indicator light is blinking orange during installation 54 Wireless network printer does not print ...57 Wireless printer is no longer working...58 Photos do not transfer from a memory card across a wireless network 63 Changing wireless settings after installation 64 Finding your MAC address...64...
... and other supplies...45 Troubleshooting...47 Setup troubleshooting...47 Incorrect language appears on the display 47 Power button is not lit ...47 Software does not install ...48 Page does not print ...49 Cannot print from digital camera using PictBridge 50 Wireless troubleshooting...50 ...Fi indicator light is blinking orange during installation 54 Wireless network printer does not print ...57 Wireless printer is no longer working...58 Photos do not transfer from a memory card across a wireless network 63 Changing wireless settings after installation 64 Finding your MAC address...64...
Getting Started
Page 26
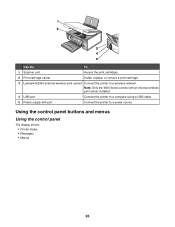
Use the To 1 Scanner unit Access the print cartridges. 2 Print cartridge carrier Install, replace, or remove a print cartridge. 3 Lexmark N2050 (internal wireless print server) Connect the printer to a power source. Using the control panel buttons and menus Using the control panel The display shows: • Printer status • Messages • Menus 26 Note: Only the 4500 Series comes with an internal wireless print server installed. 4 USB port Connect the printer to a computer using a USB cable. 5 Power supply with port Connect the printer to a wireless network.
Use the To 1 Scanner unit Access the print cartridges. 2 Print cartridge carrier Install, replace, or remove a print cartridge. 3 Lexmark N2050 (internal wireless print server) Connect the printer to a power source. Using the control panel buttons and menus Using the control panel The display shows: • Printer status • Messages • Menus 26 Note: Only the 4500 Series comes with an internal wireless print server installed. 4 USB port Connect the printer to a computer using a USB cable. 5 Power supply with port Connect the printer to a wireless network.
Getting Started
Page 48
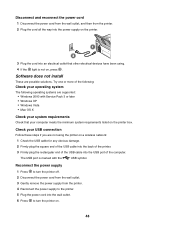
Try one or more of the computer. Software does not install These are not using . 4 If the light is marked with Service Pack 3 or later • Windows .... Check your computer meets the minimum system requirements listed on , press . The USB port is not on the printer box. Reconnect the power supply 1 Press to turn the printer on a wireless network: 1 Check the USB cable for any obvious damage. 2 Firmly plug the square end of the USB cable into the back of...
Try one or more of the computer. Software does not install These are not using . 4 If the light is marked with Service Pack 3 or later • Windows .... Check your computer meets the minimum system requirements listed on , press . The USB port is not on the printer box. Reconnect the power supply 1 Press to turn the printer on a wireless network: 1 Check the USB cable for any obvious damage. 2 Firmly plug the square end of the USB cable into the back of...
Getting Started
Page 50
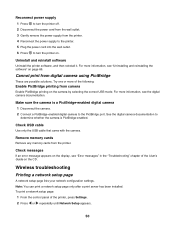
.... 2 Connect a PictBridge-enabled digital camera to turn the printer on the CD. Wireless troubleshooting Printing a network setup page A network setup page lists your network configuration settings... the following: Enable PictBridge printing from camera Enable PictBridge printing on page 66. Try one or more information, see "Error messages" in the "Troubleshooting" chapter of the User...power supply 1 Press to turn the printer off. 2 Disconnect the power cord from the wall outlet. 3 Gently remove the power supply from the printer. 4 Reconnect the power supply to the printer. 5 Plug the power...
.... 2 Connect a PictBridge-enabled digital camera to turn the printer on the CD. Wireless troubleshooting Printing a network setup page A network setup page lists your network configuration settings... the following: Enable PictBridge printing from camera Enable PictBridge printing on page 66. Try one or more information, see "Error messages" in the "Troubleshooting" chapter of the User...power supply 1 Press to turn the printer off. 2 Disconnect the power cord from the wall outlet. 3 Gently remove the power supply from the printer. 4 Reconnect the power supply to the printer. 5 Plug the power...

User's Guide
Page 2
... or the manufacturer's authorized replacement power supply and power supply cord. Operating system notice All features and functions are operating system-dependent. Connect the power supply cord to a professional service person. Lexmark is near the product and easily accessible. The safety features of specific Lexmark components. Important safety information Use only the power supply and power supply cord provided with this product...
... or the manufacturer's authorized replacement power supply and power supply cord. Operating system notice All features and functions are operating system-dependent. Connect the power supply cord to a professional service person. Lexmark is near the product and easily accessible. The safety features of specific Lexmark components. Important safety information Use only the power supply and power supply cord provided with this product...
User's Guide
Page 12
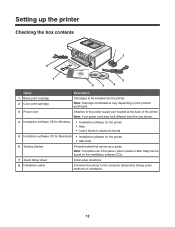
... combinations vary depending on the installation software CDs. 7 Quick Setup sheet Initial setup directions 8 Installation cable Connects the printer to the power supply port located at the back of installation. 12 Note: Complete user information (User's Guide or Mac Help) can be installed into ...the printer. Note: Your power cord may look different from the one shown. 4 Installation software CD for Windows • Installation software for the printer • Help • User's Guide...
... combinations vary depending on the installation software CDs. 7 Quick Setup sheet Initial setup directions 8 Installation cable Connects the printer to the power supply port located at the back of installation. 12 Note: Complete user information (User's Guide or Mac Help) can be installed into ...the printer. Note: Your power cord may look different from the one shown. 4 Installation software CD for Windows • Installation software for the printer • Help • User's Guide...
User's Guide
Page 17
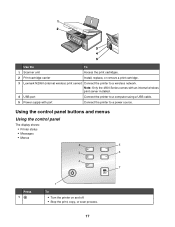
Use the To 1 Scanner unit Access the print cartridges. 2 Print cartridge carrier Install, replace, or remove a print cartridge. 3 Lexmark N2050 (internal wireless print server) Connect the printer to a power source. Using the control panel buttons and menus Using the control panel The display shows: • Printer status • Messages • ... the print, copy, or scan process. 17 Note: Only the 4500 Series comes with an internal wireless print server installed. 4 USB port Connect the printer to a computer using a USB cable. 5 Power supply with port Connect the printer to...
Use the To 1 Scanner unit Access the print cartridges. 2 Print cartridge carrier Install, replace, or remove a print cartridge. 3 Lexmark N2050 (internal wireless print server) Connect the printer to a power source. Using the control panel buttons and menus Using the control panel The display shows: • Printer status • Messages • ... the print, copy, or scan process. 17 Note: Only the 4500 Series comes with an internal wireless print server installed. 4 USB port Connect the printer to a computer using a USB cable. 5 Power supply with port Connect the printer to...
User's Guide
Page 78
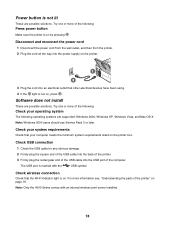
... the way into the power supply on the printer. 3 Plug the cord into the USB port of the following : Check your computer meets the minimum system requirements listed on by pressing . The USB port is marked with an internal wireless print server installed. 78 Try one or more of the ... users should use Service Pack 3 or later. Check wireless connection Check that other electrical devices have been using. 4 If the light is on the printer box. Try one or more information see, "Understanding the parts of the following : Press power button Make sure the printer is not on page 16...
... the way into the power supply on the printer. 3 Plug the cord into the USB port of the following : Check your computer meets the minimum system requirements listed on by pressing . The USB port is marked with an internal wireless print server installed. 78 Try one or more of the ... users should use Service Pack 3 or later. Check wireless connection Check that other electrical devices have been using. 4 If the light is on the printer box. Try one or more information see, "Understanding the parts of the following : Press power button Make sure the printer is not on page 16...
User's Guide
Page 79
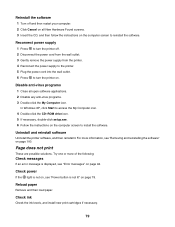
Uninstall and reinstall software Uninstall the printer software, and then reinstall it. Try one or more information, see "Error messages" on page 94. In Windows XP, click Start to access the My Computer icon. 4 Double-click the CD-ROM...open software applications. 2 Disable any anti-virus programs. 3 Double-click the My Computer icon. Reinstall the software 1 Turn off . 2 Disconnect the power cord from the wall outlet. 3 Gently remove the power supply from the printer. 4 Reconnect the power supply to the printer. 5 Plug the power cord into the wall outlet. 6 Press to turn the printer on.
Uninstall and reinstall software Uninstall the printer software, and then reinstall it. Try one or more information, see "Error messages" on page 94. In Windows XP, click Start to access the My Computer icon. 4 Double-click the CD-ROM...open software applications. 2 Disable any anti-virus programs. 3 Double-click the My Computer icon. Reinstall the software 1 Turn off . 2 Disconnect the power cord from the wall outlet. 3 Gently remove the power supply from the printer. 4 Reconnect the power supply to the printer. 5 Plug the power cord into the wall outlet. 6 Press to turn the printer on.
User's Guide
Page 80
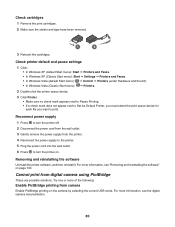
... and then reinstall it. Try one or more information, see the digital camera documentation. 80 For more of the following: Enable PictBridge printing from camera Enable PictBridge printing on the camera by selecting the correct USB mode. Reconnect power supply 1 Press to turn the printer ... 100. For more information, see "Removing and reinstalling the software" on . Cannot print from the printer. 4 Reconnect the power supply to the printer. 5 Plug the power cord into the wall outlet. 6 Press to print. Check cartridges 1 Remove the print cartridges. 2 Make sure the sticker ...
... and then reinstall it. Try one or more information, see the digital camera documentation. 80 For more of the following: Enable PictBridge printing from camera Enable PictBridge printing on the camera by selecting the correct USB mode. Reconnect power supply 1 Press to turn the printer ... 100. For more information, see "Removing and reinstalling the software" on . Cannot print from the printer. 4 Reconnect the power supply to the printer. 5 Plug the power cord into the wall outlet. 6 Press to print. Check cartridges 1 Remove the print cartridges. 2 Make sure the sticker ...
User's Guide
Page 94
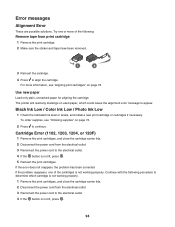
...solutions. Black Ink Low / Color Ink Low / Photo Ink Low 1 Check the indicated ink level or levels, and install a new print cartridge or cartridges if necessary. If the problem reappears, one or more information, see "Ordering supplies" on used paper, which cartridge is not working... properly. Continue with the following : Remove tape from the electrical outlet. 3 Reconnect the power cord to appear. The printer will read any ...
...solutions. Black Ink Low / Color Ink Low / Photo Ink Low 1 Check the indicated ink level or levels, and install a new print cartridge or cartridges if necessary. If the problem reappears, one or more information, see "Ordering supplies" on used paper, which cartridge is not working... properly. Continue with the following : Remove tape from the electrical outlet. 3 Reconnect the power cord to appear. The printer will read any ...
User's Guide
Page 103
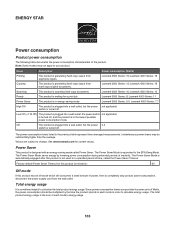
...: Some modes may not apply to your product. Lexmark 3500 Series: 15; Lexmark 3500 Series: 5.0; ENERGY STAR Power consumption Product power consumption The following table documents the power consumption characteristics of the product. Lexmark 4500 Series: 16 Scanning The product is waiting for a print job. Lexmark 3500 Series: 13; Lexmark 4500 Series: 13 Ready The product is scanning...
...: Some modes may not apply to your product. Lexmark 3500 Series: 15; Lexmark 3500 Series: 5.0; ENERGY STAR Power consumption Product power consumption The following table documents the power consumption characteristics of the product. Lexmark 4500 Series: 16 Scanning The product is waiting for a print job. Lexmark 3500 Series: 13; Lexmark 4500 Series: 13 Ready The product is scanning...

User's Guide
Page 107
...scanning 63 networking installing internal wireless print server 14 installing printer 14 newspapers, loading on the...64 only one photo enhancement may be chosen at a time 98 only one photo/size selection can be chosen at a time 98 ordering paper and other supplies 75 ...power supply port 17 print cartridge carrier 17 scanner glass 16 scanner unit 17 top cover 16 USB port 17 Wi-Fi indicator 16 Photo Card menu 21 photo cards, loading 36 Photo Greeting Cards button 27 photo ink low 94 Photo Library printing photos 53 scanning a photo to 65 viewing photos 53 Photo Packages 54 Photo Packages button 27 photo...
...scanning 63 networking installing internal wireless print server 14 installing printer 14 newspapers, loading on the...64 only one photo enhancement may be chosen at a time 98 only one photo/size selection can be chosen at a time 98 ordering paper and other supplies 75 ...power supply port 17 print cartridge carrier 17 scanner glass 16 scanner unit 17 top cover 16 USB port 17 Wi-Fi indicator 16 Photo Card menu 21 photo cards, loading 36 Photo Greeting Cards button 27 photo ink low 94 Photo Library printing photos 53 scanning a photo to 65 viewing photos 53 Photo Packages 54 Photo Packages button 27 photo...


