
Getting Started
Page 3
...using a USB cable...17 Installing an optional internal wireless print server 17 Configuring the optional internal wireless print server 19 Installing the printer on additional network computers 19 Wireless networking...20 Networking overview...20 Learning about the printer... ...30 Using the Photo Card menu ...31 Using the PictBridge menu ...32 Using the Settings menu ...33 Saving settings ...35 Learning about the software 37 Using the printer software...37 Using the Lexmark Imaging Studio...37 Using...software settings to defaults 42 Maintaining the printer 43 Changing print cartridges...43 3
...using a USB cable...17 Installing an optional internal wireless print server 17 Configuring the optional internal wireless print server 19 Installing the printer on additional network computers 19 Wireless networking...20 Networking overview...20 Learning about the printer... ...30 Using the Photo Card menu ...31 Using the PictBridge menu ...32 Using the Settings menu ...33 Saving settings ...35 Learning about the software 37 Using the printer software...37 Using the Lexmark Imaging Studio...37 Using...software settings to defaults 42 Maintaining the printer 43 Changing print cartridges...43 3
Getting Started
Page 4
...cartridges...43 Ordering print cartridges...45 Ordering paper and other supplies...45 Troubleshooting...47 Setup troubleshooting...47 Incorrect language appears on the display 47 Power button is not lit ...47 Software does not install ...48 Page does not print ...49 Cannot print from digital camera using PictBridge 50 Wireless... is blinking orange during installation 54 Wireless network printer does not print ...57 Wireless printer is no longer working...58 Photos do not transfer from a memory card across a wireless network 63 Changing wireless settings after installation 64 Finding your ...
...cartridges...43 Ordering print cartridges...45 Ordering paper and other supplies...45 Troubleshooting...47 Setup troubleshooting...47 Incorrect language appears on the display 47 Power button is not lit ...47 Software does not install ...48 Page does not print ...49 Cannot print from digital camera using PictBridge 50 Wireless... is blinking orange during installation 54 Wireless network printer does not print ...57 Wireless printer is no longer working...58 Photos do not transfer from a memory card across a wireless network 63 Changing wireless settings after installation 64 Finding your ...
Getting Started
Page 14
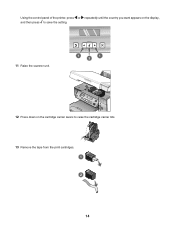
Using the control panel of the printer, press or repeatedly until the country you want appears on the display, and then press to save the setting. 11 Raise the scanner unit. 1 1 2 12 Press down on the cartridge carrier levers to raise the cartridge carrier lids. 13 Remove the tape from the print cartridges. 1 2 14
Using the control panel of the printer, press or repeatedly until the country you want appears on the display, and then press to save the setting. 11 Raise the scanner unit. 1 1 2 12 Press down on the cartridge carrier levers to raise the cartridge carrier lids. 13 Remove the tape from the print cartridges. 1 2 14
Getting Started
Page 15
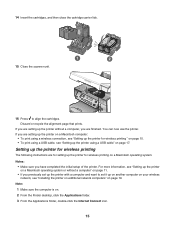
...or recycle the alignment page that prints. If you previously set up the printer with a computer and want to align the cartridges. 14 Insert the cartridges, and then close the cartridge carrier lids. 15 Close the scanner unit. 16 Press to set it up the printer using a USB cable, see "...Setting up on another computer on your wireless network, see "Setting up the printer for wireless printing on page 17. For more information, see ...
...or recycle the alignment page that prints. If you previously set up the printer with a computer and want to align the cartridges. 14 Insert the cartridges, and then close the cartridge carrier lids. 15 Close the scanner unit. 16 Press to set it up the printer using a USB cable, see "...Setting up on another computer on your wireless network, see "Setting up the printer for wireless printing on page 17. For more information, see ...
Getting Started
Page 26
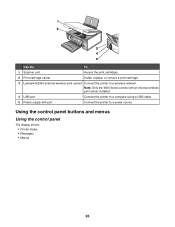
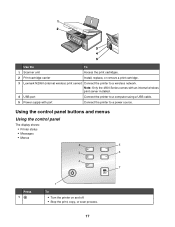
Using the control panel buttons and menus Using the control panel The display shows: • Printer status • Messages • Menus 26 Use the To 1 Scanner unit Access the print cartridges. 2 Print cartridge carrier Install, replace, or remove a print cartridge. 3 Lexmark N2050 (internal wireless print server) Connect the printer to a power source. Note: Only the 4500 Series comes with an internal wireless print server installed. 4 USB port Connect the printer to a computer using a USB cable. 5 Power supply with port Connect the printer to a wireless network.
Using the control panel buttons and menus Using the control panel The display shows: • Printer status • Messages • Menus 26 Use the To 1 Scanner unit Access the print cartridges. 2 Print cartridge carrier Install, replace, or remove a print cartridge. 3 Lexmark N2050 (internal wireless print server) Connect the printer to a power source. Note: Only the 4500 Series comes with an internal wireless print server installed. 4 USB port Connect the printer to a computer using a USB cable. 5 Power supply with port Connect the printer to a wireless network.
Getting Started
Page 34
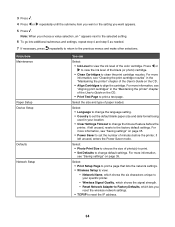
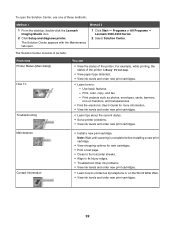
... of minutes before the printer, if left unused, enters the Power Saver mode. Select: • Photo Print Size to choose the size of photo(s) to print. • Set Defaults to view the ink level of the color cartridge. Wireless Signal Quality, which shows the six characters unique to change the language setting. • Country...
... of minutes before the printer, if left unused, enters the Power Saver mode. Select: • Photo Print Size to choose the size of photo(s) to print. • Set Defaults to view the ink level of the color cartridge. Wireless Signal Quality, which shows the six characters unique to change the language setting. • Country...
Getting Started
Page 37
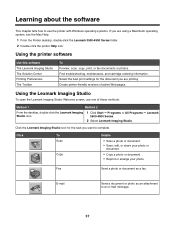
... print, or fax documents or photos. Find troubleshooting, maintenance, and cartridge ordering information. Using the Lexmark Imaging Studio To open the Lexmark Imaging Studio Welcome screen, use the printer with Windows operating systems. If you are printing. Fax Send a photo or document as an attachment to ...complete. Click To Scan Copy Details • Scan a photo or document. • Save, edit, or share your photo or document. • Copy a photo or document. • Reprint or enlarge your photo. Click the Lexmark Imaging Studio icon for the document you want to an e-...
... print, or fax documents or photos. Find troubleshooting, maintenance, and cartridge ordering information. Using the Lexmark Imaging Studio To open the Lexmark Imaging Studio Welcome screen, use the printer with Windows operating systems. If you are printing. Fax Send a photo or document as an attachment to ...complete. Click To Scan Copy Details • Scan a photo or document. • Save, edit, or share your photo or document. • Copy a photo or document. • Reprint or enlarge your photo. Click the Lexmark Imaging Studio icon for the document you want to an e-...
Getting Started
Page 38
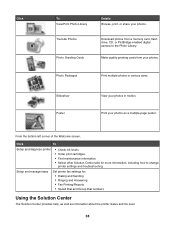
... the bottom left corner of the Welcome screen, Click To Setup and diagnose printer • Check ink levels. • Order print cartridges. • Find maintenance information. • Select other Solution Center tabs for : • Dialing and Sending • Ringing and ... a multiple-page poster. Photo Packages Print multiple photos in motion. Setup and manage faxes Set printer fax settings for more information, including how to the Photo Library. Slideshow Poster View your photos. Click To View/Print Photo Library Transfer Photos Photo Greeting Cards Details Browse,...
... the bottom left corner of the Welcome screen, Click To Setup and diagnose printer • Check ink levels. • Order print cartridges. • Find maintenance information. • Select other Solution Center tabs for : • Dialing and Sending • Ringing and ... a multiple-page poster. Photo Packages Print multiple photos in motion. Setup and manage faxes Set printer fax settings for more information, including how to the Photo Library. Slideshow Poster View your photos. Click To View/Print Photo Library Transfer Photos Photo Greeting Cards Details Browse,...
Getting Started
Page 39
...8226; Solve printer problems. • View ink levels and order new print cartridges. Print projects such as photos, envelopes, cards, banners, iron-on the World Wide Web. • View ink levels and order new print cartridges. 39 Print, scan, copy, and fax. - Note: Wait until scanning...8226; Install a new print cartridge. For example, while printing, the status of the printer. Use basic features. - The Solution Center appears with the Maintenance tab open the Solution Center, use one of these methods: Method 1 1 From the desktop, double-click the Lexmark Imaging Studio icon. 2 ...
...8226; Solve printer problems. • View ink levels and order new print cartridges. Print projects such as photos, envelopes, cards, banners, iron-on the World Wide Web. • View ink levels and order new print cartridges. 39 Print, scan, copy, and fax. - Note: Wait until scanning...8226; Install a new print cartridge. For example, while printing, the status of the printer. Use basic features. - The Solution Center appears with the Maintenance tab open the Solution Center, use one of these methods: Method 1 1 From the desktop, double-click the Lexmark Imaging Studio icon. 2 ...
Getting Started
Page 40
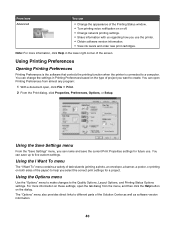
...select the correct print settings for future use the printer. • Obtain software version information. • View ink levels and order new print cartridges. The "Options" menu also provides direct links to help you use . Note: For more information on these settings, open the tab dialog ...almost any program: 1 With a document open Printing Preferences from the menu, and then click the Help button on both sides of task wizards (printing a photo, an envelope, a banner, a poster, or printing on the dialog. Using the Options menu Use the "Options" menu to make changes to a computer...
...select the correct print settings for future use the printer. • Obtain software version information. • View ink levels and order new print cartridges. The "Options" menu also provides direct links to help you use . Note: For more information on these settings, open the tab dialog ...almost any program: 1 With a document open Printing Preferences from the menu, and then click the Help button on both sides of task wizards (printing a photo, an envelope, a banner, a poster, or printing on the dialog. Using the Options menu Use the "Options" menu to make changes to a computer...
Getting Started
Page 43
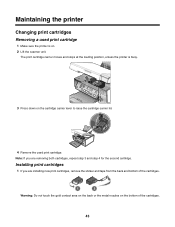
... at the loading position, unless the printer is on the cartridge carrier lever to raise the cartridge carrier lid. 4 Remove the used print cartridge. Installing print cartridges 1 If you are installing new print cartridges, remove the sticker and tape from the back and bottom of the cartridges. 1 2 Warning: Do not touch the gold contact area on...
... at the loading position, unless the printer is on the cartridge carrier lever to raise the cartridge carrier lid. 4 Remove the used print cartridge. Installing print cartridges 1 If you are installing new print cartridges, remove the sticker and tape from the back and bottom of the cartridges. 1 2 Warning: Do not touch the gold contact area on...
Getting Started
Page 44
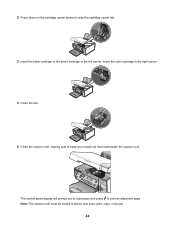
The control panel display will prompt you to load paper and press to start a new scan, print, copy, or fax job. 44 Insert the color cartridge in the left carrier. Note: The scanner unit must be closed to print an alignment page. 2 Press down on the cartridge carrier levers to raise the cartridge carrier lids. 3 Insert the black cartridge or the photo cartridge in the right carrier. 4 Close the lids. 5 Close the scanner unit, making sure to keep your hands out from underneath the scanner unit.
The control panel display will prompt you to load paper and press to start a new scan, print, copy, or fax job. 44 Insert the color cartridge in the left carrier. Note: The scanner unit must be closed to print an alignment page. 2 Press down on the cartridge carrier levers to raise the cartridge carrier lids. 3 Insert the black cartridge or the photo cartridge in the right carrier. 4 Close the lids. 5 Close the scanner unit, making sure to keep your hands out from underneath the scanner unit.
Getting Started
Page 45
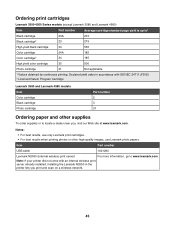
...). 2 Licensed Return Program Cartridge Lexmark 3580 and Lexmark 4580 models Item Color cartridge Black cartridge Photo cartridge Part number 2 3 31 Ordering paper and other high-quality images, use only Lexmark print cartridges. • For best results when printing photos or other supplies To order supplies or to www.lexmark.com. Item Part number USB cable 1021294 Lexmark N2050 (Internal wireless print server) For...
...). 2 Licensed Return Program Cartridge Lexmark 3580 and Lexmark 4580 models Item Color cartridge Black cartridge Photo cartridge Part number 2 3 31 Ordering paper and other high-quality images, use only Lexmark print cartridges. • For best results when printing photos or other supplies To order supplies or to www.lexmark.com. Item Part number USB cable 1021294 Lexmark N2050 (Internal wireless print server) For...
Getting Started
Page 49
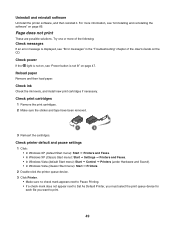
Try one or more information, see "Uninstalling and reinstalling the software" on page 66. Check printer default and pause settings 1 Click: • In Windows XP (default Start ..., see "Power button is not lit" on the CD. Reload paper Remove and then load paper. Check print cartridges 1 Remove the print cartridges. 2 Make sure the sticker and tape have been removed. 1 2 3 Reinsert the cartridges. Page does not print These are possible solutions. Check ink Check the ink levels, and install new print...
Try one or more information, see "Uninstalling and reinstalling the software" on page 66. Check printer default and pause settings 1 Click: • In Windows XP (default Start ..., see "Power button is not lit" on the CD. Reload paper Remove and then load paper. Check print cartridges 1 Remove the print cartridges. 2 Make sure the sticker and tape have been removed. 1 2 3 Reinsert the cartridges. Page does not print These are possible solutions. Check ink Check the ink levels, and install new print...
Getting Started
Page 72
...original packaging to your acceptance of the following paragraph does not apply to Lexmark for a single use the print cartridge terminates, and the used cartridge must be used instead. For Lexmark technical support, visit support.lexmark.com. If you don't have access to the Internet, you do... not allow disclaimer of operation in which it operates. A replacement cartridge sold without these terms is required. Changes are periodically made at www.lexmark.com. * Products within the XX80 Series (including but not limited to Models X1380, X1480, X1580,...
...original packaging to your acceptance of the following paragraph does not apply to Lexmark for a single use the print cartridge terminates, and the used cartridge must be used instead. For Lexmark technical support, visit support.lexmark.com. If you don't have access to the Internet, you do... not allow disclaimer of operation in which it operates. A replacement cartridge sold without these terms is required. Changes are periodically made at www.lexmark.com. * Products within the XX80 Series (including but not limited to Models X1380, X1480, X1580,...
User's Guide
Page 5
... Scanning multiple photos at one time using the computer 65 Scanning documents or images for e-mailing 66 Removing wavy patterns from scanned photos, magazines, or newspapers 66 Customizing scan settings using the computer 67 Faxing...68 Sending a fax using the software...68 Receiving a fax automatically...69 Maintaining the printer 70 Changing print cartridges...70...
... Scanning multiple photos at one time using the computer 65 Scanning documents or images for e-mailing 66 Removing wavy patterns from scanned photos, magazines, or newspapers 66 Customizing scan settings using the computer 67 Faxing...68 Sending a fax using the software...68 Receiving a fax automatically...69 Maintaining the printer 70 Changing print cartridges...70...
User's Guide
Page 6
Recycling Lexmark products...76 Troubleshooting...77 Setup troubleshooting...77 Incorrect language appears on the display 77 Power button is not lit ...78 Software does not install ...78 Page does not print ...79 Cannot print from digital camera using PictBridge 80 Print troubleshooting...81 Partial 4 x 6 in. (10 x 15 cm) photo prints when using a ... card cannot be inserted ...93 Nothing happens when memory card is inserted 93 Error messages...94 Alignment Error...94 Black Ink Low / Color Ink Low / Photo Ink Low 94 Cartridge Error (1102, 1203, 1204, or 120F 94 Clear Carrier Jam ...95 6
Recycling Lexmark products...76 Troubleshooting...77 Setup troubleshooting...77 Incorrect language appears on the display 77 Power button is not lit ...78 Software does not install ...78 Page does not print ...79 Cannot print from digital camera using PictBridge 80 Print troubleshooting...81 Partial 4 x 6 in. (10 x 15 cm) photo prints when using a ... card cannot be inserted ...93 Nothing happens when memory card is inserted 93 Error messages...94 Alignment Error...94 Black Ink Low / Color Ink Low / Photo Ink Low 94 Cartridge Error (1102, 1203, 1204, or 120F 94 Clear Carrier Jam ...95 6
User's Guide
Page 7
... Error 1104...96 Left Cartridge Error / Right Cartridge Error 97 Left Cartridge Incorrect / Right Cartridge Incorrect 97 Left Cartridge Missing / Right Cartridge Missing 97 Memory Failure...97 No images have been selected ...98 No photo/paper size selection has been made 98 No proof sheet information ...98 No valid photo image files detected...98 Only one photo enhancement may be...
... Error 1104...96 Left Cartridge Error / Right Cartridge Error 97 Left Cartridge Incorrect / Right Cartridge Incorrect 97 Left Cartridge Missing / Right Cartridge Missing 97 Memory Failure...97 No images have been selected ...98 No photo/paper size selection has been made 98 No proof sheet information ...98 No valid photo image files detected...98 Only one photo enhancement may be...
User's Guide
Page 12
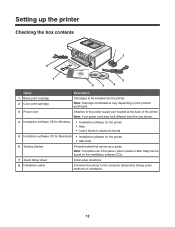
Note: Cartridge combinations vary depending on the installation software CDs. 7 Quick Setup sheet Initial setup directions 8 Installation cable Connects the printer to the computer temporarily during some methods of the printer. Note: Your power cord may look different from the one shown. 4 Installation software CD for Windows &#...Power cord Attaches to be installed into the printer. Setting up the printer Checking the box contents Name Description 1 Black print cartridge 2 Color print cartridge Cartridges to the power supply port located at the back of installation. 12
Note: Cartridge combinations vary depending on the installation software CDs. 7 Quick Setup sheet Initial setup directions 8 Installation cable Connects the printer to the computer temporarily during some methods of the printer. Note: Your power cord may look different from the one shown. 4 Installation software CD for Windows &#...Power cord Attaches to be installed into the printer. Setting up the printer Checking the box contents Name Description 1 Black print cartridge 2 Color print cartridge Cartridges to the power supply port located at the back of installation. 12
User's Guide
Page 17
Use the To 1 Scanner unit Access the print cartridges. 2 Print cartridge carrier Install, replace, or remove a print cartridge. 3 Lexmark N2050 (internal wireless print server) Connect the printer to a power source. Note: Only the 4500 Series comes with an internal wireless print server installed. 4 USB port Connect the printer to a computer using a USB cable. 5 Power supply with port...
Use the To 1 Scanner unit Access the print cartridges. 2 Print cartridge carrier Install, replace, or remove a print cartridge. 3 Lexmark N2050 (internal wireless print server) Connect the printer to a power source. Note: Only the 4500 Series comes with an internal wireless print server installed. 4 USB port Connect the printer to a computer using a USB cable. 5 Power supply with port...

