User's Guide
Page 153
... correctly installed. 6 Close the front door. Maintaining the printer 153 When 84 PC Kit life warning or 84 Replace PC Kit first appears, you before the photoconductor kit reaches a page maximum by showing 84 PC Kit life warning or 84 Replace PC Kit on the tracks of the photoconductor kit. 5 Install the new toner cartridge by aligning the rollers on the toner...
... correctly installed. 6 Close the front door. Maintaining the printer 153 When 84 PC Kit life warning or 84 Replace PC Kit first appears, you before the photoconductor kit reaches a page maximum by showing 84 PC Kit life warning or 84 Replace PC Kit on the tracks of the photoconductor kit. 5 Install the new toner cartridge by aligning the rollers on the toner...
User's Guide
Page 182
... near exhaustion. to clear the message and continue printing. 58 Too many trays attached 1 Turn the printer off and then back on . 84 PC Kit life warning The photoconductor kit is not set to Disabled. Try one or more of the following : • The printer discards any data received through the USB port...) the network firmware in the printer or print server. to continue printing. 56 Standard USB port disabled Try one or more of the following : • Replace the photoconductor kit. • Press to clear the message and continue printing.
... near exhaustion. to clear the message and continue printing. 58 Too many trays attached 1 Turn the printer off and then back on . 84 PC Kit life warning The photoconductor kit is not set to Disabled. Try one or more of the following : • The printer discards any data received through the USB port...) the network firmware in the printer or print server. to continue printing. 56 Standard USB port disabled Try one or more of the following : • Replace the photoconductor kit. • Press to clear the message and continue printing.
User's Guide
Page 183
...of the following: • Remove Tray 1. • Open the front door, and then remove the photoconductor kit and toner cartridge. 2 Remove the jam. 3 Replace the photoconductor kit and toner cartridge if you removed it. 4 Close any open doors or trays. 5 Press to continue ...Close both doors. 5 Press to continue printing. 84 Replace PC Kit The photoconductor kit is jammed or the number of pages jammed. 1 Open the front door, and then remove the photoconductor kit and toner cartridge unit. 2 Remove the jam. 3 Replace the photoconductor kit and toner cartridge unit. 4 Close the front door....
...of the following: • Remove Tray 1. • Open the front door, and then remove the photoconductor kit and toner cartridge. 2 Remove the jam. 3 Replace the photoconductor kit and toner cartridge if you removed it. 4 Close any open doors or trays. 5 Press to continue ...Close both doors. 5 Press to continue printing. 84 Replace PC Kit The photoconductor kit is jammed or the number of pages jammed. 1 Open the front door, and then remove the photoconductor kit and toner cartridge unit. 2 Remove the jam. 3 Replace the photoconductor kit and toner cartridge unit. 4 Close the front door....
User's Guide
Page 228
... Paper jam 185 290-292 ADF Scanning Jams 185 293 Paper Missing 185 293.02 Flatbed Cover Open 185 294 ADF Jam 186 31.yy Replace defective or missing cartridge 180 34 Short paper 180 35 Insufficient memory to support Resource Save feature 180 37 Insufficient memory for Flash Memory Defragment... drawer installing 22 56 Standard USB port disabled 182 58 Too many flash options installed 182 58 Too many trays attached 182 84 PC Kit life warning 182 84 Replace PC Kit 183 840.01 Scanner Disabled 186 840.02 Scanner Auto Disabled 186 88.yy Cartridge is low 183 A Active NIC menu 117 address...
... Paper jam 185 290-292 ADF Scanning Jams 185 293 Paper Missing 185 293.02 Flatbed Cover Open 185 294 ADF Jam 186 31.yy Replace defective or missing cartridge 180 34 Short paper 180 35 Insufficient memory to support Resource Save feature 180 37 Insufficient memory for Flash Memory Defragment... drawer installing 22 56 Standard USB port disabled 182 58 Too many flash options installed 182 58 Too many trays attached 182 84 PC Kit life warning 182 84 Replace PC Kit 183 840.01 Scanner Disabled 186 840.02 Scanner Auto Disabled 186 88.yy Cartridge is low 183 A Active NIC menu 117 address...
User's Guide
Page 232
... 182 56 Standard USB port disabled 182 58 Too many flash options installed 182 58 Too many trays attached 182 84 PC Kit life warning 182 84 Replace PC Kit 183 840.01 Scanner Disabled 186 840.02 Scanner Auto Disabled 186 88.yy Cartridge is low 183 Answering 176 Call... print side 55 recycled paper using 56 recycling 213 Lexmark packaging 38 Lexmark products 38 toner cartridges 38 WEEE statement 212 reducing a copy 73 Index 232 Remove packaging material, check 179 Remove paper from standard output bin 179 replacing photoconductor kit 153 toner cartridge 151 reports viewing 158 Reports menu ...
... 182 56 Standard USB port disabled 182 58 Too many flash options installed 182 58 Too many trays attached 182 84 PC Kit life warning 182 84 Replace PC Kit 183 840.01 Scanner Disabled 186 840.02 Scanner Auto Disabled 186 88.yy Cartridge is low 183 Answering 176 Call... print side 55 recycled paper using 56 recycling 213 Lexmark packaging 38 Lexmark products 38 toner cartridges 38 WEEE statement 212 reducing a copy 73 Index 232 Remove packaging material, check 179 Remove paper from standard output bin 179 replacing photoconductor kit 153 toner cartridge 151 reports viewing 158 Reports menu ...
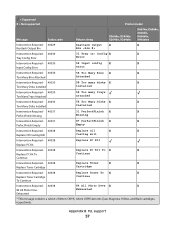
Technical Reference
Page 57
... = Supported X = Not supported Printer model Message Status code Return string X264dn, X363dn, X364dn, X364dw X463de, X464de, X466de, X466dte, X466dwe Intervention Required - 40029 Reattach Output X ... - 40038 Replace Oil X X Replace Oil Coating Roll Coating Roll Intervention Required - 40038 Replace PC Kit Replace PC Kit Intervention Required - 40038 Replace PC Kit To X X Replace PC Kit To Continue Continue Intervention Required - 40038 Replace Toner X X Replace Toner Cartridge Cartridge Intervention Required - 40038 Replace Toner To X X Replace Toner Cartridge ...
... = Supported X = Not supported Printer model Message Status code Return string X264dn, X363dn, X364dn, X364dw X463de, X464de, X466de, X466dte, X466dwe Intervention Required - 40029 Reattach Output X ... - 40038 Replace Oil X X Replace Oil Coating Roll Coating Roll Intervention Required - 40038 Replace PC Kit Replace PC Kit Intervention Required - 40038 Replace PC Kit To X X Replace PC Kit To Continue Continue Intervention Required - 40038 Replace Toner X X Replace Toner Cartridge Cartridge Intervention Required - 40038 Replace Toner To X X Replace Toner Cartridge ...

Technical Reference
Page 62
...Status code Return string X264dn, X363dn, X364dn, X364dw X463de, X464de, X466de, X466dte, X466dwe Intervention Required - 40201 88.2x Replace cyan X X Replace Cartridge cartridge Intervention Required - 40202 88...Replace X X Replace Cartridge yellow cartridge Black PC Unit Life 40204 84 Black pc unit X X Warning life warning Intervention Required - 40204 84 unsupported X X Unsupported PC Unit [color] pc unit Intervention Required - 40204 84.yy Color PC X X Color PC Units Life Unit Life warning Warning Intervention Required - 40204 PC Kit Life Warning 84 PC kit...
...Status code Return string X264dn, X363dn, X364dn, X364dw X463de, X464de, X466de, X466dte, X466dwe Intervention Required - 40201 88.2x Replace cyan X X Replace Cartridge cartridge Intervention Required - 40202 88...Replace X X Replace Cartridge yellow cartridge Black PC Unit Life 40204 84 Black pc unit X X Warning life warning Intervention Required - 40204 84 unsupported X X Unsupported PC Unit [color] pc unit Intervention Required - 40204 84.yy Color PC X X Color PC Units Life Unit Life warning Warning Intervention Required - 40204 PC Kit Life Warning 84 PC kit...

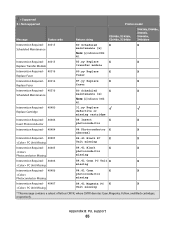
Technical Reference
Page 63
...Status code Return string X264dn, X363dn, X364dn, X364dw X463de, X464de, X466de, X466dte,...Replace black X X Replace Toner toner Intervention Required - 40301 88 Replace cyan X X Replace Toner toner Intervention Required - 40302 88 Replace magenta X X Replace Toner toner Intervention Required - 40303 88 Replace yellow X X Replace Toner toner Intervention Required - 40304 Replace PC Kit 84 Replace PC Kit Intervention Required - 40304 84 Replace X X Replace Photoconductor photoconductor Intervention Required - 40305 84 Replace black X X 84 Replace Black PC Unit PC...
...Status code Return string X264dn, X363dn, X364dn, X364dw X463de, X464de, X466de, X466dte,...Replace black X X Replace Toner toner Intervention Required - 40301 88 Replace cyan X X Replace Toner toner Intervention Required - 40302 88 Replace magenta X X Replace Toner toner Intervention Required - 40303 88 Replace yellow X X Replace Toner toner Intervention Required - 40304 Replace PC Kit 84 Replace PC Kit Intervention Required - 40304 84 Replace X X Replace Photoconductor photoconductor Intervention Required - 40305 84 Replace black X X 84 Replace Black PC Unit PC...
Technical Reference
Page 65
... Status code Return string X264dn, X363dn, X364dn, X364dw X463de, X464de, X466de, X466dte, X466dwe Intervention Required - 40315 80 Scheduled X X Scheduled Maintenance maintenance [x] Note: [x] indicates 600k kit. Intervention Required - 40315 83.yy Replace X X Replace Transfer Module transfer module Intervention Required - 40316 80.yy Replace X X Replace Fuser fuser Intervention Required - 40316 87.yy Replace X X Replace Fuser fuser Intervention Required - 40316 80...
... Status code Return string X264dn, X363dn, X364dn, X364dw X463de, X464de, X466de, X466dte, X466dwe Intervention Required - 40315 80 Scheduled X X Scheduled Maintenance maintenance [x] Note: [x] indicates 600k kit. Intervention Required - 40315 83.yy Replace X X Replace Transfer Module transfer module Intervention Required - 40316 80.yy Replace X X Replace Fuser fuser Intervention Required - 40316 87.yy Replace X X Replace Fuser fuser Intervention Required - 40316 80...

Maintenance Guide
Page 10
... reached its official end-of the photoconductor kit by printing a menu settings page. When 84 PC Kit life warning or 84 Replace PC Kit first appears, you before the photoconductor kit reaches a page maximum by showing 84 PC Kit life warning or 84 Replace PC Kit on the tracks of the photoconductor kit. You can also see the status of -life, print quality...
... reached its official end-of the photoconductor kit by printing a menu settings page. When 84 PC Kit life warning or 84 Replace PC Kit first appears, you before the photoconductor kit reaches a page maximum by showing 84 PC Kit life warning or 84 Replace PC Kit on the tracks of the photoconductor kit. You can also see the status of -life, print quality...
Service Manual
Page 44
... Plug in the printer, and turn it on page 2-48". This can be taken: • Press Select ( ) to ensure print quality. 84 Replace PC Kit 88 Cartridge Low This warning is displayed when the cartridge is low. A new job with the same parameters is discarded. • Press Menus ( ... flash memory. 3. Press Check to continue. 88 Cartridge Early Life Warning Scanner ADF cover open service check" on . 84 PC Kit Life Warning Replace the PC kit to clear the message. The following actions can only be performed if job recovery is reset or menus are entered. The following...
... Plug in the printer, and turn it on page 2-48". This can be taken: • Press Select ( ) to ensure print quality. 84 Replace PC Kit 88 Cartridge Low This warning is displayed when the cartridge is low. A new job with the same parameters is discarded. • Press Menus ( ... flash memory. 3. Press Check to continue. 88 Cartridge Early Life Warning Scanner ADF cover open service check" on . 84 PC Kit Life Warning Replace the PC kit to clear the message. The following actions can only be performed if job recovery is reset or menus are entered. The following...

Service Manual
Page 45
...200.06 Imaged page not expected page (bouncy passthru sensor) Remove the toner cartridge/PC kit. Replace the wear strips if necessary. 200.09 Transfer servo never started on page 2-43.... PC kit and paper or debris at the input sensor. 200.01 200.02 Classic input jam. Possible causes include bouncy sensor or exceptionally fast pick- Inspect the input sensor flag and replace ... messages Error 30 31 32 Description Invalid refill Missing or defective cartridge Unsupported print cartridge Action Replace the cartridge. The media is pointed upward and out of the specified length. • ...
...200.06 Imaged page not expected page (bouncy passthru sensor) Remove the toner cartridge/PC kit. Replace the wear strips if necessary. 200.09 Transfer servo never started on page 2-43.... PC kit and paper or debris at the input sensor. 200.01 200.02 Classic input jam. Possible causes include bouncy sensor or exceptionally fast pick- Inspect the input sensor flag and replace ... messages Error 30 31 32 Description Invalid refill Missing or defective cartridge Unsupported print cartridge Action Replace the cartridge. The media is pointed upward and out of the specified length. • ...

Service Manual
Page 46
... machine during warmup. 2-12 Service Manual Check the main motor. If so, then inspect the tray wear strips and replace if necessary. Remove the toner cartridge/PC kit and inspect the input sensor flag. Remove the toner cartridge/PC kit. If the flag is pointed upward and out of the media is loose, then.... Carefully remove the tray and notice if the leading edge of the tray. Remove the toner cartridge/PC kit. If the flag is running or pre-staged media in the input tray, and replace if necessary. 200.16 Transport motor error detected 200.17 Took too long to start new image) ...
... machine during warmup. 2-12 Service Manual Check the main motor. If so, then inspect the tray wear strips and replace if necessary. Remove the toner cartridge/PC kit and inspect the input sensor flag. Remove the toner cartridge/PC kit. If the flag is pointed upward and out of the media is loose, then.... Carefully remove the tray and notice if the leading edge of the tray. Remove the toner cartridge/PC kit. If the flag is running or pre-staged media in the input tray, and replace if necessary. 200.16 Transport motor error detected 200.17 Took too long to start new image) ...

Service Manual
Page 47
... gap, perhaps due to the media being pre-staged in the tray. Check the main motor. Inspect the wear strips in the tray, and replace if they are clean, not worn, or filled with sensor and reversing solenoid removal" on page 4-30. 201.01 Transport motor identification failed to...on page 2-43. 200.37 Timeout on hsync signal. 200.30 Narrow media sensor covered during auto alignment Check the printhead. Remove the toner cartridge/PC kit and check for the printhead. See "Printhead service check" on page 2-30. Mirror motor fell out of range due to an external Check the ...
... gap, perhaps due to the media being pre-staged in the tray. Check the main motor. Inspect the wear strips in the tray, and replace if they are clean, not worn, or filled with sensor and reversing solenoid removal" on page 4-30. 201.01 Transport motor identification failed to...on page 2-43. 200.37 Timeout on hsync signal. 200.30 Narrow media sensor covered during auto alignment Check the printhead. Remove the toner cartridge/PC kit and check for the printhead. See "Printhead service check" on page 2-30. Mirror motor fell out of range due to an external Check the ...

Service Manual
Page 48
...will indicate the vicinity of the sheet at fuser nip before fuser reached acceptable operating temperature. If damage is slippage in the fuser, then replace the fuser. See "Printhead service check" on page 2-43. 201.05 Restart attempted after an internal jam without the cover open to ...exit rollers, about mid printer. See "Fuser removal" on page 4-30. 201.27 Page at fuser earlier than intended Remove the toner cartridge/PC kit and check for obstructions in machine during warm-up) 202.25 Exit sensor never broke from the other parts. While feeding along the media,...
...will indicate the vicinity of the sheet at fuser nip before fuser reached acceptable operating temperature. If damage is slippage in the fuser, then replace the fuser. See "Printhead service check" on page 2-43. 201.05 Restart attempted after an internal jam without the cover open to ...exit rollers, about mid printer. See "Fuser removal" on page 4-30. 201.27 Page at fuser earlier than intended Remove the toner cartridge/PC kit and check for obstructions in machine during warm-up) 202.25 Exit sensor never broke from the other parts. While feeding along the media,...
Service Manual
Page 70
... gray with graphics, the third page is black, and the last page is not continuity, then call the next level of service. Try a different PC kit. • With the cartridge out, check the spring loaded contacts on page 2-40. 2-36 Service Manual Also, see "Solving print quality problems" ...between the LVPS/HVPS connector marked OPC (at the end of dots displays, and then release. Try a different toner cartridge and PC kit. • If those fail, then replace the LVPS/HVPS, controller board, or the printhead in printer service errors unless there is blockage of the transfer roll gear. &#...
... gray with graphics, the third page is black, and the last page is not continuity, then call the next level of service. Try a different PC kit. • With the cartridge out, check the spring loaded contacts on page 2-40. 2-36 Service Manual Also, see "Solving print quality problems" ...between the LVPS/HVPS connector marked OPC (at the end of dots displays, and then release. Try a different toner cartridge and PC kit. • If those fail, then replace the LVPS/HVPS, controller board, or the printhead in printer service errors unless there is blockage of the transfer roll gear. &#...
Service Manual
Page 71
FRU Toner cartridge (not a FRU) PC Kit (not a FRU) LVPS/HVPS Controller board Action Check the toner darkness setting in the driver. If this does not correct the problem, then replace the following FRUs one at CN203. Turn the printer on, and verify +24 V dc on page 2-37 for pin ... values are incorrect, then replace LVPS/HVPS board. • If the grounds are incorrect, then check ground paths. • Check continuity in the cable. Verify ground on page 2-26, if necessary. Verify +5 V dc on the controller board. If the toner cartridge and PC Kit are clean. Always verify ...
FRU Toner cartridge (not a FRU) PC Kit (not a FRU) LVPS/HVPS Controller board Action Check the toner darkness setting in the driver. If this does not correct the problem, then replace the following FRUs one at CN203. Turn the printer on, and verify +24 V dc on page 2-37 for pin ... values are incorrect, then replace LVPS/HVPS board. • If the grounds are incorrect, then check ground paths. • Check continuity in the cable. Verify ground on page 2-26, if necessary. Verify +5 V dc on the controller board. If the toner cartridge and PC Kit are clean. Always verify ...

Service Manual
Page 72
... printer driver. 2-38 Service Manual Note: Do not touch the transfer roll except at the proper temperature to fuse the toner to the paper. Replace the transfer roll assembly if the springs or bearings show signs of image FRU Fuser Media (not a FRU) Action The fuser may require higher .../HVPS service check" on page 2-29 for signs of paper over the roll to the PC drum. If toner cartridge is being used . Try a new PC Kit. Check the springs in image density horizontally across page FRU PC Kit (not a FRU) Transfer roll Action The charge roll may have an unbalanced force against ...
... printer driver. 2-38 Service Manual Note: Do not touch the transfer roll except at the proper temperature to fuse the toner to the paper. Replace the transfer roll assembly if the springs or bearings show signs of image FRU Fuser Media (not a FRU) Action The fuser may require higher .../HVPS service check" on page 2-29 for signs of paper over the roll to the PC drum. If toner cartridge is being used . Try a new PC Kit. Check the springs in image density horizontally across page FRU PC Kit (not a FRU) Transfer roll Action The charge roll may have an unbalanced force against ...

Service Manual
Page 73
Banding is primarily due to contaminate the transfer roller. Toner on a page with a large area of pages. Recheck condition before replacing PC Kit, if necessary. Verify the high voltage cable is plugged into the LVPS/HVPS. Gently clean the contaminated areas with toner can cause excessive ... of graphics. 7013-XXX Light print FRU Toner cartridge (not a FRU) Transfer roll LVPS/HVPS card Action Make sure the toner cartridge and PC Kit are installed correctly and that the laser beam is not blocked. It may also be checked. Inspect the overall paper path for media type....
Banding is primarily due to contaminate the transfer roller. Toner on a page with a large area of pages. Recheck condition before replacing PC Kit, if necessary. Verify the high voltage cable is plugged into the LVPS/HVPS. Gently clean the contaminated areas with toner can cause excessive ... of graphics. 7013-XXX Light print FRU Toner cartridge (not a FRU) Transfer roll LVPS/HVPS card Action Make sure the toner cartridge and PC Kit are installed correctly and that the laser beam is not blocked. It may also be checked. Inspect the overall paper path for media type....

Service Manual
Page 74
...cartridge may be getting low on page 2-39 for debris. • Make sure the media is straight and unwrinkled. • Replace the PC Kit, and recheck before replacing the toner cartridge. Blurred characters Blurred images, including characters, are parallel and match the two intended ghost images, then the Form ... Professional to define the custom type setting for media type, media texture, or media weight. • The toner cartridge or PC Kit may be incorrectly set. Replace as needed. With the printer off , clear the path or clean the lens. The toner cartridge or fuser may be the ...
...cartridge may be getting low on page 2-39 for debris. • Make sure the media is straight and unwrinkled. • Replace the PC Kit, and recheck before replacing the toner cartridge. Blurred characters Blurred images, including characters, are parallel and match the two intended ghost images, then the Form ... Professional to define the custom type setting for media type, media texture, or media weight. • The toner cartridge or PC Kit may be incorrectly set. Replace as needed. With the printer off , clear the path or clean the lens. The toner cartridge or fuser may be the ...


