User's Guide
Page 79
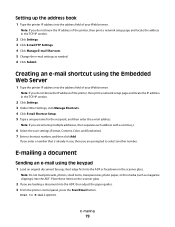
... in the TCP/IP section. 2 Click Settings. 3 Under Other Settings, click Manage Shortcuts. 4 Click E-mail Shortcut Setup. 5 Type a unique name for the recipient, and then enter the e-mail address. Note: If you do not...Shortcuts. 5 Change the e-mail settings as magazine clippings) into the address field of the printer, then print a network setup page and locate the IP address in use, then you are prompted to E-mail appears. Note: Do not load ... guides. 3 From the printer control panel, press the Scan/Email button. Note: If you do not know the IP address of your Web browser.
... in the TCP/IP section. 2 Click Settings. 3 Under Other Settings, click Manage Shortcuts. 4 Click E-mail Shortcut Setup. 5 Type a unique name for the recipient, and then enter the e-mail address. Note: If you do not...Shortcuts. 5 Change the e-mail settings as magazine clippings) into the address field of the printer, then print a network setup page and locate the IP address in use, then you are prompted to E-mail appears. Note: Do not load ... guides. 3 From the printer control panel, press the Scan/Email button. Note: If you do not know the IP address of your Web browser.
Quick Reference
Page 3
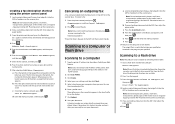
...) into the ADF. Note: If you do not know the IP address of the printer, then print a network setup page and locate the address in the TCP/IP section. 2 Click Scan Profile. 3 Click Create. 4 Select your document. d Press the arrow buttons until Enter Fax Number appears, and ...and then Cancel Job appears. 2 Press to the next space. Note: If you press the button, the number for that button appears. c Press the Scan/Email button. e Press , and then enter the shortcut number. No other printer functions are available. 2 Press 1 on selected printer models. 1 Insert a flash...
...) into the ADF. Note: If you do not know the IP address of the printer, then print a network setup page and locate the address in the TCP/IP section. 2 Click Scan Profile. 3 Click Create. 4 Select your document. d Press the arrow buttons until Enter Fax Number appears, and ...and then Cancel Job appears. 2 Press to the next space. Note: If you press the button, the number for that button appears. c Press the Scan/Email button. e Press , and then enter the shortcut number. No other printer functions are available. 2 Press 1 on selected printer models. 1 Insert a flash...
Embedded Web Server Administrator's Guide
Page 29
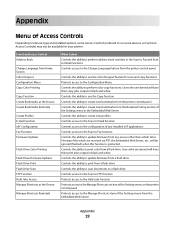
... the printer control panel Controls the ability to create new bookmarks from the Bookmark Setup section of the Settings menu in the Embedded Web Server Controls the ability to create new profiles Controls access to the Scan to Email function Controls access to the configuration of any installed eSF applications Controls access to...
... the printer control panel Controls the ability to create new bookmarks from the Bookmark Setup section of the Settings menu in the Embedded Web Server Controls the ability to create new profiles Controls access to the Scan to Email function Controls access to the configuration of any installed eSF applications Controls access to...
Service Manual
Page 36
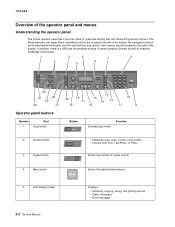
...display that enables printing of certain graphics formats as well as enabling PictBridge functionality. 1 3 5 7 8 2 6 4 Copy Scan/Email Content Darkness Text Text/Photo Photo Fax Duplex/2-Sided Copy Copies Scale Options Menu Back Select Stop/Cancel Start Fax Redial/Pause Resolution Options...button Enters the administrative menus 5 LCD display screen 2-2 Service Manual Displays: • Scanning, copying, faxing, and printing options • Status messages • Error messages The Mode selection, job setup, Back, and Menu buttons are located to the left of the display.
...display that enables printing of certain graphics formats as well as enabling PictBridge functionality. 1 3 5 7 8 2 6 4 Copy Scan/Email Content Darkness Text Text/Photo Photo Fax Duplex/2-Sided Copy Copies Scale Options Menu Back Select Stop/Cancel Start Fax Redial/Pause Resolution Options...button Enters the administrative menus 5 LCD display screen 2-2 Service Manual Displays: • Scanning, copying, faxing, and printing options • Status messages • Error messages The Mode selection, job setup, Back, and Menu buttons are located to the left of the display.


