User's Guide
Page 6
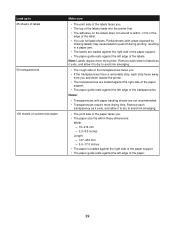
... poor print quality 68 Received fax is blank...68 Jams and misfeeds troubleshooting 68 Paper jam in the printer...68 Paper jam in the paper support...68 Paper or specialty media misfeeds...69 Printer does not feed paper, envelopes, or specialty media 69 Banner paper jams...69 Memory card troubleshooting...70...
... poor print quality 68 Received fax is blank...68 Jams and misfeeds troubleshooting 68 Paper jam in the printer...68 Paper jam in the paper support...68 Paper or specialty media misfeeds...69 Printer does not feed paper, envelopes, or specialty media 69 Banner paper jams...69 Memory card troubleshooting...70...
User's Guide
Page 10
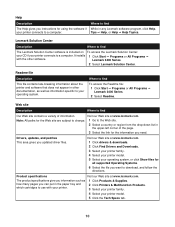
... Center. Visit our Web site at www.lexmark.com. 1 Click drivers & downloads. 2 Click Find Drivers and Downloads. 3 Select your printer family. 4 Select your printer model. 5 Select your operating system, or click Show files for all supported Operating Systems. 6 Select the file you instructions for the Web ...site are subject to change. 1 Go to a computer. Drivers, updates, and patches This area gives you need. Visit our Web site at www.lexmark.com. Note: All paths for ...
... Center. Visit our Web site at www.lexmark.com. 1 Click drivers & downloads. 2 Click Find Drivers and Downloads. 3 Select your printer family. 4 Select your printer model. 5 Select your operating system, or click Show files for all supported Operating Systems. 6 Select the file you instructions for the Web ...site are subject to change. 1 Go to a computer. Drivers, updates, and patches This area gives you need. Visit our Web site at www.lexmark.com. Note: All paths for ...
User's Guide
Page 11
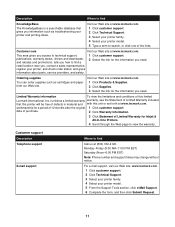
...and gives information about parts, service providers, and safety. Visit our Web site at www.lexmark.com. Customer support Description Telephone support E-mail support Where to find a 1 Click customer support. 2 Select the link for the information you , contact a sales representative, register your ... You can order supplies such as troubleshooting your printer, and check order status; For e-mail support, visit our Web site: www.lexmark.com. 1 Click customer support. 2 Click Technical Support. 3 Select your printer family. 4 Select your printer model. 5 Type a term to find...
...and gives information about parts, service providers, and safety. Visit our Web site at www.lexmark.com. Customer support Description Telephone support E-mail support Where to find a 1 Click customer support. 2 Select the link for the information you , contact a sales representative, register your ... You can order supplies such as troubleshooting your printer, and check order status; For e-mail support, visit our Web site: www.lexmark.com. 1 Click customer support. 2 Click Technical Support. 3 Select your printer family. 4 Select your printer model. 5 Type a term to find...
User's Guide
Page 14
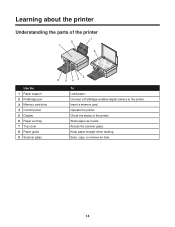
Check the status of the printer 1 8 7 9 Use the 1 Paper support 2 PictBridge port 3 Memory card slots 4 Control panel 5 Display 6 Paper exit tray 7 Top cover 8 Paper guide 9 Scanner glass 2 6 5 43 To Load paper. Access the scanner glass. Scan, copy, or remove an item. 14 Stack paper as it exits. Connect a PictBridge-enabled digital camera to the printer. Keep paper straight when feeding. Operate the printer. Insert a memory card. Learning about the printer Understanding the parts of the printer.
Check the status of the printer 1 8 7 9 Use the 1 Paper support 2 PictBridge port 3 Memory card slots 4 Control panel 5 Display 6 Paper exit tray 7 Top cover 8 Paper guide 9 Scanner glass 2 6 5 43 To Load paper. Access the scanner glass. Scan, copy, or remove an item. 14 Stack paper as it exits. Connect a PictBridge-enabled digital camera to the printer. Keep paper straight when feeding. Operate the printer. Insert a memory card. Learning about the printer Understanding the parts of the printer.
User's Guide
Page 15
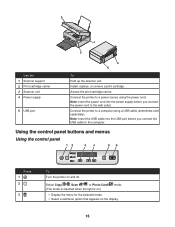
... power cord. Using the control panel buttons and menus Using the control panel Press 1 2 3 To Turn the printer on the display. 15 3 1 2 Use the 1 Scanner support 2 Print cartridge carrier 3 Scanner unit 4 Power supply 5 USB port 4 5 To Hold up the scanner unit. Connect the printer to the computer. Select Copy , Scan , or...
... power cord. Using the control panel buttons and menus Using the control panel Press 1 2 3 To Turn the printer on the display. 15 3 1 2 Use the 1 Scanner support 2 Print cartridge carrier 3 Scanner unit 4 Power supply 5 USB port 4 5 To Hold up the scanner unit. Connect the printer to the computer. Select Copy , Scan , or...
User's Guide
Page 16
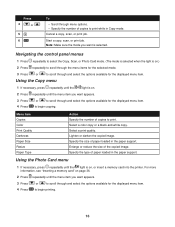
...scan, or print job. to begin copying. Specify the size of the copied image. Enlarge or reduce the size of paper loaded in the paper support. For more information, see "Inserting a memory card" on .) 2 Press repeatedly to scroll through the menu items for the selected mode. 3... Press or to print. Press 4 or 5 6 To • Scroll through menu options. • Specify the number of paper loaded in the paper support. Lighten or darken the copied image. Specify the type of copies to scroll through and select the options available for the displayed menu item. Select...
...scan, or print job. to begin copying. Specify the size of the copied image. Enlarge or reduce the size of paper loaded in the paper support. For more information, see "Inserting a memory card" on .) 2 Press repeatedly to scroll through the menu items for the selected mode. 3... Press or to print. Press 4 or 5 6 To • Scroll through menu options. • Specify the number of paper loaded in the paper support. Lighten or darken the copied image. Specify the type of copies to scroll through and select the options available for the displayed menu item. Select...
User's Guide
Page 27
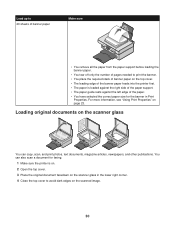
... original documents Loading paper 1 Make sure: • You use with inkjet printers. • The paper is loaded against the right side of the paper support. • The paper guide rests against the left edge of the paper. 100 sheets of heavyweight matte paper 25 sheets of photo paper 25 sheets... are using specialty paper, you follow the instructions that came with the paper.) • The paper is loaded against the right side of the paper support. • The paper guide rests against the left edge of the paper. Note: To avoid paper jams, make sure the paper does not buckle ...
... original documents Loading paper 1 Make sure: • You use with inkjet printers. • The paper is loaded against the right side of the paper support. • The paper guide rests against the left edge of the paper. 100 sheets of heavyweight matte paper 25 sheets of photo paper 25 sheets... are using specialty paper, you follow the instructions that came with the paper.) • The paper is loaded against the right side of the paper support. • The paper guide rests against the left edge of the paper. Note: To avoid paper jams, make sure the paper does not buckle ...

User's Guide
Page 28
...that have exposed flap adhesive. - Do not load envelopes with inkjet printers. • The envelopes are loaded against the right side of the paper support. • The paper guide rests against the left edge of the envelopes. Remove each photo card as it exits, and allow it to dry ...transfers faces you . • The stamp location is in the upper left corner. • The envelopes are loaded against the right side of the paper support. • The paper guide rests against the left edge of the transfers. Do not use with holes, perforations, cutouts, or deep embossing. - Remove ...
...that have exposed flap adhesive. - Do not load envelopes with inkjet printers. • The envelopes are loaded against the right side of the paper support. • The paper guide rests against the left edge of the envelopes. Remove each photo card as it exits, and allow it to dry ...transfers faces you . • The stamp location is in the upper left corner. • The envelopes are loaded against the right side of the paper support. • The paper guide rests against the left edge of the transfers. Do not use with holes, perforations, cutouts, or deep embossing. - Remove ...
User's Guide
Page 29
...does not extend to peel off during printing, resulting in a paper jam. • The labels are loaded against the right side of the paper support. • The paper guide rests against the left edge of the labels. Notes: • Transparencies with areas exposed by missing labels) may cause...: - 76-216 mm - 3.0-8.5 inches Length: - 127-432 mm - 5.0-17.0 inches • The paper is loaded against the right side of the paper support. • The paper guide rests against the left edge of the paper. 29 Partial sheets (with paper backing sheets are not recommended. • Transparencies require...
...does not extend to peel off during printing, resulting in a paper jam. • The labels are loaded against the right side of the paper support. • The paper guide rests against the left edge of the labels. Notes: • Transparencies with areas exposed by missing labels) may cause...: - 76-216 mm - 3.0-8.5 inches Length: - 127-432 mm - 5.0-17.0 inches • The paper is loaded against the right side of the paper support. • The paper guide rests against the left edge of the paper. 29 Partial sheets (with paper backing sheets are not recommended. • Transparencies require...
User's Guide
Page 30
... edges on the scanned image. 30 Load up to 20 sheets of banner paper Make sure • You remove all the paper from the paper support before loading the banner paper. • You tear off only the number of pages needed to print the banner. • You place the required stack.... • The leading edge of the banner paper feeds into the printer first. • The paper is loaded against the right side of the paper support. • The paper guide rests against the left edge of the paper. • You have selected the correct paper size for faxing. 1 Make sure the...
... edges on the scanned image. 30 Load up to 20 sheets of banner paper Make sure • You remove all the paper from the paper support before loading the banner paper. • You tear off only the number of pages needed to print the banner. • You place the required stack.... • The leading edge of the banner paper feeds into the printer first. • The paper is loaded against the right side of the paper support. • The paper guide rests against the left edge of the paper. • You have selected the correct paper size for faxing. 1 Make sure the...

User's Guide
Page 39
... from saved photos" section, select a paper size for each , while the memory card is still in the right panel, select the folder where your camera supports DPOF, you insert the memory card into the printer. For best results, use photo or glossy paper with the paper.) 2 Insert a memory card. For more...
... from saved photos" section, select a paper size for each , while the memory card is still in the right panel, select the folder where your camera supports DPOF, you insert the memory card into the printer. For best results, use photo or glossy paper with the paper.) 2 Insert a memory card. For more...
User's Guide
Page 53
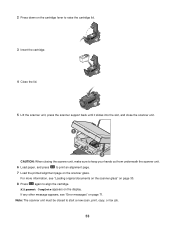
.... 53 2 Press down on the cartridge lever to raise the cartridge lid. 3 Insert the cartridge. 4 Close the lid. 5 Lift the scanner unit, press the scanner support back until it slides into the slot, and close the scanner unit. 1 3 2 CAUTION: When closing the scanner unit, make sure to keep your hands out...
.... 53 2 Press down on the cartridge lever to raise the cartridge lid. 3 Insert the cartridge. 4 Close the lid. 5 Lift the scanner unit, press the scanner support back until it slides into the slot, and close the scanner unit. 1 3 2 CAUTION: When closing the scanner unit, make sure to keep your hands out...
User's Guide
Page 58
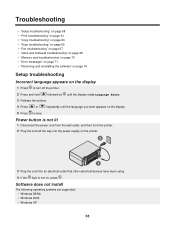
... electrical devices have been using. 4 If the light is not on the display 1 Press to save. Software does not install The following operating systems are supported: • Windows 98/Me • Windows 2000 • Windows XP 58 Troubleshooting • "Setup troubleshooting" on page 58 • "Print troubleshooting" on page 61 •...
... electrical devices have been using. 4 If the light is not on the display 1 Press to save. Software does not install The following operating systems are supported: • Windows 98/Me • Windows 2000 • Windows XP 58 Troubleshooting • "Setup troubleshooting" on page 58 • "Print troubleshooting" on page 61 •...
User's Guide
Page 67
... until the other device is being used by another DPI setting. 6 Click Scan Now. Cannot scan to an application 1 From the Selected Application Does Not Support Multiple Pages dialog, click Cancel. 2 From the All-In-One Center Scanning & Copying tab, choose a different application from magazines or newspapers" on the scanner glass...
... until the other device is being used by another DPI setting. 6 Click Scan Now. Cannot scan to an application 1 From the Selected Application Does Not Support Multiple Pages dialog, click Cancel. 2 From the All-In-One Center Scanning & Copying tab, choose a different application from magazines or newspapers" on the scanner glass...
User's Guide
Page 68
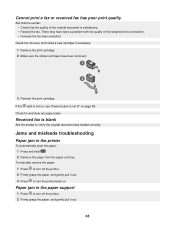
... was loaded correctly. Check for and clear any paper jams. Received fax is not lit" on . Jams and misfeeds troubleshooting Paper jam in the paper support 1 Press to turn off the printer. 2 Firmly grasp the paper, and gently pull it out. 3 Press to turn the printer back on page 58. To...
... was loaded correctly. Check for and clear any paper jams. Received fax is not lit" on . Jams and misfeeds troubleshooting Paper jam in the paper support 1 Press to turn off the printer. 2 Firmly grasp the paper, and gently pull it out. 3 Press to turn the printer back on page 58. To...
User's Guide
Page 69
... appear next to turn the printer back on page 27 for information about: • Maximum loading amounts per paper type • Specific loading instructions for supported paper and specialty media Load paper with the print side facing you. Make sure the printer is set as it exits, and let it does...
... appear next to turn the printer back on page 27 for information about: • Maximum loading amounts per paper type • Specific loading instructions for supported paper and specialty media Load paper with the print side facing you. Make sure the printer is set as it exits, and let it does...
User's Guide
Page 73
... have removed the memory card from the printer, or turned off the printer, before scanning the photo proof sheet. 73 No photo files found No supported images have not selected any obvious damage. 2 Firmly plug the rectangular end of the USB cable into the USB port on the back of the...
... have removed the memory card from the printer, or turned off the printer, before scanning the photo proof sheet. 73 No photo files found No supported images have not selected any obvious damage. 2 Firmly plug the rectangular end of the USB cable into the USB port on the back of the...

User's Guide
Page 77
... Lexington, KY 40550 (859) 232-3000 Industry Canada compliance statement This Class B digital apparatus meets all requirements of EN 60950. A declaration of Manufacturing and Technical Support, Lexmark International, Inc., S.A., Boigny, France. Avis de conformité aux normes de l'industrie du Canada Cet appareil numérique de la classe B respecte toutes les...
... Lexington, KY 40550 (859) 232-3000 Industry Canada compliance statement This Class B digital apparatus meets all requirements of EN 60950. A declaration of Manufacturing and Technical Support, Lexmark International, Inc., S.A., Boigny, France. Avis de conformité aux normes de l'industrie du Canada Cet appareil numérique de la classe B respecte toutes les...
User's Guide
Page 80
... or attachments -Accidents or misuse -Unsuitable physical or operating environment -Maintenance by a Lexmark warranty, technical support may be available for exchange is provided for loss of Lexmark specifications -Supplies (such as shown on the World Wide Web at www.lexmark.com/support. The warranty period ends 12 months later. To obtain warranty service you present...
... or attachments -Accidents or misuse -Unsuitable physical or operating environment -Maintenance by a Lexmark warranty, technical support may be available for exchange is provided for loss of Lexmark specifications -Supplies (such as shown on the World Wide Web at www.lexmark.com/support. The warranty period ends 12 months later. To obtain warranty service you present...
User's Guide
Page 83
...software 74 invalid photo/paper size selection 73 iron-on transfers, loading 28 J jams and misfeeds troubleshooting banner paper jams 69 paper jam in paper support 68 paper jam in printer 68 paper or specialty media misfeeds 69 printer does not feed paper, envelopes, or specialty media 69 L labels, ...or specialty media misfeeds 69 Paper Setup tab changing orientation 24 changing paper size 24 paper sizes, specifying 24 paper skewed error 74 paper support 14 paper type, changing 31 paper, loading 27 partial document or photo copies 65 partial document or photo prints 64 partial document or photo...
...software 74 invalid photo/paper size selection 73 iron-on transfers, loading 28 J jams and misfeeds troubleshooting banner paper jams 69 paper jam in paper support 68 paper jam in printer 68 paper or specialty media misfeeds 69 printer does not feed paper, envelopes, or specialty media 69 L labels, ...or specialty media misfeeds 69 Paper Setup tab changing orientation 24 changing paper size 24 paper sizes, specifying 24 paper skewed error 74 paper support 14 paper type, changing 31 paper, loading 27 partial document or photo copies 65 partial document or photo prints 64 partial document or photo...

