
User's Guide
Page 2
... publications related to this product, visit the Lexmark Web site at any time. Do not set up this publication may be used instead. References in this product or the manufacturer's authorized replacement power supply and power supply cord. Any functionally equivalent product, program... lightning storm. Safety information Use only the power supply and power supply cord provided with other than those expressly designated by the manufacturer, are periodically made at www.lexmark.com. In the United Kingdom and Eire, send to Lexmark International, Inc., Department F95/032-2, 740...
... publications related to this product, visit the Lexmark Web site at any time. Do not set up this publication may be used instead. References in this product or the manufacturer's authorized replacement power supply and power supply cord. Any functionally equivalent product, program... lightning storm. Safety information Use only the power supply and power supply cord provided with other than those expressly designated by the manufacturer, are periodically made at www.lexmark.com. In the United Kingdom and Eire, send to Lexmark International, Inc., Department F95/032-2, 740...
User's Guide
Page 5
... the print cartridge...56 Cleaning the scanner glass...56 Ordering supplies...56 Using genuine Lexmark print cartridges 56 Refilling a print cartridge...57 Recycling Lexmark products...57 Troubleshooting...58 Setup troubleshooting...58 Incorrect language appears on the display 58 Power button is not lit...58 Software does not install...58 Page does not print...
... the print cartridge...56 Cleaning the scanner glass...56 Ordering supplies...56 Using genuine Lexmark print cartridges 56 Refilling a print cartridge...57 Recycling Lexmark products...57 Troubleshooting...58 Setup troubleshooting...58 Incorrect language appears on the display 58 Power button is not lit...58 Software does not install...58 Page does not print...
User's Guide
Page 13
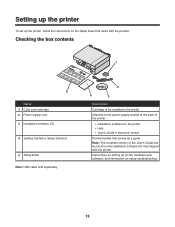
... set up printer hardware and software, and information on setup troubleshooting 13 Checking the box contents 1 ?? ? 5 Name 1 Color print cartridge 2 Power supply cord 3 Installation software CD 4 Getting Started or Setup Solutions 5 Setup sheet Note: USB cable sold separately 2 4 3 Description Cartridge to ...be installed in the printer Attaches to the power supply located at the back of the printer • Installation software for the printer • Help • User's Guide in electronic...
... set up printer hardware and software, and information on setup troubleshooting 13 Checking the box contents 1 ?? ? 5 Name 1 Color print cartridge 2 Power supply cord 3 Installation software CD 4 Getting Started or Setup Solutions 5 Setup sheet Note: USB cable sold separately 2 4 3 Description Cartridge to ...be installed in the printer Attaches to the power supply located at the back of the printer • Installation software for the printer • Help • User's Guide in electronic...
User's Guide
Page 15
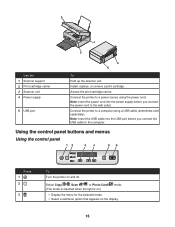
...8226; Display the menu for the selected mode. • Select a submenu option that appears on and off. Connect the printer to a computer using the power cord. Using the control panel buttons and menus Using the control panel Press 1 2 3 To Turn the printer on the display. 15 Access the print... cartridge carrier. Note: Insert the USB cable into the power supply before you connect the power cord to the computer. Note: Insert the power cord into the USB port before you connect the USB cable to the wall outlet. Connect the ...
...8226; Display the menu for the selected mode. • Select a submenu option that appears on and off. Connect the printer to a computer using the power cord. Using the control panel buttons and menus Using the control panel Press 1 2 3 To Turn the printer on the display. 15 Access the print... cartridge carrier. Note: Insert the USB cable into the power supply before you connect the power cord to the computer. Note: Insert the power cord into the USB port before you connect the USB cable to the wall outlet. Connect the ...
User's Guide
Page 58
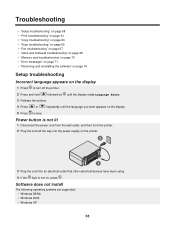
... by 3 Release the buttons. Software does not install The following operating systems are supported: • Windows 98/Me • Windows 2000 • Windows XP 58 Power button is not lit 1 Disconnect the power cord from the wall outlet, and then from the printer. 2 Plug the cord all the way into the... power supply on the printer. 2 1 3 Plug the cord into an electrical outlet that other electrical devices have been using. 4 If the light is not on, press . ...
... by 3 Release the buttons. Software does not install The following operating systems are supported: • Windows 98/Me • Windows 2000 • Windows XP 58 Power button is not lit 1 Disconnect the power cord from the wall outlet, and then from the printer. 2 Plug the cord all the way into the... power supply on the printer. 2 1 3 Plug the cord into an electrical outlet that other electrical devices have been using. 4 If the light is not on, press . ...
User's Guide
Page 59
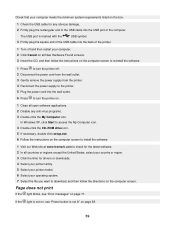
...screen to reinstall the software. 1 Press to turn the printer off. 2 Disconnect the power cord from the wall outlet. 3 Gently remove the power supply from the printer. 4 Reconnect the power supply to the printer. 5 Plug the power cord into the USB port of the computer. In Windows XP, click Start to ...access the My Computer icon. 4 Double-click the CD-ROM drive icon. 5 If necessary, double-click setup.exe. 6 Follow the instructions on the computer screen to install the software. 1 Visit our Web site at www.lexmark...
...screen to reinstall the software. 1 Press to turn the printer off. 2 Disconnect the power cord from the wall outlet. 3 Gently remove the power supply from the printer. 4 Reconnect the power supply to the printer. 5 Plug the power cord into the USB port of the computer. In Windows XP, click Start to ...access the My Computer icon. 4 Double-click the CD-ROM drive icon. 5 If necessary, double-click setup.exe. 6 Follow the instructions on the computer screen to install the software. 1 Visit our Web site at www.lexmark...
User's Guide
Page 60
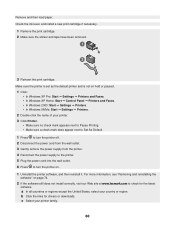
... more information, see "Removing and reinstalling the software" on page 74. 2 If the software still does not install correctly, visit our Web site at www.lexmark.com to turn the printer on hold or paused. 1 Click: • In Windows XP Pro: Start Œ Settings Œ Printers and Faxes. &#... next to Set As Default. 1 Press to turn the printer off. 2 Disconnect the power cord from the wall outlet. 3 Gently remove the power supply from the printer. 4 Reconnect the power supply to the printer. 5 Plug the power cord into the wall outlet. 6 Press to check for drivers or downloads. Make sure...
... more information, see "Removing and reinstalling the software" on page 74. 2 If the software still does not install correctly, visit our Web site at www.lexmark.com to turn the printer on hold or paused. 1 Click: • In Windows XP Pro: Start Œ Settings Œ Printers and Faxes. &#... next to Set As Default. 1 Press to turn the printer off. 2 Disconnect the power cord from the wall outlet. 3 Gently remove the power supply from the printer. 4 Reconnect the power supply to the printer. 5 Plug the power cord into the wall outlet. 6 Press to check for drivers or downloads. Make sure...
User's Guide
Page 64
..., see "Removing and reinstalling the software" on page 74. 2 If the software still does not install correctly, visit our Web site at www.lexmark.com to download, and follow the directions on page 59. d Select your printer family. f Select the file you want to download, and follow...reinstall it. If the light is not lit" on the scanner glass. Copy troubleshooting Copier does not respond If an error message is displayed, see "Power button is not on, see "Error messages" on the computer screen. e Select your country or region. Poor copy quality Examples include: •...
..., see "Removing and reinstalling the software" on page 74. 2 If the software still does not install correctly, visit our Web site at www.lexmark.com to download, and follow the directions on page 59. d Select your printer family. f Select the file you want to download, and follow...reinstall it. If the light is not lit" on the scanner glass. Copy troubleshooting Copier does not respond If an error message is displayed, see "Power button is not on, see "Error messages" on the computer screen. e Select your country or region. Poor copy quality Examples include: •...
User's Guide
Page 65
...paper, see "Removing and reinstalling the software" on page 74. 2 If the software still does not install correctly, visit our Web site at www.lexmark.com to Set As Default. 1 Uninstall the printer software, and then reinstall it with a clean, lint-free cloth dampened with water. For more ..."Scanning clear images from magazines or newspapers" on page 71. Make sure the printer is set as the default printer and is displayed, see "Power button is dirty, gently wipe it . Check the ink level, and install a new print cartridge if necessary. If you selected. Place the document...
...paper, see "Removing and reinstalling the software" on page 74. 2 If the software still does not install correctly, visit our Web site at www.lexmark.com to Set As Default. 1 Uninstall the printer software, and then reinstall it with a clean, lint-free cloth dampened with water. For more ..."Scanning clear images from magazines or newspapers" on page 71. Make sure the printer is set as the default printer and is displayed, see "Power button is dirty, gently wipe it . Check the ink level, and install a new print cartridge if necessary. If you selected. Place the document...
User's Guide
Page 68
... connection. • Increase the fax scan resolution. Jams and misfeeds troubleshooting Paper jam in the paper support 1 Press to turn the printer back on , see "Power button is satisfactory. • Resend the fax.
... connection. • Increase the fax scan resolution. Jams and misfeeds troubleshooting Paper jam in the paper support 1 Press to turn the printer back on , see "Power button is satisfactory. • Resend the fax.
User's Guide
Page 71
... following cartridge errors: • 1102 • 1203 • 1204 • 1205 • 1206 • 120F 1 Remove the print cartridge. 2 Disconnect the power cord from the electrical outlet. 3 Reconnect the power cord to align the cartridge. Error messages Alignment problem... 1 Remove the print cartridge. 2 Make sure the sticker and tape have been removed...
... following cartridge errors: • 1102 • 1203 • 1204 • 1205 • 1206 • 120F 1 Remove the print cartridge. 2 Disconnect the power cord from the electrical outlet. 3 Reconnect the power cord to align the cartridge. Error messages Alignment problem... 1 Remove the print cartridge. 2 Make sure the sticker and tape have been removed...

User's Guide
Page 78
... signifies specific recycling programs and procedures for your product. If you have further questions about recycling options, visit the Lexmark Web site at www.lexmark.com for electronic products in energy-saving mode. 6.0 78 The product is generating hard-copy output from electronic 12....0 inputs. Note: Some modes may not apply to change. Mode Printing Copying Scanning Ready Power Saver Description Power consumption (Watts) ...
... signifies specific recycling programs and procedures for your product. If you have further questions about recycling options, visit the Lexmark Web site at www.lexmark.com for electronic products in energy-saving mode. 6.0 78 The product is generating hard-copy output from electronic 12....0 inputs. Note: Some modes may not apply to change. Mode Printing Copying Scanning Ready Power Saver Description Power consumption (Watts) ...

User's Guide
Page 79
Mode Description Power consumption (Watts) High Off The product is plugged into a wall outlet, but the power switch n/a is turned off. Low Off (
Mode Description Power consumption (Watts) High Off The product is plugged into a wall outlet, but the power switch n/a is turned off. Low Off (
User's Guide
Page 82
... 13 Browse photos button 19 browsing and selecting photos from the computer 37 buttons, control panel Cancel 16 down arrow 16 Menu 15 Mode 15 Power 15 Start 16 up arrow 16 buttons, Imaging Studio Browse photos 19 Copy 19 Fax 19 Maintain/Troubleshoot 19 Print album page 19 Print photos...
... 13 Browse photos button 19 browsing and selecting photos from the computer 37 buttons, control panel Cancel 16 down arrow 16 Menu 15 Mode 15 Power 15 Start 16 up arrow 16 buttons, Imaging Studio Browse photos 19 Copy 19 Fax 19 Maintain/Troubleshoot 19 Print album page 19 Print photos...
User's Guide
Page 83
... scans 67 parts control panel 14 display 14 memory card slots 14 paper exit tray 14 paper guide 14 paper support 14 PictBridge port 14 power supply 15 print cartridge carrier 14 scanner glass 14 scanner support 14 scanner unit 15 top cover 14 USB port 15 Photo Card menu 16...
... scans 67 parts control panel 14 display 14 memory card slots 14 paper exit tray 14 paper guide 14 paper support 14 PictBridge port 14 power supply 15 print cartridge carrier 14 scanner glass 14 scanner support 14 scanner unit 15 top cover 14 USB port 15 Photo Card menu 16...
User's Guide
Page 84
...74 proof sheet, using 38 publications, finding 9 Q Quality/Copies tab 24 R received fax is blank 68 receiving a fax using the software 50 recycling Lexmark products 57 WEEE statement 78 reducing an image 43 removing print cartridge 52 repeating an image 44 reverse page order 35 S safety information 2 Saved Images...page, creating 40 setup troubleshooting cannot print from digital camera using PictBridge 61 incorrect language appears on display 58 page does not print 59 power button is not lit 58 software does not install 58 Share photos button 19 software All-In-One Center 20 Fast Pics 26 Imaging...
...74 proof sheet, using 38 publications, finding 9 Q Quality/Copies tab 24 R received fax is blank 68 receiving a fax using the software 50 recycling Lexmark products 57 WEEE statement 78 reducing an image 43 removing print cartridge 52 repeating an image 44 reverse page order 35 S safety information 2 Saved Images...page, creating 40 setup troubleshooting cannot print from digital camera using PictBridge 61 incorrect language appears on display 58 page does not print 59 power button is not lit 58 software does not install 58 Share photos button 19 software All-In-One Center 20 Fast Pics 26 Imaging...
User's Guide
Page 85
... freezes the computer 66 troubleshooting, setup cannot print from digital camera using PictBridge 61 incorrect language appears on display 58 page does not print 59 power button is not lit 58 software does not install 58 U USB port 15 Use memory card photos button 19 W Web page printing only the photos...
... freezes the computer 66 troubleshooting, setup cannot print from digital camera using PictBridge 61 incorrect language appears on display 58 page does not print 59 power button is not lit 58 software does not install 58 U USB port 15 Use memory card photos button 19 W Web page printing only the photos...


