
User's Guide
Page 3
... Using the Macintosh printer software...21 Loading paper and original documents 23 Loading paper...23 Loading various paper types...23 Loading original documents on the scanner glass 26 Printing 28 Printing basic documents...28 Printing a document...28 Printing Web pages...28 Printing multiple copies of a document...29 Collating printed copies...29...
... Using the Macintosh printer software...21 Loading paper and original documents 23 Loading paper...23 Loading various paper types...23 Loading original documents on the scanner glass 26 Printing 28 Printing basic documents...28 Printing a document...28 Printing Web pages...28 Printing multiple copies of a document...29 Collating printed copies...29...
User's Guide
Page 4
......44 Installing print cartridges...44 Removing used print cartridges...45 Refilling print cartridges...46 Using genuine Lexmark print cartridges...46 Wiping the print cartridge nozzles and contacts ...46 Preserving the print cartridges ...47 Cleaning the scanner glass...47 Cleaning the exterior of the printer...48 Ordering supplies...48 Ordering print cartridges ...48...
......44 Installing print cartridges...44 Removing used print cartridges...45 Refilling print cartridges...46 Using genuine Lexmark print cartridges...46 Wiping the print cartridge nozzles and contacts ...46 Preserving the print cartridges ...47 Cleaning the scanner glass...47 Cleaning the exterior of the printer...48 Ordering supplies...48 Ordering print cartridges ...48...
User's Guide
Page 14
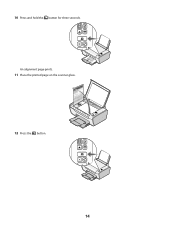
An alignment page prints. 11 Place the printed page on the scanner glass. 12 Press the button. 14 10 Press and hold the button for three seconds.
An alignment page prints. 11 Place the printed page on the scanner glass. 12 Press the button. 14 10 Press and hold the button for three seconds.
User's Guide
Page 15
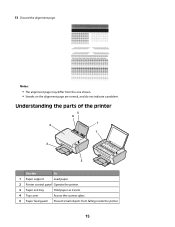
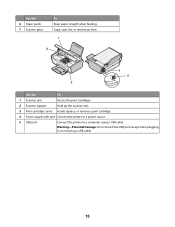
Understanding the parts of the printer 5 6 1 4 7 3 2 Use the To 1 Paper support Load paper. 2 Printer control panel Operate the printer. 3 Paper exit tray Hold paper as it exits. 4 Top cover Access the scanner glass. 5 Paper feed guard Prevent small objects from the one shown. • Streaks on the alignment page are normal, and do not indicate a problem. Notes: • The alignment page may differ from falling inside the printer. 15 13 Discard the alignment page.
Understanding the parts of the printer 5 6 1 4 7 3 2 Use the To 1 Paper support Load paper. 2 Printer control panel Operate the printer. 3 Paper exit tray Hold paper as it exits. 4 Top cover Access the scanner glass. 5 Paper feed guard Prevent small objects from the one shown. • Streaks on the alignment page are normal, and do not indicate a problem. Notes: • The alignment page may differ from falling inside the printer. 15 13 Discard the alignment page.
User's Guide
Page 16
Use the 6 Paper guide 7 Scanner glass To Keep paper straight when feeding. Copy, scan, fax, or remove an item. 1 2 4 5 3 Use the To 1 Scanner unit Access the print cartridges. 2 Scanner support Hold up the scanner unit. 3 Print cartridge carrier Install, replace, or remove a print cartridge. 4 Power supply with port Connect the printer to a power source. 5 USB port Connect the printer to a computer using a USB cable. Warning-Potential Damage: Do not touch the USB port except when plugging in or removing a USB cable. 16
Use the 6 Paper guide 7 Scanner glass To Keep paper straight when feeding. Copy, scan, fax, or remove an item. 1 2 4 5 3 Use the To 1 Scanner unit Access the print cartridges. 2 Scanner support Hold up the scanner unit. 3 Print cartridge carrier Install, replace, or remove a print cartridge. 4 Power supply with port Connect the printer to a power source. 5 USB port Connect the printer to a computer using a USB cable. Warning-Potential Damage: Do not touch the USB port except when plugging in or removing a USB cable. 16
User's Guide
Page 26
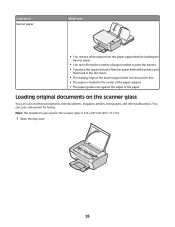
Note: The maximum scan area for faxing. Loading original documents on the scanner glass You can scan a document for the scanner glass is loaded in .). 1 Open the top cover. 26 You can scan and then print photos, text documents, magazine articles, newspapers, and other publications. Load ...
Note: The maximum scan area for faxing. Loading original documents on the scanner glass You can scan a document for the scanner glass is loaded in .). 1 Open the top cover. 26 You can scan and then print photos, text documents, magazine articles, newspapers, and other publications. Load ...

User's Guide
Page 27
Note: Photos should be loaded as shown. 3 Close the top cover to avoid dark edges on the scanner glass in the lower right corner. 2 Place the original document or item facedown on the scanned image. 27
Note: Photos should be loaded as shown. 3 Close the top cover to avoid dark edges on the scanner glass in the lower right corner. 2 Place the original document or item facedown on the scanned image. 27
User's Guide
Page 39
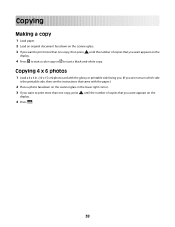
.... (If you are not sure which side is the printable side, then see the instructions that came with the paper.) 2 Place a photo facedown on the scanner glass in the lower right corner. 3 If you want to print more than one copy, then press until the number of copies that you want... the number of copies that you want appears on the display. 4 Press . 39 Copying Making a copy 1 Load paper. 2 Load an original document facedown on the scanner glass. 3 If you want to start a black-and-white copy.
.... (If you are not sure which side is the printable side, then see the instructions that came with the paper.) 2 Place a photo facedown on the scanner glass in the lower right corner. 3 If you want to print more than one copy, then press until the number of copies that you want... the number of copies that you want appears on the display. 4 Press . 39 Copying Making a copy 1 Load paper. 2 Load an original document facedown on the scanner glass. 3 If you want to start a black-and-white copy.
User's Guide
Page 40
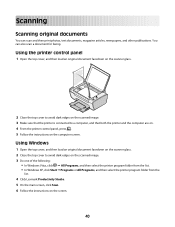
...panel, press . 5 Follow the instructions on the screen. 40 Using Windows 1 Open the top cover, and then load an original document facedown on the scanner glass. 2 Close the top cover to a computer, and that the printer is connected to avoid dark edges on the scanned image. 3 Do one of... the list. • In Windows XP, click Start Œ Programs or All Programs, and then select the printer program folder from the list. 4 Click Lexmark Productivity Studio. 5 On the main screen, click Scan. 6 Follow the instructions on the computer screen. You can scan and then print photos, text documents,...
...panel, press . 5 Follow the instructions on the screen. 40 Using Windows 1 Open the top cover, and then load an original document facedown on the scanner glass. 2 Close the top cover to a computer, and that the printer is connected to avoid dark edges on the scanned image. 3 Do one of... the list. • In Windows XP, click Start Œ Programs or All Programs, and then select the printer program folder from the list. 4 Click Lexmark Productivity Studio. 5 On the main screen, click Scan. 6 Follow the instructions on the computer screen. You can scan and then print photos, text documents,...
User's Guide
Page 41
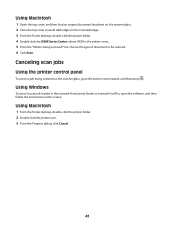
... the "What is being scanned?" Using Macintosh 1 Open the top cover, and then load an original document facedown on the scanner glass. 2 Close the top cover to avoid dark edges on the scanner glass, go to be scanned. 6 Click Scan. list, choose the type of document to the printer control panel, and...-click the printer folder. 2 Double-click the printer icon. 3 From the Progress dialog, click Cancel. 41 Using Windows To cancel a scan job started in the Lexmark Productivity Studio or Lexmark FastPics, open the software, and then follow the instructions on the screen.
... the "What is being scanned?" Using Macintosh 1 Open the top cover, and then load an original document facedown on the scanner glass. 2 Close the top cover to avoid dark edges on the scanner glass, go to be scanned. 6 Click Scan. list, choose the type of document to the printer control panel, and...-click the printer folder. 2 Double-click the printer icon. 3 From the Progress dialog, click Cancel. 41 Using Windows To cancel a scan job started in the Lexmark Productivity Studio or Lexmark FastPics, open the software, and then follow the instructions on the screen.
User's Guide
Page 42
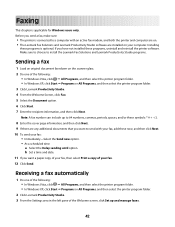
... Set up to send with an active fax modem, and both the printer and computer are on. • The Lexmark Fax Solutions and Lexmark Productivity Studio software are installed on the scanner glass. 2 Do one of the following: • In Windows Vista, click Œ All Programs, and then ...select the printer program folder. • In Windows XP, click Start Œ Programs or All Programs, and then select the printer program folder. 2 Click Lexmark Productivity Studio. 3...
... Set up to send with an active fax modem, and both the printer and computer are on. • The Lexmark Fax Solutions and Lexmark Productivity Studio software are installed on the scanner glass. 2 Do one of the following: • In Windows Vista, click Œ All Programs, and then ...select the printer program folder. • In Windows XP, click Start Œ Programs or All Programs, and then select the printer program folder. 2 Click Lexmark Productivity Studio. 3...
User's Guide
Page 45
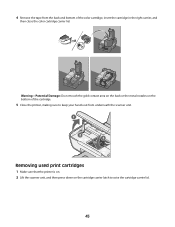
4 Remove the tape from underneath the scanner unit. 1 2 3 Removing used print cartridges 1 Make sure that the printer is on. 2 Lift the scanner unit, and then press down on the bottom of the color cartridge, insert the cartridge in the right carrier, and then close the color cartridge carrier lid. Warning-Potential Damage: Do not touch the gold contact area on the back or the metal nozzles on the cartridge carrier latch to keep your hands out from the back and bottom of the cartridge. 5 Close the printer, making sure to raise the cartridge carrier lid. 45
4 Remove the tape from underneath the scanner unit. 1 2 3 Removing used print cartridges 1 Make sure that the printer is on. 2 Lift the scanner unit, and then press down on the bottom of the color cartridge, insert the cartridge in the right carrier, and then close the color cartridge carrier lid. Warning-Potential Damage: Do not touch the gold contact area on the back or the metal nozzles on the cartridge carrier latch to keep your hands out from the back and bottom of the cartridge. 5 Close the printer, making sure to raise the cartridge carrier lid. 45
User's Guide
Page 47
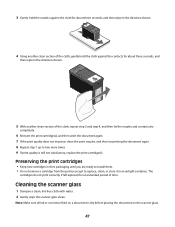
... dry before placing the document on a document is still not satisfactory, replace the print cartridge(s). Note: Make sure all ink or corrective fluid on the scanner glass. 47 Preserving the print cartridges • Keep new cartridges in an airtight container. The cartridges do not print correctly if left exposed for about... three seconds, and then wipe in the direction shown. 5 With another clean section of time. Cleaning the scanner glass 1 Dampen a clean, lint-free cloth with water. 2 Gently wipe the...
... dry before placing the document on a document is still not satisfactory, replace the print cartridge(s). Note: Make sure all ink or corrective fluid on the scanner glass. 47 Preserving the print cartridges • Keep new cartridges in an airtight container. The cartridges do not print correctly if left exposed for about... three seconds, and then wipe in the direction shown. 5 With another clean section of time. Cleaning the scanner glass 1 Dampen a clean, lint-free cloth with water. 2 Gently wipe the...
User's Guide
Page 68
... Up arrow 17 C canceling print jobs 32 scan job 41 cards loading 25 cartridges, print installing 44 ordering 48 preserving 47 removing 45 using genuine Lexmark 46 wiping 46 cleaning exterior of the printer 48 copying 39 4 x 6 photos 39 custom-size paper, loading 25, 36 custom-size paper, printing 36 D ... loading 25 L labels, loading 24 labels, printing 35 last page first, printing 30 loading banner paper 26 custom-size paper 25, 36 documents on the scanner glass 26, 40 envelopes 24, 34 glossy and photo paper 28 glossy paper 23 greeting cards 25 heavyweight matte paper 23 index cards 25 iron...
... Up arrow 17 C canceling print jobs 32 scan job 41 cards loading 25 cartridges, print installing 44 ordering 48 preserving 47 removing 45 using genuine Lexmark 46 wiping 46 cleaning exterior of the printer 48 copying 39 4 x 6 photos 39 custom-size paper, loading 25, 36 custom-size paper, printing 36 D ... loading 25 L labels, loading 24 labels, printing 35 last page first, printing 30 loading banner paper 26 custom-size paper 25, 36 documents on the scanner glass 26, 40 envelopes 24, 34 glossy and photo paper 28 glossy paper 23 greeting cards 25 heavyweight matte paper 23 index cards 25 iron...
User's Guide
Page 69
... parts paper exit tray 15 paper guide 16 paper support 15 power supply port 16 print cartridge carrier 16 printer control panel 15 scanner glass 16 scanner support 16 scanner unit 16 top cover 15 USB port 16 photo cards, loading 25 photo paper, loading 23 photos copying 4 x 6 photos 39 loading ...not lit 50 power supply port 16 print cartridge carrier 16 print cartridges installing 44 ordering 48 preserving 47 refilling 46 removing 45 using genuine Lexmark 46 wiping 46 print jobs, canceling 32 print settings saving and deleting 37 printer setting up without a computer 10 printer control panel 15 ...
... parts paper exit tray 15 paper guide 16 paper support 15 power supply port 16 print cartridge carrier 16 printer control panel 15 scanner glass 16 scanner support 16 scanner unit 16 top cover 15 USB port 16 photo cards, loading 25 photo paper, loading 23 photos copying 4 x 6 photos 39 loading ...not lit 50 power supply port 16 print cartridge carrier 16 print cartridges installing 44 ordering 48 preserving 47 refilling 46 removing 45 using genuine Lexmark 46 wiping 46 print jobs, canceling 32 print settings saving and deleting 37 printer setting up without a computer 10 printer control panel 15 ...

