
User's Guide
Page 4
... ...37 Saving and deleting print settings...37 Copying 39 Making a copy...39 Copying 4 x 6 photos...39 Scanning 40 Scanning original documents...40 Canceling scan jobs...41 Faxing 42 Sending a fax...42 Receiving a fax automatically...42 Maintaining the printer 44 Maintaining print cartridges......44 Installing print cartridges...44 Removing used print cartridges...45 Refilling print cartridges...46 Using genuine Lexmark print cartridges...46...
... ...37 Saving and deleting print settings...37 Copying 39 Making a copy...39 Copying 4 x 6 photos...39 Scanning 40 Scanning original documents...40 Canceling scan jobs...41 Faxing 42 Sending a fax...42 Receiving a fax automatically...42 Maintaining the printer 44 Maintaining print cartridges......44 Installing print cartridges...44 Removing used print cartridges...45 Refilling print cartridges...46 Using genuine Lexmark print cartridges...46...
User's Guide
Page 16
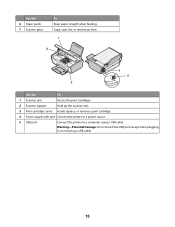
Warning-Potential Damage: Do not touch the USB port except when plugging in or removing a USB cable. 16 Use the 6 Paper guide 7 Scanner glass To Keep paper straight when feeding. Copy, scan, fax, or remove an item. 1 2 4 5 3 Use the To 1 Scanner unit Access the print cartridges. 2 Scanner support Hold up the scanner unit. 3 Print cartridge carrier Install, replace, or remove a print cartridge. 4 Power supply with port Connect the printer to a power source. 5 USB port Connect the printer to a computer using a USB cable.
Warning-Potential Damage: Do not touch the USB port except when plugging in or removing a USB cable. 16 Use the 6 Paper guide 7 Scanner glass To Keep paper straight when feeding. Copy, scan, fax, or remove an item. 1 2 4 5 3 Use the To 1 Scanner unit Access the print cartridges. 2 Scanner support Hold up the scanner unit. 3 Print cartridge carrier Install, replace, or remove a print cartridge. 4 Power supply with port Connect the printer to a power source. 5 USB port Connect the printer to a computer using a USB cable.

User's Guide
Page 17
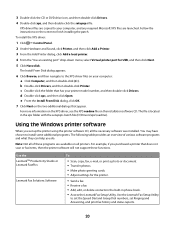
Using the printer control panel 1 2 8 3 4 7 5 6 Press 1 To Start a color copy of a document or photo. 2 Start a black-and-white copy of a document or photo. 3 Start a 4 x 6-inch color photo copy. 4 Scan a document or photo to the computer. 5 Load or eject paper. 6 • Turn the printer on or off. • Cancel a print, copy, or scan job in progress. • Reset the printer. 7 Cancel a print, copy, or scan job in progress. 8 Set the number of copies. 17
Using the printer control panel 1 2 8 3 4 7 5 6 Press 1 To Start a color copy of a document or photo. 2 Start a black-and-white copy of a document or photo. 3 Start a 4 x 6-inch color photo copy. 4 Scan a document or photo to the computer. 5 Load or eject paper. 6 • Turn the printer on or off. • Cancel a print, copy, or scan job in progress. • Reset the printer. 7 Cancel a print, copy, or scan job in progress. 8 Set the number of copies. 17
User's Guide
Page 20
... fax items, then the printer software will not support these programs are launched. Use the LexmarkTM Productivity Studio or Lexmark FastPics Lexmark Fax Solutions Software To • Scan, copy, fax, e-mail, or print a photo or document. • Transfer photos. • Make photo greeting cards. • ... to set the Speed Dial and Group Dial numbers, set up the printer using the printer software CD, all printers. Use the Lexmark Fax Setup Utility to install some additional programs. The following table provides an overview of these functions. To install the XPS driver:...
... fax items, then the printer software will not support these programs are launched. Use the LexmarkTM Productivity Studio or Lexmark FastPics Lexmark Fax Solutions Software To • Scan, copy, fax, e-mail, or print a photo or document. • Transfer photos. • Make photo greeting cards. • ... to set the Speed Dial and Group Dial numbers, set up the printer using the printer software CD, all printers. Use the Lexmark Fax Setup Utility to install some additional programs. The following table provides an overview of these functions. To install the XPS driver:...
User's Guide
Page 21
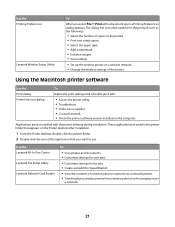
... File Œ Print with the printer software during installation. Use the Lexmark All-In-One Center Lexmark Fax Setup Utility Lexmark Network Card Reader To • Scan photos and documents. • Customize settings for scan jobs. • Customize settings for the print job such as the following.... • Enhance images. • Save settings. • Set up the wireless printer on the computer. Use the Printing Preferences Lexmark Wireless Setup Utility To When you want to use. Using the Macintosh printer software Use the To Print dialog Adjust the print settings and...
... File Œ Print with the printer software during installation. Use the Lexmark All-In-One Center Lexmark Fax Setup Utility Lexmark Network Card Reader To • Scan photos and documents. • Customize settings for scan jobs. • Customize settings for the print job such as the following.... • Enhance images. • Save settings. • Set up the wireless printer on the computer. Use the Printing Preferences Lexmark Wireless Setup Utility To When you want to use. Using the Macintosh printer software Use the To Print dialog Adjust the print settings and...
User's Guide
Page 26
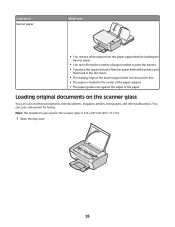
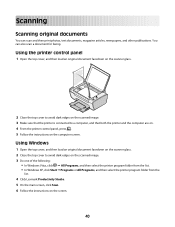
... for faxing. Loading original documents on the scanner glass You can scan a document for the scanner glass is loaded in the center of the paper support. • The paper guides rest against the edges of the banner ... into the printer first. • The paper is 216 x 297 mm (8.5 x 11.7 in the first sheet. • The leading edge of the paper. You can scan and then print photos, text documents, magazine articles, newspapers, and other publications. Load up to banner paper Make sure • You remove all the paper...
... for faxing. Loading original documents on the scanner glass You can scan a document for the scanner glass is loaded in the center of the paper support. • The paper guides rest against the edges of the banner ... into the printer first. • The paper is 216 x 297 mm (8.5 x 11.7 in the first sheet. • The leading edge of the paper. You can scan and then print photos, text documents, magazine articles, newspapers, and other publications. Load up to banner paper Make sure • You remove all the paper...

User's Guide
Page 27
2 Place the original document or item facedown on the scanned image. 27 Note: Photos should be loaded as shown. 3 Close the top cover to avoid dark edges on the scanner glass in the lower right corner.
2 Place the original document or item facedown on the scanned image. 27 Note: Photos should be loaded as shown. 3 Close the top cover to avoid dark edges on the scanner glass in the lower right corner.
User's Guide
Page 40
... on the scanned image. 3 Do one of the following: • In Windows Vista, click Œ All Programs, and then select the printer program folder from the list. • In Windows XP, click Start Œ Programs or All Programs, and then select the printer program folder from the list. 4 Click Lexmark Productivity Studio.... 5 On the main screen, click Scan. 6 Follow the instructions on the computer screen.
... on the scanned image. 3 Do one of the following: • In Windows Vista, click Œ All Programs, and then select the printer program folder from the list. • In Windows XP, click Start Œ Programs or All Programs, and then select the printer program folder from the list. 4 Click Lexmark Productivity Studio.... 5 On the main screen, click Scan. 6 Follow the instructions on the computer screen.
User's Guide
Page 41
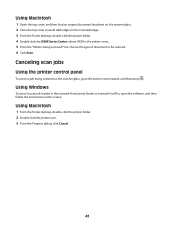
...From the Progress dialog, click Cancel. 41 Using Windows To cancel a scan job started in the Lexmark Productivity Studio or Lexmark FastPics, open the software, and then follow the instructions on the scanner glass, go to be scanned. 6 Click Scan. list, choose the type of document to the printer control panel, ...Open the top cover, and then load an original document facedown on the scanner glass. 2 Close the top cover to avoid dark edges on the scanned image. 3 From the Finder desktop, double-click the printer folder. 4 Double-click the XXXX Series Center, where XXXX is the printer series. ...
...From the Progress dialog, click Cancel. 41 Using Windows To cancel a scan job started in the Lexmark Productivity Studio or Lexmark FastPics, open the software, and then follow the instructions on the scanner glass, go to be scanned. 6 Click Scan. list, choose the type of document to the printer control panel, ...Open the top cover, and then load an original document facedown on the scanner glass. 2 Close the top cover to avoid dark edges on the scanned image. 3 From the Finder desktop, double-click the printer folder. 4 Double-click the XXXX Series Center, where XXXX is the printer series. ...
User's Guide
Page 62
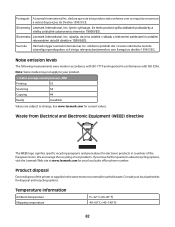
...Lexmark...conformance with ISO 9296. See www.lexmark.com for electronic products in ostalimi relevantnimi določ...you have further questions about recycling options, visit the Lexmark Web site at www.lexmark.com for disposal and recycling options. izjavlja, da...bestämmelser som framgår av direktiv 1999/5/EG. Slovensky Lexmark International, Inc. Temperature information Ambient temperature Shipping temperature 15-32° C ...60° C (-40-140° F) 62 Português A Lexmark International Inc. declara que este este produto está conforme com ...
...Lexmark...conformance with ISO 9296. See www.lexmark.com for electronic products in ostalimi relevantnimi določ...you have further questions about recycling options, visit the Lexmark Web site at www.lexmark.com for disposal and recycling options. izjavlja, da...bestämmelser som framgår av direktiv 1999/5/EG. Slovensky Lexmark International, Inc. Temperature information Ambient temperature Shipping temperature 15-32° C ...60° C (-40-140° F) 62 Português A Lexmark International Inc. declara que este este produto está conforme com ...

User's Guide
Page 63
...average. n/a Off The product is plugged into a wall outlet, but the power switch is in each mode's energy usage. 63 Scanning The product is scanning hard-copy documents. 7.24 Ready The product is waiting for a specified period of each mode in the previous table represent time-averaged ...copy output from electronic inputs. 14.97 Copying The product is designed with an energy-saving mode called the Power Saver Timeout. See www.lexmark.com for this product (in minutes): n/a Off mode If this product is the sum of time, called Power Saver. Since power ...
...average. n/a Off The product is plugged into a wall outlet, but the power switch is in each mode's energy usage. 63 Scanning The product is scanning hard-copy documents. 7.24 Ready The product is waiting for a specified period of each mode in the previous table represent time-averaged ...copy output from electronic inputs. 14.97 Copying The product is designed with an energy-saving mode called the Power Saver Timeout. See www.lexmark.com for this product (in minutes): n/a Off mode If this product is the sum of time, called Power Saver. Since power ...
User's Guide
Page 68
...Black Copy 17 Cancel 17 Color Copy 17 Paper Feed 17 Power 17 Scan 17 Up arrow 17 C canceling print jobs 32 scan job 41 cards loading 25 cartridges, print installing 44 ordering 48 preserving 47 removing 45 using genuine Lexmark 46 wiping 46 cleaning exterior of the printer 48 copying 39 4 x... 6 photos 39 custom-size paper, loading 25, 36 custom-size paper, printing 36 D document multiple copies, printing 29 documents loading on scanner glass 40 loading on the scanner glass 26 printing 28 scanning using FastPics...
...Black Copy 17 Cancel 17 Color Copy 17 Paper Feed 17 Power 17 Scan 17 Up arrow 17 C canceling print jobs 32 scan job 41 cards loading 25 cartridges, print installing 44 ordering 48 preserving 47 removing 45 using genuine Lexmark 46 wiping 46 cleaning exterior of the printer 48 copying 39 4 x... 6 photos 39 custom-size paper, loading 25, 36 custom-size paper, printing 36 D document multiple copies, printing 29 documents loading on scanner glass 40 loading on the scanner glass 26 printing 28 scanning using FastPics...
User's Guide
Page 69
...50 power supply port 16 print cartridge carrier 16 print cartridges installing 44 ordering 48 preserving 47 refilling 46 removing 45 using genuine Lexmark 46 wiping 46 print jobs, canceling 32 print settings saving and deleting 37 printer setting up without a computer 10 printer control panel...information 7 saving and deleting print settings 37 scanner glass 16 cleaning 47 loading documents 26, 40 scanner support 16 scanner unit 16 scanning canceling a scan 41 using All-In-One Center (Macintosh) 40 using FastPics or Productivity Studio 40 using the printer control panel 40 security information ...
...50 power supply port 16 print cartridge carrier 16 print cartridges installing 44 ordering 48 preserving 47 refilling 46 removing 45 using genuine Lexmark 46 wiping 46 print jobs, canceling 32 print settings saving and deleting 37 printer setting up without a computer 10 printer control panel...information 7 saving and deleting print settings 37 scanner glass 16 cleaning 47 loading documents 26, 40 scanner support 16 scanner unit 16 scanning canceling a scan 41 using All-In-One Center (Macintosh) 40 using FastPics or Productivity Studio 40 using the printer control panel 40 security information ...


