User's Guide
Page 5
... that is designed, tested, and approved to a professional service person. Lexmark is misused, a risk of fire or electrical shock results. CAUTION-SHOCK HAZARD: Do not set up this product or the manufacturer's authorized replacement power supply and power supply cord. Remove the power cord from the printer before inspecting it. CAUTION-POTENTIAL INJURY: Do not twist, bind...
... that is designed, tested, and approved to a professional service person. Lexmark is misused, a risk of fire or electrical shock results. CAUTION-SHOCK HAZARD: Do not set up this product or the manufacturer's authorized replacement power supply and power supply cord. Remove the power cord from the printer before inspecting it. CAUTION-POTENTIAL INJURY: Do not twist, bind...
User's Guide
Page 9
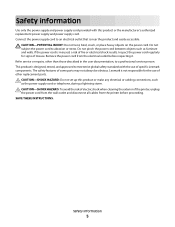
... during software installation Third-party applications, including antivirus, security, and firewall programs may vary. 2 Power cord 3 Printer software CD 4 Quick Setup sheet Setting up the printer 9 For your printer to work properly, allow the printer software to be installed on your computer. Setting up the printer as the number of print cartridges, may alert you about the...
... during software installation Third-party applications, including antivirus, security, and firewall programs may vary. 2 Power cord 3 Printer software CD 4 Quick Setup sheet Setting up the printer 9 For your printer to work properly, allow the printer software to be installed on your computer. Setting up the printer as the number of print cartridges, may alert you about the...
User's Guide
Page 10
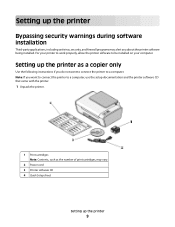
Setting up the printer 10 2 Remove all tape and packing material from all areas of the printer. 3 Extend the paper exit tray, and then raise the paper support. 4 Extend the paper guides. 5 Connect the power cord, and then make sure the power is on.
Setting up the printer 10 2 Remove all tape and packing material from all areas of the printer. 3 Extend the paper exit tray, and then raise the paper support. 4 Extend the paper guides. 5 Connect the power cord, and then make sure the power is on.
User's Guide
Page 47
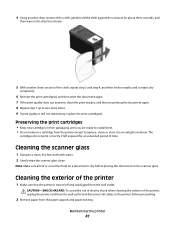
...for an extended period of time. CAUTION-SHOCK HAZARD: To avoid the risk of electric shock when cleaning the exterior of the printer, unplug the power cord from the wall outlet and disconnect all ink or corrective fluid on the scanner glass. The cartridges do not print correctly if ...scanner glass 1 Dampen a clean, lint-free cloth with water. 2 Gently wipe the scanner glass clean. Maintaining the printer 47 Cleaning the exterior of the printer 1 Make sure that the printer is turned off and unplugged from the paper support and paper exit tray. 4 Using another clean section of the cloth...
...for an extended period of time. CAUTION-SHOCK HAZARD: To avoid the risk of electric shock when cleaning the exterior of the printer, unplug the power cord from the wall outlet and disconnect all ink or corrective fluid on the scanner glass. The cartridges do not print correctly if ...scanner glass 1 Dampen a clean, lint-free cloth with water. 2 Gently wipe the scanner glass clean. Maintaining the printer 47 Cleaning the exterior of the printer 1 Make sure that the printer is turned off and unplugged from the paper support and paper exit tray. 4 Using another clean section of the cloth...

User's Guide
Page 50
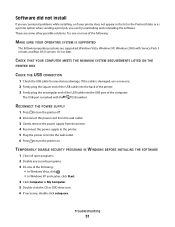
... Lexmark Service Center link. Try one of the following : • In Windows Vista, click All Programs, and then select the printer program folder from the list. • In Windows XP, click Start Programs or All Programs, and then select the printer program folder from the printer. 3 Plug the cord all the way into the power...
... Lexmark Service Center link. Try one of the following : • In Windows Vista, click All Programs, and then select the printer program folder from the list. • In Windows XP, click Start Programs or All Programs, and then select the printer program folder from the printer. 3 Plug the cord all the way into the power...
User's Guide
Page 51
...one . 2 Firmly plug the square end of the USB cable into the back of the printer. 3 Firmly plug the rectangular end of the USB cable into the wall outlet. 6 Press to turn the printer off. 2 Disconnect the power cord from the wall outlet. 3 Gently remove the power supply from the printer. 4 Reconnect the power... supply to the printer. 5 Plug the power cord into the USB port of the following operating systems are...
...one . 2 Firmly plug the square end of the USB cable into the back of the printer. 3 Firmly plug the rectangular end of the USB cable into the wall outlet. 6 Press to turn the printer off. 2 Disconnect the power cord from the wall outlet. 3 Gently remove the power supply from the printer. 4 Reconnect the power... supply to the printer. 5 Plug the power cord into the USB port of the following operating systems are...
User's Guide
Page 52
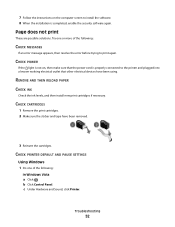
... appears, then resolve the error before trying to the printer and plugged into a known working electrical outlet that the power cord is completed, enable the security software again. c Under Hardware and Sound, click Printer. Troubleshooting 52 Page does not print These are possible solutions. Try one of the following : In Windows Vista a Click . REMOVE AND...
... appears, then resolve the error before trying to the printer and plugged into a known working electrical outlet that the power cord is completed, enable the security software again. c Under Hardware and Sound, click Printer. Troubleshooting 52 Page does not print These are possible solutions. Try one of the following : In Windows Vista a Click . REMOVE AND...
User's Guide
Page 54
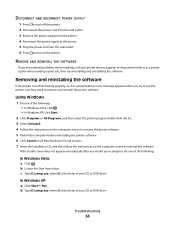
... computer, do one of the following : • In Windows Vista, click . • In Windows XP, click Start. 2 Click Programs or All Programs, and then select the printer program folder from the printer. 4 Reconnect the power supply to the printer. 5 Plug the power cord into the wall... outlet. 6 Press to turn off the printer. 2 Disconnect the power cord from the wall outlet. 3 Remove the power supply from the list. 3 Select Uninstall...
... computer, do one of the following : • In Windows Vista, click . • In Windows XP, click Start. 2 Click Programs or All Programs, and then select the printer program folder from the printer. 4 Reconnect the power supply to the printer. 5 Plug the power cord into the wall... outlet. 6 Press to turn off the printer. 2 Disconnect the power cord from the wall outlet. 3 Remove the power supply from the list. 3 Select Uninstall...
User's Guide
Page 56
Try one or more of the following: MAKE SURE THE PRINTER POWER SUPPLY IS ATTACHED CORRECTLY 1 Press to turn the printer off slowly, then the printer is in sleep mode. These are possible solutions. MAKE SURE THE PRINTER IS NOT IN SLEEP MODE If the power light is blinking on and off . 2 Disconnect the power cord from the wall outlet...
Try one or more of the following: MAKE SURE THE PRINTER POWER SUPPLY IS ATTACHED CORRECTLY 1 Press to turn the printer off slowly, then the printer is in sleep mode. These are possible solutions. MAKE SURE THE PRINTER IS NOT IN SLEEP MODE If the power light is blinking on and off . 2 Disconnect the power cord from the wall outlet...

User's Guide
Page 61
... X2600); LEXMARK SOFTWARE LIMITED WARRANTY AND LICENSE AGREEMENTS PLEASE READ CAREFULLY BEFOREUSING THIS PRODUCT: BY USING THIS PRODUCT, YOU AGREE TO BE BOUND BY ALL THE TERMS AND CONDITIONS OF THIS SOFTWARE LIMITED WARRANTY AND LICENSE AGREEMENTS. Mode Description Power consumption ...the previous table represent time-averaged measurements. Power Saver The product is waiting for current values. Factory default Power Saver Timeout for a specified period of power, then to completely stop product power consumption, disconnect the power supply cord from 11.84 (ENERGY STAR-compliant ...
... X2600); LEXMARK SOFTWARE LIMITED WARRANTY AND LICENSE AGREEMENTS PLEASE READ CAREFULLY BEFOREUSING THIS PRODUCT: BY USING THIS PRODUCT, YOU AGREE TO BE BOUND BY ALL THE TERMS AND CONDITIONS OF THIS SOFTWARE LIMITED WARRANTY AND LICENSE AGREEMENTS. Mode Description Power consumption ...the previous table represent time-averaged measurements. Power Saver The product is waiting for current values. Factory default Power Saver Timeout for a specified period of power, then to completely stop product power consumption, disconnect the power supply cord from 11.84 (ENERGY STAR-compliant ...


