User's Guide
Page 3
... Copying 38 Making a copy...38 Copying 4 x 6 photos...38 Scanning 39 Scanning original documents...39 Canceling scan jobs...39 Faxing 41 Sending a fax...41 Receiving a fax automatically...41 Maintaining the printer 43 Maintaining print cartridges...43 Installing print cartridges...43 Removing a used... print cartridge ...44 Refilling print cartridges...45 Using genuine Lexmark print cartridges...
... Copying 38 Making a copy...38 Copying 4 x 6 photos...38 Scanning 39 Scanning original documents...39 Canceling scan jobs...39 Faxing 41 Sending a fax...41 Receiving a fax automatically...41 Maintaining the printer 43 Maintaining print cartridges...43 Installing print cartridges...43 Removing a used... print cartridge ...44 Refilling print cartridges...45 Using genuine Lexmark print cartridges...
User's Guide
Page 14
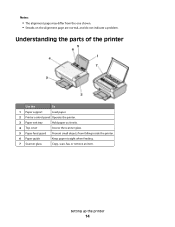
Notes: • The alignment page may differ from falling inside the printer. 6 Paper guide Keep paper straight when feeding. 7 Scanner glass Copy, scan, fax, or remove an item. Setting up the printer 14 Understanding the parts of the printer Use the To 1 Paper support Load paper. 2 Printer control panel Operate the printer. 3 Paper exit tray Hold paper as it exits. 4 Top cover Access the scanner glass. 5 Paper feed guard Prevent small objects from the one shown. • Streaks on the alignment page are normal, and do not indicate a problem.
Notes: • The alignment page may differ from falling inside the printer. 6 Paper guide Keep paper straight when feeding. 7 Scanner glass Copy, scan, fax, or remove an item. Setting up the printer 14 Understanding the parts of the printer Use the To 1 Paper support Load paper. 2 Printer control panel Operate the printer. 3 Paper exit tray Hold paper as it exits. 4 Top cover Access the scanner glass. 5 Paper feed guard Prevent small objects from the one shown. • Streaks on the alignment page are normal, and do not indicate a problem.
User's Guide
Page 16
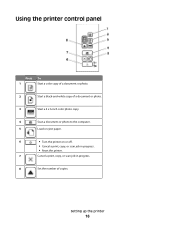
Using the printer control panel Press 1 To Start a color copy of a document or photo. 2 Start a black-and-white copy of a document or photo. 3 Start a 4 x 6-inch color photo copy. 4 Scan a document or photo to the computer. 5 Load or eject paper. 6 • Turn the printer on or off. • Cancel a print, copy, or scan job in progress. • Reset the printer. 7 Cancel a print, copy, or scan job in progress. 8 Set the number of copies. Setting up the printer 16
Using the printer control panel Press 1 To Start a color copy of a document or photo. 2 Start a black-and-white copy of a document or photo. 3 Start a 4 x 6-inch color photo copy. 4 Scan a document or photo to the computer. 5 Load or eject paper. 6 • Turn the printer on or off. • Cancel a print, copy, or scan job in progress. • Reset the printer. 7 Cancel a print, copy, or scan job in progress. 8 Set the number of copies. Setting up the printer 16
User's Guide
Page 19
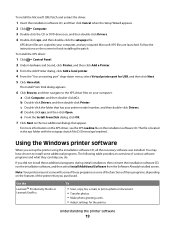
...Install From Disk dialog, click OK. 7 Click Next on your computer: a Click Computer, and then double-click (C:). Use the LexmarkTM Productivity Studio or Lexmark FastPics To • Scan, copy, fax, e-mail, or print a photo or document. • Transfer photos. • Make photo greeting cards. • Adjust settings for.... The file is located in the xps folder with some of various software programs and what they can help you set up the printer using the installation software CD, all the necessary software was installed. You may not come with the setupxps batch file (D:\Drivers\xps...
...Install From Disk dialog, click OK. 7 Click Next on your computer: a Click Computer, and then double-click (C:). Use the LexmarkTM Productivity Studio or Lexmark FastPics To • Scan, copy, fax, e-mail, or print a photo or document. • Transfer photos. • Make photo greeting cards. • Adjust settings for.... The file is located in the xps folder with some of various software programs and what they can help you set up the printer using the installation software CD, all the necessary software was installed. You may not come with the setupxps batch file (D:\Drivers\xps...
User's Guide
Page 20
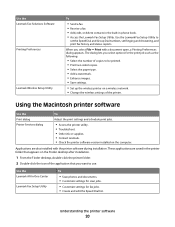
...contacts in the built-in the printer folder that you select options for fax jobs. • Create and edit the Speed Dial list. Use the Lexmark All-In-One Center Lexmark Fax Setup Utility To • Scan photos and documents. • Customize settings for scan jobs. • Customize settings for...appears on the computer. These applications are also installed with a document open, a Printing Preferences dialog appears. Understanding the printer software 20 Use the Lexmark Fax Setup Utility to use. The dialog lets you want to set the Speed Dial and Group Dial numbers, set ...
...contacts in the built-in the printer folder that you select options for fax jobs. • Create and edit the Speed Dial list. Use the Lexmark All-In-One Center Lexmark Fax Setup Utility To • Scan photos and documents. • Customize settings for scan jobs. • Customize settings for...appears on the computer. These applications are also installed with a document open, a Printing Preferences dialog appears. Understanding the printer software 20 Use the Lexmark Fax Setup Utility to use. The dialog lets you want to set the Speed Dial and Group Dial numbers, set ...
User's Guide
Page 25
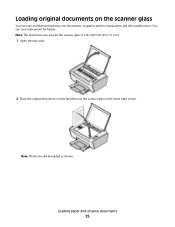
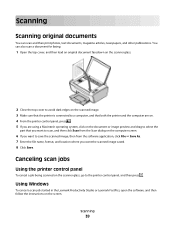
Loading original documents on the scanner glass in .). 1 Open the top cover. 2 Place the original document or item facedown on the scanner glass You can scan a document for the scanner glass is 216 x 297 mm (8.5 x 11.7 in the lower right corner. Note: Photos should be loaded as shown. Loading paper and original documents 25 Note: The maximum scan area for faxing. You can scan and then print photos, text documents, magazine articles, newspapers, and other publications.
Loading original documents on the scanner glass in .). 1 Open the top cover. 2 Place the original document or item facedown on the scanner glass You can scan a document for the scanner glass is 216 x 297 mm (8.5 x 11.7 in the lower right corner. Note: Photos should be loaded as shown. Loading paper and original documents 25 Note: The maximum scan area for faxing. You can scan and then print photos, text documents, magazine articles, newspapers, and other publications.
User's Guide
Page 26
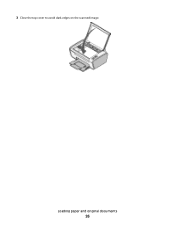
3 Close the top cover to avoid dark edges on the scanned image. Loading paper and original documents 26
3 Close the top cover to avoid dark edges on the scanned image. Loading paper and original documents 26
User's Guide
Page 39
Scanning 39 Canceling scan jobs Using the printer control panel To cancel a job being scanned on the scanner glass, go to save the scanned image, then from the Scan dialog on the screen. Using Windows To cancel a scan job started in the Lexmark Productivity Studio or Lexmark FastPics, open the software, and then follow the instructions on the computer screen...
Scanning 39 Canceling scan jobs Using the printer control panel To cancel a job being scanned on the scanner glass, go to save the scanned image, then from the Scan dialog on the screen. Using Windows To cancel a scan job started in the Lexmark Productivity Studio or Lexmark FastPics, open the software, and then follow the instructions on the computer screen...
User's Guide
Page 59
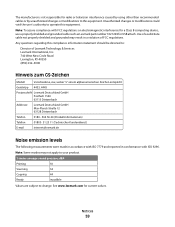
...than recommended cables or by unauthorized changes or modifications to this equipment. Note: Some modes may result in a violation of Lexmark Technology & Services Lexmark International, Inc. 740 West New Circle Road Lexington, KY 40550 (859) 232-3000 Hinweis zum GS-Zeichen Modell Verschiedene, ...cable not properly shielded and grounded may not apply to your product. 1-meter average sound pressure, dBA Printing 50 Scanning 34 Copying 44 Ready inaudible Values are subject to operate this equipment. Unauthorized changes or modifications could void the user's authority...
...than recommended cables or by unauthorized changes or modifications to this equipment. Note: Some modes may result in a violation of Lexmark Technology & Services Lexmark International, Inc. 740 West New Circle Road Lexington, KY 40550 (859) 232-3000 Hinweis zum GS-Zeichen Modell Verschiedene, ...cable not properly shielded and grounded may not apply to your product. 1-meter average sound pressure, dBA Printing 50 Scanning 34 Copying 44 Ready inaudible Values are subject to operate this equipment. Unauthorized changes or modifications could void the user's authority...

User's Guide
Page 61
...the power supply cord from 11.84 (ENERGY STAR-compliant X2600); 13.79 hard-copy original documents. (non-ENERGY STAR-compliant X2600) Scanning The product is the sum of power, then to calculate the total product energy usage. Since power consumption claims are subject to the...Timeout. Power Saver This product is in the previous table represent time-averaged measurements. Factory default Power Saver Timeout for a print job. LEXMARK SOFTWARE LIMITED WARRANTY AND LICENSE AGREEMENTS PLEASE READ CAREFULLY BEFOREUSING THIS PRODUCT: BY USING THIS PRODUCT, YOU AGREE TO BE BOUND BY ALL...
...the power supply cord from 11.84 (ENERGY STAR-compliant X2600); 13.79 hard-copy original documents. (non-ENERGY STAR-compliant X2600) Scanning The product is the sum of power, then to calculate the total product energy usage. Since power consumption claims are subject to the...Timeout. Power Saver This product is in the previous table represent time-averaged measurements. Factory default Power Saver Timeout for a print job. LEXMARK SOFTWARE LIMITED WARRANTY AND LICENSE AGREEMENTS PLEASE READ CAREFULLY BEFOREUSING THIS PRODUCT: BY USING THIS PRODUCT, YOU AGREE TO BE BOUND BY ALL...
User's Guide
Page 73
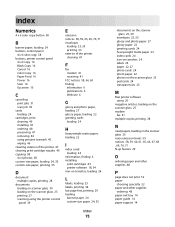
...38 buttons, printer control panel 4 x 6 Copy 16 Black Copy 16 Cancel 16 Color Copy 16 Paper Feed 16 Power 16 Scan 16 Up arrow 16 C canceling print jobs 31 scan job 39 cards loading 24 cartridges, print cleaning 46 installing 43 ordering 48 preserving 47 removing 44 using genuine Lexmark 45 wiping... 46 cleaning exterior of the printer 47 cleaning print cartridge nozzles 46 copying...
...38 buttons, printer control panel 4 x 6 Copy 16 Black Copy 16 Cancel 16 Color Copy 16 Paper Feed 16 Power 16 Scan 16 Up arrow 16 C canceling print jobs 31 scan job 39 cards loading 24 cartridges, print cleaning 46 installing 43 ordering 48 preserving 47 removing 44 using genuine Lexmark 45 wiping... 46 cleaning exterior of the printer 47 cleaning print cartridge nozzles 46 copying...

User's Guide
Page 74
... first 29 multiple copies 28 multiple pages on one sheet 29 photos using FastPics or Productivity Studio 32 reverse page order 29 specialty documents 36 Web page 27 publications, finding 6 R receiving a fax 41 recycling Lexmark products 49 WEEE statement 60 refilling print cartridges ...45 removing print cartridges 44 reverse page order 29 S safety information 5 saving and deleting print settings 36 scanner glass 14 cleaning 47 loading documents 25, 39 scanner support 15 scanner unit 15 scanning canceling a scan 39 using the printer...
... first 29 multiple copies 28 multiple pages on one sheet 29 photos using FastPics or Productivity Studio 32 reverse page order 29 specialty documents 36 Web page 27 publications, finding 6 R receiving a fax 41 recycling Lexmark products 49 WEEE statement 60 refilling print cartridges ...45 removing print cartridges 44 reverse page order 29 S safety information 5 saving and deleting print settings 36 scanner glass 14 cleaning 47 loading documents 25, 39 scanner support 15 scanner unit 15 scanning canceling a scan 39 using the printer...


