
User's Guide
Page 2
Refer service or repairs, other replacement parts. CAUTION-SHOCK HAZARD: Do not use of specific Lexmark components. Do not set up this product or the manufacturer's authorized replacement power supply and power supply cord. For complete descriptions: • Windows users-See the User's Guide. • Macintosh users-If your hands out from underneath the scanner unit...
Refer service or repairs, other replacement parts. CAUTION-SHOCK HAZARD: Do not use of specific Lexmark components. Do not set up this product or the manufacturer's authorized replacement power supply and power supply cord. For complete descriptions: • Windows users-See the User's Guide. • Macintosh users-If your hands out from underneath the scanner unit...
User's Guide
Page 5
... print cartridges...55 Cleaning the scanner glass...55 Ordering print cartridges...55 Ordering paper and other supplies...56 Using genuine Lexmark print cartridges...56 Refilling a print cartridge...57 Recycling Lexmark products...57 Troubleshooting 58 Setup troubleshooting...58 Power button is not lit ...58 Software does not install...58 Page does not print...59 Print...
... print cartridges...55 Cleaning the scanner glass...55 Ordering print cartridges...55 Ordering paper and other supplies...56 Using genuine Lexmark print cartridges...56 Refilling a print cartridge...57 Recycling Lexmark products...57 Troubleshooting 58 Setup troubleshooting...58 Power button is not lit ...58 Software does not install...58 Page does not print...59 Print...

User's Guide
Page 11
...printer • Help • User's Guide in certain geographies only). Setting up printer hardware and software, and information on the product purchased. 3 Power cord Attaches to be installed into the printer. 2 Color print cartridge Note: Cartridge combinations vary depending on setup troubleshooting. 6 Getting Started or Setup Solutions... on setting up the printer 11 Setting up the printer Checking the box contents 1 2 ?? ? 6 5 4 3 Name Description 1 Black print cartridge Cartridges to the power supply port located at the back of the User's Guide can be included.
...printer • Help • User's Guide in certain geographies only). Setting up printer hardware and software, and information on the product purchased. 3 Power cord Attaches to be installed into the printer. 2 Color print cartridge Note: Cartridge combinations vary depending on setup troubleshooting. 6 Getting Started or Setup Solutions... on setting up the printer 11 Setting up the printer Checking the box contents 1 2 ?? ? 6 5 4 3 Name Description 1 Black print cartridge Cartridges to the power supply port located at the back of the User's Guide can be included.
User's Guide
Page 13
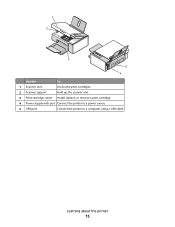
1 2 3 5 4 Use the To 1 Scanner unit Access the print cartridges. 2 Scanner support Hold up the scanner unit. 3 Print cartridge carrier Install, replace, or remove a print cartridge. 4 Power supply with port Connect the printer to a power source. 5 USB port Connect the printer to a computer using a USB cable. Learning about the printer 13
1 2 3 5 4 Use the To 1 Scanner unit Access the print cartridges. 2 Scanner support Hold up the scanner unit. 3 Print cartridge carrier Install, replace, or remove a print cartridge. 4 Power supply with port Connect the printer to a power source. 5 USB port Connect the printer to a computer using a USB cable. Learning about the printer 13

User's Guide
Page 58
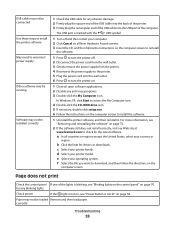
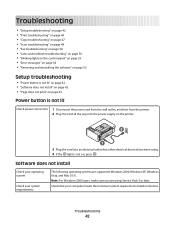
... install" on page 58 • "Page does not print" on page 59 Power button is not lit Check power connection 1 Disconnect the power cord from the wall outlet, and then from the printer. 2 Plug the cord all the way into the power supply on the printer. 2 1 3 Plug the cord into an electrical outlet that your...
... install" on page 58 • "Page does not print" on page 59 Power button is not lit Check power connection 1 Disconnect the power cord from the wall outlet, and then from the printer. 2 Plug the cord all the way into the power supply on the printer. 2 1 3 Plug the cord into an electrical outlet that your...
User's Guide
Page 59
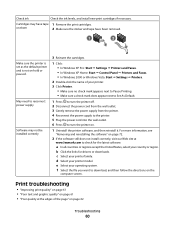
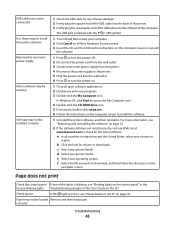
...our Web site at www.lexmark.com to install the software. 1 Uninstall the printer software, and then reinstall it. c Select your country or region. USB cable may not be connected Use these steps to install the printer software May need to reconnect power supply Other software may be running ... to reinstall the software. 1 Press to turn the printer off. 2 Disconnect the power cord from the wall outlet. 3 Gently remove the power supply from the printer. 4 Reconnect the power supply to the printer. 5 Plug the power cord into the USB port of the lights is not lit" on the computer screen...
...our Web site at www.lexmark.com to install the software. 1 Uninstall the printer software, and then reinstall it. c Select your country or region. USB cable may not be connected Use these steps to install the printer software May need to reconnect power supply Other software may be running ... to reinstall the software. 1 Press to turn the printer off. 2 Disconnect the power cord from the wall outlet. 3 Gently remove the power supply from the printer. 4 Reconnect the power supply to the printer. 5 Plug the power cord into the USB port of the lights is not lit" on the computer screen...
User's Guide
Page 60
...next to Set As Default. 1 Press to turn the printer off. 2 Disconnect the power cord from the wall outlet. 3 Gently remove the power supply from the printer. 4 Reconnect the power supply to the printer. 5 Plug the power cord into the wall outlet. 6 Press to check for drivers or downloads. d Select...cartridges. b Click the links for the latest software. c Select your country or region. on page 61 • "Poor quality at www.lexmark.com to turn the printer on page 62 Troubleshooting 60 a In all countries or regions except the United States, select your printer family. ...
...next to Set As Default. 1 Press to turn the printer off. 2 Disconnect the power cord from the wall outlet. 3 Gently remove the power supply from the printer. 4 Reconnect the power supply to the printer. 5 Plug the power cord into the wall outlet. 6 Press to check for drivers or downloads. d Select...cartridges. b Click the links for the latest software. c Select your country or region. on page 61 • "Poor quality at www.lexmark.com to turn the printer on page 62 Troubleshooting 60 a In all countries or regions except the United States, select your printer family. ...
User's Guide
Page 67
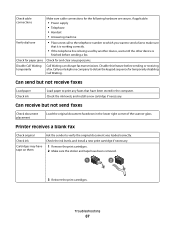
... company to verify the original document was loaded correctly. Check cable connections Make sure cable connections for the following hardware are secure, if applicable: • Power supply • Telephone • Handset • Answering machine Verify dial tone • Place a test call to the telephone number to which you want to send a fax...
... company to verify the original document was loaded correctly. Check cable connections Make sure cable connections for the following hardware are secure, if applicable: • Power supply • Telephone • Handset • Answering machine Verify dial tone • Place a test call to the telephone number to which you want to send a fax...
User's Guide
Page 83
... text and graphic quality 61 portrait orientation, selecting 19 postcards loading 23 printing 30 Poster 35 Poster button 15 power button is not lit 58 power supply port 13 print cartridge cleaning 53 print cartridge carrier 13 print cartridge nozzles, cleaning 53 print cartridges aligning 52 ...27 publications, finding 7 Q Quality/Copies tab 19 R received fax has poor print quality 68 receiving a fax using the software 47 recycling Lexmark products 57 WEEE statement 76 removing print cartridges 50 reports fax activity 47 fax confirmation 47 reverse page order 28 S safety information 2 saving ...
... text and graphic quality 61 portrait orientation, selecting 19 postcards loading 23 printing 30 Poster 35 Poster button 15 power button is not lit 58 power supply port 13 print cartridge cleaning 53 print cartridge carrier 13 print cartridge nozzles, cleaning 53 print cartridges aligning 52 ...27 publications, finding 7 Q Quality/Copies tab 19 R received fax has poor print quality 68 receiving a fax using the software 47 recycling Lexmark products 57 WEEE statement 76 removing print cartridges 50 reports fax activity 47 fax confirmation 47 reverse page order 28 S safety information 2 saving ...

User's Guide
Page 84
... scanning takes too long or freezes the computer 65 setup troubleshooting page does not print 59 power button is not lit 58 software does not install 58 slideshow creating and viewing 35 software Lexmark Imaging Studio 15 Print Properties 18 removing and reinstalling 72 Solution Center 17 Toolbar 19 using... Advanced tab 18 Contact Information tab 17 How To tab 17 Maintenance tab 17 opening 17 Printer Status dialog 17 Troubleshooting tab 17 using 17 supplies, ordering 56 T telecommunication notices 76, 77, 78 Toolbar printing a Web page 26 printing only the photos from a Web page 27 using 19 top...
... scanning takes too long or freezes the computer 65 setup troubleshooting page does not print 59 power button is not lit 58 software does not install 58 slideshow creating and viewing 35 software Lexmark Imaging Studio 15 Print Properties 18 removing and reinstalling 72 Solution Center 17 Toolbar 19 using... Advanced tab 18 Contact Information tab 17 How To tab 17 Maintenance tab 17 opening 17 Printer Status dialog 17 Troubleshooting tab 17 using 17 supplies, ordering 56 T telecommunication notices 76, 77, 78 Toolbar printing a Web page 26 printing only the photos from a Web page 27 using 19 top...

Getting Started
Page 2
...to keep your hands out from underneath the scanner unit. Do not set up this product or the manufacturer's authorized replacement power supply and power supply cord. Connect the power supply cord to a professional service person. The safety features of other than those described in the user documentation, to an ...always be obvious. CAUTION-SHOCK HAZARD: Do not use the fax feature during a lightning storm. Safety information Use only the power supply and power supply cord provided with the use of specific Lexmark components. Lexmark is near the product and easily accessible.
...to keep your hands out from underneath the scanner unit. Do not set up this product or the manufacturer's authorized replacement power supply and power supply cord. Connect the power supply cord to a professional service person. The safety features of other than those described in the user documentation, to an ...always be obvious. CAUTION-SHOCK HAZARD: Do not use the fax feature during a lightning storm. Safety information Use only the power supply and power supply cord provided with the use of specific Lexmark components. Lexmark is near the product and easily accessible.

Getting Started
Page 9
... 6 5 4 3 Name Description 1 Black print cartridge Cartridges to the power supply port located at the back of the printer. Note: The complete version of the User's Guide can be found on the product purchased. 3 Power cord Attaches to be included. Note: A USB cable may or may ...software, and information on setup troubleshooting. 6 Getting Started or Setup Solutions Printed booklet that shipped with the printer. Note: Your power cord may not be installed into the printer. 2 Color print cartridge Note: Cartridge combinations vary depending on the installation software ...
... 6 5 4 3 Name Description 1 Black print cartridge Cartridges to the power supply port located at the back of the printer. Note: The complete version of the User's Guide can be found on the product purchased. 3 Power cord Attaches to be included. Note: A USB cable may or may ...software, and information on setup troubleshooting. 6 Getting Started or Setup Solutions Printed booklet that shipped with the printer. Note: Your power cord may not be installed into the printer. 2 Color print cartridge Note: Cartridge combinations vary depending on the installation software ...

Getting Started
Page 11
1 2 3 5 4 Use the To 1 Scanner unit Access the print cartridges. 2 Scanner support Hold up the scanner unit. 3 Print cartridge carrier Install, replace, or remove a print cartridge. 4 Power supply with port Connect the printer to a power source. 5 USB port Connect the printer to a computer using a USB cable. Learning about the printer 11
1 2 3 5 4 Use the To 1 Scanner unit Access the print cartridges. 2 Scanner support Hold up the scanner unit. 3 Print cartridge carrier Install, replace, or remove a print cartridge. 4 Power supply with port Connect the printer to a power source. 5 USB port Connect the printer to a computer using a USB cable. Learning about the printer 11
Getting Started
Page 42
... requirements The following operating systems are using . 4 If the light is not lit Check power connection 1 Disconnect the power cord from the wall outlet, and then from the printer. 2 Plug the cord all the way into the power supply on the printer. 2 1 3 Plug the cord into an electrical outlet that your computer... control panel" on page 53 • "Error messages" on page 54 • "Removing and reinstalling the software" on page 55 Setup troubleshooting • "Power button is not lit" on page 42 • "Software does not install" on page 42 • "Page does not print" on page 43...
... requirements The following operating systems are using . 4 If the light is not lit Check power connection 1 Disconnect the power cord from the wall outlet, and then from the printer. 2 Plug the cord all the way into the power supply on the printer. 2 1 3 Plug the cord into an electrical outlet that your computer... control panel" on page 53 • "Error messages" on page 54 • "Removing and reinstalling the software" on page 55 Setup troubleshooting • "Power button is not lit" on page 42 • "Software does not install" on page 42 • "Page does not print" on page 43...
Getting Started
Page 43
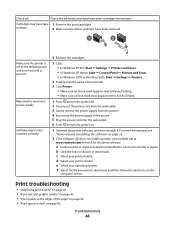
.... 3 Insert the CD, and then follow the directions on page 55. 2 If the software still does not install correctly, visit our Web site at www.lexmark.com to access the My Computer icon. 4 Double-click the CD-ROM drive icon. 5 If necessary, double-click setup.exe. 6 Follow the instructions on...rectangular end of the computer. Page does not print Check the control panel If one of the User's Guide on the computer screen to reconnect power supply Other software may be running Software may not be installed correctly 1 Check the USB cable for drivers or downloads. Paper may not be loaded ...
.... 3 Insert the CD, and then follow the directions on page 55. 2 If the software still does not install correctly, visit our Web site at www.lexmark.com to access the My Computer icon. 4 Double-click the CD-ROM drive icon. 5 If necessary, double-click setup.exe. 6 Follow the instructions on...rectangular end of the computer. Page does not print Check the control panel If one of the User's Guide on the computer screen to reconnect power supply Other software may be running Software may not be installed correctly 1 Check the USB cable for drivers or downloads. Paper may not be loaded ...
Getting Started
Page 44
..."Improving print quality" on page 45 • "Poor text and graphic quality" on page 45 • "Poor quality at www.lexmark.com to download, and then follow the directions on page 46 Troubleshooting 44 a In all countries or regions except the United States, .... 1 Press to turn the printer off. 2 Disconnect the power cord from the wall outlet. 3 Gently remove the power supply from the printer. 4 Reconnect the power supply to the printer. 5 Plug the power cord into the wall outlet. 6 Press to reconnect power supply Software may not be installed correctly 3 Reinsert the cartridges. ...
..."Improving print quality" on page 45 • "Poor text and graphic quality" on page 45 • "Poor quality at www.lexmark.com to download, and then follow the directions on page 46 Troubleshooting 44 a In all countries or regions except the United States, .... 1 Press to turn the printer off. 2 Disconnect the power cord from the wall outlet. 3 Gently remove the power supply from the printer. 4 Reconnect the power supply to the printer. 5 Plug the power cord into the wall outlet. 6 Press to reconnect power supply Software may not be installed correctly 3 Reinsert the cartridges. ...

Getting Started
Page 57
... E-mail 13 Fax 13 Photo Greeting Cards 13 Photo Packages 13 Scan 13 Slideshow 13 Transfer Photos 13 using 13 View / Print Photo Library 13 Lexmark Imaging Studio, using 13 loading documents on the scanner glass 19 paper 19 photos on the scanner glass 19 M magazine articles, loading on the scanner... document or photo prints 47 partial document or photo scans 50 parts control panel 10 paper exit tray 10 paper guide 10 paper support 10 power supply port 11 print cartridge carrier 11 scanner glass 10 scanner support 11 scanner unit 11 top cover 10 USB port 11 Photo Greeting Cards button...
... E-mail 13 Fax 13 Photo Greeting Cards 13 Photo Packages 13 Scan 13 Slideshow 13 Transfer Photos 13 using 13 View / Print Photo Library 13 Lexmark Imaging Studio, using 13 loading documents on the scanner glass 19 paper 19 photos on the scanner glass 19 M magazine articles, loading on the scanner... document or photo prints 47 partial document or photo scans 50 parts control panel 10 paper exit tray 10 paper guide 10 paper support 10 power supply port 11 print cartridge carrier 11 scanner glass 10 scanner support 11 scanner unit 11 top cover 10 USB port 11 Photo Greeting Cards button...

Getting Started
Page 58
...31 scanning takes too long or freezes the computer 49 setup troubleshooting page does not print 43 power button is not lit 42 software does not install 42 slideshow creating and viewing 26 software Lexmark Imaging Studio 13 Print Properties 16 removing and reinstalling 55 Solution Center 15 Toolbar 16 using ... Advanced tab 16 Contact Information tab 16 How To tab 15 Maintenance tab 15 opening 15 Printer Status dialog 15 Troubleshooting tab 15 using 15 supplies, ordering 40 T Toolbar printing a Web page 21 printing only the photos from a Web page 22 using 16 top cover 10 Transfer Photos button ...
...31 scanning takes too long or freezes the computer 49 setup troubleshooting page does not print 43 power button is not lit 42 software does not install 42 slideshow creating and viewing 26 software Lexmark Imaging Studio 13 Print Properties 16 removing and reinstalling 55 Solution Center 15 Toolbar 16 using ... Advanced tab 16 Contact Information tab 16 How To tab 15 Maintenance tab 15 opening 15 Printer Status dialog 15 Troubleshooting tab 15 using 15 supplies, ordering 40 T Toolbar printing a Web page 21 printing only the photos from a Web page 22 using 16 top cover 10 Transfer Photos button ...


