User's Guide
Page 20
... text of photos or images valid for printing appears next to defaults Windows 2000, Windows XP, or Windows Vista users: 1 Click Start ΠSettings ΠPrinters or Printers and Faxes. 2 Right-click the Lexmark 2500 Series icon. 3 Click Printing Preferences. 4 Click the Save Settings menu. 5 From the Restore section, select Factory Settings...
... text of photos or images valid for printing appears next to defaults Windows 2000, Windows XP, or Windows Vista users: 1 Click Start ΠSettings ΠPrinters or Printers and Faxes. 2 Right-click the Lexmark 2500 Series icon. 3 Click Printing Preferences. 4 Click the Save Settings menu. 5 From the Restore section, select Factory Settings...
User's Guide
Page 32
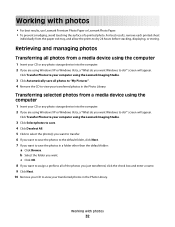
... . For best results, remove each printed sheet individually from a media device using the computer 1 Insert your computer using Windows XP or Windows Vista, a "What do you want Windows to do ?" screen will appear. Click Transfer Photos to view your transferred photos in a folder other... than the default folder: a Click Browse. Working with photos • For best results, use Lexmark Premium Photo Paper or Lexmark Photo Paper. • To prevent smudging, avoid touching the surface of the photos you just transferred, click the check box and ...
... . For best results, remove each printed sheet individually from a media device using the computer 1 Insert your computer using Windows XP or Windows Vista, a "What do you want Windows to do ?" screen will appear. Click Transfer Photos to view your transferred photos in a folder other... than the default folder: a Click Browse. Working with photos • For best results, use Lexmark Premium Photo Paper or Lexmark Photo Paper. • To prevent smudging, avoid touching the surface of the photos you just transferred, click the check box and ...
User's Guide
Page 33
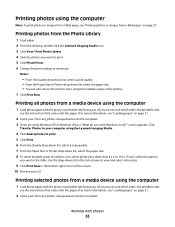
..., see "Loading paper" on page 21. 2 Insert your CD or any photo storage device into the computer. Click Transfer Photos to your computer using the Lexmark Imaging Studio. 4 Click Select photos to print. 5 Click Print. 6 From the Quality drop-down list, select a copy quality. 7 From the Paper Size in the... from a media device using the computer 1 Load photo paper with the glossy or printable side facing you. (If you are using Windows XP or Windows Vista, a "What do you want Windows to select photo sizes other sizes. 9 Click Print Now in Printer drop-down list, select the paper size. 8 ...
..., see "Loading paper" on page 21. 2 Insert your CD or any photo storage device into the computer. Click Transfer Photos to your computer using the Lexmark Imaging Studio. 4 Click Select photos to print. 5 Click Print. 6 From the Quality drop-down list, select a copy quality. 7 From the Paper Size in the... from a media device using the computer 1 Load photo paper with the glossy or printable side facing you. (If you are using Windows XP or Windows Vista, a "What do you want Windows to select photo sizes other sizes. 9 Click Print Now in Printer drop-down list, select the paper size. 8 ...
User's Guide
Page 34
... the options you want in the bottom right corner of the screen. Creating photo projects Creating Photo Greeting Cards 1 From the desktop, double-click the Lexmark Imaging Studio icon. 2 Click Photo Greeting Cards. 3 From the Style tab, click to select a style for your greeting card. 4 From the Photo tab... 34. 8 If you want to print your photo greeting card, select Print your computer using Windows XP or Windows Vista, a "What do you want Windows to do?" 3 If you are using the Lexmark Imaging Studio. 4 Click Select photos to print. 5 Click Deselect All. 6 Click to select the photo(s) you want...
... the options you want in the bottom right corner of the screen. Creating photo projects Creating Photo Greeting Cards 1 From the desktop, double-click the Lexmark Imaging Studio icon. 2 Click Photo Greeting Cards. 3 From the Style tab, click to select a style for your greeting card. 4 From the Photo tab... 34. 8 If you want to print your photo greeting card, select Print your computer using Windows XP or Windows Vista, a "What do you want Windows to do?" 3 If you are using the Lexmark Imaging Studio. 4 Click Select photos to print. 5 Click Deselect All. 6 Click to select the photo(s) you want...

User's Guide
Page 58
... are using . 4 If the light is not on the box. Note: For Windows 2000 users, make sure you are supported: Windows 2000, Windows XP, Windows Vista, and Mac OS X. Software does not install Check your operating system Check your computer meets the minimum system requirements listed on , press .
... are using . 4 If the light is not on the box. Note: For Windows 2000 users, make sure you are supported: Windows 2000, Windows XP, Windows Vista, and Mac OS X. Software does not install Check your operating system Check your computer meets the minimum system requirements listed on , press .
User's Guide
Page 60
...Print troubleshooting • "Improving print quality" on page 61 • "Poor text and graphic quality" on page 61 • "Poor quality at www.lexmark.com to download, and then follow the directions on them 2 Make sure the sticker and tape have tape 1 Remove the print cartridges. d Select your...Œ Printers and Faxes. • In Windows XP Home: Start Œ Control Panel Œ Printers and Faxes. • In Windows 2000 or Windows Vista: Start Œ Settings Œ Printers. 2 Double-click the name of the page" on hold or paused. a In all countries or regions except the United...
...Print troubleshooting • "Improving print quality" on page 61 • "Poor text and graphic quality" on page 61 • "Poor quality at www.lexmark.com to download, and then follow the directions on them 2 Make sure the sticker and tape have tape 1 Remove the print cartridges. d Select your...Œ Printers and Faxes. • In Windows XP Home: Start Œ Control Panel Œ Printers and Faxes. • In Windows 2000 or Windows Vista: Start Œ Settings Œ Printers. 2 Double-click the name of the page" on hold or paused. a In all countries or regions except the United...
Getting Started
Page 18
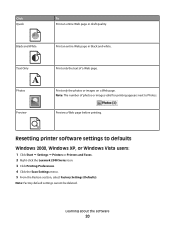
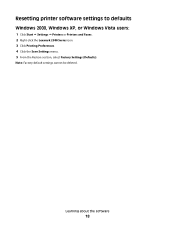
Learning about the software 18 Note: Factory default settings cannot be deleted. Resetting printer software settings to defaults Windows 2000, Windows XP, or Windows Vista users: 1 Click Start ΠSettings ΠPrinters or Printers and Faxes. 2 Right-click the Lexmark 2500 Series icon. 3 Click Printing Preferences. 4 Click the Save Settings menu. 5 From the Restore section, select Factory Settings (Defaults).
Learning about the software 18 Note: Factory default settings cannot be deleted. Resetting printer software settings to defaults Windows 2000, Windows XP, or Windows Vista users: 1 Click Start ΠSettings ΠPrinters or Printers and Faxes. 2 Right-click the Lexmark 2500 Series icon. 3 Click Printing Preferences. 4 Click the Save Settings menu. 5 From the Restore section, select Factory Settings (Defaults).
Getting Started
Page 23
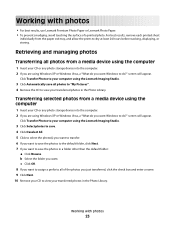
...". 4 Remove the CD to dry at least 24 hours before stacking, displaying, or storing. Click Transfer Photos to your computer using the Lexmark Imaging Studio. 3 Click Automatically save all photos from the paper exit tray, and allow the prints to view your computer using Windows XP or... Windows Vista, a "What do ?" Working with photos • For best results, use Lexmark Premium Photo Paper or Lexmark Photo Paper. • To prevent smudging, avoid touching the surface of the photos you just ...
...". 4 Remove the CD to dry at least 24 hours before stacking, displaying, or storing. Click Transfer Photos to your computer using the Lexmark Imaging Studio. 3 Click Automatically save all photos from the paper exit tray, and allow the prints to view your computer using Windows XP or... Windows Vista, a "What do ?" Working with photos • For best results, use Lexmark Premium Photo Paper or Lexmark Photo Paper. • To prevent smudging, avoid touching the surface of the photos you just ...

Getting Started
Page 24
... multiple prints of a photo, or to select photo sizes other photo sizes, and print multiple copies of the screen. 10 Remove your computer using the Lexmark Imaging Studio. 4 Click Select photos to print. 5 Click Print. 6 From the Quality drop-down list, select a copy quality. 7 From the Paper Size... a media device using the computer 1 Load photo paper with the glossy or printable side facing you. (If you are using Windows XP or Windows Vista, a "What do you want Windows to do?" screen appears. Printing selected photos from a media device using the computer 1 Load photo paper with ...
... multiple prints of a photo, or to select photo sizes other photo sizes, and print multiple copies of the screen. 10 Remove your computer using the Lexmark Imaging Studio. 4 Click Select photos to print. 5 Click Print. 6 From the Quality drop-down list, select a copy quality. 7 From the Paper Size... a media device using the computer 1 Load photo paper with the glossy or printable side facing you. (If you are using Windows XP or Windows Vista, a "What do you want Windows to do?" screen appears. Printing selected photos from a media device using the computer 1 Load photo paper with ...
Getting Started
Page 25
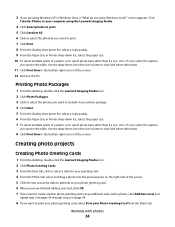
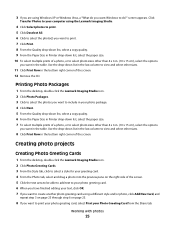
3 If you are using Windows XP or Windows Vista, a "What do ?" Click Transfer Photos to your computer using a ... the screen. Working with photos 25 Creating photo projects Creating Photo Greeting Cards 1 From the desktop, double-click the Lexmark Imaging Studio icon. 2 Click Photo Greeting Cards. 3 From the Style tab, click to select a style for your...copy quality. 6 From the Paper Size in the table. Printing Photo Packages 1 From the desktop, double-click the Lexmark Imaging Studio icon. 2 Click Photo Packages. 3 Click to select the photos you want Windows to select the photo...
3 If you are using Windows XP or Windows Vista, a "What do ?" Click Transfer Photos to your computer using a ... the screen. Working with photos 25 Creating photo projects Creating Photo Greeting Cards 1 From the desktop, double-click the Lexmark Imaging Studio icon. 2 Click Photo Greeting Cards. 3 From the Style tab, click to select a style for your...copy quality. 6 From the Paper Size in the table. Printing Photo Packages 1 From the desktop, double-click the Lexmark Imaging Studio icon. 2 Click Photo Packages. 3 Click to select the photos you want Windows to select the photo...
Getting Started
Page 42
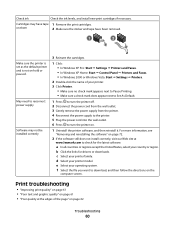
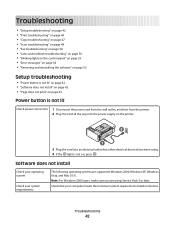
... on the printer. 2 1 3 Plug the cord into an electrical outlet that your system requirements The following operating systems are supported: Windows 2000, Windows XP, Windows Vista, and Mac OS X. Troubleshooting 42 Software does not install Check your operating system Check your computer meets the minimum system requirements listed on , press . Check...
... on the printer. 2 1 3 Plug the cord into an electrical outlet that your system requirements The following operating systems are supported: Windows 2000, Windows XP, Windows Vista, and Mac OS X. Troubleshooting 42 Software does not install Check your operating system Check your computer meets the minimum system requirements listed on , press . Check...
Getting Started
Page 44
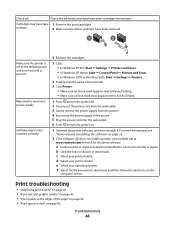
... Œ Settings Œ Printers and Faxes. • In Windows XP Home: Start Œ Control Panel Œ Printers and Faxes. • In Windows 2000 or Windows Vista: Start Œ Settings Œ Printers. 2 Double-click the name of the page" on page 46 • "Print speed is not on them 2 Make sure the... if necessary. Print troubleshooting • "Improving print quality" on page 45 • "Poor text and graphic quality" on page 45 • "Poor quality at www.lexmark.com to download, and then follow the directions on page 46 Troubleshooting 44
... Œ Settings Œ Printers and Faxes. • In Windows XP Home: Start Œ Control Panel Œ Printers and Faxes. • In Windows 2000 or Windows Vista: Start Œ Settings Œ Printers. 2 Double-click the name of the page" on page 46 • "Print speed is not on them 2 Make sure the... if necessary. Print troubleshooting • "Improving print quality" on page 45 • "Poor text and graphic quality" on page 45 • "Poor quality at www.lexmark.com to download, and then follow the directions on page 46 Troubleshooting 44


